理解前端的 MVC 服务:VanillaJS
介绍
这篇文章是三篇系列文章中的第一篇,旨在帮助您理解如何使用 MVC 架构创建前端应用程序。本系列文章的目标是了解如何构建一个前端应用程序,将一个使用 JavaScript 作为脚本语言的网页发展成一个使用 JavaScript 作为面向对象语言的应用程序。
在本篇博文中,我们将使用 VanillaJS 构建应用程序。因此,本文将开发大量与 DOM 相关的代码。然而,了解应用程序各部分之间的关系及其结构至关重要。
在第二篇文章中,我们将通过将 JavaScript 代码转换为 TypeScript 版本来强化它。
最后,在最后一篇文章中,我们将转换我们的代码以将其与 Angular 框架集成。
项目架构
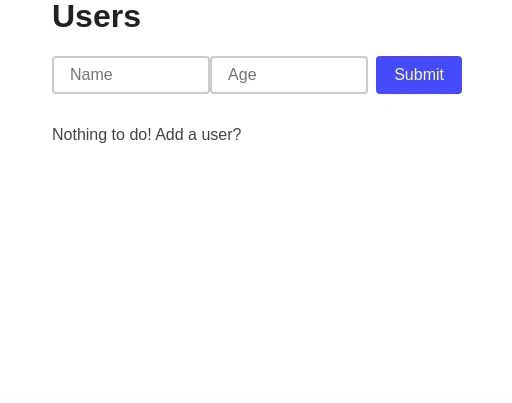
没有什么比图像更有价值的,可以帮助我们了解我们要构建的内容,下面有一个 GIF,其中说明了我们要构建的应用程序。
可以使用单个 JavaScript 文件构建此应用程序,该文件修改文档的 DOM 并执行所有操作,但这是一个强耦合的代码,并不是我们打算在本文中应用的。
什么是 MVC 架构?MVC 是一个包含 3 个层级/部分的架构:
-
模型——管理应用程序的数据。由于模型将被引用到服务,因此它们将是贫血的(它们缺乏功能)。
-
视图——模型的视觉表示。
-
控制器——服务和视图之间的链接。
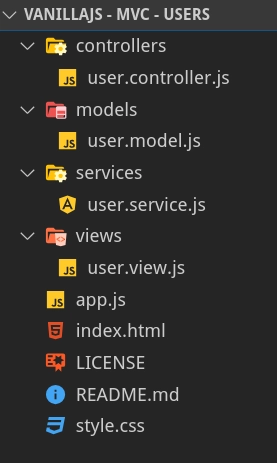
下面,我们展示了我们的问题域中将拥有的文件结构:
index.html 文件将充当画布,整个应用程序将使用根元素在其上动态构建。此外,由于所有文件将在 html 文件本身中链接,因此该文件将充当所有文件的加载器。
最后,我们的文件架构由以下 JavaScript 文件组成:
-
user.model.js — 用户的属性(模型)。
-
user.controller.js — 负责连接服务和视图。
-
user.service.js — 管理对用户的所有操作。
-
user.views.js — 负责刷新和改变显示屏。
HTML 文件如下所示:
<!DOCTYPE html>
<html lang="en">
  <head>
    <meta charset="utf-8" />
    <meta name="viewport" content="width=device-width, initial-scale=1.0" />
    <meta http-equiv="X-UA-Compatible" content="ie=edge" />

    <title>User App</title>

    <link rel="stylesheet" href="style.css" />
  </head>

  <body>
    <div id="root"></div>
    <script src="models/user.model.js"></script>
    <script src="services/user.service.js"></script>
    <script src="controllers/user.controller.js"></script>
    <script src="views/user.view.js"></script>
    <script src="app.js"></script>
  </body>
</html>
模型(贫血)
本例中构建的第一个类是应用程序模型 user.model.js,它由类属性和生成随机 ID 的私有方法组成(这些 ID 可能来自服务器中的数据库)。
该模型将具有以下字段:
-
id . 唯一值。
-
名称。用户的名称。
-
年龄。用户的年龄。
-
完成。布尔值,让您知道我们是否可以将用户从列表中删除。
user.model.js如下所示:
/**
 * @class Model
 *
 * Manages the data of the application.
 */

class User {
  constructor({ name, age, complete } = { complete: false }) {
    this.id = this.uuidv4();
    this.name = name;
    this.age = age;
    this.complete = complete;
  }

  uuidv4() {
    return ([1e7] + -1e3 + -4e3 + -8e3 + -1e11).replace(/[018]/g, c =>
      (
        c ^
        (crypto.getRandomValues(new Uint8Array(1))[0] & (15 >> (c / 4)))
      ).toString(16)
    );
  }
}
对用户执行的操作在服务中执行。服务使得模型能够实现贫血,因为所有逻辑负载都包含在模型中。在本例中,我们将使用一个数组来存储所有用户,并构建与读取、修改、创建和删除(CRUD)用户相关的四个方法。需要注意的是,服务会使用模型,将从 LocalStorage 中提取的对象实例化为 User 类。这是因为 LocalStorage 仅存储数据,而不存储已存储数据的原型。从后端传输到前端的数据也是如此,它们的类没有被实例化。
我们的类的构造函数如下:
  constructor() {
    const users = JSON.parse(localStorage.getItem('users')) || [];
    this.users = users.map(user => new User(user));
  }
请注意,我们已经定义了一个名为 users 的类变量,该变量存储所有用户从平面对象转换为 User 类的原型对象后的内容。
接下来我们必须在服务中定义我们要开发的每个操作。这些操作使用 ECMAScript 编写,无需使用任何 TypeScript 代码:
add(user) {
    this.users.push(new User(user));

    this._commit(this.users);
  }

  edit(id, userToEdit) {
    this.users = this.users.map(user =>
      user.id === id
        ? new User({
            ...user,
            ...userToEdit
          })
        : user
    );

    this._commit(this.users);
  }

  delete(_id) {
    this.users = this.users.filter(({ id }) => id !== _id);

    this._commit(this.users);
  }

  toggle(_id) {
    this.users = this.users.map(user =>
      user.id === _id ? new User({ ...user, complete: !user.complete }) : user
    );

    this._commit(this.users);
  }
仍需定义提交方法,该方法负责存储在我们的数据存储(在我们的例子中是 LocalStorage)中执行的操作。
  bindUserListChanged(callback) {
    this.onUserListChanged = callback;
  }

  _commit(users) {
    this.onUserListChanged(users);
    localStorage.setItem('users', JSON.stringify(users));
  }
该方法调用了在创建服务时绑定的回调函数,正如方法定义中所示bindUserListChanged。我已经告诉过你,这个回调函数来自视图,负责刷新屏幕上的用户列表。
文件user.service.js如下:
/**
 * @class Service
 *
 * Manages the data of the application.
 */
class UserService {
  constructor() {
    const users = JSON.parse(localStorage.getItem('users')) || [];
    this.users = users.map(user => new User(user));
  }

  bindUserListChanged(callback) {
    this.onUserListChanged = callback;
  }

  _commit(users) {
    this.onUserListChanged(users);
    localStorage.setItem('users', JSON.stringify(users));
  }

  add(user) {
    this.users.push(new User(user));

    this._commit(this.users);
  }

  edit(id, userToEdit) {
    this.users = this.users.map(user =>
      user.id === id
        ? new User({
            ...user,
            ...userToEdit
          })
        : user
    );

    this._commit(this.users);
  }

  delete(_id) {
    this.users = this.users.filter(({ id }) => id !== _id);

    this._commit(this.users);
  }

  toggle(_id) {
    this.users = this.users.map(user =>
      user.id === _id ? new User({ ...user, complete: !user.complete }) : user
    );

    this._commit(this.users);
  }
}
视图是模型的可视化表示。我们决定动态创建整个视图,而不是像许多框架那样创建 HTML 内容并注入。首先要做的是通过视图构造函数中所示的 DOM 方法缓存视图的所有变量:
constructor() {
    this.app = this.getElement('#root');

    this.form = this.createElement('form');
    this.createInput({
      key: 'inputName',
      type: 'text',
      placeholder: 'Name',
      name: 'name'
    });
    this.createInput({
      key: 'inputAge',
      type: 'text',
      placeholder: 'Age',
      name: 'age'
    });

    this.submitButton = this.createElement('button');
    this.submitButton.textContent = 'Submit';

    this.form.append(this.inputName, this.inputAge, this.submitButton);

    this.title = this.createElement('h1');
    this.title.textContent = 'Users';
    this.userList = this.createElement('ul', 'user-list');
    this.app.append(this.title, this.form, this.userList);

    this._temporaryAgeText = '';
    this._initLocalListeners();
  }
视图的下一个最相关的点是视图与服务方法(将通过控制器发送)的结合。例如,bindAddUser 方法接收一个驱动函数作为参数,该函数将执行服务中描述的 addUser 操作。在 bindXXX 方法中,定义了每个视图控件的 EventListener。请注意,我们可以从视图访问用户在屏幕上提供的所有数据;这些数据通过处理函数连接起来。
 bindAddUser(handler) {
    this.form.addEventListener('submit', event => {
      event.preventDefault();

      if (this._nameText) {
        handler({
          name: this._nameText,
          age: this._ageText
        });
        this._resetInput();
      }
    });
  }

  bindDeleteUser(handler) {
    this.userList.addEventListener('click', event => {
      if (event.target.className === 'delete') {
        const id = event.target.parentElement.id;

        handler(id);
      }
    });
  }

  bindEditUser(handler) {
    this.userList.addEventListener('focusout', event => {
      if (this._temporaryAgeText) {
        const id = event.target.parentElement.id;
        const key = 'age';

        handler(id, { [key]: this._temporaryAgeText });
        this._temporaryAgeText = '';
      }
    });
  }

  bindToggleUser(handler) {
    this.userList.addEventListener('change', event => {
      if (event.target.type === 'checkbox') {
        const id = event.target.parentElement.id;

        handler(id);
      }
    });
  }
视图的其余代码用于处理文档的 DOM。文件 user.view.js 如下:
/**
 * @class View
 *
 * Visual representation of the model.
 */
class UserView {
  constructor() {
    this.app = this.getElement('#root');

    this.form = this.createElement('form');
    this.createInput({
      key: 'inputName',
      type: 'text',
      placeholder: 'Name',
      name: 'name'
    });
    this.createInput({
      key: 'inputAge',
      type: 'text',
      placeholder: 'Age',
      name: 'age'
    });

    this.submitButton = this.createElement('button');
    this.submitButton.textContent = 'Submit';

    this.form.append(this.inputName, this.inputAge, this.submitButton);

    this.title = this.createElement('h1');
    this.title.textContent = 'Users';
    this.userList = this.createElement('ul', 'user-list');
    this.app.append(this.title, this.form, this.userList);

    this._temporaryAgeText = '';
    this._initLocalListeners();
  }

  get _nameText() {
    return this.inputName.value;
  }
  get _ageText() {
    return this.inputAge.value;
  }

  _resetInput() {
    this.inputName.value = '';
    this.inputAge.value = '';
  }

  createInput(
    { key, type, placeholder, name } = {
      key: 'default',
      type: 'text',
      placeholder: 'default',
      name: 'default'
    }
  ) {
    this[key] = this.createElement('input');
    this[key].type = type;
    this[key].placeholder = placeholder;
    this[key].name = name;
  }

  createElement(tag, className) {
    const element = document.createElement(tag);

    if (className) element.classList.add(className);

    return element;
  }

  getElement(selector) {
    return document.querySelector(selector);
  }

  displayUsers(users) {
    // Delete all nodes
    while (this.userList.firstChild) {
      this.userList.removeChild(this.userList.firstChild);
    }

    // Show default message
    if (users.length === 0) {
      const p = this.createElement('p');
      p.textContent = 'Nothing to do! Add a user?';
      this.userList.append(p);
    } else {
      // Create nodes
      users.forEach(user => {
        const li = this.createElement('li');
        li.id = user.id;

        const checkbox = this.createElement('input');
        checkbox.type = 'checkbox';
        checkbox.checked = user.complete;

        const spanUser = this.createElement('span');

        const spanAge = this.createElement('span');
        spanAge.contentEditable = true;
        spanAge.classList.add('editable');

        if (user.complete) {
          const strikeName = this.createElement('s');
          strikeName.textContent = user.name;
          spanUser.append(strikeName);

          const strikeAge = this.createElement('s');
          strikeAge.textContent = user.age;
          spanAge.append(strikeAge);
        } else {
          spanUser.textContent = user.name;
          spanAge.textContent = user.age;
        }

        const deleteButton = this.createElement('button', 'delete');
        deleteButton.textContent = 'Delete';
        li.append(checkbox, spanUser, spanAge, deleteButton);

        // Append nodes
        this.userList.append(li);
      });
    }
  }

  _initLocalListeners() {
    this.userList.addEventListener('input', event => {
      if (event.target.className === 'editable') {
        this._temporaryAgeText = event.target.innerText;
      }
    });
  }

  bindAddUser(handler) {
    this.form.addEventListener('submit', event => {
      event.preventDefault();

      if (this._nameText) {
        handler({
          name: this._nameText,
          age: this._ageText
        });
        this._resetInput();
      }
    });
  }

  bindDeleteUser(handler) {
    this.userList.addEventListener('click', event => {
      if (event.target.className === 'delete') {
        const id = event.target.parentElement.id;

        handler(id);
      }
    });
  }

  bindEditUser(handler) {
    this.userList.addEventListener('focusout', event => {
      if (this._temporaryAgeText) {
        const id = event.target.parentElement.id;
        const key = 'age';

        handler(id, { [key]: this._temporaryAgeText });
        this._temporaryAgeText = '';
      }
    });
  }

  bindToggleUser(handler) {
    this.userList.addEventListener('change', event => {
      if (event.target.type === 'checkbox') {
        const id = event.target.parentElement.id;

        handler(id);
      }
    });
  }
}
该架构的最后一个文件是控制器。控制器通过依赖注入 (DI) 接收其拥有的两个依赖项(服务和视图)。这些依赖项存储在控制器的私有变量中。此外,由于控制器是唯一可以访问这两方的元素,因此构造函数会在视图和服务之间建立显式连接。
文件 user.controller.js 如下所示:
/**
 * @class Controller
 *
 * Links the user input and the view output.
 *
 * @param model
 * @param view
 */
class UserController {
  constructor(userService, userView) {
    this.userService = userService;
    this.userView = userView;

    // Explicit this binding
    this.userService.bindUserListChanged(this.onUserListChanged);
    this.userView.bindAddUser(this.handleAddUser);
    this.userView.bindEditUser(this.handleEditUser);
    this.userView.bindDeleteUser(this.handleDeleteUser);
    this.userView.bindToggleUser(this.handleToggleUser);

    // Display initial users
    this.onUserListChanged(this.userService.users);
  }

  onUserListChanged = users => {
    this.userView.displayUsers(users);
  };

  handleAddUser = user => {
    this.userService.add(user);
  };

  handleEditUser = (id, user) => {
    this.userService.edit(id, user);
  };

  handleDeleteUser = id => {
    this.userService.delete(id);
  };

  handleToggleUser = id => {
    this.userService.toggle(id);
  };
}
我们应用程序的最后一部分是应用程序启动器。在本例中,我们将其命名为app.js。应用程序的执行是通过创建不同的元素来实现的:UserService、UserView和UserController,如文件 所示app.js。
const app = new UserController(new UserService(), new UserView());
在第一篇文章中,我们开发了一个 Web 应用程序,其中项目按照 MVC 架构构建,其中使用贫血模型,并且逻辑的责任在于服务。
需要强调的是,这篇文章的教学重点是理解项目在不同文件中不同职责的结构,以及视图如何完全独立于模型/服务和控制器。
在接下来的文章中,我们将使用 TypeScript 来增强 JavaScript,这将为我们提供一种更强大的 Web 应用程序开发语言。使用 JavaScript 导致我们不得不编写大量冗长重复的代码来管理 DOM(使用 Angular 框架可以最大限度地减少这种情况)。
这篇文章的GitHub 分支是https://github.com/Caballerog/VanillaJS-MVC-Users
文章来源:https://dev.to/carlillo/understanding-mvc-services-for-frontend-vanillajs-335h 后端开发教程 - Java、Spring Boot 实战 - msg200.com

