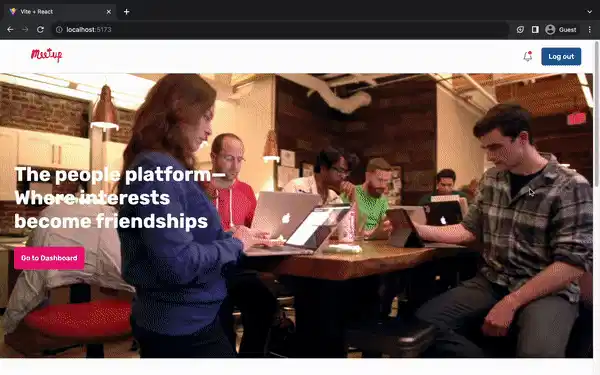
🔥 2 个技巧 🔥 在 30 分钟内使用 React 构建一个 Meetup.com 克隆版 🪄✨
在本教程中,您将学习如何构建我们将涉及的 Meetup.com 克隆:
- 创建并加入在线活动
- 在即将举行的活动下添加评论
- [技巧 1]:使用 SuperTokens 在 5 分钟内构建身份验证/授权
- [技巧 2]:使用 Novu 在 10 分钟内通知有人加入并对其活动发表评论。
那么我们见面吧!
Novu:开源通知基础设施🚀
简单介绍一下我们。Novu 是一个开源通知基础设施。我们主要负责管理所有产品通知。通知可以是应用内通知(类似于开发者社区的Websockets中的铃铛图标)、电子邮件、短信等等。
让我们开始吧!🔥
现在,我将引导您创建应用程序的项目设置。我们将使用 React.js 作为前端,使用 Node.js 作为后端服务器。
如下所示为 Web 应用程序创建一个文件夹。
mkdir meetup-clone
cd meetup-clone
mkdir client server
添加 Node.js 服务器
导航到服务器文件夹并创建一个package.json文件。
cd server & npm init -y
安装 Express、Nodemon 和 CORS 库。
npm install express cors nodemon
ExpressJS 是一个快速、简约的框架,它提供了在 Node.js 中构建 Web 应用程序的多种功能, CORS 是一个允许不同域之间通信的 Node.js 包, Nodemon 是一个在检测到文件更改后自动重启服务器的 Node.js 工具。
创建一个index.js文件——Web 服务器的入口点。
touch index.js
使用 ExpressJS 设置 Node.js 服务器。当您http://localhost:4000/api在浏览器中访问时,以下代码片段会返回一个 JSON 对象。
//👇🏻index.js
const express = require("express");
const cors = require("cors");
const app = express();
const PORT = 4000;

app.use(express.urlencoded({ extended: true }));
app.use(express.json());
app.use(cors());

app.get("/api", (req, res) => {
    res.json({
        message: "Hello world",
    });
});

app.listen(PORT, () => {
    console.log(`Server listening on ${PORT}`);
});
通过将启动命令添加到package.json文件中的脚本列表中来配置 Nodemon。下面的代码片段使用 Nodemon 启动服务器。
//👇🏻 In server/package.json

"scripts": {
    "test": "echo \"Error: no test specified\" && exit 1",
    "start": "nodemon index.js"
  },
恭喜!🎉您现在可以使用以下命令启动服务器。
npm start
设置 React 应用程序⚒️
通过终端导航到客户端文件夹并使用 Vite创建一个新的 React.js 项目。
npm create vite@latest
安装 React Icons 和 React Router - 一个 JavaScript 库,使我们能够在 React 应用程序中的页面之间导航。
npm install react-router-dom react-icons
删除 React 应用程序中的冗余文件(例如徽标和测试文件),并更新App.jsx文件以显示“Hello World”,如下所示。
function App() {
    return (
        <div>
            <p>Hello World!</p>
        </div>
    );
}
export default App;
将项目样式所需的 CSS 文件复制 到src/index.css文件中。
精心设计用户界面🧪
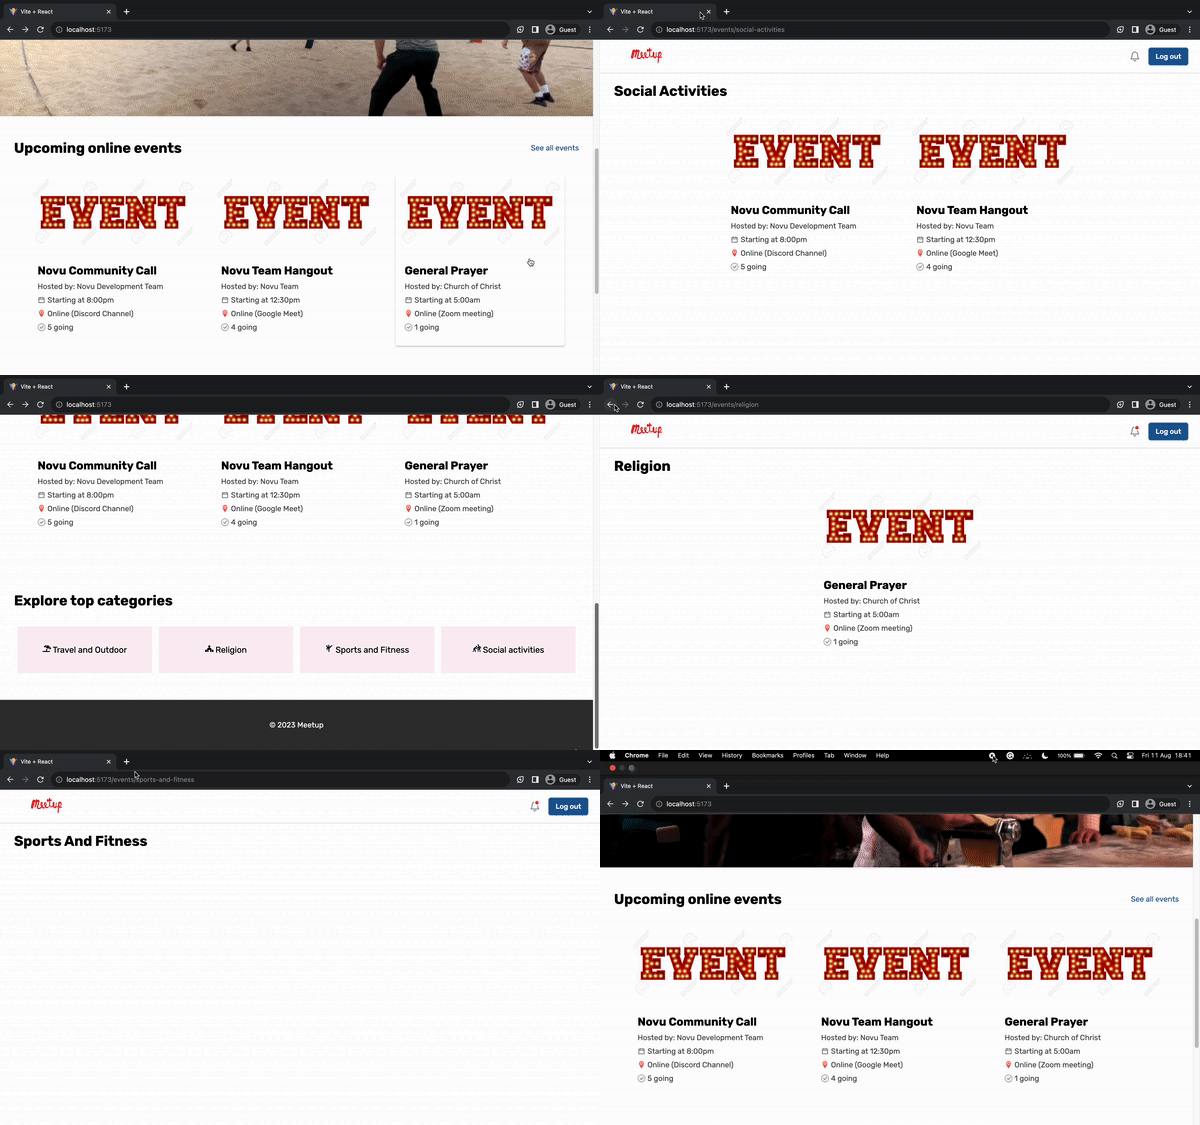
在这里,我们将为 Meetup 克隆创建用户界面,以允许用户创建和加入活动并查看活动详细信息。
client/src在包含CreateEvent.jsx、Dashboard.jsx、EventDetails.jsx、Events.jsx、EventsCategories.jsx和 的文件夹内创建一个 pages 文件夹Home.jsx。
cd client/src
mkdir pages
cd pages
touch Home.jsx Dashboard.jsx CreateEvent.jsx EventDetails.jsx Events.jsx EventsCategories.jsx
- 从上面的代码片段来看,
- 该
Home.jsx组件是应用程序的主页,用户可以在其中查看所有即将发生的事件。 - 该
Dashboard.jsx组件显示所有用户的事件。 - 该
CreateEvent.jsx组件使用户能够提供有关事件的详细信息并创建新事件。 - 该
EventDetails.jsx组件提供有关事件的所有详细信息。 Events.jsx和组件EventsCategories.jsx类似。Events.jsx组件显示所有可用事件, 则EventsCategories.jsx显示特定类别下的所有事件。
- 该
接下来,在 文件夹中创建一个 components 文件夹,client/src其中包含CategoriesSection.jsx、EventsSection.jsx、Footer.jsx、Hero.jsx和Nav.jsx组件。这些组件是主页的不同部分。
cd client/src
mkdir components
cd components
touch CategoriesSection.jsx EventsSection.jsx Footer.jsx Hero.jsx Nav.jsx
更新App.jsx文件以使用 React Router 呈现页面。
import { BrowserRouter as Router, Routes, Route } from "react-router-dom";
import Home from "./pages/Home";
import Dashboard from "./pages/Dashboard";
import Events from "./pages/Events";
import EventsCategory from "./pages/EventsCategory";
import CreateEvent from "./pages/CreateEvent";
import EventDetails from "./pages/EventDetails";

function App() {
    return (
        <Router>
            <Routes>
                <Route path='/' element={<Home />} />
                <Route path='/dashboard' element={<Dashboard />} />
                <Route path='/events/all' element={<Events />} />
                <Route path='/events/:category' element={<EventsCategory />} />
                <Route path='/create/event' element={<CreateEvent />} />
                <Route path='/event/:slug' element={<EventDetails />} />
            </Routes>
        </Router>
    );
}

export default App;
主页🏠
主页显示应用程序内所有可用的事件,并允许用户导航到网站上的其他页面。将以下代码复制到Home.jsx文件中。
import CategoriesSection from "../components/CategoriesSection";
import EventsSection from "../components/EventsSection";
import Footer from "../components/Footer";
import Hero from "../components/Hero";
import Nav from "../components/Nav";

const Home = () => {
    return (
        <div>
            <Nav />
            <Hero />
            <EventsSection />
            <CategoriesSection />
            <Footer />
        </div>
    );
};

export default Home;
添加事件📕
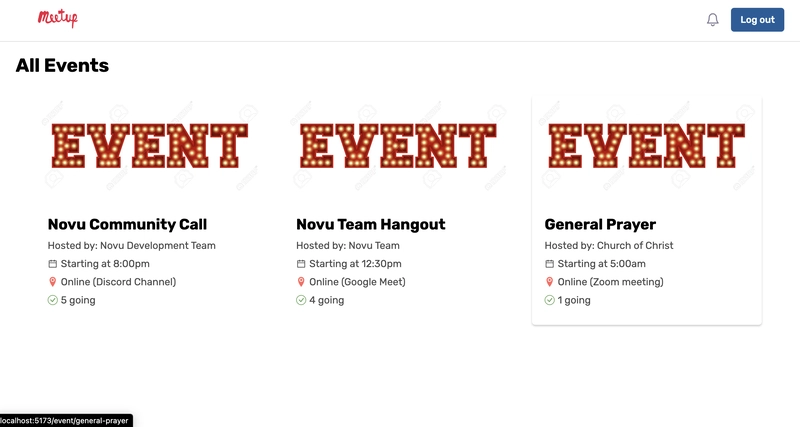
这些页面显示应用程序内或特定类别内的所有事件。
import event from "../assets/event.jpeg";
import Nav from "../components/Nav";
import { AiOutlineCalendar } from "react-icons/ai";
import { BsCheckCircle } from "react-icons/bs";
import { ImLocation2 } from "react-icons/im";
import { Link } from "react-router-dom";

const Events = () => {
    return (
        <>
            <Nav />
            <div className='home_events' style={{ paddingTop: "20px" }}>
                <h1 style={{ fontSize: "30px", marginBottom: "20px" }}>All Events</h1>

                <div className='body_events'>
                    <Link to={`/event/slug`} className='i_event'>
                        <img src={event} alt='Event' className='i_image' />
                        <div className='i_content'>
                            <h2 style={{ marginBottom: "10px" }}>Novu Community Call</h2>
                            <p style={{ marginBottom: "10px", opacity: 0.7 }}>
                                Hosted by: Novu Development Team
                            </p>
                            <div
                                style={{
                                    display: "flex",
                                    alignItems: "center",
                                    opacity: 0.7,
                                    marginBottom: "10px",
                                }}
                            >
                                <AiOutlineCalendar style={{ marginRight: "5px" }} />
                                <p>Starting at 8:00pm</p>
                            </div>
                            <div
                                style={{
                                    display: "flex",
                                    alignItems: "center",
                                    opacity: 0.7,
                                    marginBottom: "10px",
                                }}
                            >
                                <ImLocation2 style={{ marginRight: "5px", color: "red" }} />
                                <p>Online (Discord Channel)</p>
                            </div>
                            <div
                                style={{
                                    display: "flex",
                                    alignItems: "center",
                                    opacity: 0.7,
                                    marginBottom: "10px",
                                }}
                            >
                                <BsCheckCircle style={{ marginRight: "5px", color: "green" }} />
                                <p>12 going</p>
                            </div>
                        </div>
                    </Link>
                </div>
            </div>
        </>
    );
};

export default Events;
创建活动页面📅
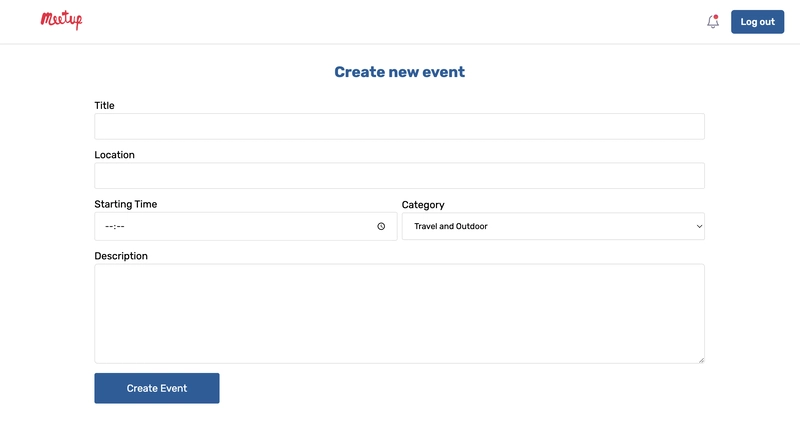
此页面显示一个表单字段,用于填写新事件的详细信息。请将以下代码片段复制到CreateEvent.jsx文件中。
import Nav from "../components/Nav";
import { useState } from "react";
import { postNewEvent } from "../utils/util";
import { useNavigate } from "react-router-dom";

const CreateEvent = () => {
    const [title, setTitle] = useState("");
    const navigate = useNavigate();
    const [location, setLocation] = useState("");
    const [category, setCategory] = useState("");
    const [description, setDescription] = useState("");
    const [startTime, setStartTime] = useState("");

    const handleSubmit = (e) => {
        e.preventDefault();
        console.log({ title, location, category, startTime, description });
        setTitle("");
        setLocation("");
        setCategory("");
        setDescription("");
        setStartTime("");
    };
    return (
        <div className='create_event'>
            <Nav />
            <div style={{ padding: "30px" }}>
                <h2
                    style={{
                        textAlign: "center",
                        marginBottom: "30px",
                        color: "#1d5d9b",
                    }}
                >
                    Create new event
                </h2>
                <form className='create_form' onSubmit={handleSubmit}>
                    <label htmlFor='title'>Title</label>
                    <input
                        type='text'
                        name='title'
                        id='title'
                        value={title}
                        onChange={(e) => setTitle(e.target.value)}
                        required
                        className='event_title'
                    />

                    <label htmlFor='location'>Location</label>
                    <input
                        type='text'
                        name='location'
                        id='location'
                        value={location}
                        onChange={(e) => setLocation(e.target.value)}
                        className='event_title'
                        required
                    />

                    <div
                        style={{
                            width: "100%",
                            display: "flex",
                            alignItems: "center",
                            justifyContent: "space-between",
                        }}
                    >
                        <div
                            style={{
                                display: "flex",
                                flexDirection: "column",
                                width: "50%",
                                marginRight: "7px",
                            }}
                        >
                            <label htmlFor='startTime'>Starting Time</label>
                            <input
                                type='time'
                                name='startTime'
                                id='startTime'
                                value={startTime}
                                onChange={(e) => setStartTime(e.target.value)}
                                className='event_title'
                                required
                            />
                        </div>
                        <div
                            style={{ display: "flex", flexDirection: "column", width: "50%" }}
                        >
                            <label htmlFor='category'>Category</label>
                            <select
                                value={category}
                                onChange={(e) => setCategory(e.target.value)}
                                className='event_title'
                                required
                            >
                                <option value='travel-and-outdoor'>Travel and Outdoor</option>
                                <option value='religion'>Religion</option>
                                <option value='sports-and-fitness'>Sports and Fitness</option>
                                <option value='social-activities'>Social Activities</option>
                            </select>
                        </div>
                    </div>

                    <label htmlFor='description'>Description</label>
                    <textarea
                        rows={8}
                        value={description}
                        onChange={(e) => setDescription(e.target.value)}
                        required
                    />
                    <button className='createEventBtn' type='submit'>
                        Create Event
                    </button>
                </form>
            </div>
        </div>
    );
};

export default CreateEvent;
仪表板页面
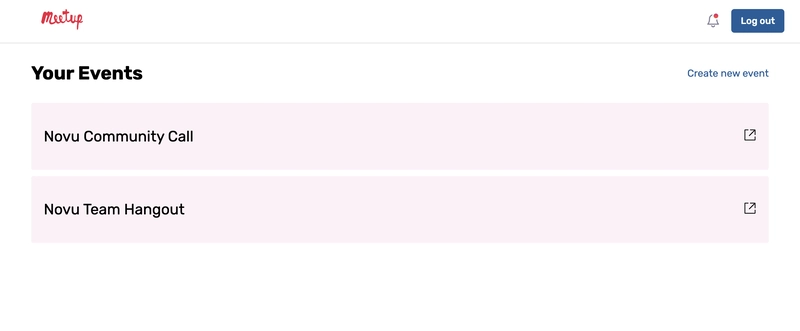
仪表板页面显示用户的事件并允许用户创建事件。
import Nav from "../components/Nav";
import { Link } from "react-router-dom";

const Dashboard = () => {
    return (
        <div className='dashboard_container'>
            <Nav />
            <div className='dashboard_main'>
                <section className='header_events'>
                    <h1 style={{ fontSize: "30px" }}>Your Events</h1>
                    <Link to='/create/event' className='link'>
                        Create new event
                    </Link>
                </section>
                <div>{/*--user's events*/}</div>
            </div>
        </div>
    );
};

export default Dashboard;
活动详情页面🗓️
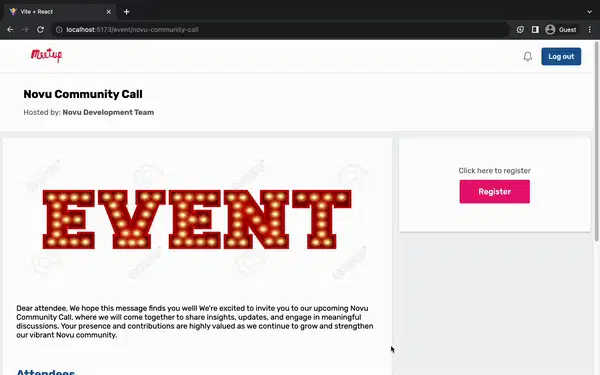
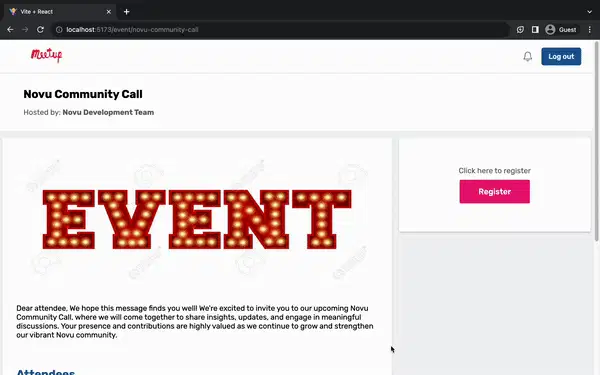
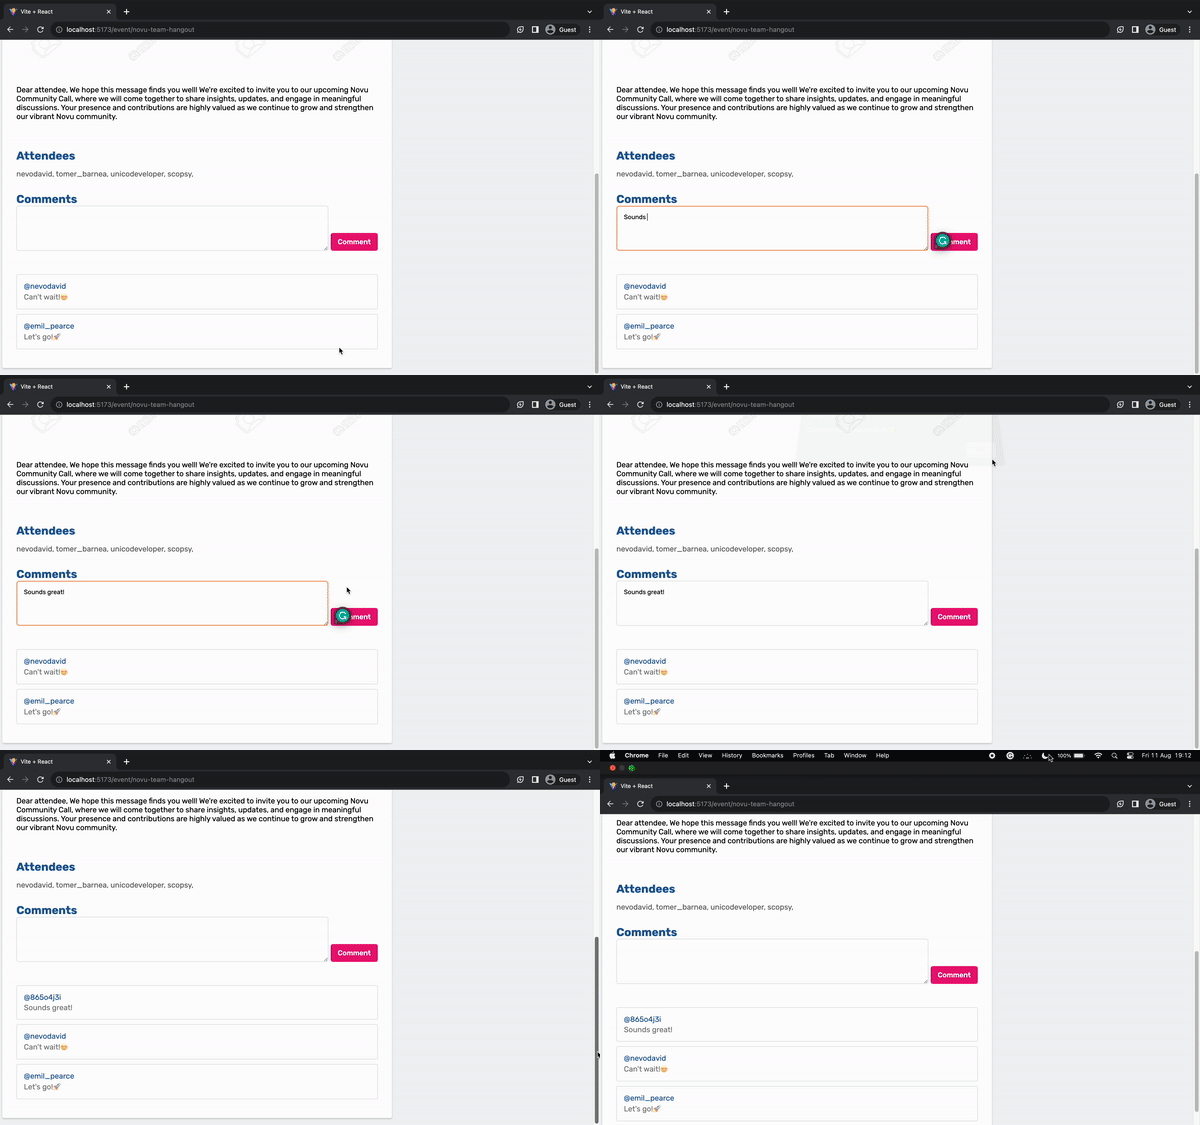
该页面显示有关活动的信息,使用户只需单击即可注册活动,并对活动发表评论。
import Nav from "../components/Nav";
import event from "../assets/event.jpeg";
import { useState } from "react";
import { useParams } from "react-router-dom";

const EventDetails = () => {
    const [comment, setComment] = useState("");
    const { slug } = useParams();

    const addComment = (e) => {
        e.preventDefault();
        console.log(comment, slug);
    };
    return (
        <div>
            <Nav />
            <header className='details_header'>
                <h2 style={{ marginBottom: "15px" }}>Title</h2>
                <p style={{ opacity: 0.6 }}>
                    Hosted by: <span style={{ fontWeight: "bold" }}>Host</span>
                </p>
            </header>
            <main className='details_main'>
                <div className='details_content'>
                    <img src={event} alt='Event' className='details_image' />
                    <div style={{ marginBottom: "30px" }}>Description</div>
                    <div style={{ padding: "30px 0" }}>
                        <h2 style={{ color: "#1d5d9b", marginBottom: "15px" }}>
                            Attendees
                        </h2>
                        <p style={{ opacity: 0.6 }}>Attendees</p>
                    </div>

                    <div className='comments'>
                        <h2 style={{ color: "#1d5d9b" }}>Comments</h2>
                        <form className='comment_form' onSubmit={addComment}>
                            <textarea
                                rows={4}
                                className='commentInput'
                                value={comment}
                                onChange={(e) => setComment(e.target.value)}
                                required
                            />
                            <button className='buttons commentBtn'>Comment</button>
                        </form>

                        <div className='comment_section'>
                            <div
                                style={{
                                    padding: "15px",
                                    border: "1px solid #ddd",
                                    borderRadius: "3px",
                                    marginBottom: "10px",
                                }}
                                key={comment.id}
                            >
                                <p style={{ color: "#1d5d9b", marginBottom: "3px" }}>@User</p>
                                <p style={{ opacity: 0.5 }}>Comment</p>
                            </div>
                        </div>
                    </div>
                </div>
                <div className='details_cta'>
                    <p style={{ marginBottom: "10px", opacity: "0.6" }}>
                        Click here to register
                    </p>
                    <button className='buttons registerBtn'>Register</button>
                </div>
            </main>
        </div>
    );
};

export default EventDetails;
身份验证和授权🔑
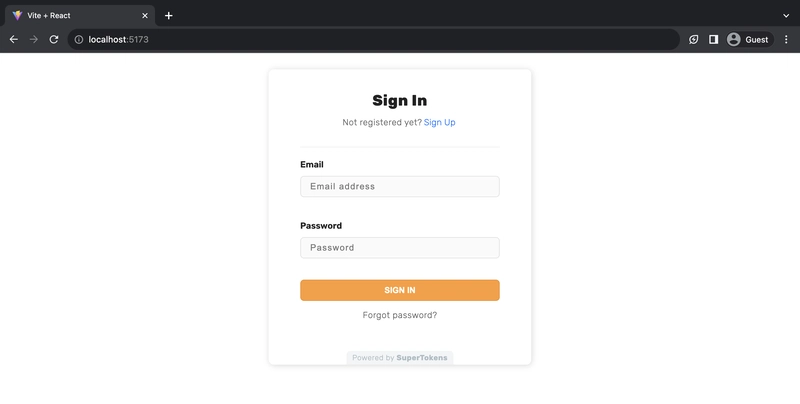
SuperTokens是一个开源身份验证服务提供商,可让您为软件应用程序添加安全无缝的用户身份验证和会话管理。
它还提供了预建的用户界面,用于各种身份验证形式,例如电子邮件和密码登录、社交登录以及无密码登录。使用 SuperTokens,您可以在几分钟内为 Web 和移动应用程序添加身份验证。
将其添加到我们的应用程序🎉
本文将学习如何使用 SuperTokens 为 React 和 Node.js 应用程序添加身份验证。您可以自动将 SuperToken 添加到您的应用程序,也可以手动添加到现有项目。
要自动安装 SuperTokens,请运行下面的代码片段来安装启动应用程序。
npx create-supertokens-app@latest --recipe=emailpassword
💡 附言:配方标志代表您要使用 SuperTokens 设置的身份验证方法。您可以查看 文档以获取完整指南。
配置超级令牌
转到 主页 并创建一个帐户。
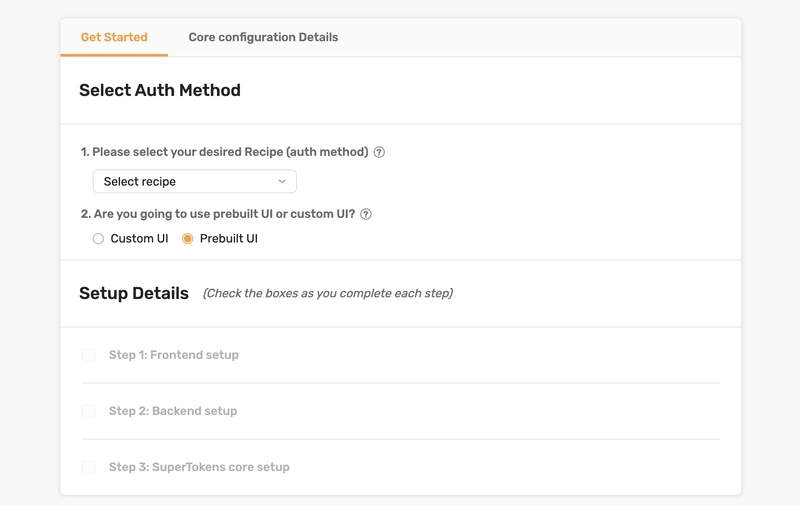
前往您的仪表板并相应地填写“开始”表格。
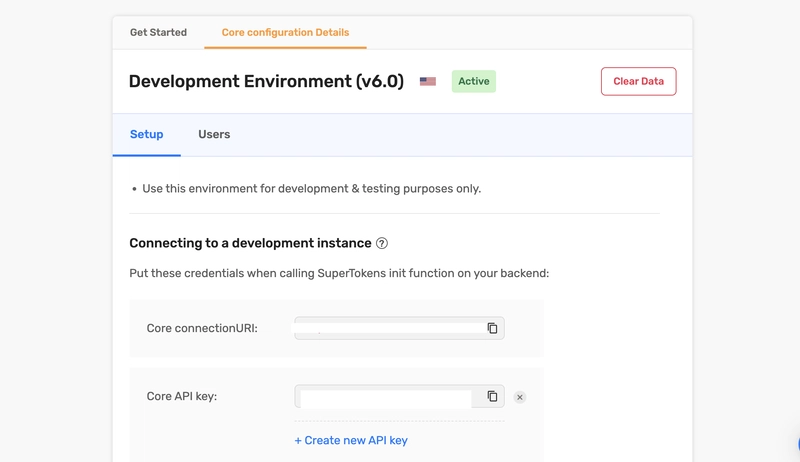
接下来,切换到核心配置详细信息菜单选项卡来生成您的Core connectionURI和Core API key.
将 SuperTokens 与 React 应用连接 📳
通过运行下面的代码片段将 SuperTokens 安装到 React 应用程序。
npm i -s supertokens-auth-react
将下面的代码片段添加到App.jsx文件中。
import SuperTokens, { SuperTokensWrapper } from "supertokens-auth-react";
import { getSuperTokensRoutesForReactRouterDom } from "supertokens-auth-react/ui";
import { EmailPasswordPreBuiltUI } from "supertokens-auth-react/recipe/emailpassword/prebuiltui";
import * as reactRouterDom from "react-router-dom";
import EmailPassword from "supertokens-auth-react/recipe/emailpassword";
import Session from "supertokens-auth-react/recipe/session";
import { SessionAuth } from "supertokens-auth-react/recipe/session";

SuperTokens.init({
    appInfo: {
        appName: "meetup-clone",
        apiDomain: "http://localhost:4000",
        websiteDomain: "http://localhost:5173",
        apiBasePath: "/auth",
        websiteBasePath: "/",
    },
    recipeList: [EmailPassword.init(), Session.init()],
});
上面的代码片段在 React 应用程序中使用电子邮件和密码初始化 SuperTokens。
最后,按照如下所示更新路线。
return (
    <SuperTokensWrapper>
        <Router>
            <Routes>
                {getSuperTokensRoutesForReactRouterDom(reactRouterDom, [
                    EmailPasswordPreBuiltUI,
                ])}
                <Route
                    path='/'
                    element={
                        <SessionAuth>
                            <Home />
                        </SessionAuth>
                    }
                />
                <Route path='/' element={<Home />} />
                <Route
                    path='/dashboard'
                    element={
                        <SessionAuth>
                            <Dashboard />
                        </SessionAuth>
                    }
                />
                <Route
                    path='/events/all'
                    element={
                        <SessionAuth>
                            <Events />
                        </SessionAuth>
                    }
                />
                <Route
                    path='/events/:category'
                    element={
                        <SessionAuth>
                            <EventsCategory />
                        </SessionAuth>
                    }
                />
                <Route
                    path='/create/event'
                    element={
                        <SessionAuth>
                            <CreateEvent />
                        </SessionAuth>
                    }
                />
                <Route
                    path='/event/:slug'
                    element={
                        <SessionAuth>
                            <EventDetails />
                        </SessionAuth>
                    }
                />
            </Routes>
        </Router>
    </SuperTokensWrapper>
);
从上面的代码片段中,我用 SuperTokens 提供的组件包装了所有路由,<SessionAuth/>以保护它们免受未经身份验证的用户的攻击,直到他们登录应用程序。
将 SuperTokens 添加到 Node.js 服务器
通过运行以下代码将 SuperTokens 安装到 Node.js 应用程序。
npm i -s supertokens-node
添加下面的代码片段来初始化 SuperTokens。
const supertokens = require("supertokens-node");
const Session = require("supertokens-node/recipe/session");
const EmailPassword = require("supertokens-node/recipe/emailpassword");
const { middleware } = require("supertokens-node/framework/express");
const { errorHandler } = require("supertokens-node/framework/express");

supertokens.init({
    framework: "express",
    supertokens: {
        connectionURI: "<YOUR_CONNECTION_URL>",
        apiKey: "<YOUR_API_KEY>",
    },
    appInfo: {
        appName: "meetup-clone",
        apiDomain: "http://localhost:4000",
        websiteDomain: "http://localhost:5173",
        apiBasePath: "/auth",
        websiteBasePath: "/",
    },
    recipeList: [EmailPassword.init(), Session.init()],
});
如下所示更新服务器 CORS。
app.use(
    cors({
        origin: "http://localhost:5173",
        allowedHeaders: ["content-type", ...supertokens.getAllCORSHeaders()],
        credentials: true,
    })
);

// IMPORTANT: CORS should be before the below line.
app.use(middleware());
最后,添加SuperTokens提供的错误处理程序。
// ...your API routes

// Add this AFTER all your routes
app.use(errorHandler());
恭喜!🎉 您已成功将 SuperTokens 添加到 React 和 Node.js 应用程序中。如果您遇到任何问题,请随时按照 SuperTokens 安装指南进行操作。
与 Node.js 服务器通信
在本节中,您将学习如何通过在应用程序内检索和创建事件来与 Node.js 服务器通信。
在我们开始之前,请在 React 应用程序中创建一个utils包含文件的文件夹。util.js
cd client
mkdir utils
cd utils
touch util.js
获取现有事件
index.js在服务器上的文件中创建包含事件属性的事件数组。
const events = [
    {
        id: generateID(),
        title: "Novu Community Call",
        slug: "novu-community-call",
        host: "Novu Development Team",
        category: "social-activities",
        start_time: "8:00pm",
        location: "Online (Discord Channel)",
        comments: [
            { user: "nevodavid", id: generateID(), comment: "Can't wait!😍" },
            { user: "emil_pearce", id: generateID(), comment: "Let's go!🚀" },
        ],
        attendees: [
            "nevodavid",
            "emil_pearce",
            "tomer_barnea",
            "unicodeveloper",
            "scopsy",
        ],
        description:
            "Dear attendee,\n We hope this message finds you well! We're excited to invite you to our upcoming Novu Community Call, where we will come together to share insights, updates, and engage in meaningful discussions. Your presence and contributions are highly valued as we continue to grow and strengthen our vibrant Novu community.",
    },
    {
        id: generateID(),
        title: "Novu Team Hangout",
        slug: "novu-team-hangout",
        host: "Novu Team",
        category: "social-activities",
        start_time: "12:30pm",
        location: "Online (Google Meet)",
        comments: [
            { user: "nevodavid", id: generateID(), comment: "Can't wait!😍" },
            { user: "emil_pearce", id: generateID(), comment: "Let's go!🚀" },
        ],
        attendees: ["nevodavid", "tomer_barnea", "unicodeveloper", "scopsy"],
        description:
            "Dear attendee,\n We hope this message finds you well! We're excited to invite you to our upcoming Novu Community Call, where we will come together to share insights, updates, and engage in meaningful discussions. Your presence and contributions are highly valued as we continue to grow and strengthen our vibrant Novu community.",
    },
];
添加另一个以 JSON 格式返回事件的端点。
app.get("/events", (req, res) => {
    res.json({
        message: "Success!",
        events,
    });
});
接下来,在文件中创建一个函数utils/util.js,从 React 应用程序向端点发送请求。
export const fetchEvents = (setEvents) => {
    fetch("http://localhost:4000/events")
        .then((res) => res.json())
        .then((data) => {
            if (data.message) {
                setEvents(data.events);
            }
        })
        .catch((err) => console.error(err));
};
最后,在Home组件挂载的时候执行该函数。
const Home = () => {
    const [events, setEvents] = useState([]);
    //generates a random string as ID
    const generateID = () => Math.random().toString(36).substring(2, 10);

    useEffect(() => {
        fetchEvents(setEvents);
        //save a user_id property to the database
        if (!localStorage.getItem("user_id")) {
            localStorage.setItem("user_id", generateID());
        }
    }, []);

    return <div>{/*--render events from the server--*/}</div>;
};
上面的代码片段从服务器检索所有事件,并user_id在 Web 浏览器上创建一个属性,以使我们能够识别每个用户。
💡 PS:由于这是一个小型应用程序,因此我使用了本地存储。如果您在生产环境中使用 SuperTokens,请查看 SuperTokens 后端指南。
按类别获取事件
为了获取特定类别下的事件,/events/:category客户端路由接受类别名称作为其路径名的一部分,并将其发送到服务器以返回该类别下的所有事件。
<Route
    path='/events/:category'
    element={
        <SessionAuth>
            <EventsCategory />
        </SessionAuth>
    }
/>
在服务器上添加一个端点,根据事件的类别名称检索事件。
app.post("/event/category", (req, res) => {
    const { category } = req.body;
    const result = events.filter((e) => e.category === category);
    res.json({ message: "Success!", events: result });
});
向服务器上的端点发送请求并显示特定类别下的事件。
export const fetchEventByCategory = (category, setEvents) => {
    fetch("http://localhost:4000/event/category", {
        method: "POST",
        body: JSON.stringify({ category }),
        headers: {
            Accept: "application/json",
            "Content-Type": "application/json",
        },
    })
        .then((res) => res.json())
        .then((data) => {
            if (data.message) {
                console.log(data.events);
                setEvents(data.events);
            }
        })
        .catch((err) => console.error(err));
};
通过 slug 检索事件详细信息
为此,向服务器添加一个 POST 路由,该路由通过从 React 应用程序收到的 slug 过滤事件。
app.post("/event/slug", (req, res) => {
    const { slug } = req.body;
    const result = events.filter((e) => e.slug === slug);
    res.json({ message: "Success!", event: result[0] });
});
上面的代码片段使用事件的 slug 从服务器检索其整个事件对象。
创建一个函数,utils/util.js向服务器上的端点发送请求。
//👇🏻Within the util.js file
export const fetchEventBySlug = (slug, setEvent) => {
    fetch("http://localhost:4000/event/slug", {
        method: "POST",
        body: JSON.stringify({ slug }),
        headers: {
            Accept: "application/json",
            "Content-Type": "application/json",
        },
    })
        .then((res) => res.json())
        .then((data) => {
            if (data.message) {
                setEvent(data.event);
            }
        })
        .catch((err) => console.error(err));
};
在组件内执行组件挂载时的函数EventDetails,并显示相应的属性。
import { useNavigate, useParams } from "react-router-dom";
import { useNavigate, useParams } from "react-router-dom"
import { useState, useEffect } from "react"
import { fetchEventBySlug } from "../utils/util"

export const EventDetails = () => {
    const [eventDetails, setEventDetails] = useState({});
    const { slug } = useParams();

    useEffect(() => {
        fetchEventBySlug(slug, setEventDetails);
        setLoading(false);
    }, [slug]);

    return <div>{/*--displays event details --*/}</div>;
};
创建新事件
创建一个将新事件添加到events数组的端点。
//👇🏻 generates slug from a text
const createSlug = (text) => {
    let slug = text
        .trim()
        .toLowerCase()
        .replace(/[^\w\s-]/g, "");
    slug = slug.replace(/\s+/g, "-");
    return slug;
};
//👇🏻 generates a random string as ID
const generateID = () => Math.random().toString(36).substring(2, 10);

//👇🏻 endpoint for creating new events
app.post("/create/event", async (req, res) => {
    const { title, location, startTime, category, description, host } = req.body;

    const eventObject = {
        id: generateID(),
        title,
        slug: createSlug(title),
        host,
        category,
        start_time: startTime,
        location,
        comments: [],
        attendees: [],
        description,
    };
    events.unshift(eventObject);
    res.json({ message: "Event added successfully!✅" });
});
上面的代码片段接受组件内表单的事件属性,并在用户提交表单时CreateEvent将事件添加到数组中。events
当用户提交表单时执行下面的函数。
//👇🏻 runs when a user submits the form
const handleSubmit = (e) => {
    e.preventDefault();
    postNewEvent(
        title,
        location,
        category,
        startTime,
        description,
        localStorage.getItem("user_id")
    );
};
//👇🏻 makes a request to the server
const postNewEvent = () => {
    fetch("http://localhost:4000/create/event", {
        method: "POST",
        body: JSON.stringify({
            title,
            location,
            category,
            startTime,
            description,
            host,
        }),
        headers: {
            Accept: "application/json",
            "Content-Type": "application/json",
        },
    })
        .then((res) => res.json())
        .then((data) => {
            if (data.message) {
                alert(data.message);
                navigate("/dashboard");
            }
        })
        .catch((err) => console.error(err));
};
为事件添加评论
要向事件添加评论,请创建另一个端点,该端点接受用户的 ID、事件的 slug 和来自 React 应用程序的评论。
app.post("/event/comment", async (req, res) => {
    const { comment, user, slug } = req.body;
    for (let i = 0; i < events.length; i++) {
        if (events[i].slug === slug) {
            events[i].comments.unshift({
                user,
                id: generateID(),
                comment,
            });

            return res.json({ message: "Comment added successfully!✅" });
        }
    }
上面的代码片段从请求中检索具有相同 slug 的事件,并comment使用最新的评论更新属性。
当用户发表新评论时执行该功能。
const addComment = (e) => {
    e.preventDefault();
    postNewComment(comment, localStorage.getItem("user_id"), slug);
};

const postNewComment = (comment, user, slug) => {
    fetch("http://localhost:4000/event/comment", {
        method: "POST",
        body: JSON.stringify({ comment, user, slug }),
        headers: {
            Accept: "application/json",
            "Content-Type": "application/json",
        },
    })
        .then((res) => res.json())
        .then((data) => {
            if (data.message) {
                alert(data.message);
            }
        })
        .catch((err) => console.error(err));
};
注册活动
当用户注册某个活动时,用户的 ID 会被添加到attendees该活动的属性(数组)中。不过,在更新该属性之前,您需要检查用户是否尚未注册attendees。
向执行该功能的服务器添加 POST 路由。
app.post("/register/event", async (req, res) => {
    const { userID, eventID } = req.body;

    for (let i = 0; i < events.length; i++) {
        if (events[i].id === eventID) {
            const validate = events[i].attendees.filter((user) => user === userID);
            if (validate.length === 0) {
                events[i].attendees.push(user);

                return res.json({ message: "Registered successfully!✅" });
                }
            } else {
                return res.json({ message: "You cannot register twice ❌" });
            }
        }
    }
});
上面的代码片段从 React 应用程序接受事件和用户 ID,通过 ID 过滤事件数组,并使用匹配的 ID 更新事件上的参与者列表。
当用户点击注册按钮时执行下面的函数。
const eventRegister = (user, id) => {
    fetch("http://localhost:4000/register/event", {
        method: "POST",
        body: JSON.stringify({ user, id }),
        headers: {
            Accept: "application/json",
            "Content-Type": "application/json",
        },
    })
        .then((res) => res.json())
        .then((data) => {
            if (data.message) {
                alert(data.message);
                navigate("/");
            }
        })
        .catch((err) => console.error(err));
};
检索用户事件
在组件内Dashboard,您可以显示用户注册的所有事件。
首先,创建一个接受用户 id、循环整个事件并返回用户事件的端点。
app.post("/user/events", (req, res) => {
    const { userID } = req.body;
    let userEvents = [];
    for (let i = 0; i < events.length; i++) {
        let result = events[i].attendees.filter((user) => user === userID);
        if (result.length > 0) {
            userEvents.push(events[i]);
        }
    }
    res.json({ message: "Successful", events: userEvents });
});
显示页面加载时从服务器返回的事件Dashboard。
const fetchMyEvents = (userID, setEvents) => {
    fetch("http://localhost:4000/user/events", {
        method: "POST",
        body: JSON.stringify({ userID }),
        headers: {
            Accept: "application/json",
            "Content-Type": "application/json",
        },
    })
        .then((res) => res.json())
        .then((data) => {
            if (data.message) {
                console.log(data);
                setEvents(data.events);
            }
        })
        .catch((err) => console.error(err));
};
恭喜您取得了如此大的进步!🎉 在接下来的部分中,您将学习如何在有人评论并使用 Novu 注册他们的活动时提醒用户。
技巧 2:向您的应用添加通知ℹ️
在这里,我们需要在有人评论并注册他们的活动时通知用户。此外,您还可以在有新活动时提醒所有人。
为此,我们将使用 Novu - 一种开源通知基础设施,使您能够从单个仪表板发送应用内、短信、聊天、推送和电子邮件通知。
启动它⚡️
导航到client文件夹并通过运行以下代码创建一个 Novu 项目。
cd client
npx novu init
输入您的应用程序名称并登录 Novu 控制面板。以下代码片段包含运行后应遵循的步骤npx novu init.
Now let's setup your account and send your first notification
? What is your application name? Meetup Clone
? Now lets setup your environment. How would you like to proceed? Create a free cloud account (Recommended)
? Create your account with: Sign-in with GitHub
? I accept the Terms and Conditions (https://novu.co/terms) and have read the Privacy Policy (https://novu.co/privacy) Yes
✔ Created your account successfully.
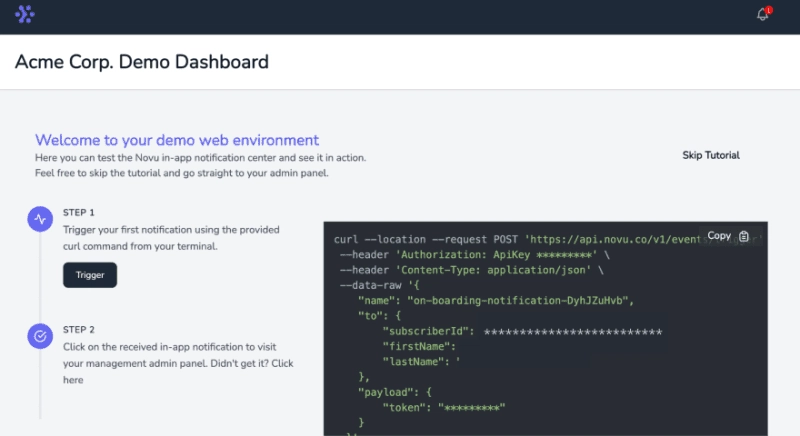
访问演示页面,从页面复制您的订阅者 ID,然后单击Skip Tutorial按钮。
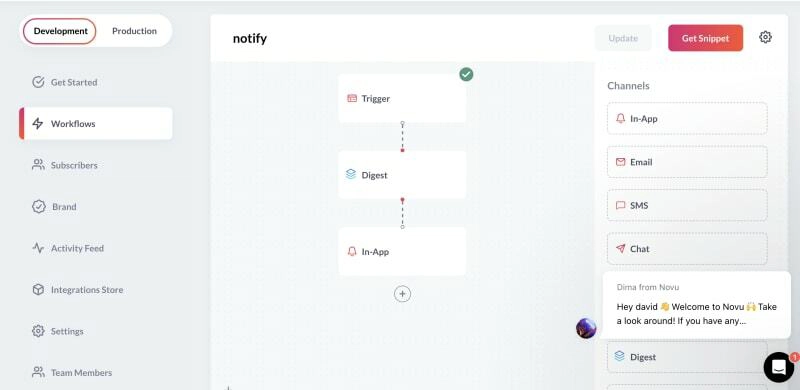
创建一个具有如下所示的工作流程的通知模板:
💡PS:您需要创建三个不同的通知模板,当有人评论活动、注册活动和创建新活动时触发。
Novu Digest 允许您控制在应用中发送通知的方式。它可以收集多个触发事件,安排它们的时间,或将它们作为单条消息发送。
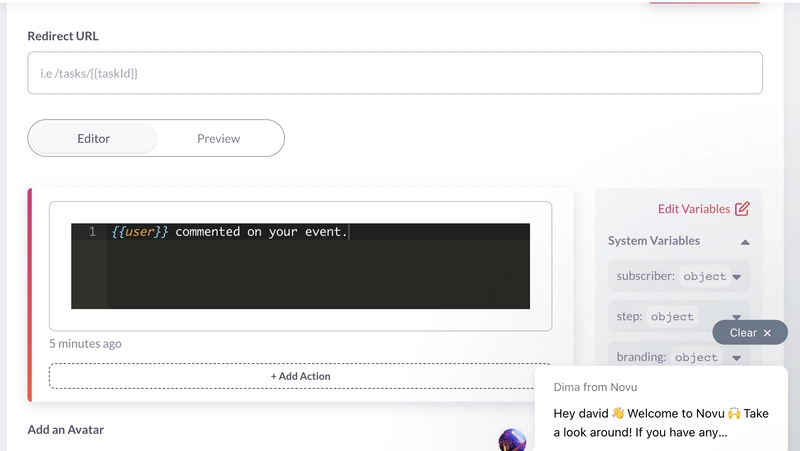
更新应用内通知步骤,当有人对其活动发表评论时将此消息发送给活动主持人。
{{user}} commented on your event.
向 React 应用添加 Novu 通知铃
Novu 应用内通知使用通知铃声向用户发送提醒。本文将教您如何将其添加到您的 React 应用程序中。
安装 Novu 通知包。
npm install @novu/notification-center
Novu.jsx 在组件文件夹中创建一个 文件并将以下内容复制到该文件中。
import React from "react";
import {
    NovuProvider,
    PopoverNotificationCenter,
    NotificationBell,
} from "@novu/notification-center";
import { useNavigate } from "react-router-dom";

function Novu() {
    const navigate = useNavigate();
    const onNotificationClick = (notification) =>
        navigate(notification.cta.data.url);

    return (
        <>
            <NovuProvider
                subscriberId='<YOUR_SUBSCRIBER_ID>'
                applicationIdentifier='<YOUR_APP_ID>'
            >
                <PopoverNotificationCenter
                    onNotificationClick={onNotificationClick}
                    colorScheme='light'
                >
                    {({ unseenCount }) => <NotificationBell unseenCount={unseenCount} />}
                </PopoverNotificationCenter>
            </NovuProvider>
        </>
    );
}
上面的代码片段使我们能够将 Novu 的通知铃声图标添加到应用程序中。这样,您就可以查看应用程序内的所有通知。
在您的 Novu 管理面板上选择“设置”以复制您的应用程序 ID,并用您的 ID 替换订阅者的 ID 占位符。
将 Novu.jsx 组件导入到组件中 Nav.jsx。
import meetup from "../assets/meetup.png"
import { Link } from "react-router-dom"
import Novu from "./Novu"

const Nav = () => {
  return (
      <nav className='navbar'>
          <Link to="/">
              <img src={meetup} alt="Meetup" className="logo"/>
          </Link>
          <div className="navBtn">
              <Novu />
              <button className="buttons signUpBtn">Log out</button>
          </div>
      </nav>
  )
}

export default Nav
在 Node.js 服务器上配置 Novu
将 Novu SDK for Node.js 安装到服务器文件夹中。
npm install @novu/node
从包中导入 Novu 并使用您的 API 密钥创建实例。
const { Novu } = require("@novu/node");
const novu = new Novu("<YOUR_API_KEY>");
在文件中创建一个函数 index.js ,通过 Novu 向事件主机发送通知。
const addCommentNotification = async (userID) => {
    await novu.subscribers.identify(userID, {
        firstName: "inAppSubscriber",
    });
    const response = await novu.trigger("notify", {
        to: {
            subscriberId: "<YOUR_SUBSCRIBER_ID>",
        },
        payload: {
            user: userID,
        },
    });
    return response.data.data;
};
当用户对事件发表评论时执行该功能。
app.post("/event/comment", async (req, res) => {
    const { comment, user, slug } = req.body;
    for (let i = 0; i < events.length; i++) {
        if (events[i].slug === slug) {
            events[i].comments.unshift({
                user,
                id: generateID(),
                comment,
            });
            //👇🏻 sends notification via Novu
            const sendNotification = await addCommentNotification(user);
            if (sendNotification.acknowledged) {
                return res.json({ message: "Comment added successfully!✅" });
            }
        }
    }
});
恭喜!您已完成申请。🎉
结论
到目前为止,您已经学习了如何使用 SuperTokens 对用户进行身份验证、在 React 和 Node.js 应用之间进行通信以及如何使用 Novu Digest 发送应用内通知。
Novu 可让您在应用程序中创建丰富的通知系统,从而为用户提供卓越的用户体验。您还应该尝试 SuperTokens—— 它易于集成,并为您的用户提供无缝的身份验证流程。
本教程的源代码可以在这里找到:
https://github.com/novuhq/blog/tree/main/meetup-clone-react-supertokens-nodejs。
感谢您的阅读!
文章来源:https://dev.to/novu/2-tricks-to-build-a-meetupcom-clone-with-react-in-30-minutes-9hm
 后端开发教程 - Java、Spring Boot 实战 - msg200.com


