桥接模式——设计模式与前端的结合
桥接设计模式是我最难理解的设计模式之一。🤯注意:本文假设读者具备面向对象编程中接口的一些基本知识。
在本文中,我将解释这种模式是什么,如何使用它,以及它目前在前端空间中使用的地方的一个例子(psst Angular 🚀)。
我们将讨论以下几点:
- 这是啥?🤔
- 让我们分解一下😱
- 但为什么呢?😐
- 我可以在哪里找到它的实际效果?🚀
- 我还能在哪里使用它?🎉
这是啥?🤔
桥接模式可以被认为是组合优于继承论证的一部分。它本质上是在抽象和实现之间“架设了桥梁”。这些术语可能会引起一些混淆,所以让我们先来解释一下。
- 实现 - 这是一个接口,它描述了一组特定的行为,可供我们代码库中的任何对象使用。它可以有多个具体的实现,并遵循接口中定义的契约。
- 抽象 - 提供 API 的对象,该 API 将利用底层实现。它充当实现之上的一层,如有需要,可以通过继承进一步细化。
好吧,真是让人大跌眼镜。🤯我知道,读起来可能有点费解。
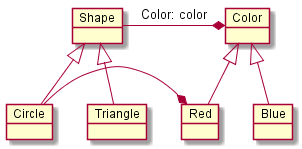
那就让我们快速看一下 UML 图吧(我知道,唉,但它确实很有帮助):
从图中我们可以看出,该模式允许我们分离两个可以定义对象细节的接口,在本例中是对象的 Shape 类型和 Shape 的颜色。
我们可以创建多种颜色或多种形状,而不必担心它们互相影响,从而增加代码库的松散耦合!🔥
让我们分解一下😱
记住上面的例子,抽象就是我们的 Shape 类,而我们的实现就是 Color 类。
抽象类通过类的属性包含对实现类的引用(因此是组合优于继承)。在我们的例子中,Shape 有一个 Color 属性。任何实现了 Color 契约的类都可以被 Shape 的任何属性使用。
抽象的消费者不需要担心底层的实现,而模式本身也增加了抽象和实现之间的松散耦合。
如果你和我一样,看看代码就能理清思路。那就开始吧!
我们将使用 TypeScript 来举例
// Define an interface for the Implementation
interface Color {
    log(): string;
}

// Define an abstract class for the Abstraction
abstract class Shape {
    color: Color;

    constructor(color: Color) {
        this.color = color;
    }

    logMe() {
        console.log(`I am a ${this.color.log()} shape.`);
    }
}

// Create a Concrete Implementation
class Red implements Color {
    log() {
        return 'red';
    }
}

class Blue implements Color {
    log() {
        return 'blue';
    }
}

// Create a refined Abstraction that behaves slightly differently
class Circle extends Shape {
    constructor(color: Color) {
        super(color);
    }

    logMe() {
        console.log(`I am a ${this.color.log()} circle.`);
    }
}

class Triangle extends Shape {
    constructor(color: Color) {
        super(color);
    }
}

// Instantiate the circle with a concrete implementation
const circle = new Circle(new Red());
const triangle = new Triangle(new Blue());

circle.logMe();
// Output: I am a red circle.

triangle.logMe();
// Output: I am a blue shape.
太棒了!我们可以创建Colors任意数量的,或者不限数量Shapes,而且彼此互不影响!🚀🚀🚀
保持简单和分离可以提高代码的可维护性和可测试性,从而提高代码质量!现在,我们将来也可以轻松地扩展和添加新的形状和颜色!
但为什么呢?😐
让我们看一下使用这种模式的一些原因:
- 桥接模式将抽象和实现分离,因此允许两者独立地区分。
- 它将抽象和实现保留在它们自己的继承层次结构中,允许它们增长而不影响其他。
- 抽象不需要了解具体实现,因此可以在运行时设置或交换它而不会破坏抽象。
太棒了,但是我可以在哪里使用它呢?🤔
我可以在哪里找到它的实际效果?🚀
好吧,桥接模式很棒。它可以增强我们的松耦合,但是,我们实际上可以在哪里使用它呢?它在哪里被广泛使用?
Angular 用到了它!(非常感谢Wes Copeland - @wescopeland_指出了这一点。)
他们在Forms API 中使用它来连接NgControl和ControlValueAccessor。
这ControlValueAccessor是一个接口,其中包含一些方法,任何实现它的类都必须实现这些方法。Angular 提供了它自己的具体实现ControlValueAccessor,但任何开发者都可以实现该接口,并且任何人NgControl都可以使用它!
换句话说,Angular 框架之外的实现完全可以被框架内的抽象所接受!🔥🔥
同样,开发人员可以创建自己的应用NgControl,并且 Angular 提供的任何具体实现都可以与之兼容!💥💥
希望这可以帮助您理解桥接模式背后的力量,但如果您仍然需要自己的用例,请继续阅读!
我还能在哪里使用它?🚀
嗯,我发现前端世界中一个完美的例子就是数据访问层。
你可以有以下内容:
- 定义实体服务的抽象,它将处理与系统内的实体相关的逻辑。
- 定义 API 接口的实现,允许您与任何潜在的后端系统或 API 进行交互。
让我们快速看一下实际效果:
我们将从我们的实现(API 接口)开始:
export interface IApiService {
    get<T>(): T;
    getAll<T>(): T[];
    add<T>(entity: T): void;
    update<T>(entity: T): void;
    delete<T>(entity: T): void;
}
接下来我们将定义我们的抽象(实体服务):
export abstract class EntityService {
    apiService: IApiService;

    constructor(apiService: IApiService) {
        this.apiService = apiService;
    }
}
好的,我们已经设置好了抽象和实现。让我们开始使用它们吧!
首先,让我们创建一个 UserService 来细化我们的抽象。
export interface User {
    id: string;
    name: string;
    email: string;
}

export class UserService extends EntityService {
    activeUser: User;

    constructor(apiService: IApiService) {
        super(apiService);
    }

    addNewUser(user: User) {
        this.apiService.add(user);
    }

    // Here we perform some logic custom to the UserService
    // But use the underlying bridge between the concrete
    // implementation and the abstraction to update the
    // active user after some custom logic
    setActiveUserEmail(email: string) {
        this.activeUser.email = email;
        this.apiService.update(this.activeUser);
    }
}
现在我们有了精细的抽象,让我们继续创建一个具体的实现
export class CustomApiService implements IApiService {
    get<T>(): T {
        // fetch the user from the api
    }

    getAll<T>(): T[] {
        // etc
    }

    add<T>(entity: T): void {
        // etc
    }

    update<T>(entity: T): void {
        // etc
    }

    delete<T>(entity: T): void {
        // etc
    }
}
好的,现在让我们将具体实现与精细抽象一起使用:
const apiService = new CustomApiService();
const userService = new UserService(apiService);

userService.addNewUser({...} as User);
太棒了!我们UserService不需要了解IApiService实现的细节,它仍然可以按预期运行。
如果以后需求发生变化,我们突然无法CustomApiService再使用它了,该怎么办?😱
别害怕,桥梁图案就在这里!😍
只需创建一个新的具体实现,并将其提供给UserService:
// Create new implementation
export class MongoDBService implements IApiService {
   // etc
}

// Swap out the api service
const apiService = new MongoDbService();

// No need to change the rest!
const userService = new UserService(apiService);

userService.addNewUser({...} as User);
太棒了!🚀🚀🚀
希望您通过本文学到一些(更多? )有关桥接模式的知识,了解它的潜在用例以及它在 Angular 中的使用方式。
如果您有任何疑问,请随时在下面提问或在 Twitter 上联系我:@FerryColum。
文章来源:https://dev.to/coly010/the-bridge-pattern-design-patterns-meet-the-frontend-46fc 后端开发教程 - Java、Spring Boot 实战 - msg200.com
