使用 Three.js 的太阳系
大家好!今天,我要用 Three.js 构建一个太阳系。不过在开始之前,你应该知道,这篇文章的灵感来自于我目前正在负责的一位客户代表。没错,就是你——那个相信地球是平的的人。
JavaScript/Node 拥有最大的库生态系统,涵盖了海量功能,简化了你的开发,因此你总能选择最符合你需求的库。然而,如果我们谈论 3D 图形,就没那么多酷炫的选择,而Three.js可能是其中最好的,并且拥有最大的社区。
那么,让我们深入研究 Three.js,并使用它构建太阳系。在本文中,我将介绍:
初始化项目和场景
首先:为了初始化项目,我使用Vite并安装了 Three.js 依赖项。现在的问题是如何设置 Three.js。为此,您需要三个东西:场景、相机和渲染器。我还使用了内置插件 OrbitControls,它允许我在场景内导航。启动应用程序后,应该会出现一个黑屏。
import { Scene, WebGLRenderer, PerspectiveCamera } from "three";
import { OrbitControls } from "three/addons/controls/OrbitControls.js";

const w = window.innerWidth;
const h = window.innerHeight;

const scene = new Scene();
const camera = new PerspectiveCamera(75, w / h, 0.1, 100);
const renderer = new WebGLRenderer({ antialias: true });
const controls = new OrbitControls(camera, renderer.domElement);

controls.minDistance = 10;
controls.maxDistance = 60;
camera.position.set(30 * Math.cos(Math.PI / 6), 30 * Math.sin(Math.PI / 6), 40);

renderer.setSize(w, h);
renderer.setPixelRatio(window.devicePixelRatio);
document.body.appendChild(renderer.domElement);

renderer.render(scene, camera);

window.addEventListener("resize", () => {
  const w = window.innerWidth;
  const h = window.innerHeight;
  renderer.setSize(w, h);
  camera.aspect = w / h;
  camera.updateProjectionMatrix();
});

const animate = () => {
  requestAnimationFrame(animate);
  controls.update();
  renderer.render(scene, camera);
};

animate();
你可能注意到我通过控件限制了缩放,并且更改了相机的默认角度。这将有助于在接下来的步骤中正确显示场景。
现在是时候添加一个简单的星空了,因为我们的太阳系应该被恒星环绕。为了简化解释,假设你有一个球体,并在球体上随机选取 1000 个点。然后,通过在这些点上映射星形纹理来创建星星。最后,我添加动画,使所有这些点绕 y 轴旋转。这样,星空就可以添加到场景中了。
import {
  Group,
  Color,
  Points,
  Vector3,
  TextureLoader,
  PointsMaterial,
  BufferGeometry,
  AdditiveBlending,
  Float32BufferAttribute,
} from "three";

export class Starfield {
  group;
  loader;
  animate;

  constructor({ numStars = 1000 } = {}) {
    this.numStars = numStars;

    this.group = new Group();
    this.loader = new TextureLoader();

    this.createStarfield();

    this.animate = this.createAnimateFunction();
    this.animate();
  }

  createStarfield() {
    let col;
    const verts = [];
    const colors = [];
    const positions = [];

    for (let i = 0; i < this.numStars; i += 1) {
      let p = this.getRandomSpherePoint();
      const { pos, hue } = p;
      positions.push(p);
      col = new Color().setHSL(hue, 0.2, Math.random());
      verts.push(pos.x, pos.y, pos.z);
      colors.push(col.r, col.g, col.b);
    }

    const geo = new BufferGeometry();
    geo.setAttribute("position", new Float32BufferAttribute(verts, 3));
    geo.setAttribute("color", new Float32BufferAttribute(colors, 3));
    const mat = new PointsMaterial({
      size: 0.2,
      alphaTest: 0.5,
      transparent: true,
      vertexColors: true,
      blending: AdditiveBlending,
      map: this.loader.load("/solar-system-threejs/assets/circle.png"),
    });
    const points = new Points(geo, mat);
    this.group.add(points);
  }

  getRandomSpherePoint() {
    const radius = Math.random() * 25 + 25;
    const u = Math.random();
    const v = Math.random();
    const theta = 2 * Math.PI * u;
    const phi = Math.acos(2 * v - 1);
    let x = radius * Math.sin(phi) * Math.cos(theta);
    let y = radius * Math.sin(phi) * Math.sin(theta);
    let z = radius * Math.cos(phi);

    return {
      pos: new Vector3(x, y, z),
      hue: 0.6,
      minDist: radius,
    };
  }

  createAnimateFunction() {
    return () => {
      requestAnimationFrame(this.animate);
      this.group.rotation.y += 0.00005;
    };
  }

  getStarfield() {
    return this.group;
  }
}
添加星空很简单,只需在场景类中使用 add 方法即可
const starfield = new Starfield().getStarfield();
scene.add(starfield);
至于纹理,您可以在代码库中找到本项目使用的所有纹理,链接位于文章末尾。除了恒星和行星环的纹理外,大多数纹理都取自此网站。
创造太阳
对于太阳,我使用了二十面体几何体,并在其上映射了纹理。使用改进的噪点,我实现了太阳脉动的效果,模拟了真实恒星向太空发射能量流的方式。太阳不仅仅是一个带有映射纹理的图形;它还需要成为场景中的光源,因此我使用 PointLight 来模拟这一点。
import {
  Mesh,
  Group,
  Color,
  Vector3,
  BackSide,
  PointLight,
  TextureLoader,
  ShaderMaterial,
  AdditiveBlending,
  DynamicDrawUsage,
  MeshBasicMaterial,
  IcosahedronGeometry,
} from "three";
import { ImprovedNoise } from "three/addons/math/ImprovedNoise.js";

export class Sun {
  group;
  loader;
  animate;
  corona;
  sunRim;
  glow;

  constructor() {
    this.sunTexture = "/solar-system-threejs/assets/sun-map.jpg";

    this.group = new Group();
    this.loader = new TextureLoader();

    this.createCorona();
    this.createRim();
    this.addLighting();
    this.createGlow();
    this.createSun();

    this.animate = this.createAnimateFunction();
    this.animate();
  }

  createSun() {
    const map = this.loader.load(this.sunTexture);
    const sunGeometry = new IcosahedronGeometry(5, 12);
    const sunMaterial = new MeshBasicMaterial({
      map,
      emissive: new Color(0xffff99),
      emissiveIntensity: 1.5,
    });
    const sunMesh = new Mesh(sunGeometry, sunMaterial);
    this.group.add(sunMesh);

    this.group.add(this.sunRim);

    this.group.add(this.corona);

    this.group.add(this.glow);

    this.group.userData.update = (t) => {
      this.group.rotation.y = -t / 5;
      this.corona.userData.update(t);
    };
  }

  createCorona() {
    const coronaGeometry = new IcosahedronGeometry(4.9, 12);
    const coronaMaterial = new MeshBasicMaterial({
      color: 0xff0000,
      side: BackSide,
    });
    const coronaMesh = new Mesh(coronaGeometry, coronaMaterial);
    const coronaNoise = new ImprovedNoise();

    let v3 = new Vector3();
    let p = new Vector3();
    let pos = coronaGeometry.attributes.position;
    pos.usage = DynamicDrawUsage;
    const len = pos.count;

    const update = (t) => {
      for (let i = 0; i < len; i += 1) {
        p.fromBufferAttribute(pos, i).normalize();
        v3.copy(p).multiplyScalar(5);
        let ns = coronaNoise.noise(
          v3.x + Math.cos(t),
          v3.y + Math.sin(t),
          v3.z + t
        );
        v3.copy(p)
          .setLength(5)
          .addScaledVector(p, ns * 0.4);
        pos.setXYZ(i, v3.x, v3.y, v3.z);
      }
      pos.needsUpdate = true;
    };

    coronaMesh.userData.update = update;
    this.corona = coronaMesh;
  }

  createGlow() {
    const uniforms = {
      color1: { value: new Color(0x000000) },
      color2: { value: new Color(0xff0000) },
      fresnelBias: { value: 0.2 },
      fresnelScale: { value: 1.5 },
      fresnelPower: { value: 4.0 },
    };

    const vertexShader = `
    uniform float fresnelBias;
    uniform float fresnelScale;
    uniform float fresnelPower;

    varying float vReflectionFactor;

    void main() {
      vec4 mvPosition = modelViewMatrix * vec4( position, 1.0 );
      vec4 worldPosition = modelMatrix * vec4( position, 1.0 );

      vec3 worldNormal = normalize( mat3( modelMatrix[0].xyz, modelMatrix[1].xyz, modelMatrix[2].xyz ) * normal );

      vec3 I = worldPosition.xyz - cameraPosition;

      vReflectionFactor = fresnelBias + fresnelScale * pow( 1.0 + dot( normalize( I ), worldNormal ), fresnelPower );

      gl_Position = projectionMatrix * mvPosition;
    }
    `;

    const fragmentShader = `
      uniform vec3 color1;
      uniform vec3 color2;

      varying float vReflectionFactor;

      void main() {
        float f = clamp( vReflectionFactor, 0.0, 1.0 );
        gl_FragColor = vec4(mix(color2, color1, vec3(f)), f);
      }
    `;

    const sunGlowMaterial = new ShaderMaterial({
      uniforms,
      vertexShader,
      fragmentShader,
      transparent: true,
      blending: AdditiveBlending,
    });
    const sunGlowGeometry = new IcosahedronGeometry(5, 12);
    const sunGlowMesh = new Mesh(sunGlowGeometry, sunGlowMaterial);
    sunGlowMesh.scale.setScalar(1.1);
    this.glow = sunGlowMesh;
  }

  createRim() {
    const uniforms = {
      color1: { value: new Color(0xffff99) },
      color2: { value: new Color(0x000000) },
      fresnelBias: { value: 0.2 },
      fresnelScale: { value: 1.5 },
      fresnelPower: { value: 4.0 },
    };

    const vertexShader = `
    uniform float fresnelBias;
    uniform float fresnelScale;
    uniform float fresnelPower;

    varying float vReflectionFactor;

    void main() {
      vec4 mvPosition = modelViewMatrix * vec4( position, 1.0 );
      vec4 worldPosition = modelMatrix * vec4( position, 1.0 );

      vec3 worldNormal = normalize( mat3( modelMatrix[0].xyz, modelMatrix[1].xyz, modelMatrix[2].xyz ) * normal );

      vec3 I = worldPosition.xyz - cameraPosition;

      vReflectionFactor = fresnelBias + fresnelScale * pow( 1.0 + dot( normalize( I ), worldNormal ), fresnelPower );

      gl_Position = projectionMatrix * mvPosition;
    }
    `;
    const fragmentShader = `
    uniform vec3 color1;
    uniform vec3 color2;

    varying float vReflectionFactor;

    void main() {
      float f = clamp( vReflectionFactor, 0.0, 1.0 );
      gl_FragColor = vec4(mix(color2, color1, vec3(f)), f);
    }
    `;

    const sunRimMaterial = new ShaderMaterial({
      uniforms,
      vertexShader,
      fragmentShader,
      transparent: true,
      blending: AdditiveBlending,
    });
    const sunRimGeometry = new IcosahedronGeometry(5, 12);
    const sunRimMesh = new Mesh(sunRimGeometry, sunRimMaterial);
    sunRimMesh.scale.setScalar(1.01);
    this.sunRim = sunRimMesh;
  }

  addLighting() {
    const sunLight = new PointLight(0xffff99, 1000);
    sunLight.position.set(0, 0, 0);
    this.group.add(sunLight);
  }

  createAnimateFunction() {
    return (t = 0) => {
      const time = t * 0.00051;
      requestAnimationFrame(this.animate);
      this.group.userData.update(time);
    };
  }

  getSun() {
    return this.group;
  }
}
创造行星
所有行星的构建逻辑都类似:每个行星都需要一个轨道、一个纹理、一个轨道速度和一个自转速度。对于需要这些条件的行星,还需要添加环。
import {
  Mesh,
  Color,
  Group,
  DoubleSide,
  RingGeometry,
  TorusGeometry,
  TextureLoader,
  ShaderMaterial,
  SRGBColorSpace,
  AdditiveBlending,
  MeshPhongMaterial,
  MeshBasicMaterial,
  IcosahedronGeometry,
} from "three";

export class Planet {
  group;
  loader;
  animate;
  planetGroup;
  planetGeometry;

  constructor({
    orbitSpeed = 1,
    orbitRadius = 1,
    orbitRotationDirection = "clockwise",

    planetSize = 1,
    planetAngle = 0,
    planetRotationSpeed = 1,
    planetRotationDirection = "clockwise",
    planetTexture = "/solar-system-threejs/assets/mercury-map.jpg",

    rimHex = 0x0088ff,
    facingHex = 0x000000,

    rings = null,
  } = {}) {
    this.orbitSpeed = orbitSpeed;
    this.orbitRadius = orbitRadius;
    this.orbitRotationDirection = orbitRotationDirection;

    this.planetSize = planetSize;
    this.planetAngle = planetAngle;
    this.planetTexture = planetTexture;
    this.planetRotationSpeed = planetRotationSpeed;
    this.planetRotationDirection = planetRotationDirection;

    this.rings = rings;

    this.group = new Group();
    this.planetGroup = new Group();
    this.loader = new TextureLoader();
    this.planetGeometry = new IcosahedronGeometry(this.planetSize, 12);

    this.createOrbit();
    this.createRings();
    this.createPlanet();
    this.createGlow(rimHex, facingHex);

    this.animate = this.createAnimateFunction();
    this.animate();
  }

  createOrbit() {
    const orbitGeometry = new TorusGeometry(this.orbitRadius, 0.01, 100);
    const orbitMaterial = new MeshBasicMaterial({
      color: 0xadd8e6,
      side: DoubleSide,
    });
    const orbitMesh = new Mesh(orbitGeometry, orbitMaterial);
    orbitMesh.rotation.x = Math.PI / 2;
    this.group.add(orbitMesh);
  }

  createPlanet() {
    const map = this.loader.load(this.planetTexture);
    const planetMaterial = new MeshPhongMaterial({ map });
    planetMaterial.map.colorSpace = SRGBColorSpace;
    const planetMesh = new Mesh(this.planetGeometry, planetMaterial);
    this.planetGroup.add(planetMesh);
    this.planetGroup.position.x = this.orbitRadius - this.planetSize / 9;
    this.planetGroup.rotation.z = this.planetAngle;
    this.group.add(this.planetGroup);
  }

  createGlow(rimHex, facingHex) {
    const uniforms = {
      color1: { value: new Color(rimHex) },
      color2: { value: new Color(facingHex) },
      fresnelBias: { value: 0.2 },
      fresnelScale: { value: 1.5 },
      fresnelPower: { value: 4.0 },
    };

    const vertexShader = `
    uniform float fresnelBias;
    uniform float fresnelScale;
    uniform float fresnelPower;

    varying float vReflectionFactor;

    void main() {
      vec4 mvPosition = modelViewMatrix * vec4( position, 1.0 );
      vec4 worldPosition = modelMatrix * vec4( position, 1.0 );

      vec3 worldNormal = normalize( mat3( modelMatrix[0].xyz, modelMatrix[1].xyz, modelMatrix[2].xyz ) * normal );

      vec3 I = worldPosition.xyz - cameraPosition;

      vReflectionFactor = fresnelBias + fresnelScale * pow( 1.0 + dot( normalize( I ), worldNormal ), fresnelPower );

      gl_Position = projectionMatrix * mvPosition;
    }
    `;

    const fragmentShader = `
      uniform vec3 color1;
      uniform vec3 color2;

      varying float vReflectionFactor;

      void main() {
        float f = clamp( vReflectionFactor, 0.0, 1.0 );
        gl_FragColor = vec4(mix(color2, color1, vec3(f)), f);
      }
    `;

    const planetGlowMaterial = new ShaderMaterial({
      uniforms,
      vertexShader,
      fragmentShader,
      transparent: true,
      blending: AdditiveBlending,
    });
    const planetGlowMesh = new Mesh(this.planetGeometry, planetGlowMaterial);
    planetGlowMesh.scale.setScalar(1.1);
    this.planetGroup.add(planetGlowMesh);
  }

  createRings() {
    if (!this.rings) return;

    const innerRadius = this.planetSize + 0.1;
    const outerRadius = innerRadius + this.rings.ringsSize;

    const ringsGeometry = new RingGeometry(innerRadius, outerRadius, 32);

    const ringsMaterial = new MeshBasicMaterial({
      side: DoubleSide,
      transparent: true,
      map: this.loader.load(this.rings.ringsTexture),
    });

    const ringMeshs = new Mesh(ringsGeometry, ringsMaterial);
    ringMeshs.rotation.x = Math.PI / 2;
    this.planetGroup.add(ringMeshs);
  }

  createAnimateFunction() {
    return () => {
      requestAnimationFrame(this.animate);

      this.updateOrbitRotation();
      this.updatePlanetRotation();
    };
  }

  updateOrbitRotation() {
    if (this.orbitRotationDirection === "clockwise") {
      this.group.rotation.y -= this.orbitSpeed;
    } else if (this.orbitRotationDirection === "counterclockwise") {
      this.group.rotation.y += this.orbitSpeed;
    }
  }

  updatePlanetRotation() {
    if (this.planetRotationDirection === "clockwise") {
      this.planetGroup.rotation.y -= this.planetRotationSpeed;
    } else if (this.planetRotationDirection === "counterclockwise") {
      this.planetGroup.rotation.y += this.planetRotationSpeed;
    }
  }

  getPlanet() {
    return this.group;
  }
}
对于地球,我正在扩展 Planet 类以添加额外的纹理,例如云和地球夜晚的夜间纹理。
import {
  Mesh,
  AdditiveBlending,
  MeshBasicMaterial,
  MeshStandardMaterial,
} from "three";
import { Planet } from "./planet";

export class Earth extends Planet {
  constructor(props) {
    super(props);

    this.createPlanetLights();
    this.createPlanetClouds();
  }

  createPlanetLights() {
    const planetLightsMaterial = new MeshBasicMaterial({
      map: this.loader.load("/solar-system-threejs/assets/earth-map-2.jpg"),
      blending: AdditiveBlending,
    });
    const planetLightsMesh = new Mesh(
      this.planetGeometry,
      planetLightsMaterial
    );
    this.planetGroup.add(planetLightsMesh);

    this.group.add(this.planetGroup);
  }

  createPlanetClouds() {
    const planetCloudsMaterial = new MeshStandardMaterial({
      map: this.loader.load("/solar-system-threejs/assets/earth-map-3.jpg"),
      transparent: true,
      opacity: 0.8,
      blending: AdditiveBlending,
      alphaMap: this.loader.load(
        "/solar-system-threejs/assets/earth-map-4.jpg"
      ),
    });
    const planetCloudsMesh = new Mesh(
      this.planetGeometry,
      planetCloudsMaterial
    );
    planetCloudsMesh.scale.setScalar(1.003);
    this.planetGroup.add(planetCloudsMesh);

    this.group.add(this.planetGroup);
  }
}
通过在 Google 上搜索大约五分钟,您会看到一个表格,其中包含向场景中添加行星所需的所有必要值。
| 行星 | 尺寸(直径) | 旋转速度 | 旋转方向 | 轨道速度 |
|---|---|---|---|---|
| 汞 | 4,880 公里 | 10.83公里/小时 | 逆时针 | 47.87 公里/秒 |
| 金星 | 12,104 公里 | 6.52公里/小时 | 顺时针 | 35.02 公里/秒 |
| 地球 | 12,742 公里 | 1674.4公里/小时 | 逆时针 | 29.78公里/秒 |
| 火星 | 6,779 公里 | 866.5公里/小时 | 逆时针 | 24.07 公里/秒 |
| 木星 | 142,984 公里 | 45,300 公里/小时 | 逆时针 | 13.07 公里/秒 |
| 土星 | 120,536 公里 | 35,500 公里/小时 | 逆时针 | 9.69 公里/秒 |
| 天王星 | 51,118 公里 | 9,320 公里/小时 | 顺时针 | 6.81 公里/秒 |
| 海王星 | 49,528 公里 | 9,720 公里/小时 | 逆时针 | 5.43公里/秒 |
现在,所有行星和太阳都可以添加到场景中。
const planets = [
  {
    orbitSpeed: 0.00048,
    orbitRadius: 10,
    orbitRotationDirection: "clockwise",
    planetSize: 0.2,
    planetRotationSpeed: 0.005,
    planetRotationDirection: "counterclockwise",
    planetTexture: "/solar-system-threejs/assets/mercury-map.jpg",
    rimHex: 0xf9cf9f,
  },
  {
    orbitSpeed: 0.00035,
    orbitRadius: 13,
    orbitRotationDirection: "clockwise",
    planetSize: 0.5,
    planetRotationSpeed: 0.0005,
    planetRotationDirection: "clockwise",
    planetTexture: "/solar-system-threejs/assets/venus-map.jpg",
    rimHex: 0xb66f1f,
  },
  {
    orbitSpeed: 0.00024,
    orbitRadius: 19,
    orbitRotationDirection: "clockwise",
    planetSize: 0.3,
    planetRotationSpeed: 0.01,
    planetRotationDirection: "counterclockwise",
    planetTexture: "/solar-system-threejs/assets/mars-map.jpg",
    rimHex: 0xbc6434,
  },
  {
    orbitSpeed: 0.00013,
    orbitRadius: 22,
    orbitRotationDirection: "clockwise",
    planetSize: 1,
    planetRotationSpeed: 0.06,
    planetRotationDirection: "counterclockwise",
    planetTexture: "/solar-system-threejs/assets/jupiter-map.jpg",
    rimHex: 0xf3d6b6,
  },
  {
    orbitSpeed: 0.0001,
    orbitRadius: 25,
    orbitRotationDirection: "clockwise",
    planetSize: 0.8,
    planetRotationSpeed: 0.05,
    planetRotationDirection: "counterclockwise",
    planetTexture: "/solar-system-threejs/assets/saturn-map.jpg",
    rimHex: 0xd6b892,
    rings: {
      ringsSize: 0.5,
      ringsTexture: "/solar-system-threejs/assets/saturn-rings.jpg",
    },
  },
  {
    orbitSpeed: 0.00007,
    orbitRadius: 28,
    orbitRotationDirection: "clockwise",
    planetSize: 0.5,
    planetRotationSpeed: 0.02,
    planetRotationDirection: "clockwise",
    planetTexture: "/solar-system-threejs/assets/uranus-map.jpg",
    rimHex: 0x9ab6c2,
    rings: {
      ringsSize: 0.4,
      ringsTexture: "/solar-system-threejs/assets/uranus-rings.jpg",
    },
  },
  {
    orbitSpeed: 0.000054,
    orbitRadius: 31,
    orbitRotationDirection: "clockwise",
    planetSize: 0.5,
    planetRotationSpeed: 0.02,
    planetRotationDirection: "counterclockwise",
    planetTexture: "/solar-system-threejs/assets/neptune-map.jpg",
    rimHex: 0x5c7ed7,
  },
];

planets.forEach((item) => {
  const planet = new Planet(item).getPlanet();
  scene.add(planet);
});

const earth = new Earth({
  orbitSpeed: 0.00029,
  orbitRadius: 16,
  orbitRotationDirection: "clockwise",
  planetSize: 0.5,
  planetAngle: (-23.4 * Math.PI) / 180,
  planetRotationSpeed: 0.01,
  planetRotationDirection: "counterclockwise",
  planetTexture: "/solar-system-threejs/assets/earth-map-1.jpg",
}).getPlanet();

scene.add(earth);
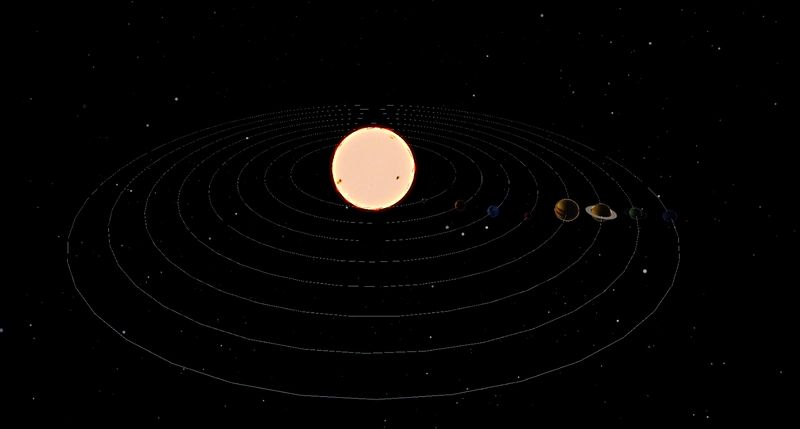
最终整个太阳系看起来将会是这样的:
部署到 GitHub Pages
为了部署,请设置正确的基础vite.config.js。
如果要部署到https://<USERNAME>.github.io/,或者通过 GitHub Pages 部署到自定义域,请将 base 设置为'/'。或者,您可以从配置中删除 base ,因为它默认为'/'。
如果您要部署到https://<USERNAME>.github.io/<REPO>/(例如,您的存储库位于https://github.com/<USERNAME>/<REPO>),则将 base 设置为'/<REPO>/'。
转到存储库设置页面中的 GitHub Pages 配置,并选择部署源为“GitHub Actions”,这将引导您创建一个构建和部署项目的工作流,提供了一个使用 npm 安装依赖项和构建的示例工作流:
# Simple workflow for deploying static content to GitHub Pages
name: Deploy static content to Pages

on:
  # Runs on pushes targeting the default branch
  push:
    branches: ['main']

  # Allows you to run this workflow manually from the Actions tab
  workflow_dispatch:

# Sets the GITHUB_TOKEN permissions to allow deployment to GitHub Pages
permissions:
  contents: read
  pages: write
  id-token: write

# Allow one concurrent deployment
concurrency:
  group: 'pages'
  cancel-in-progress: true

jobs:
  # Single deploy job since we're just deploying
  deploy:
    environment:
      name: github-pages
      url: ${{ steps.deployment.outputs.page_url }}
    runs-on: ubuntu-latest
    steps:
      - name: Checkout
        uses: actions/checkout@v4
      - name: Set up Node
        uses: actions/setup-node@v4
        with:
          node-version: 20
          cache: 'npm'
      - name: Install dependencies
        run: npm ci
      - name: Build
        run: npm run build
      - name: Setup Pages
        uses: actions/configure-pages@v4
      - name: Upload artifact
        uses: actions/upload-pages-artifact@v3
        with:
          # Upload dist folder
          path: './dist'
      - name: Deploy to GitHub Pages
        id: deployment
        uses: actions/deploy-pages@v4
就是这样。如果您的部署尚未自动启动,您可以随时在代码库的“操作”选项卡中手动启动它。已部署项目的链接如下。
结论
今天就到这里!你可以在下方找到整个项目的链接。希望你觉得这篇文章有趣,并且不再相信地球是平的。
再见!