微前端:构建 Web 应用的下一代方式
总结
感谢阅读
在企业级应用程序中,使用单一代码库开发应用程序会非常令人头疼。为此,微前端架构应运而生。让我们深入探索微前端的世界,并讨论遵循这种方法的一些细节。
什么是微前端?
让我们检查一下谷歌搜索给出的定义:
微前端架构是一种设计方法,其中前端应用程序被分解为松散地协同工作的单独、独立的“微应用程序” 。
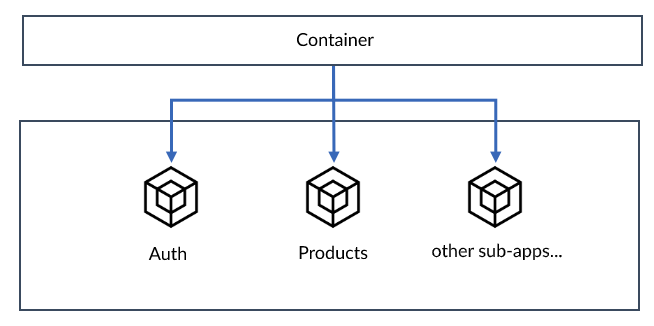
微前端应用程序有两个主要部分:
- 容器
- 子应用程序
容器决定每个子应用程序何时显示在屏幕上。所有业务逻辑由每个子应用程序处理。
为什么要使用微前端?
使用微前端架构有许多好处:
- 您可以在每个子应用程序中使用不同的框架
- 一个子应用程序中的修改甚至错误不会对其他子应用程序产生影响
- 您可以轻松运行A/B 测试,以最大化客户转化率
- 使团队更轻松地在项目上进行协作(可以作为每个子应用程序的单独存储库或单一存储库托管)
- 以及更多
微前端的关键原则
此架构有两个严格的要求:
- 微应用程序应该彼此完全独立地工作,例如,授权子应用程序不应该以任何方式依赖产品子应用程序的数据
- 微应用 可以与容器通信,但通信应尽可能精简,并尽可能采用通用的方式。因此,即使容器和子应用都使用相同的框架(例如 React),它们之间也不应该传递 React 组件,而应该传递一些通用函数和对象。这样可以确保在微应用或容器进行重大重构时,我们无需处理另一个。
基本微前端应用
好了,说得够多了!现在是时候动手制作一个基本的微前端应用了。
让我们创建三个文件夹:
- 容器
- 大车
- 产品
我们将使用它来为购物车和产品faker生成虚假数据。要安装该库,请在命令提示符中打开文件夹,使用 初始化一个节点项目,然后使用。npm initnpm install faker
实现微前端对几乎所有人来说都是一场噩梦,但幸运的是,我们有webpack提供的Module Federation插件,让这一切变得轻而易举。要安装所有与webpack相关的软件包,请在各个文件夹中使用以下命令:
npm install -D webpack webpack-cli html-webpack-plugin webpack-dev-server
添加public/index.html所有三个文件夹
<!-- cart -->
<div id="dev-cart"></div>
<!-- products-->
<div id="dev-products"></div>
<!-- container-->
<div id="product-list"></div>
<hr />
<div id="cart-items"></div>
现在设置我们的webpack.config.js:
const path = require('path');
const HTMLWebpackPlugin = require('html-webpack-plugin');

module.exports = {
    mode: 'development',
    devServer: {
        port: 3000,
    },
    plugins: [
        new HTMLWebpackPlugin({
            template: path.resolve(__dirname, 'public', 'index.html'),
        })
    ],
};
复制每个文件夹的根目录webpack.config.js,但确保开发服务器有不同的端口号。
现在让我们设置Module Federation:
// cart/webpack.config.js

// ...
const ModuleFederationPlugin = require('webpack/lib/container/ModuleFederationPlugin');
const packageJson = require('./package.json')

module.exports = {
    // ...
    plugins: [
        new ModuleFederationPlugin({
            name: 'cart', // name of the item being exposed (required in container)
            filename: 'remoteEntry.js', // name of the file
            exposes: {
                './Cart': './src/bootstrap' // actual file being exposed
            },
            shared: packageJson.dependencies, // to remove duplicate external modules loading in the container
        }),
        // ...
    ]
};
// products/webpack.config.js

// ...
const ModuleFederationPlugin = require('webpack/lib/container/ModuleFederationPlugin');
const packageJson = require('./package.json')

module.exports = {
    // ...
    plugins: [
        new ModuleFederationPlugin({
            name: 'products', // name of the item being exposed (required in container)
            filename: 'remoteEntry.js', // name of the file
            exposes: {
                './ProductIndex': './src/bootstrap' // actual file being exposed
            },
            shared: packageJson.dependencies, // to remove duplicate external modules loading in the container
        }),
        // ...
    ]
};
// container/webpack.config.js

// ...
const ModuleFederationPlugin = require('webpack/lib/container/ModuleFederationPlugin');
const packageJson = require('./package.json')

module.exports = {
    // ...
    plugins: [
        new ModuleFederationPlugin({
            name: 'container',
            remotes: {
                products: 'products@http://localhost:8000/remoteEntry.js', // importing products file from port 8000
                cart: 'cart@http://localhost:8001/remoteEntry.js', // importing cart file from port 8001
            },
        }),
        // ...
    ]
};
现在webpack已经设置好了,我们需要添加购物车、产品和容器:
// cart/src/bootstrap.js

import faker from 'faker'

const mount = (element) => {
  // generating fake data
  element.innerHTML = `
  <p>You have ${faker.datatype.number(10)} items in your cart</p>
`
}

const mountPt = document.querySelector('#dev-cart')
if (process.env.NODE_ENV === 'development' && mountPt) {
  mount(document.querySelector('#dev-cart'))
}

export { mount } // sharing generic mount function
// products/src/bootstrap.js

import faker from 'faker'

const PRODUCTS_COUNT = 5

const mount = (element) => {
    // generating fake data
    let productsArr = []
    for (let i = 0; i < PRODUCTS_COUNT; i++) {
        const product = faker.commerce.productName();
        productsArr.push(`<div>${product}</div>\n`)
    }

    const products = productsArr.join('')
    element.innerHTML = products
}

const mountPt = document.querySelector('#dev-products')
if (process.env.NODE_ENV === 'development' && mountPt) {
    mount(mountPt)
}

export { mount } // sharing generic mount function
// container/src/bootstrap.js

import { mount as mountProducts } from 'products/ProductIndex'
import { mount as mountCart } from 'cart/Cart'

mountProducts(document.querySelector('#product-list'))
mountCart(document.querySelector('#cart-items'))
现在最终在每个子应用程序和容器index.js的文件夹中创建一个文件src
import('./bootstrap')
使用动态导入创建此文件绝对至关重要,因为如果没有它, webpack 将无法导入外部包(因为包是共享的,所以它们的行为不同)。
scripts现在你的应用已经准备好了。你可以在部分中添加以下脚本package.json:
"scripts": {
    "dev": "webpack serve"
}
并调用npm run dev启动 webpack 服务器
产品(端口 8000)
购物车(端口 8001)
容器和整个应用程序(端口 3000)
总结
本文介绍了微前端架构的基础知识。希望它能为您的开发之旅提供帮助 :)
我目前正在开发一个利用微前端架构的项目,请随时查看:
 ruppysuppy /加密众筹
🤑💰 由以太坊区块链支持的众筹平台,让您的创意项目变为现实
感谢阅读
需要一位顶级软件开发自由职业者来解决你的开发难题吗?在Upwork上联系我
想联系我吗?请在LinkedIn上联系我
关注我的博客,每两周在Medium上获取最新资讯
常问问题
这些是我经常收到的一些问题。希望这个常见问题解答部分能解决您的问题。
-
我是初学者,该如何学习前端 Web 开发?
可以参考以下文章: -
你能指导我吗?
抱歉,我工作已经很忙了,没时间指导任何人。
 后端开发教程 - Java、Spring Boot 实战 - msg200.com


