使用 React、ChatGPT 和 TypeChat 构建咖啡配送聊天机器人 🤖
TL;DR
在本文中,我将展示如何使用新的基于 AI 的库 TypeChat 在 React 和 NodeJS 中构建咖啡配送服务。
在我们开始之前...我想请你帮个忙。🤗
我正在构建一个开源功能标记平台,如果你能在 GitHub 上为这个项目点赞,那对我来说意义非凡!这也能帮助我继续写这样的文章!
https://github.com/switchfeat-com/switchfeat
TypeChat 是什么?🤔
TypeChat 是由 Microsoft Typescript 团队构建的一个新的实验库,它允许使用 OpenAI 基础架构将自然语言字符串转换为类型安全意图。
例如,提供这样的文本:“我想要一杯加一包糖的卡布奇诺”,TypeChat 可以将该字符串转换为以下结构化的 JSON 对象,我们的 API 可以更轻松地解析和处理该对象,然后我们自己手动标记字符串。
{
  "items": [
    {
      "type": "lineitem",
      "product": {
        "type": "LatteDrinks",
        "name": "cappuccino",
        "options": [
          {
            "type": "Sweeteners",
            "name": "sugar",
            "optionQuantity": "regular"
          }
        ]
      },
      "quantity": 1
    }
  ]
}
设置
首先,我们需要设置create-react-app和 的常用样板Express。我不会过多地讨论这些细节,因为这很无聊,而且对本文也没什么帮助。
设置 React 应用
让我们快速创建两个文件夹,client然后server开始安装我们的依赖项。
mkdir client server
在客户端文件夹中,让我们安装create-react-app:
cd client & npx create-react-app my-react-app --template typescript
安装完成后,让我们安装react-router-dom以便更轻松地管理路由:
npm install react-router-dom heroicons
设置 Express 服务器
让我们转到服务器文件夹并安装 Express 和我们将要使用的一些其他依赖项:
cd server & npm init -y
npm install express cors typescript @types/node @types/express types/cors dotenv
一旦一切都安装完毕,让我们初始化打字稿:
npx tsc --init
让我们创建index.ts包含主服务器 API 逻辑的文件:
touch index.ts
这是 TypeScript 中最简单的 Express 配置:
import express, { Express } from 'express';
import cors from "cors";

const app: Express = express();
const port = 4000;

app.use(express.urlencoded({ extended: false }));
app.use(express.json());
app.use(cors);

app.get("/api", (req, res) => {
    res.json({
        message: "Food ordering chatbot",
    });
});

app.listen(port, () => {
    console.log(`⚡️[server]: Server is running on port 4000`);
});
在package.json服务器中,我们需要添加一个脚本来运行它:
"scripts": {
    "start": "node index.js"
  }
为了完成我们的设置,让我们编译 typescript 并运行服务器:
tsc & npm run start
太棒了!让我们做点更酷的事情好吗?
构建 UI
我们将使用 TailwindCSS 来管理样式,这将使管理变得更加轻松。首先,我们将App.tsx文件更改为以下格式,使用 React Router 在页面上渲染组件。
import './output.css';
import { BrowserRouter, Route, Routes } from 'react-router-dom';
import { ChatBot } from './components/Chatbot';

export const App = () => {
  return (
    <BrowserRouter>
      <Routes>
        <Route path='/' element={<ChatBot />} />
      </Routes>
    </BrowserRouter>
  );
}
让我们创建一个ChatBot组件,它将显示聊天机器人用户界面并向我们的 Express 服务器发送 API 请求。
这是组件的标记ChatBot:
return (
<div className="flex min-h-full flex-1 flex-col justify-center overflow-hidden">
    <div className="divide-y divide-gray-200 overflow-hidden  flex  flex-col
                    justify-between">
        <div className="w-full h-full px-4 py-5 sm:p-6 mb-32">
            <ul className="mb-8  h-full">
                {chatSession.map((x, index) =>
                (x.role !== 'system' ?
                    <div key={index}>
                        <li>
                            <div className="relative pb-8">
                                {index !== chatSession.length - 1 ? (
                                    <span className="absolute left-4 top-4 -ml-px h-full w-0.5 bg-gray-200" aria-hidden="true" />
                                ) : null}
                                <div className="relative flex space-x-3">
                                    <div>
                                        <span className={classNames('h-8 w-8 rounded-full flex items-center justify-center ring-8 ring-white', x.role === 'user' ? 'bg-slate-600' : 'bg-orange-500')}>
                                            {x.role === 'user' && <UserIcon className="h-5 w-5 text-white" aria-hidden="true" />}
                                            {x.role === 'assistant' && <RocketLaunchIcon className="h-5 w-5 text-white" aria-hidden="true" />}
                                        </span>
                                    </div>
                                    <div className="flex min-w-0 flex-1 justify-between space-x-4 pt-1">
                                        <div>
                                            <p className="text-md text-gray-500" style={{ whiteSpace: "pre-wrap" }}>
                                                {x.content}
                                            </p>
                                        </div>
                                    </div>
                                </div>
                            </div>
                        </li>
                    </div> : <div key={index}></div>))
                {isProcessing && (
                <li key={'assistant-msg'}>
                    <div className="relative pb-8">
                        <div className="relative flex space-x-3">
                            <div>
                                <span className={classNames('h-8 w-8 rounded-full flex items-center justify-center ring-8 ring-white', 'bg-orange-500')}>
                                    <RocketLaunchIcon className="h-5 w-5 text-white" aria-hidden="true" />
                                </span>
                            </div>
                            <div className="flex min-w-0 flex-1 justify-between space-x-4 pt-1">
                                <div>
                                    <p ref={processingMessage} className="text-md text-gray-500" style={{ whiteSpace: "pre-wrap" }}>
                                        {currentAssistantMessage}
                                    </p>
                                </div>
                            </div>
                        </div>
                    </div>
                </li>)
                <div ref={messagesEndRef} />
                {isProcessing && (
                    <button type="button" className="inline-flex items-center px-4 py-2 font-semibold leading-6 text-sm shadow rounded-md text-white bg-indigo-500 hover:bg-indigo-400 transition ease-in-out duration-150 cursor-not-allowed" disabled>
                        <svg className="animate-spin -ml-1 mr-3 h-5 w-5 text-white" xmlns="http://www.w3.org/2000/svg" fill="none" viewBox="0 0 24 24">
                            <circle className="opacity-25" cx="12" cy="12" r="10" stroke="currentColor" strokeWidth="4"></circle>
                            <path className="opacity-75" fill="currentColor" d="M4 12a8 8 0 018-8V0C5.373 0 0 5.373 0 12h4zm2 5.291A7.962 7.962 0 014 12H0c0 3.042 1.135 5.824 3 7.938l3-2.647z"></path>
                        </svg>
                        Processing...
                    </button>
                )}
            </ul>
        </div>
        <div className=" w-full bottom-0 mt-2 flex rounded-md   px-4 py-5 sm:p-6 bg-slate-50 fixed">
            <div className="relative flex flex-grow items-stretch focus-within:z-10 w-full">
                <input
                    ref={chatInput}
                    type="text"
                    name="textValue"
                    className="block w-full rounded-md border-0 py-1.5 text-gray-900 shadow-sm ring-1 ring-inset ring-gray-300 placeholder:text-gray-400 focus:ring-2 focus:ring-inset focus:ring-indigo-600 sm:text-sm sm:leading-6"
                    placeholder="your order here..."
                />
            </div>
            <button
                onClick={processOrderRequest}
                type="button"
                className="relative -ml-px inline-flex items-center gap-x-1.5 rounded-r-md px-3 py-2 text-sm font-semibold text-gray-900 ring-1 ring-inset ring-gray-300 hover:bg-gray-50"
            >
                <BarsArrowUpIcon className="-ml-0.5 h-5 w-5 text-gray-400" aria-hidden="true" />
                Send
            </button>
        </div>
    </div>
</div>);
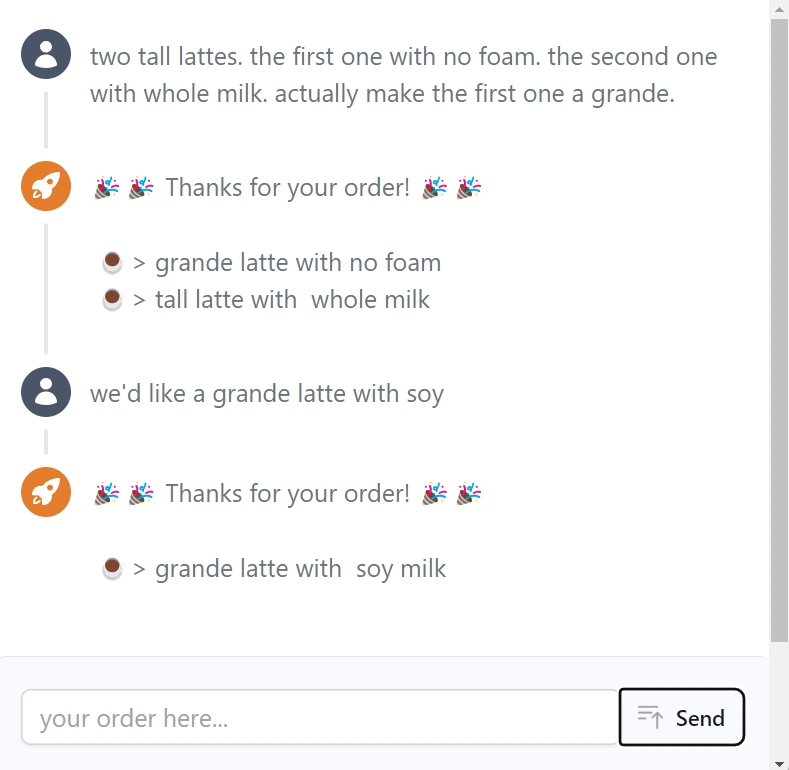
这里没有太多内容,大部分代码都是关于更新聊天记录并添加一个按钮来将订单请求发送到我们的 API。该组件在页面上的显示效果如下:
向 API 发送订单请求
向快递服务器添加一条POST路由,该路由接受包含自然语言订单的字符串,处理订单并将已处理好的订单返回给用户。
const processOrderRequest = async () => {

        setIsProcessing(true);
        if (!chatInput.current) {
            setIsProcessing(false);
            return;
        }

        chatSession.push({ role: "user", content: chatInput.current.value });
        const tempArr: ChatMessage[] = [];
        for (const t of chatSession) {
            tempArr.push(t);
        }
        setChatSession([...tempArr]);

        fetch("http://localhost:4000/api/order-request", {
            method: "POST",
            body: JSON.stringify({ newMessage: chatInput.current.value }),
            headers: {
                "Content-Type": "application/json",
            },
        })
            .then((res) => res.json())
            .then((result) => {
                const order: any[] = [];
                result.items.forEach((x: any) => {
                    const options = x.product.options ? x.product.options.map((opt: any) => { return {name: opt.name, quantity: opt.optionQuantity}; }) : [];
                    order.push({product: x.product.name, options: options, size: x.product.size});
                });
                const orderString: string[] = [];
                order.forEach((x: any) => {
                    orderString.push(`${x.size} ${x.product} with ${x.options.map((x: any) => `${x.quantity === undefined ? "" : x.quantity} ${x.name}`).join(" and ")}`);
                });
                const resp = `🎉🎉 Thanks for your order! 🎉🎉 \n\n ☕> ${orderString.join("\n ☕> ")}`;
                tempArr.push({ role: "assistant", content: resp });
                setChatSession([...tempArr]);
                setCurrentAssistantMessage("");
                if (processingMessage.current)
                    processingMessage.current.innerText = "";
                if (chatInput.current)
                    chatInput.current.value = "";
            })
            .catch((err) => console.error(err))
            .finally(() => { setIsProcessing(false); });
    };
上面的函数从输入字段中抓取自然语言字符串,更新聊天记录,并将请求发送到我们的 API。一旦我们得到结果,它会解析数据,并在聊天记录中添加一条包含已确认订单的新消息。
在服务器上设置 TypeChat
在这里,你将学习如何设置 TypeChat 并开始向 OpenAI 发送请求。让我们回到server文件夹,从 NPM 安装该库:
npm install typechat
安装完成后,我们必须配置 TypeChat 使用的架构,以便将 AI 响应转换为正确的类型。为了本文的目的,我毫不犹豫地使用了官方 TypeChat 示例代码库中的架构定义,并将其移植到我们的项目中。链接如下。该架构的主要部分是 Cart 类型的定义:
export interface Cart {
    items: (LineItem | UnknownText)[];
}

// Use this type for order items that match nothing else
export interface UnknownText {
    type: 'unknown',
    text: string; // The text that wasn't understood
}

export interface LineItem {
    type: 'lineitem',
    product: Product;
    quantity: number;
}
我们将指示 TypeChat 使用这个特定的模型将来自请求的字符串转换为 Cart 对象,该对象基本上是客户想要购买的产品列表。
现在我们需要设置 TypeChat 在后台执行请求时使用的 OpenAI API 密钥。该 API 密钥需要保持私密(请勿与任何人共享!),但需要存储在.env项目服务器文件夹中的文件中。其结构如下:
OPENAI_MODEL="gpt-3.5-turbo"
OPENAI_API_KEY="<YOUR OPENAI APIKEY>"
以下代码片段POST向 Express 应用程序添加了一个新端点,该端点从 UI 接收订单请求,使用 TypeChat 从该字符串中提取意图并最终处理订单:
const model = createLanguageModel(process.env);
const schema = fs.readFileSync(path.join(__dirname, "coffeOrdersSchema.ts"), "utf8");
const translator = createJsonTranslator<Cart>(model, schema, "Cart");

app.post("/api/order-request", async (req, res) => {
    const { newMessage } = req.body;
    console.log(newMessage);

    if (!newMessage || newMessage === "") {
        console.log("missing order");
        res.json({error: "missing order"});
        return;
    }

    // query TypeChat to translate this into an intent
    const response: Result<Cart> = await translator.translate(newMessage as string);

    if (!response.success) {
        console.log(response.message);
        res.json({error: response.message});
        return;
    }

    await processOrder(response.data);

    res.json({
        items: response.data.items
    });
});
为了简单起见,我们的processOrder功能将是一个简单的console.log(),但实际上它可以将订单发送到处理队列或任何其他后台进程。
const processOrder = async (cart: Cart) => {
    // add this to a queue or any other background process
    console.log(JSON.stringify(cart, undefined, 2));
};
恭喜!🎉
如果你做到了这一步,那么你已经成功构建了一个功能齐全的聊天机器人,可以接收咖啡订单。这个系统非常灵活,你可以将相同的架构和逻辑应用于任何其他类型的在线订购服务,例如杂货、服装、餐厅……等等!只需更改架构,TypeChat 就能根据你的需求生成结构化的响应。
在下一部分中,您将了解如何使用 SwitchFeat 来评估当前用户对此聊天机器人的高级功能的访问权限。
使用功能标志显示高级功能
在本节中,我们将使用SwitchFeat API来评估特定用户是否有权访问此聊天机器人的高级功能,例如快速送货或周末送货。
目前阶段,SwitchFeat 还没有专用的 SDK,因此我们将使用简单的方法fetch来联系 API 并评估当前的用户请求。
让我们修改组件,使其能够将当前用户数据跟踪到状态变量中。这些信息应该来自数据库或任何数据存储,并且可以存储在 Context Provider 中,以便在多个组件之间共享。但出于本文的目的,我们尽量简化操作。
const [userContext, setUserContext] =
          useState<{}>({
                 username: 'a@switchfeat.com',
                 isPremium: true
          });
添加另一个状态变量,该变量将定义是否应向当前用户显示高级功能:
const [showPremium, setShowPremium] = useState<boolean>(false);
fetch最后向组件添加以下请求:
 useEffect(() => {
    const formData = new FormData();
    formData.append('flagKey', "premium-delivery");
    formData.append('flagContext', JSON.stringify(userContext));
    formData.append('correlationId', uuidv4());

    const evaluateFlag = () => {
      fetch(`http://localhost:4000/api/sdk/flag/`, {
        method: "POST",
        headers: {
          Accept: "application/json",
          "Access-Control-Allow-Credentials": "true",
          "Access-Control-Allow-Origin": "true"
        },
        body: formData
      }).then(resp => {
        return resp.json();
      }).then(respJson => {
        setShowPremium(respJson.data.match);
      }).catch(error => { console.log(error); });
    };
    evaluateFlag();
  }, []);
上面的代码片段向 SwitchFeat 发送 API 请求,检查当前用户是否是高级用户,并评估他们是否被允许使用高级功能。
最后,只需将此代码片段添加到您希望PremiumFeatures渲染组件的任何位置即可。
{showPremium && <PremiumFeatures />}
为什么要为此使用功能标志?
你已经知道用户是否是高级用户了,对吧!?没错……但是……如果你无论如何都想禁用这个功能怎么办?
在多种情况下,您可能想要暂停高级配送(或任何其他功能),例如司机稀缺、高级订单不足等。只需单击一下即可实时打开/关闭该功能的简单逻辑非常强大,并且避免了在整个代码库中构建临时更改。
在 SwitchFeat 中创建你的旗帜
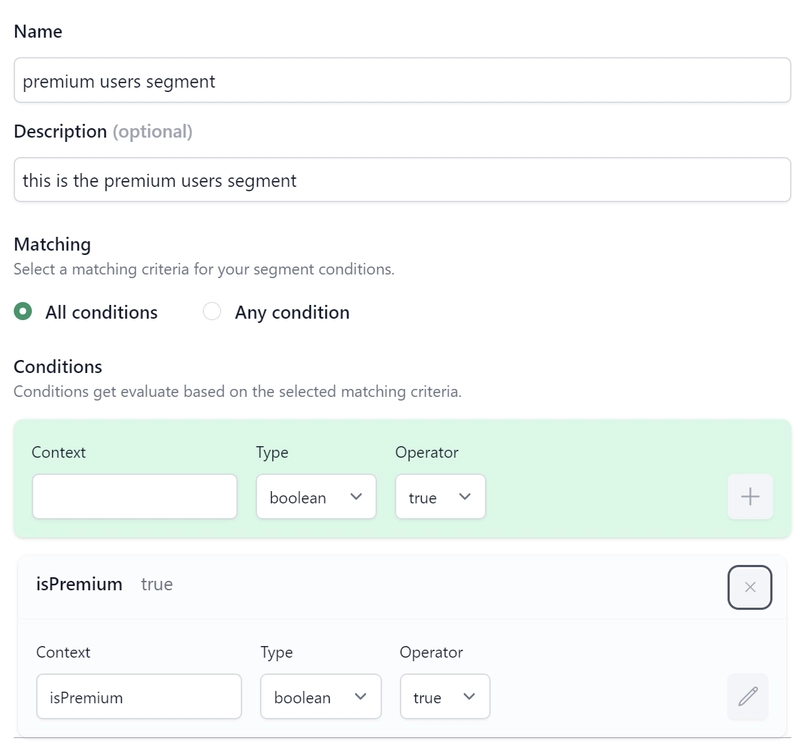
首先,我们需要创建一个新的用户段,将所有为高级服务付费的用户分组:
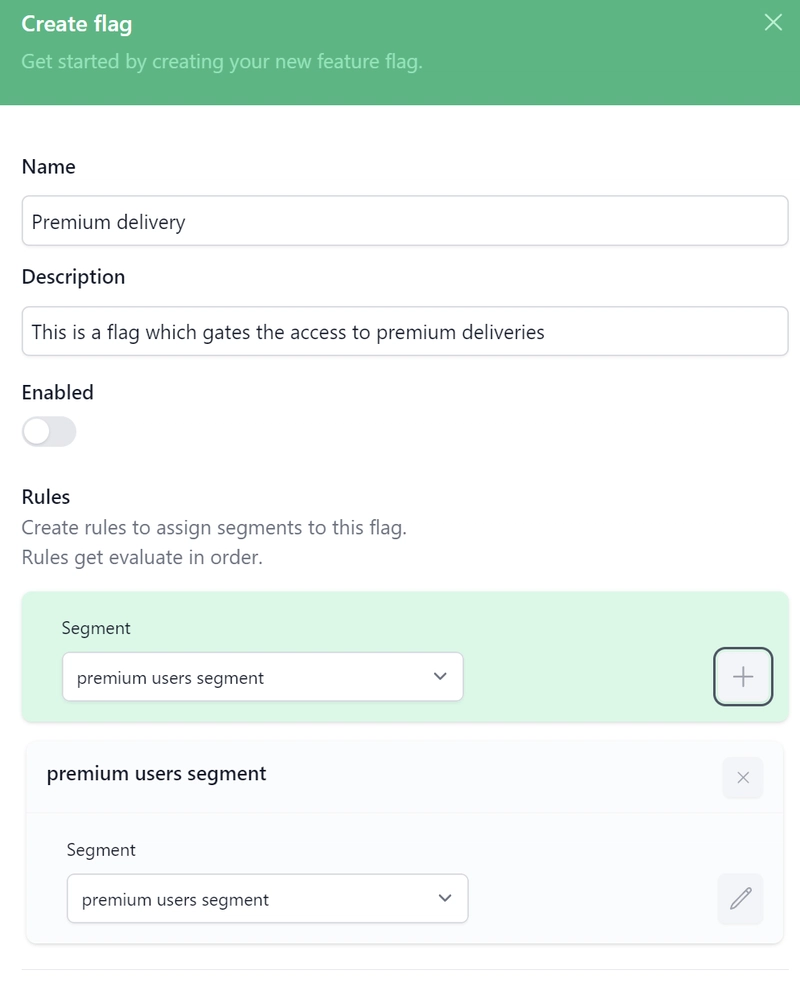
然后我们需要创建一个新标志,使用以下段来控制对高级功能的访问:
这是我们可以在 API 请求中使用的新标志:
现在,只需更改 SwitchFeat 中开关的状态,即可激活或停用高级功能,无需更改代码或重新部署。请观看下方视频。
大家辛苦了!你们终于读完了这篇文章,并且了解了 TypeChat 是什么,以及为什么它这么好用。我已经把这篇文章的完整代码库推送到Github上了,想去看看的可以看看。
那么..你能帮忙吗?😉
希望这篇文章能给你一些启发。如果你能给 我的代码库点个星, 那我真是太开心了!
https://github.com/switchfeat-com/switchfeat
鏂囩珷鏉ユ簮锛�https://dev.to/dev_bre/building-a-coffe-delivery-chatbot-with-react-chatgpt-and-typechat-1go0 后端开发教程 - Java、Spring Boot 实战 - msg200.com


