HowTo:我的终端和 Shell 设置 - Hyper.js + ZSH + starship ☄🔥
[修订于 2020-07-07]
开发人员拿到新电脑后做的第一件事可能就是……终端设置。我想和大家分享一下我目前的开发设置——这里是终端设置。
说起来容易做起来难,让我们展示一些代码吧。
1. 终端 - Hyper.js
1.1 下载并安装 Hyper。
让我们前往Hyper™页面,下载适用于您操作系统的版本。
我下载的是 Mac OS 版本。解压 zip 文件后,Hyper-3.0.2-mac.zip会得到一个Hyper.app文件。要安装它,只需将其拖到Applications文件夹中即可。现在,使用Spotlight 搜索( CMD+ SPACE) 输入hyper,列表中应该会显示 Hyper 应用程序。
在我的例子中,Hyper 的窗口如下所示:

如果您的提示符看起来不同,请不要担心。我们稍后会处理这个问题。您可能一开始使用了不同的 shell 或不同的配置。
1.2 基本配置
现在,奇迹发生了。Hyper 的配置被定义为~/.hyper.js文件。文件结构如下:
// Future versions of Hyper may add additional config options,
// which will not automatically be merged into this file.
// See https://hyper.is#cfg for all currently supported options.

module.exports = {
  config: {
    // choose either `'stable'` for receiving highly polished,
    // or `'canary'` for less polished but more frequent updates
    updateChannel: 'stable',

    // default font size in pixels for all tabs
    fontSize: 12,

    // font family with optional fallbacks
    fontFamily: 'Menlo, "DejaVu Sans Mono", Consolas, "Lucida Console", monospace',

    // default font weight: 'normal' or 'bold'
    fontWeight: 'normal',

    // rest of the config
  }
  // rest of the file
}
这信息太棒了!我们完全掌控了我们的设置。
让我们从基本配置开始。
1.2.1 字体
fontSize- 就我个人而言,我更喜欢大一点的字体,我们就用 13 吧。稍后,您可以使用CMD++和CMD+-键盘快捷键在终端中更改字体大小。fontFamily- 让我们使用一款非常漂亮的带连字的字体——FiraCode。我在下面附上了一份概述:

安装说明请参见此处。我更喜欢手动安装(适用于 Mac OS):
- 从 Github 选项卡下载最新版本的字体
releases:Releases · tonsky/FiraCode · GitHub - 目前,它是Fira_Code_v5.2.zip。 - 提取档案并转到
ttf目录。 - 选择所有字体
.ttf文件,单击右键,然后Open选择Install Font
现在,字体安装完成后,我们在超级终端中进行设置。配置文件应该放在主目录中:
nano ~/.hyper.js
module.exports = {
  config: {
      fontSize: 13,
    fontFamily: '"Fira Code", Menlo, "DejaVu Sans Mono", Consolas, "Lucida Console", monospace',
      // rest of the config
  }
  // rest of the file
}
此时,我们Fira Code在终端中启用了字体,但连字功能仍然没有启用。让我们启用它。
我们需要安装一个专用插件hyper-font-ligatures:
hyper i hyper-font-ligatures
插件应该立即出现在我们的配置文件中:
module.exports = {
  // rest of the file
  plugins: ["hyper-font-ligatures"],
为了启用连字,我们需要在配置中添加一行(有关更多详细信息,请参阅问题 #8和zeit/hyper#3607 ):
module.exports = {
  config: {
    // rest of the config
    webGLRenderer: false,
  }
  // rest of the file
}
现在,一切都应该按预期工作,我们应该在终端中看到带有连字的新字体:

1.2.2 主题
使用 Hyper,我们可以下载多个主题,这些主题可在此处获取:Hyper Store - Plugins。我将使用Hyper Store - hyper-one-dark主题。要安装它,只需运行:
hyper i hyper-one-dark
在我当前的 shell 中它看起来像这样:

1.2.3 搜索插件
为了能够在终端中搜索关键字,我们需要安装一个专用插件:Hyper Store - hyper-search
hyper i hyper-search
这次我们需要彻底重启 Hyper。重启后,我们就可以开始使用我们的插件了:

1.2.4 窗格导航插件
如果我们想在终端的窗格之间跳转,我们需要添加Hyper Store - hyper-pane插件:
hyper i hyper-pane
它是如何工作的?

1.2.5 在同一目录下打开新标签页
打开新标签页时,我经常希望位于同一目录。为了实现这一点,我们来添加Hyper Store - hypercwd:
hyper i hypercwd
1.2.6 通过添加符号来标记活动选项卡
有时我们打开了多个标签页,可能很难注意到当前哪个标签页处于活动状态。为了方便起见,我们添加了Hyper Store - hyper-active-tab:
hyper i hyper-active-tab
我将使用自定义符号:
module.exports = {
  config: {
    // rest of the config
    activeTab: '🚀'
  }
  // rest of the file
}
现在,它看起来像这样:

1.2.7 显示 CPU、RAM、电池状态
如果我们想要跟踪我们的 CPU、内存、电池资源,我们可以添加:GitHub - Hyperline/hyperline:✨ Hyper 的状态行插件 ✨:
hyper i hyperline
完全重新加载后将出现新的状态行:

甚至还有一个 Spotify 插件显示当前播放的歌曲。
1.2.8 奖励:感受这种力量!
JavaScript 几乎可以让用户创建任何内容。让我们看看Hyper Store - hyperpower能做什么:
hyper i hyperpower
这个相当炫耀:

还有许多其他插件,而且列表还在快速增长。更多插件请查看以下两个来源:
- 官方插件商店:Hyper Store - 插件
- 包含 Hyper 插件列表的存储库:https://github.com/bnb/awesome-hyper
2. Shell - ZSH + starship 提示符
Linux 上有几个最流行的 shell:
- Bash Shell - Bash(Unix shell) - 维基百科
- Tcsh/Csh Shell - https://pl.wikipedia.org/wiki/Tcsh
- Ksh Shell - https://pl.wikipedia.org/wiki/Korn_shell
- Zsh Shell - https://pl.wikipedia.org/wiki/Zsh
- 鱼 - https://pl.wikipedia.org/wiki/Friendly_interactive_shell
在尝试了一些 shell 之后,我决定使用 ZSH。
2.1 安装 ZSH
对于 Mac OS:
brew install zsh
如果您尚未homebrew安装,您可以添加它(官方安装文档在这里):
/usr/bin/ruby -e "$(curl -fsSL https://raw.githubusercontent.com/Homebrew/install/master/install)"
Homebrew 是 macOS 的包管理器。
安装 ZSH 后检查其版本:
❯ zsh --version
zsh 5.7.1 (x86_64-apple-darwin19.0)

❯ which zsh
/usr/local/bin/zsh
要将 ZSH 与 Hyper 一起使用,我们需要在配置 ( ~/.hyper.js) 中指定它:
module.exports = {
  config: {
    // rest of the config
    shell: '/usr/local/bin/zsh',
  }
  // rest of the file
}
此时,Hyper 应该会以新安装的 ZSH 作为默认 shell 启动。
我们可以继续下一步了。
2.2 安装starship提示

有很多不同的提示符可以使用。在测试了一些之后,我决定继续使用GitHub - starship/starship:☄️🌌️ 宇航员的跨 Shell 提示符。
2.2.1 安装
文档中描述了几种安装starship的不同方法: GitHub - starship/starship:☄️🌌️ 宇航员的跨 shell 提示。
对于 Mac OS:
brew install starship
检查它是否正常工作:
❯ starship --version
starship 0.44.0
为了启用startship提示,我们需要将其添加到~/.zshrc。在文件末尾添加以下代码~/.zshrc:
echo 'eval "$(starship init zsh)"' >> ~/.zshrc
重新启动 Hyper 后,我们的终端应如下所示:

遗憾的是,我们没有语法高亮、命令补全、历史记录启用、别名和其他一些功能。我们需要调整一下。
2.2.2 语法高亮
还有一个很棒的 ZSH 插件仓库值得一看:GitHub - unixorn/awesome-zsh-plugins:ZSH 框架、插件和主题的集合,灵感来源于各种优秀的列表集合。我搜索了一下语法高亮插件,
打算用GitHub - zdharma/fast-syntax-highlighting:(简称 F-Sy-H)。Zshell 的语法高亮——精细的粒度、丰富的功能、40 小时的开发时间主题。
我将通过克隆 repo 来安装它(稍后可以通过拉取主版本轻松地保持其最新状态):
# Create a `.zsh` directory to store our plugins in one place
mkdir ~/.zsh
# Clone repo to `~/.zsh/` directory
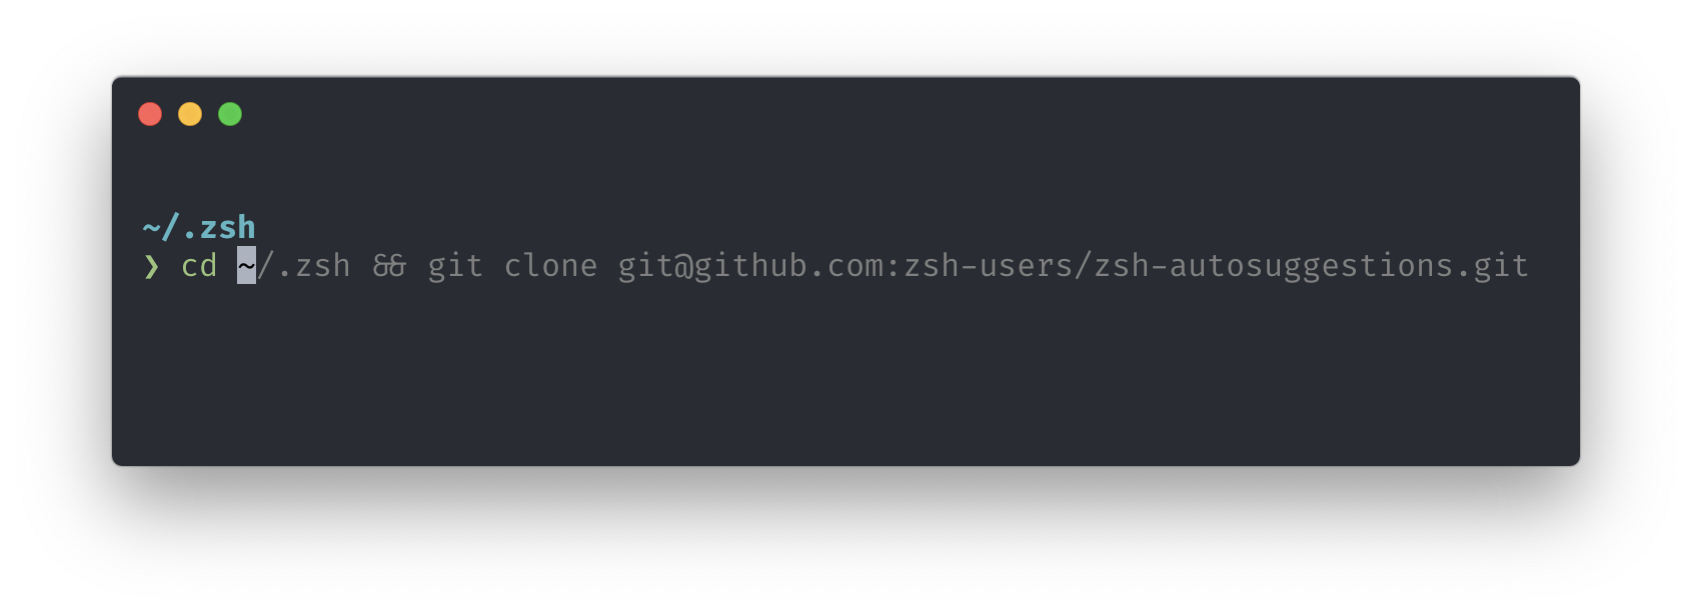
cd ~/.zsh && git clone git@github.com:zdharma/fast-syntax-highlighting.git
# Enable 'fast-syntax-highlighting' plugin in ZSH
echo "source $HOME/.zsh/fast-syntax-highlighting/fast-syntax-highlighting.plugin.zsh" >> ~/.zshrc
# Reload ZSH
source ~/.zshrc
如果您无法克隆 repo 并收到如下错误:
git@github.com: Permission denied (publickey)
然后尝试使用“使用 HTTPS 克隆”,它看起来像这样:
git clone https://github.com/zdharma/fast-syntax-highlighting.git
经过这几个步骤之后,我们应该已经启用了语法高亮:

2.2.3 设置补全插件
我们将使用GitHubcompletion.zsh上已经定义的- robbyrussell/oh-my-zsh:
# Download completion config
cd ~/.zsh && wget https://raw.githubusercontent.com/robbyrussell/oh-my-zsh/master/lib/completion.zsh

# Enable 'completion' plugin in ZSH
echo "source $HOME/.zsh/completion.zsh" >> ~/.zshrc
此外,这次我们需要在文件中添加几行~/.zshrc:
# rest of the `~/.zshrc` file
# Load completion config
source $HOME/.zsh/completion.zsh
# Initialize the completion system
autoload -Uz compinit
# Cache completion if nothing changed - faster startup time
typeset -i updated_at=$(date +'%j' -r ~/.zcompdump 2>/dev/null || stat -f '%Sm' -t '%j' ~/.zcompdump 2>/dev/null)
if [$(date +'%j') != $updated_at]; then
compinit -i
else
compinit -C -i
fi
# Enhanced form of menu completion called `menu selection'
zmodload -i zsh/complist
```
<!--kg-card-end: code-->
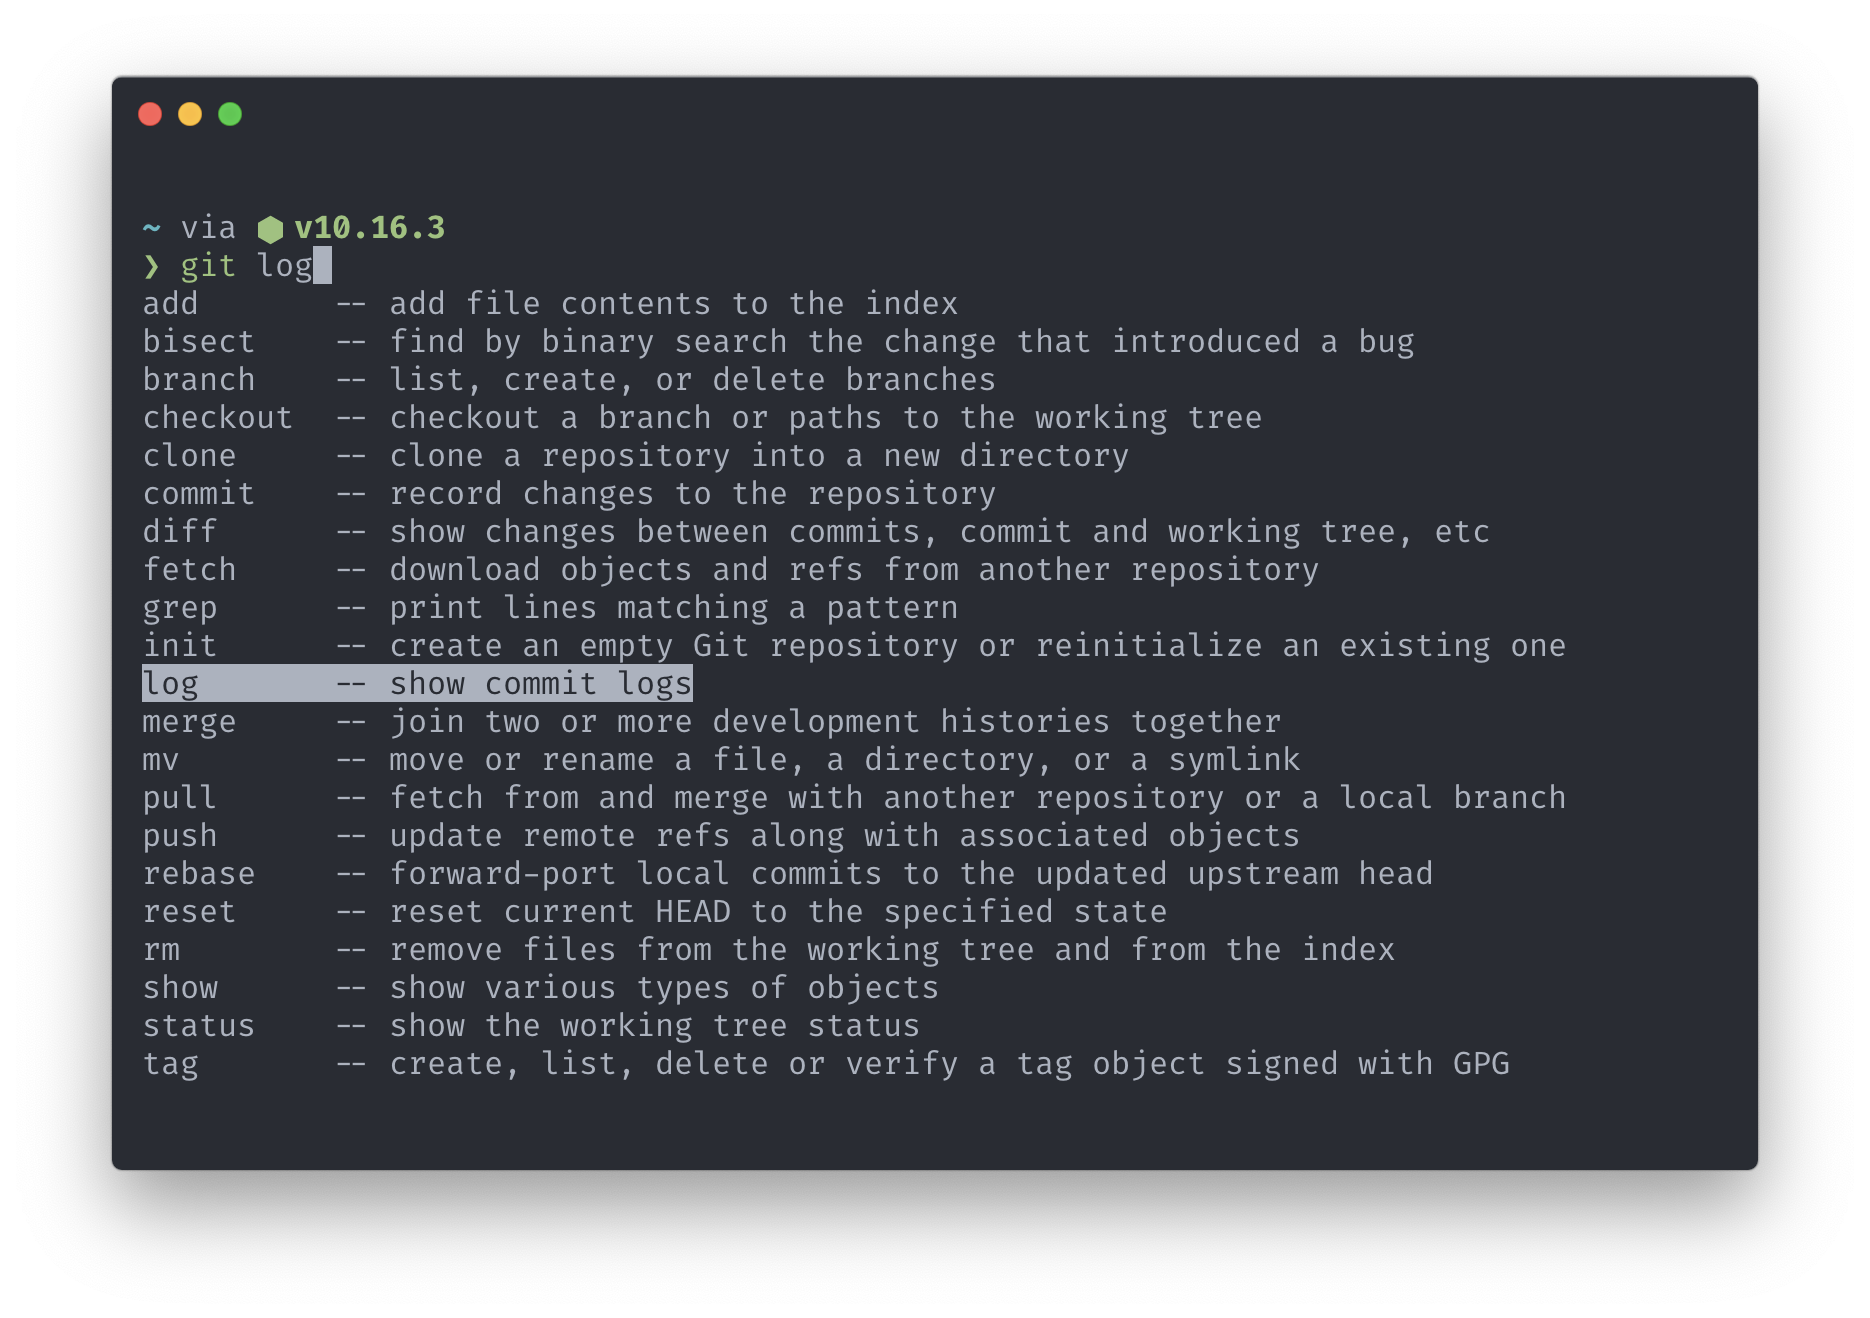
Restart the terminal and completion should work now:
<!--kg-card-begin: image-->
<!--kg-card-end: image-->
You might ask, why I don’t use Oh My Zsh? It feels overloaded for me. I like to have control over the tools I use. I prefer to build things starting from small parts and build on that something bigger, step by step.
#### 2.2.4 Setting autosuggestions plugin
Except completion feature it’s nice to have also suggestions. When you start typing there is a suggestion displayed in the command line. Let’s use [GitHub - zsh-users/zsh-autosuggestions: Fish-like autosuggestions for zsh](https://github.com/zsh-users/zsh-autosuggestions) plugin.
Install it:
<!--kg-card-begin: code-->
```shell
# Download 'zsh-autosuggestions' plugin
cd ~/.zsh && git clone git@github.com:zsh-users/zsh-autosuggestions.git
# Enable 'zsh-autosuggestions' plugin in ZSH
echo "source $HOME/.zsh/zsh-autosuggestions/zsh-autosuggestions.zsh" >> ~/.zshrc
# Reload ZSH
source ~/.zshrc
```
<!--kg-card-end: code-->
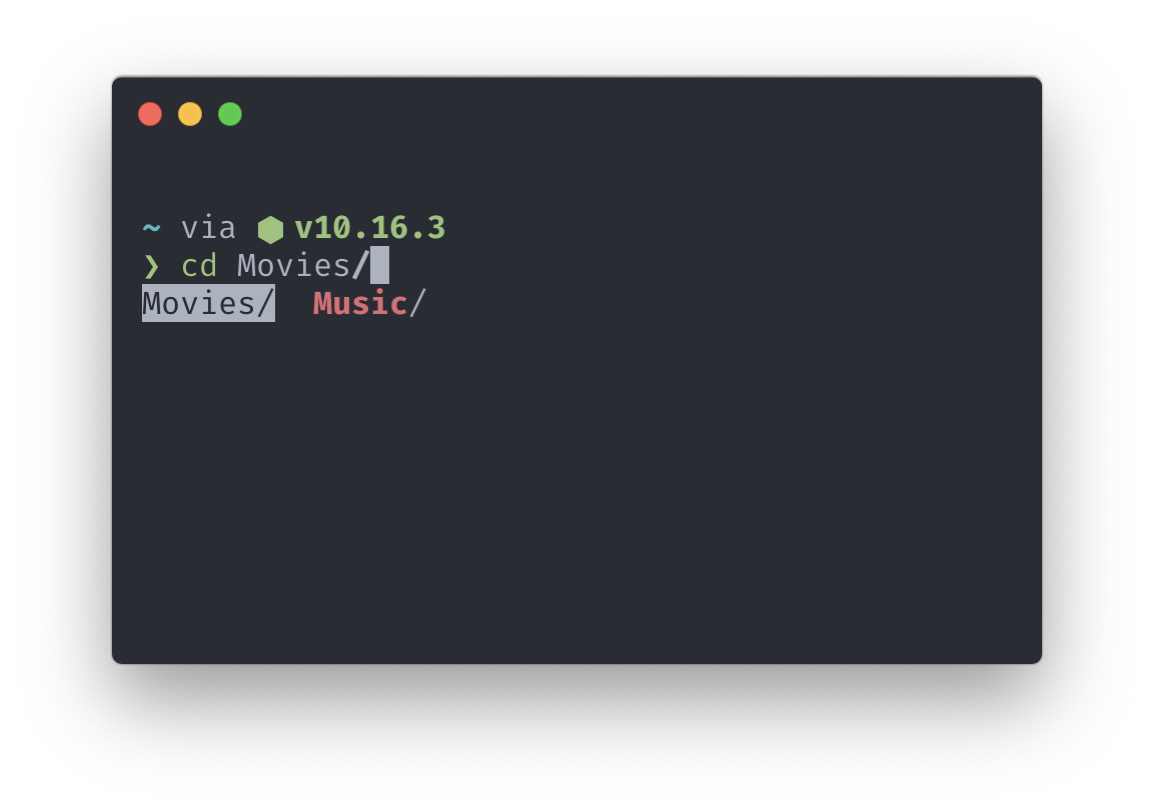
It works really nicely by suggesting the rest of the command, you can use arrows to accept suggested command:
<!--kg-card-begin: image-->
<!--kg-card-end: image-->
#### 2.2.5 Commands history config
Here again, we are going to use a ready config from oh-my-zsh:
<!--kg-card-begin: code-->
```shell
# Download history config
cd ~/.zsh && wget https://raw.githubusercontent.com/robbyrussell/oh-my-zsh/master/lib/history.zsh
# Enable 'history' config in ZSH
echo "source $HOME/.zsh/history.zsh" >> ~/.zshrc
# Reload ZSH
source ~/.zshrc
```
<!--kg-card-end: code-->
Now, by using the Up Arrow we can go back to our previous commands. We can also use backwards search by clicking `CTRL` + `R`:
<!--kg-card-begin: image-->
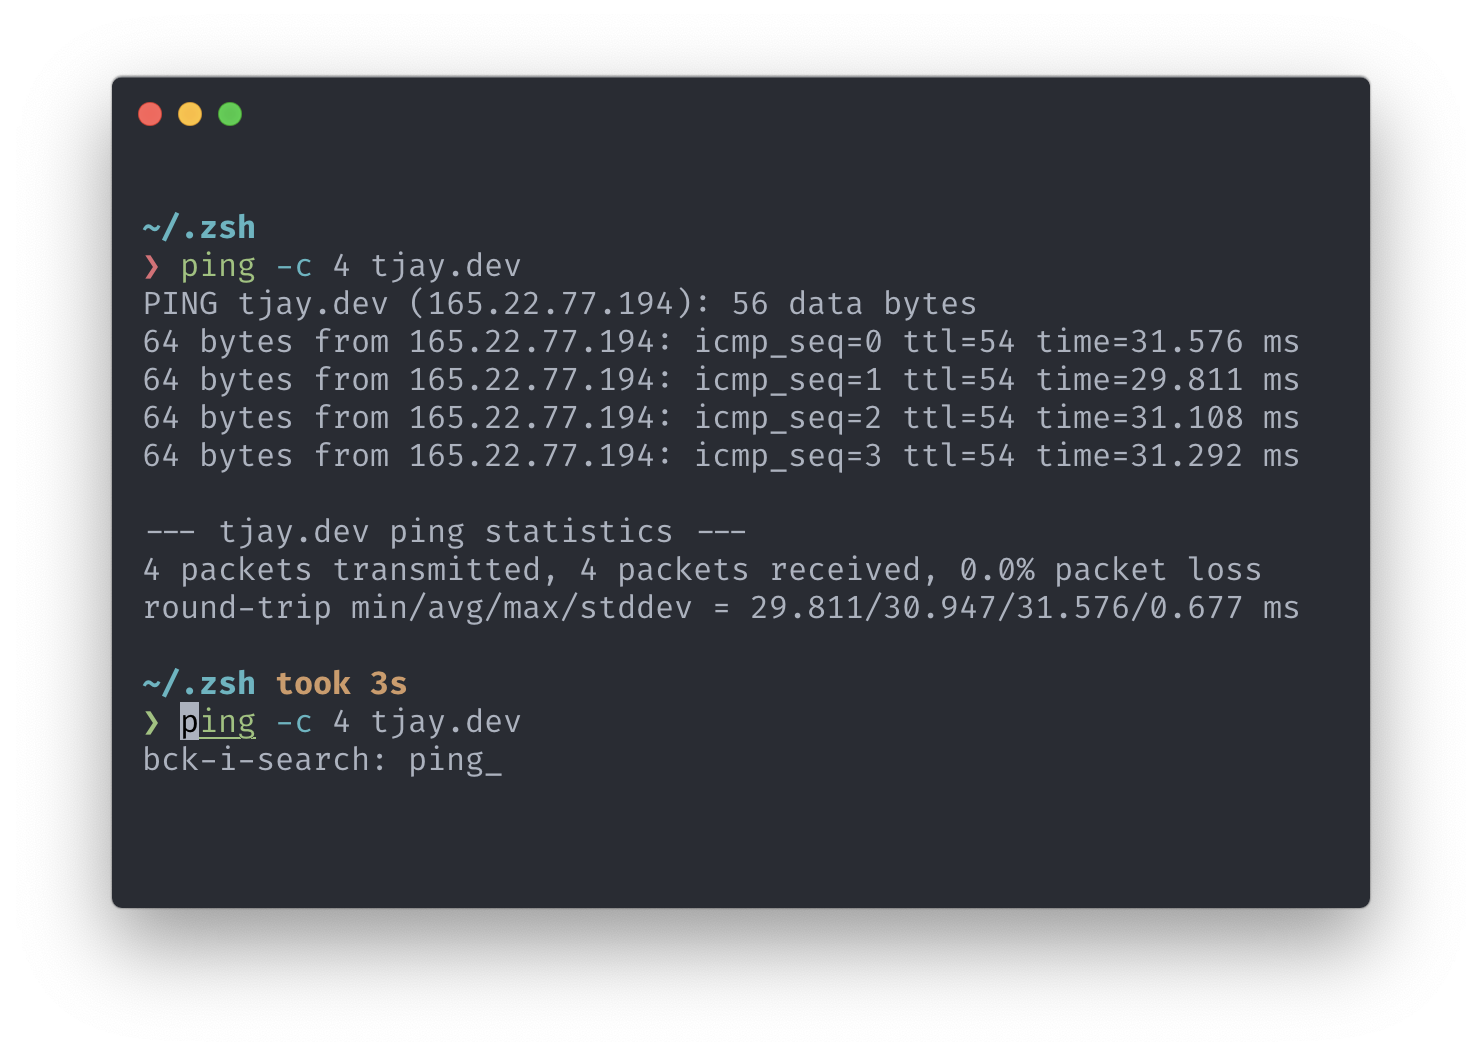
<!--kg-card-end: image-->
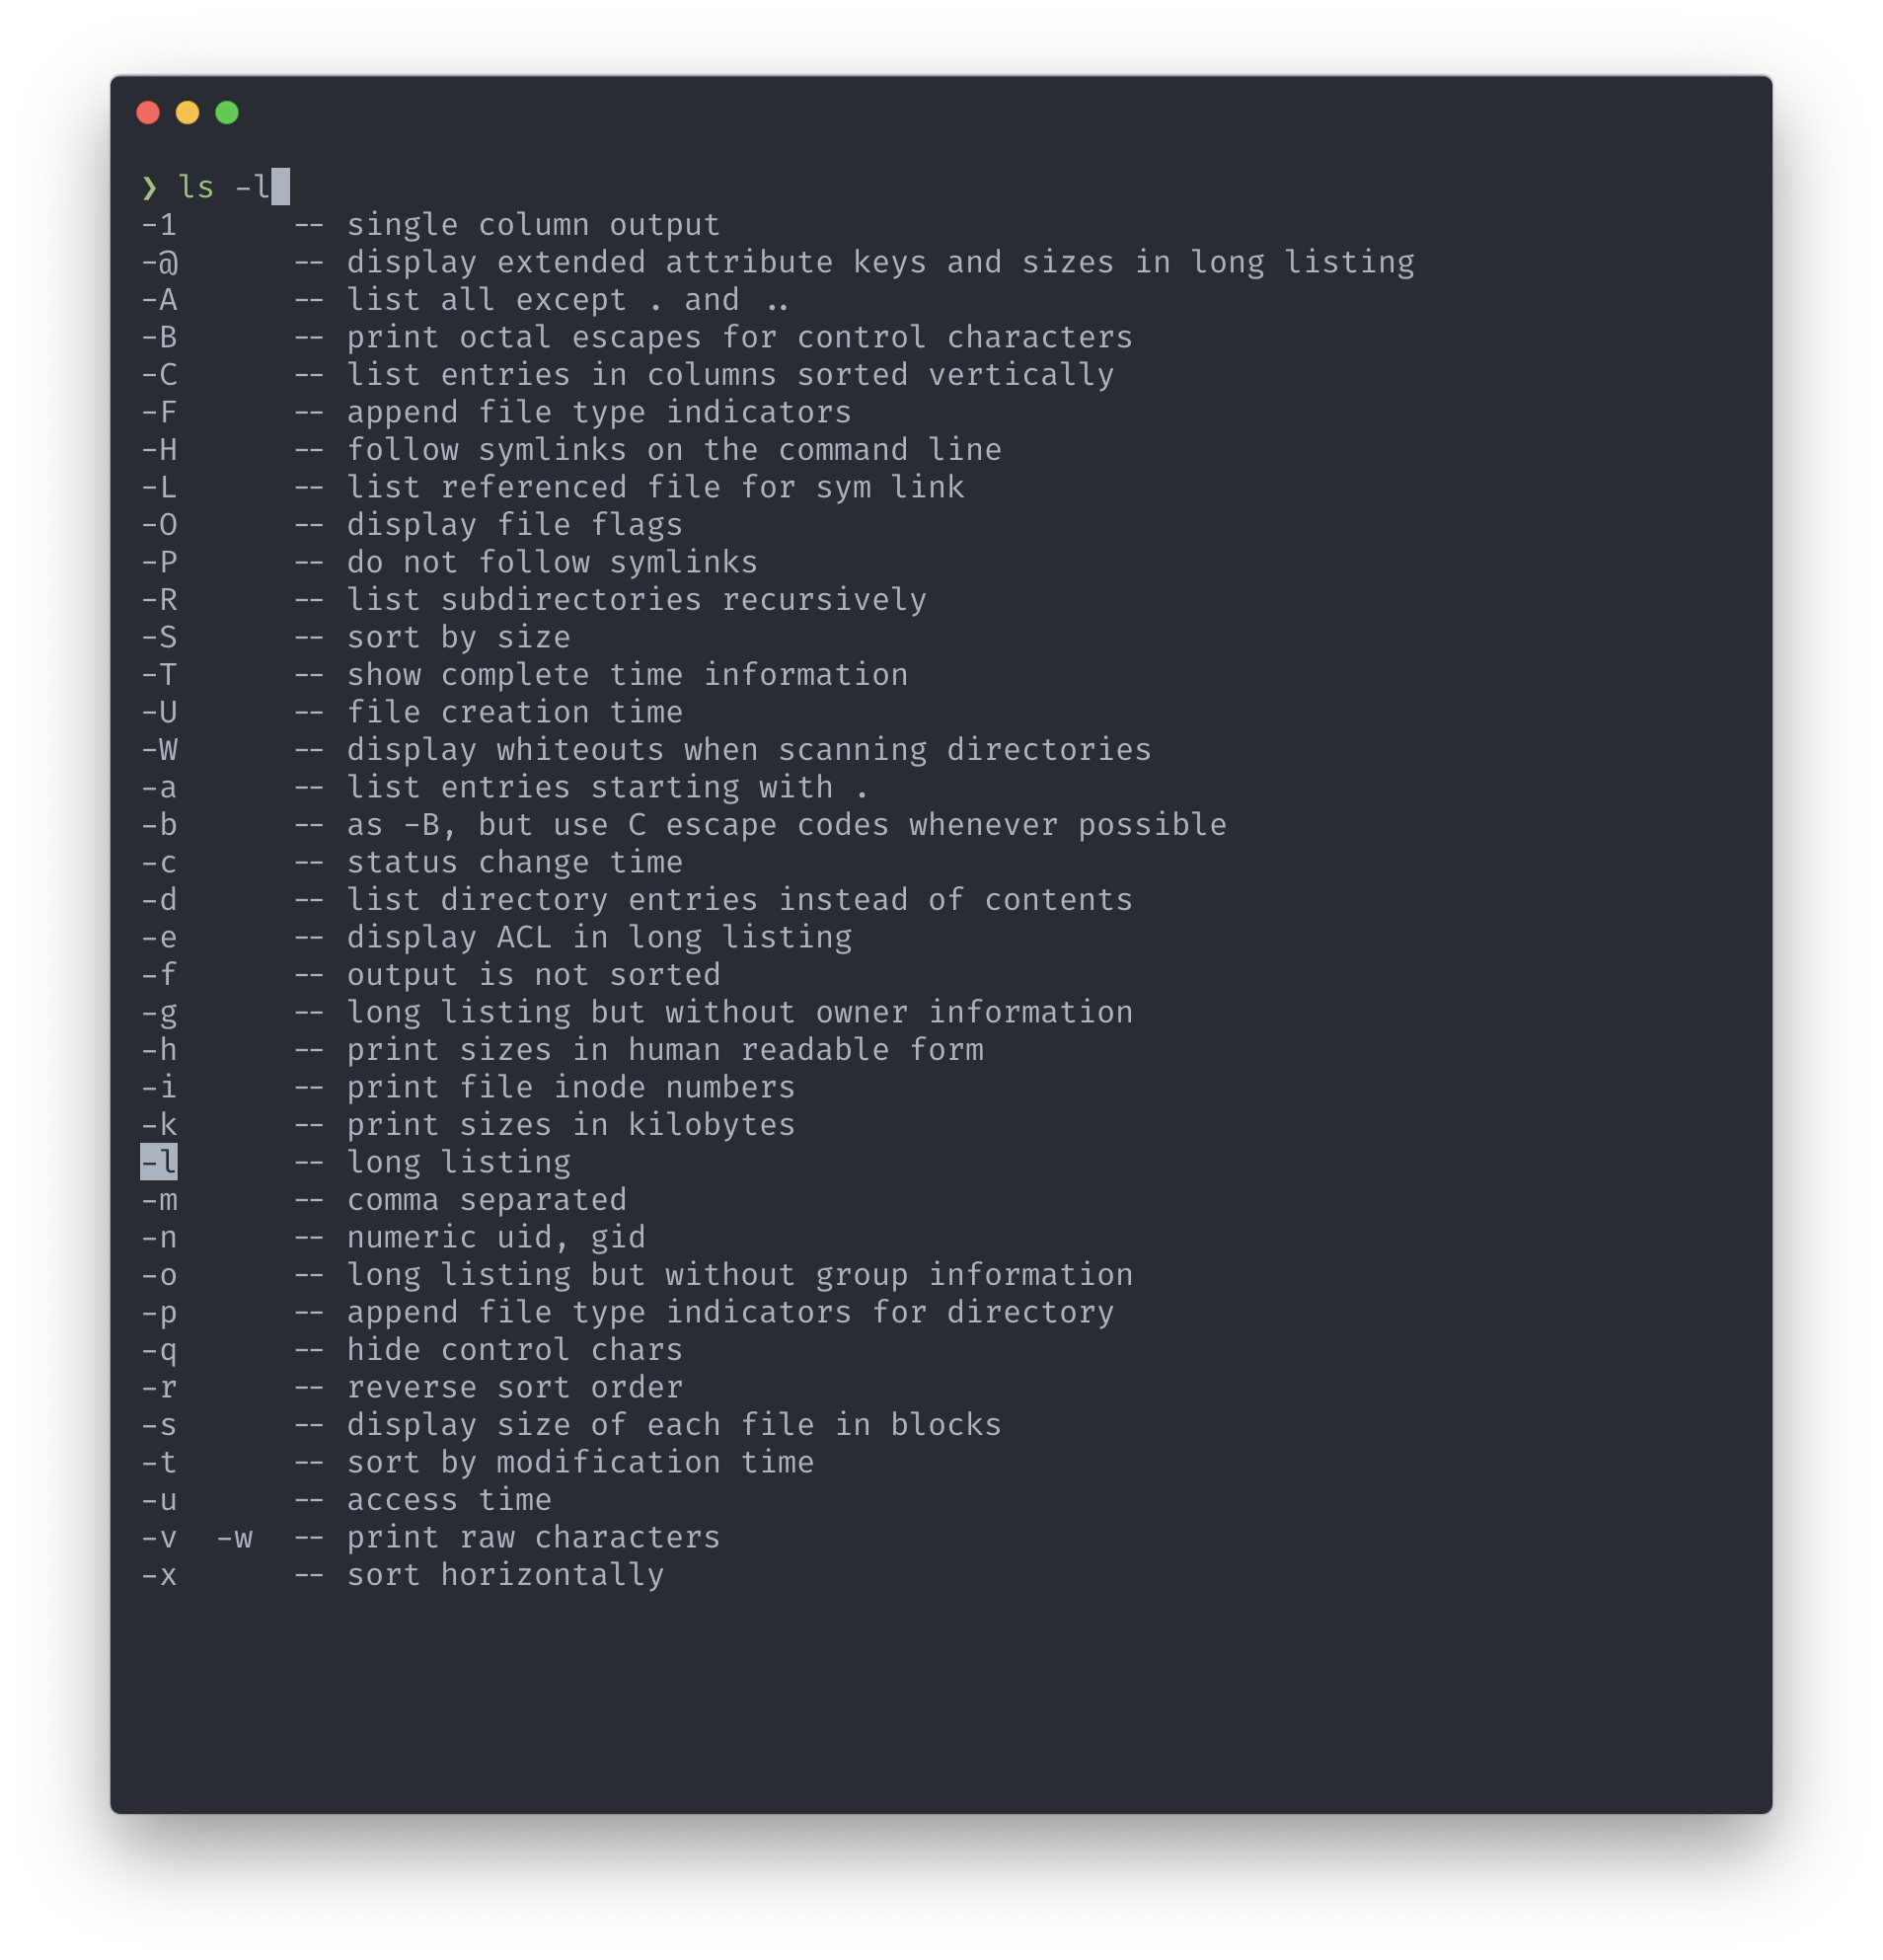
#### 2.2.6 Colorized `ls` output
Right now when we want to list a directory’s content we have a raw gray list:
<!--kg-card-begin: image-->
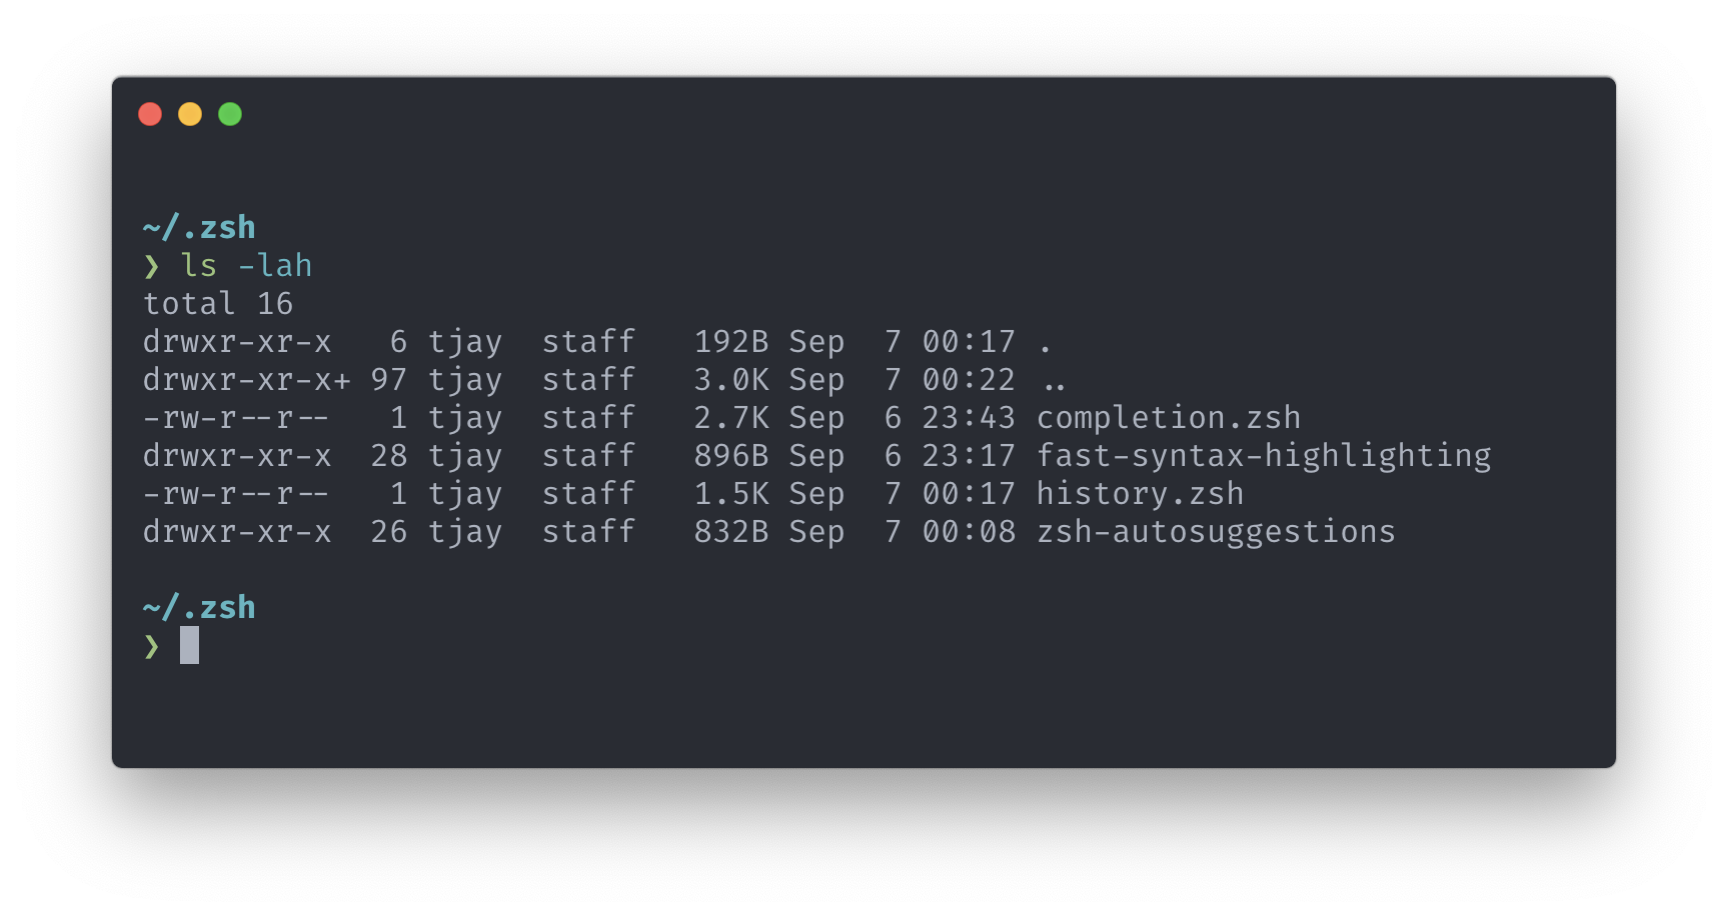
<!--kg-card-end: image-->
It doesn’t look good. Let’s use some colours to make it more readable.
When you go to `ls` command’s manual there is a `-G` option:
<!--kg-card-begin: code-->
```shell
-G Enable colorized output. This option is equivalent to defining CLICOLOR in the environment. (See below.)
```
<!--kg-card-end: code-->
But, we are not going to add `-G` each time when we want to use `ls`command. We can create an alias for it:
<!--kg-card-begin: code-->
```shell
# Enable colorized output for `ls` command.
echo "alias ls='ls -G'" >> ~/.zshrc
# Reload ZSH
source ~/.zshrc
```
<!--kg-card-end: code-->
It looks better now:
<!--kg-card-begin: image-->
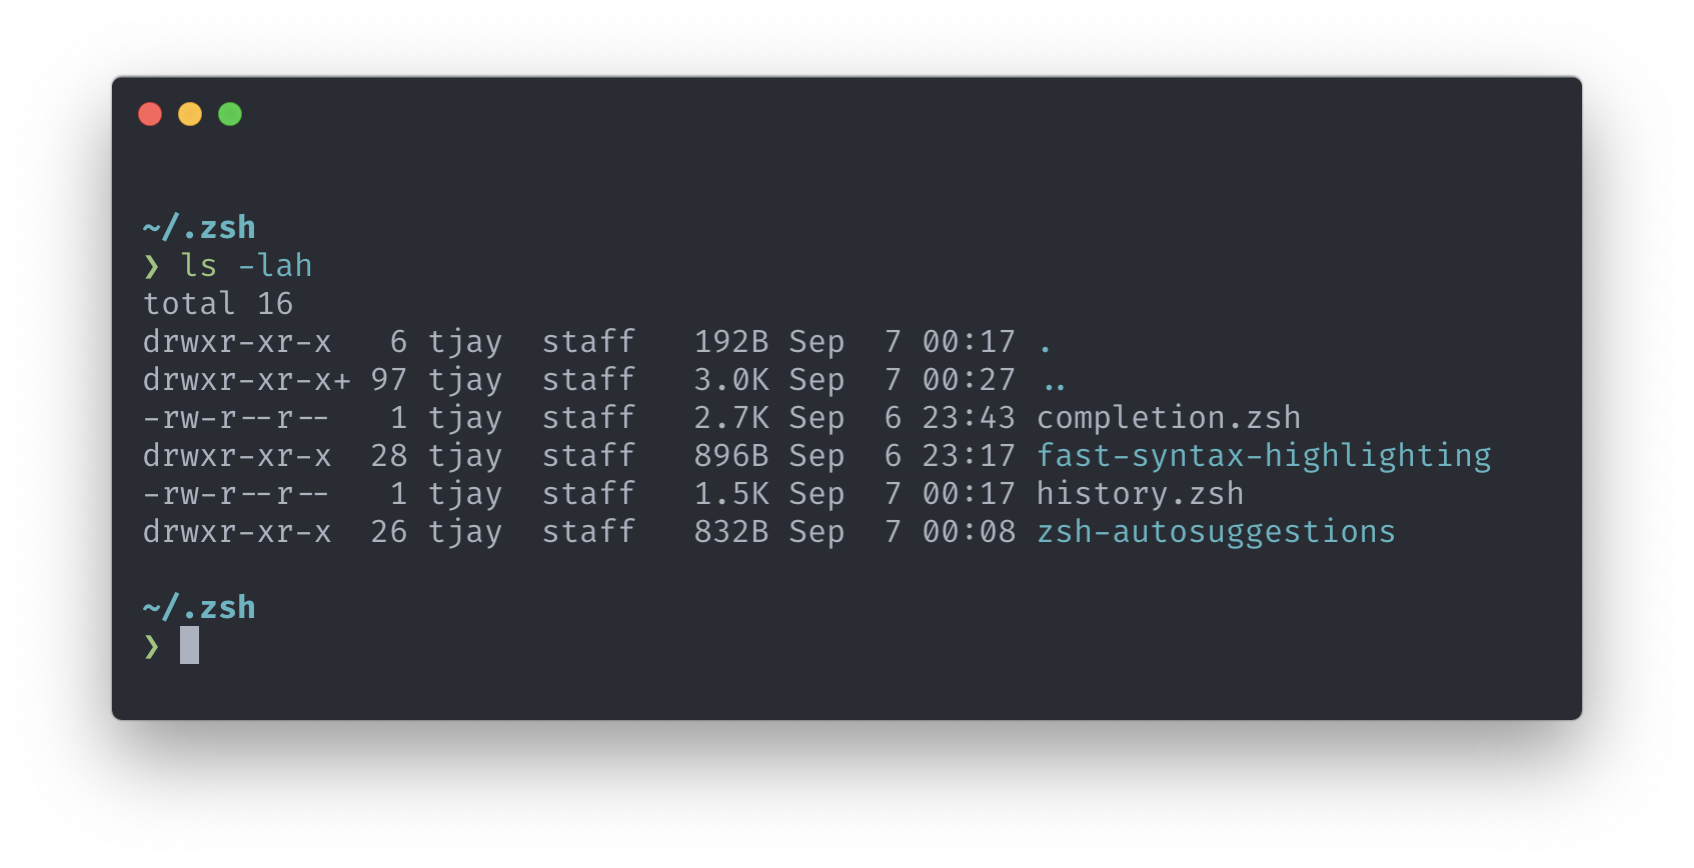
<!--kg-card-end: image-->
#### 2.2.7 Key bindings
When working in the terminal on daily basis it’s good to have shortcuts enabled. Going back to the beginning of the line (`CMD` + `LEFT ARROW`), or to the end (`CMD` + `RIGHT ARROW`)?
Let’s install key bindings:
<!--kg-card-begin: code-->
```shell
# Download key bindings config
cd ~/.zsh && wget https://raw.githubusercontent.com/robbyrussell/oh-my-zsh/master/lib/key-bindings.zsh
# Enable 'key-bindings' config in ZSH
echo "source $HOME/.zsh/key-bindings.zsh" >> ~/.zshrc
# Reload ZSH
source ~/.zshrc
```
<!--kg-card-end: code-->
#### 2.2.8 Aliases
Shell aliases play a huge part in productivity when using a command line. If you have well defined shortcuts it allows you to be really efficient and quick when developing new apps, scripts, etc.
<!--kg-card-begin: code-->
```shell
touch aliases.zsh
echo "source $HOME/.zsh/aliases.zsh" >> ~/.zshrc
```
<!--kg-card-end: code-->
A few useful aliases that I often use are listed below:
`~/.zsh/aliases.zsh`
<!--kg-card-begin: code-->
```shell
alias ls='ls -G' # colorize `ls` output
alias zshreload='source ~/.zshrc' # reload ZSH
alias shtop='sudo htop' # run `htop` with root rights
alias grep='grep --color=auto' # colorize `grep` output
alias ..='cd ..'
alias ...='cd ../..'
alias ....='cd ../../..'
alias less='less -R'
alias g='git'
alias rm='rm -i' # confirm removal
alias cp='cp -i' # confirm copy
alias mv='mv -i' # confirm move
alias cal='gcal --starting-day=1' # print simple calendar for current month
alias weather='curl v2.wttr.in' # print weather for current location (https://github.com/chubin/wttr.in)
```
<!--kg-card-end: code-->
As a bonus, I thought that sharing git aliases might also benefit you. The list below might seem to be quite broad but I added comments explaining what each of them is meant to be doing.
`~/.gitconfig`
<!--kg-card-begin: code-->
```shell
[alias]
a = add # Add file contents to the index
ai = add --interactive # Add modified contents in the working tree interactively to the index.
##############
b = branch
ba = branch --all # List both remote-tracking branches and local branches.
bav = branch --all --verbose # When in list mode, show sha1 and commit subject line for each head, along with relationship to upstream branch (if any)
bd = branch --delete # Delete a branch. The branch must be fully merged in its upstream branch, or in HEAD if no upstream was set with --track or --set-upstream-to.
bdd = branch -D # Shortcut for --delete --force.
bm = branch --move # Move/rename a branch and the corresponding reflog.
bmm = branch -M # Shortcut for --move --force.
br = branch --remotes # List or delete (if used with -d) the remote-tracking branches.
##############
c = commit # Record changes to the repository
ca = commit --all # Tell the command to automatically stage files that have been modified and deleted, but new files you have not told Git about are not affected.
cm = commit -m # Use the given <msg> as the commit message.
cam = commit -am # Shortcut for --all and -m
cem = commit --allow-empty -m # Allows to create a commit without any files modified
cd = commit --amend # Replace the tip of the current branch by creating a new commit.
cad = commit --all --amend # Shortcut for --amend and --all
cadne = commit --all --amend --no-edit # Amends a commit without changing its commit message.
##############
cl = clone # Clone a repository into a new directory
cld = clone --depth 1 # Create a shallow clone with a history truncated to the specified number of commits.
##############
cp = cherry-pick # Apply the changes introduced by some existing commits
cpa = cherry-pick --abort # Cancel the operation and return to the pre-sequence state.
cpc = cherry-pick --continue # Continue the operation in progress using the information in .git/sequencer. Can be used to continue after resolving conflicts in a failed cherry-pick or revert.
cps = cherry-pick --skip # Skip the current commit and continue with the rest of the sequence.
##############
d = diff # Show changes between commits, commit and working tree, etc
di = !"d() { git diff --patch-with-stat HEAD~$1; }; git diff-index --quiet HEAD -- || clear; d" # `git di $number` shows the diff between the state `$number` revisions ago and the current state
dt = difftool # Show changes using common diff tools
##############
f = fetch # Download objects and refs from another repository
fo = fetch origin # Update the remote-tracking branches
fu = fetch upstream # Fetch the branches and their respective commits from the upstream repository.
##############
fk = fsck # Verifies the connectivity and validity of the objects in the database
##############
g = grep -p # Print lines matching a pattern
##############
l = log --oneline # Show commit logs, the commit message is prefixed with this information on the same line.
lg = log --oneline --graph --decorate # Draw a text-based graphical representation of the commit history on the left hand side of the output.
lgs = !"git log --pretty=format:"%C(yellow)%h\\ %ad%Cred%d\\ %Creset%s%Cblue\\ [%cn]" --decorate --date=short" # SHA + date + Commit message + author
lgc = !"git log --pretty=format:"%C(yellow)%h%Cred%d\\ %Creset%s%Cblue\\ [%cn]" --decorate --numstat" # SHA + Commit message + author + changed files
lgt = !"git log --graph --pretty='%Cred%h%Creset -%C(yellow)%d%Creset %s %Cgreen(%cr) %C(bold blue)<%an>%Creset' --abbrev-commit --all" # As tree: SHA + Commit message + Time ago + author
##############
ls = ls-files # Show information about files in the index and the working tree
lsm = ls-files --modified # Show modified files in the output
lss = ls-files --stage # Show staged contents' mode bits, object name and stage number in the output.
##############
m = merge # Join two or more development histories together
ma = merge --abort # Abort the current conflict resolution process, and try to reconstruct the pre-merge state.
mc = merge --continue # After a git merge stops due to conflicts you can conclude the merge by running git merge --continue
mq = merge --quit # Forget about the current merge in progress. Leave the index and the working tree as-is.
mm = merge master # Merge 'master' branch to the current branch.
##############
o = checkout # Switch branches or restore working tree files.
om = checkout master # Switch branch to master.
ob = checkout -b # Create and switch to a new branch
##############
pr = prune --verbose --progress # Prune all unreachable objects from the object database. Report all removed objects. Show progress.
prn = prune --dry-run # Do not remove anything; just report what it would remove.
##############
ps = push # Update remote refs along with associated objects
psa = push --all # Push all branches (i.e. refs under refs/heads/); cannot be used with other <refspec>.
psf = push --force # Usually, the command refuses to update a remote ref that is not an ancestor of the local ref used to overwrite it. This flag disables these checks, and can cause the remote repository to lose commits; use it with care.
psu = push --set-upstream # For every branch that is up to date or successfully pushed, add upstream (tracking) reference.
##############
pso = push origin # `origin` is an alias in the system for a particular remote repository. Can be checked by running `git remote -v`.
psao = push --all origin # Same as `push --all` but for origin.
psfo = push --force origin # Same as `push --force` but for origin.
psuo = push --set-upstream origin # Same as `push --set-upstream` but for origin.
#############
psom = push origin master # Same as `push origin` but for master branch.
psaom = push --all origin master # Same as `push --all origin` but for master branch.
psfom = push --force origin master # Same as `push --force origin` but for master branch.
psuom = push --set-upstream origin master # Same as `push --set-upstream origin` but for master branch.
#############
pl = pull # Fetch from and integrate with another repository or a local branch.
plr = pull --rebase # When true, rebase the current branch on top of the upstream branch after fetching.
plv = pull --verbose # Pass --verbose to git-fetch and git-merge.
#############
plo = pull origin # Same as `pull` but for origin.
plro = pull --rebase origin # Same as `pull --rebase` but for origin.
plom = pull origin master # Same as `pull origin` but for master branch.
#############
plu = pull upstream # Same as `pull` but for upstream.
plum = pull upstream master # Same as `pull upstream` but for master branch.
plrum = pull --rebase upstream master # Same as `pull --rebase` but for upstream and master branch.
#############
rb = rebase # Reapply commits on top of another base tip.
rba = rebase --abort # Abort the rebase operation and reset HEAD to the original branch.
rbc = rebase --continue # Restart the rebasing process after having resolved a merge conflict.
rbi = rebase --interactive # Make a list of the commits which are about to be rebased. Let the user edit that list before rebasing. This mode can also be used to split commits.
rbs = rebase --skip # Restart the rebasing process by skipping the current patch.
rbin = "!r() { git rebase -i HEAD~$1; }; r" # Interactive rebase with the given number of latest commits.
#############
re = reset # Reset current HEAD to the specified state
rh = reset HEAD # HEAD is defined explicitly
reh = reset --hard # Resets the index and working tree. Any changes to tracked files in the working tree since <commit> are discarded.
rem = reset --mixed # Resets the index but not the working tree (i.e., the changed files are preserved but not marked for commit) and reports what has not been updated. This is the default action.
res = reset --soft # Does not touch the index file or the working tree at all (but resets the head to <commit>, just like all modes do). This leaves all your changed files "Changes to be committed".
rehh = reset --hard HEAD # HEAD is defined explicitly
remh = reset --mixed HEAD # HEAD is defined explicitly
resh = reset --soft HEAD # HEAD is defined explicitly
rehom = reset --hard origin/master # Throw away all my staged and unstaged changes, forget everything on my current local branch and make it exactly the same as origin/master.
#############
r = remote # Manage set of tracked repositories
ra = remote add # Adds a remote named <name> for the repository at <url>.
rr = remote remove # Remove the remote named <name>. All remote-tracking branches and configuration settings for the remote are removed.
rv = remote --verbose # Be a little more verbose and show remote url after name.
rn = remote rename # Rename the remote named <old> to <new>. All remote-tracking branches and configuration settings for the remote are updated.
rp = remote prune # Deletes stale references associated with <name>. By default, stale remote-tracking branches under <name> are deleted, but depending on global configuration and the configuration of the remote we might even prune local tags that haven't been pushed there.
rs = remote show # Gives some information about the remote <name>.
rao = remote add origin # Add new origin.
rau = remote add upstream # Add new upstream.
rro = remote remove origin # Remove origin.
rru = remote remove upstream # Remove upstream.
rso = remote show origin # Show current origin.
rsu = remote show upstream # Show current upstream.
rpo = remote prune origin # Prune current origin.
rpu = remote prune upstream # Prune current upstream.
#############
rmf = rm -f # Remove files from the working tree and from the index. Override the up-to-date check.
rmrf = rm -r -f # Same as above + Allow recursive removal when a leading directory name is given.
#############
s = status # Show the working tree status
sb = status -s -b # Same as above + Give the output in the short-format. Show the branch and tracking info even in short-format.
#############
sa = stash apply # Like pop, but do not remove the state from the stash list.
sc = stash clear # Remove all the stash entries. Note that those entries will then be subject to pruning, and may be impossible to recover.
sd = stash drop # Remove a single stash entry from the list of stash entries. When no <stash> is given, it removes the latest one.
sl = stash list # List the stash entries that you currently have.
sp = stash pop # Remove a single stashed state from the stash list and apply it on top of the current working tree state, i.e., do the inverse operation of git stash push.
sps = stash push # Save your local modifications to a new stash entry and roll them back to HEAD (in the working tree and in the index). The <message> part is optional and gives the description along with the stashed state.
spsk = stash push -k # All changes already added to the index are left intact.
sw = stash show # Show the changes recorded in the stash entry as a diff between the stashed contents and the commit back when the stash entry was first created. When no <stash> is given, it shows the latest one.
st = !git stash list | wc -l 2>/dev/null | grep -oEi '[0-9][0-9]*'
#############
t = tag # Create, list, delete or verify a tag object signed with GPG.
td = tag --delete # Delete existing tags with the given names.
tl = tag --list # Show verbose output about tags.
#############
w = show # Show various types of objects.
wo = show --oneline # This is a shorthand for "--pretty=oneline --abbrev-commit" used together.
wf = show --format=fuller # Print more extensive info.
#############
aliases = !git config -l | grep alias | cut -c 7- # List git aliases
branches = branch --all # List both remote-tracking branches and local branches.
remotes = remote --verbose # Be a little more verbose and show remote url after name.
contributors = shortlog --summary --numbered # List contributors with number of commits
amend = commit --amend --no-edit # Amend the currently staged files to the latest commit.
go = "!f() { git checkout -b \"$1\" 2> /dev/null || git checkout \"$1\"; }; f" # Switch to a branch, creating it if necessary
fb = "!f() { git branch -a --contains $1; }; f" # Find branches containing commit
ft = "!f() { git describe --always --contains $1; }; f" # Find tags containing commit
fc = "!f() { git log --pretty=format:'%C(yellow)%h %Cblue%ad %Creset%s%Cgreen [%cn] %Cred%d' --decorate --date=short -S$1; }; f" # Find commits by source code
fm = "!f() { git log --pretty=format:'%C(yellow)%h %Cblue%ad %Creset%s%Cgreen [%cn] %Cred%d' --decorate --date=short --grep=$1; }; f" # Find commits by commit message
dm = "!git branch --merged | grep -v '\\*' | xargs -n 1 git branch -d" # Remove branches that have already been merged with master (a.k.a. ‘delete merged’)
```
<!--kg-card-end: code-->
## Summary
I hope you will find this article useful and it will help you boost your productivity in the command line. It’s not an ultimate setup, rather treat it as a beginning or enhancement for your current setup. The amount of available tools, plugins, configs is simply overwhelming. Each user has different use cases, different technologies that he uses.
I tried to focus on the common ground which could be used by anyone.
If you know and recommend some of the tools you use and can’t live without please let me know in the comments.
**This article was originally posted on my personal dev blog: [https://tjay.dev/](https://tjay.dev/howto-my-terminal-shell-setup-hyper-js-zsh-starship/?utm_source=dev.to&utm_medium=footer-link&utm_campaign=reblogging)**
_Photo by [Анна В](https://unsplash.com/@niakris?utm_source=unsplash&utm_medium=referral&utm_content=creditCopyText) on [Unsplash](https://unsplash.com/search/photos/shell?utm_source=unsplash&utm_medium=referral&utm_content=creditCopyText)_