每个 ASP.NET Core Web API 项目都需要什么 - 第 1 部分 - Serilog
在接下来的一系列文章中,我将展示一种适用于瘦 Web API 项目或微服务架构的 Web API 的架构实现。在前几篇文章中,我将介绍几个有用的库。
让我们开始使用日志记录。日志记录对于调试、故障排除和监控至关重要。一个好的日志系统可以让生活变得更加轻松。
为什么选择Serilog?它易于设置,API 简洁,并且可以在最新的 .NET 平台之间移植。Serilog 与其他框架最大的区别在于,它旨在实现开箱即用的结构化日志记录。我非常喜欢 Serilog 的另一个特点是,它可以通过appsetting.json文件进行配置,也可以通过代码进行配置。无需修改代码库即可更改日志记录配置,这非常实用,尤其是在生产环境中。
让我们从创建一个新项目开始。
步骤 1 - 新建项目
创建一个新的 ASP.NET Core 5.0 API 项目。
第 2 步 - 安装包
安装Serilog.AspNetCore nuget 包。
步骤 3 - 添加UseSerilog扩展方法
打开Program.cs文件及修改CreateHostBuilder方法:
public static IHostBuilder CreateHostBuilder(string[] args) =>
    Host.CreateDefaultBuilder(args)
        .ConfigureWebHostDefaults(webBuilder =>
        {
            webBuilder.UseStartup<Startup>();
        })
        .UseSerilog((hostingContext, loggerConfiguration) =>
            loggerConfiguration.ReadFrom.Configuration(hostingContext.Configuration));
UseSerilog将 Serilog 设置为日志提供程序。我们将通过该appsettings.json文件配置 Serilog。
步骤 4 - 删除默认配置
打开appsettings.json文件appsettings.Development.json并删除日志部分:
"Logging": {
  "LogLevel": {
    "Default": "Information",
    "Microsoft": "Warning",
    "Microsoft.Hosting.Lifetime": "Information"
  }
}
步骤5:添加Serilog配置
将 Serilog 配置部分添加到appsettings.Development.json文件:
"Serilog": {
  "MinimumLevel": {
    "Default": "Debug",
    "Override": {
      "Microsoft": "Information",
      "System": "Information"
    },
    "Using": [ ],
  },
  "WriteTo": [
    { }
  ]
}
Serilog.AspNetCorenuget 包依赖于Serilog.Settings.Configuration nuget 包,它是一个从Microsoft.Extensions.Configuration源读取数据的 Serilog 设置提供程序。上述配置相当于:
Log.Logger = new LoggerConfiguration()
    .MinimumLevel.Debug()
    .MinimumLevel.Override("Microsoft", LogEventLevel.Information)
    .MinimumLevel.Override("System", LogEventLevel.Information)
    .Enrich.FromLogContext()
    .CreateLogger();
步骤 6 - 安装水槽
Serilog 使用接收器将日志事件写入存储,例如数据库、文件等。调试环境中最流行的接收器之一是控制台接收器。
- 安装
Serilog.Sinks.Consolenuget 包 - 添加以下配置:```json
“Serilog”:{
“MinimumLevel”:{
“Default”:“调试”,
“Override”:{
“Microsoft”:“信息”,
“System”:“信息”
}
},
“Using”:[“Serilog.Sinks.Console”],
“WriteTo”:[
{“Name”:“控制台”}
]
}
After installing the sink
- In the `Using` section add the sink's nuget package name `"Using": [ "Serilog.Sinks.Console" ]`
- In the `WriteTo` section add sink name and arguments `"WriteTo":[ { "Name": "Console" } ]`
Now we want to use SQL Server sink for other environments:
- Install [Serilog.Sinks.MSSqlServer](https://www.nuget.org/packages/serilog.sinks.mssqlserver) sink
- Copy Serilog setting form `appsettings.Development.json` to `appsettings.json` file
```json
"Serilog": {
"MinimumLevel": {
"Default": "Information",
"Override": {
"Microsoft": "Error",
"System": "Error"
},
"Using": [ "Serilog.Sinks.MSSqlServer" ]
},
"WriteTo": [
{
"Name": "MSSqlServer",
"Args": {
"connectionString": "ConnectionString",
"tableName": "Logs",
"autoCreateSqlTable": true
}
}
]
}
步骤 7 - 如何配置接收器
嗯,通过代码配置接收器appsettings.json可能比通过代码配置更难,而且对于每个接收器,您可能找不到 JSON 配置示例。通常,每个接收器都会接受几个参数来配置接收器。例如,控制台接收器接受以下参数: 每个参数都可以通过 JSON 配置:
"WriteTo": [
  {
    "Name": "Console",
    "Args": {
      "restrictedToMinimumLevel": "Verbose",
      "outputTemplate": "[{Timestamp:HH:mm:ss} {Level:u3}] {Message:lj} <s:{SourceContext}>{NewLine}{Exception}",
      "theme": "Serilog.Sinks.SystemConsole.Themes.AnsiConsoleTheme::Code, Serilog.Sinks.Console"
    }
  }
]

要查看完整的 SQL Server 接收器 JSON 配置,请查看此处。
第 8 步 - 丰富器
日志事件可以通过多种方式添加属性。您可以使用丰富器添加其他数据。例如,在生产环境中,我们希望将客户端的 IP 添加到日志事件中。
- 安装Serilog.Enrichers.ClientInfo包
- 将丰富的包名称添加到
Using部分 - 添加
Enrich具有值的部分WithClientIp(丰富的名称通常以With单词开头)```json
"使用": [ "Serilog.Sinks.MSSqlServer", "Serilog.Enrichers.ClientInfo" ],
"丰富": [ "WithClientIp" ]
All events written through log will carry a property `ClientIp` with the IP of the client. Check out the list of available enrichers [here](https://github.com/serilog/serilog/wiki/Enrichment#available-enricher-packages).

###Step 9 - Filters
By using filters you can exclude or include some log events.
- Install `Serilog.Expressions` nuget package
- Add the "Filter" section to Serilog settings
```json


"Filter": [
  {
    "Name": "ByExcluding",
    "Args": {
      "expression": "RequestPath like '%swagger%'"
    }
  }
]
所有包含以下内容的日志事件都swagger将被排除。 要查看所有可能的配置,请查看Serilog.Settings.Configuration Github 仓库。
步骤 10 - HTTP 请求日志记录
此外,您还可以记录 HTTP 请求。
- 在
Startup.cs文件中,添加中间件UseSerilogRequestLogging():```csharp
公共无效配置(IApplicationBuilder应用程序,IWebHostEnvironment环境)
{
...
应用程序。使用SerilogRequestLogging();
- In `MinimumLevel.Override` section add `"Microsoft.AspNetCore": "Warning"`:
```json


"MinimumLevel": {
  "Default": "Information",
  "Override": {
    "Microsoft": "Error",
    "Microsoft.AspNetCore": "Warning",
    "System": "Error"
  },
步骤 11 - 覆盖 docker 中的配置
最后但同样重要的是,您可以通过 Docker 环境变量覆盖 Serilog 设置。请考虑以下配置:
"Serilog": {
  "MinimumLevel": {
    "Default": "Information",
    "Override": {
      "Microsoft": "Error",
      "System": "Error"
    },
    "Using": [ "Serilog.Sinks.MSSqlServer" ]
  },
  "WriteTo": [
    {
      "Name": "MSSqlServer",
      "Args": {
        "connectionString": "",
        "tableName": "Logs",
        "autoCreateSqlTable": true
      }
    }
  ]
}
现在,在 dcoker-compose 文件中,我们想要传递实际的连接字符串:
  my-api:
    environment:
      - ASPNETCORE_ENVIRONMENT=Production
      - Serilog__MinimumLevel__Default=Warning
      - Serilog__WriteTo__0__Args__connectionString="Your connection string"
每个部分的值可以通过 访问__,例如,Serilog__MinimumLevel__Default相当于:
"Serilog": {
  "MinimumLevel": {
    "Default": "",
在要访问数组中某个项的部分中,请使用项索引号。"WriteTo"该部分接受一个接收器配置数组。如果您使用两个接收器,则使用Serilog__WriteTo__0__来访问第一个接收器,Serilog__WriteTo__1__使用 来访问第二个接收器。
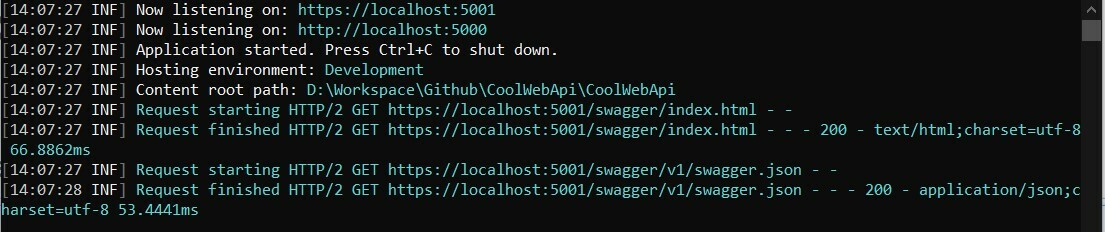
测试
我们来做一个简单的测试。在项目目录下打开CMD一个:Powershell
- 键入
dotnet add package Serilog.Sinks.File以安装文件接收器
- 打开
appsettings.josn文件并像这样更改日志配置:```json
“Serilog”:{
“MinimumLevel”:{
“Default”:“调试”,
“Override”:{
“Microsoft”:“信息”,
“System”:“信息”
}
},
“Using”:[“Serilog.Sinks.Console”,“Serilog.Sinks.File”],
“WriteTo”:[
{“Name”:“控制台”},
{
“Name”:“文件”,
“Args”:{
“path”:“log.txt”,
“rollingInterval”:“天”
}
}
]
}
- Type `dotnet build` then `dotnet run`
- After running the application you should see a log file inside the project directory

As you can see without touching codes we added another sink to save the log events.
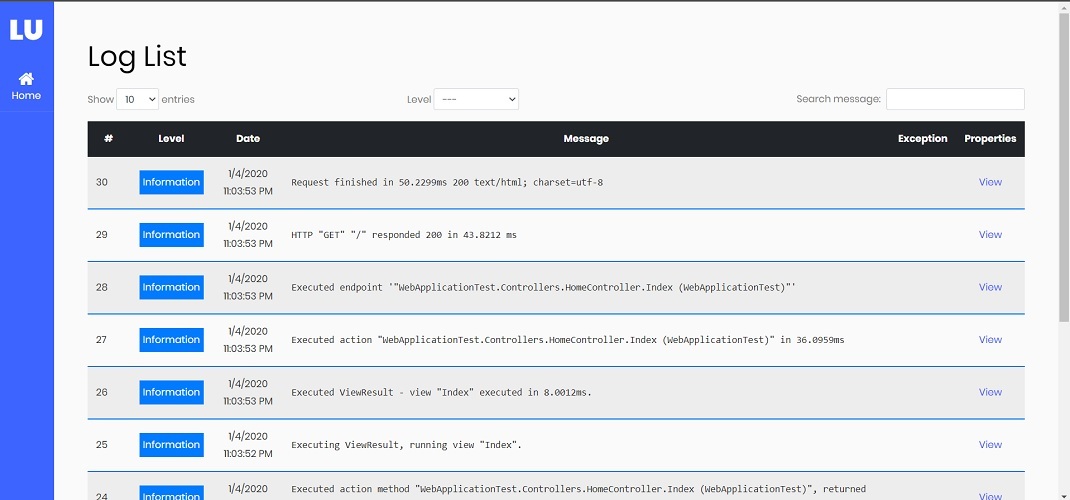
If you're using SQL Server, PostgreSQL or MongoDB sinks, I have developed a small [log viewer](https://github.com/mo-esmp/serilog-ui) for small projects. It helps a lot, especially in the production environment and you don't need to query the database to view logs.
The source code for this walkthrough could be found on [Github](https://github.com/mo-esmp/cool-webapi).