全栈无服务器 - 使用 GraphQL、CDK、AppSync 和 React 构建实时聊天应用程序
封面图片由Scott Webb提供
在本教程中,您将学习如何使用CDK、React、GraphQL 和AWS AppSync构建实时全栈云应用程序并将其部署到 AWS 。
该应用程序将包括身份验证、数据库、GraphQL API 和前端,所有这些都通过用 TypeScript 编写的 CDK 部署到 AWS。
全栈无服务器应用程序最强大的功能之一是能够在几分钟内将可扩展的全栈应用程序共享并部署到云端。
这是通过结合使用基础设施即代码(IAC) 和集成到端到端解决方案中的解耦前端来实现的。
过去,IAC 的进入门槛相当高,传统的前端开发人员或不熟悉云的开发人员很难开始使用它。
我们现在看到像 AWS CDK 和 Amplify CLI 这样的工具使开发人员可以更轻松地使用他们现有的技能组合开始使用 IAC 构建云应用程序。
当我说使用他们现有的技能时,我假设典型的前端或全栈开发人员熟悉以下内容:
- JavaScript、TypeScript 或 Python
- 与 CLI 交互
- 对与 RESTful 或 GraphQL API 交互的基本了解
Amplify 与 CDK 对比
如果您读过我过去几年的任何文章,您可能已经看到我谈论过Amplify CLI。Amplify CLI 使用基于类别的方法在后台为您生成和管理 IAC。另一方面,CDK 允许您使用 Python、Typescript、Java 和 C#/.Net 等编程语言来构建云基础架构。
由于 Amplify 还具有非 CLI 独有的客户端库,因此您可以将 CDK 与 Amplify 结合使用来构建全栈云应用程序。
在本教程中,这将是我们的堆栈:
- React 用于单页应用程序
- 用 TypeScript 编写的用于基础设施的 CDK
- 放大库以处理来自客户端代码的 API 调用。
入门
接下来,安装 CDK CLI:
npm install -g aws-cdk
CDK CLI
安装 CDK 后,您应该能够cdk从终端运行并查看可用命令的列表。
以下是您可能最常使用的命令:
init - 初始化新项目
deploy - 将基础设施部署到 AWS
diff - 将指定的堆栈与已部署的堆栈进行比较,并向您提供有关下次运行时将进行的更改的反馈deploy
通常工作流程是这样的:
- 使用以下方式初始化新项目
init - 编写一些代码
- 运行
cdk diff以查看下次部署时将部署/更改的内容 - 运行
deploy以部署更新
创建 CDK 项目
首先,创建一个您希望该项目驻留的文件夹:
mkdir cdk-chat

cd cdk-chat
接下来,您可以使用以下命令创建 CDK 项目init:
cdk init --language=typescript
语言标志可以是
csharp、java、或javascriptpythontypescript
项目创建完成后,您应该会看到一堆文件和文件夹。项目的主要代码位于lib/cdk-chat-stack.ts中。
为了能够在项目中使用某些 AWS 服务,首先需要安装它们。本项目将使用以下服务:
- Amazon DynamoDB(数据库)
- Amazon Cognito(身份验证)
- AWS AppSync(GraphQL API,实时)
- AWS IAM(管理 IAM 权限)
现在,让我们使用 npm 或 yarn 安装这些服务所需的库:
npm install @aws-cdk/aws-appsync @aws-cdk/aws-cognito @aws-cdk/aws-dynamodb @aws-cdk/aws-iam
安装完这些依赖项后,请检查
package.json文件,确保@aws-cdk/core这些软件包的版本相同。如果不是,我会升级@aws-cdk/core到已安装软件包的相同版本,然后npm install再次运行。
定义 GraphQL Schema
现在 CDK 项目已创建,我们需要一个描述聊天应用的 GraphQL 架构。在 CDK 项目的根目录中,创建一个名为graphql的新文件夹,并在其中创建一个名为schema.graphql的新文件。在此文件中,添加以下架构:
| type Message { | |
| id: ID! | |
| content: String! | |
| owner: String | |
| createdAt: String | |
| roomId: ID | |
| } | |
| type Room { | |
| id: ID! | |
| name: String | |
| messages( | |
| sortDirection: ModelSortDirection, | |
| limit: Int, | |
| nextToken: String | |
| ): MessageConnection | |
| createdAt: AWSDateTime | |
| updatedAt: AWSDateTime | |
| } | |
| enum ModelSortDirection { | |
| ASC | |
| DESC | |
| } | |
| type MessageConnection { | |
| items: [Message] | |
| nextToken: String | |
| } | |
| type RoomConnection { | |
| items: [Room] | |
| nextToken: String | |
| } | |
| type Query { | |
| getRoom(id: ID): Room | |
| listMessagesForRoom(roomId: ID, sortDirection: ModelSortDirection): MessageConnection | |
| listRooms(limit: Int): RoomConnection | |
| } | |
| type Mutation { | |
| createMessage(input: MessageInput): Message | |
| createRoom(input: RoomInput): Room | |
| } | |
| input MessageInput { | |
| id: ID | |
| content: String! | |
| owner: String | |
| createdAt: String | |
| roomId: ID | |
| } | |
| input RoomInput { | |
| id: ID | |
| name: String | |
| } | |
| type Subscription { | |
| onCreateRoom: Room | |
| @aws_subscribe(mutations: ["createRoom"]) | |
| onCreateMessageByRoomId(roomId: ID): Message | |
| @aws_subscribe(mutations: ["createMessage"]) | |
| } |
这里主要需要注意以下几点:
RoomGraphQL类型Message- 基本操作的典型
Mutation定义Query,例如通过 ID 获取房间、列出房间以及通过 ID 查询列出房间的消息 onCreateRoom和的订阅定义onCreateMessageByRoomId。通过使用 修饰订阅定义@aws_subscribe,AppSync 将自动在服务中创建订阅。通过传入一个突变数组,我们可以指定希望此订阅接收哪些事件的通知。
编写 CDK 代码
最终的 CDK 代码位于此处供您参考,但我们将在下面逐步介绍它。
现在已经创建了 Schema,我们可以开始定义我们的 CDK 代码。
接下来,打开lib/cdk-chat-stack.ts。在文件顶部,添加以下导入:
| import * as cdk from '@aws-cdk/core'; | |
| import { UserPool, VerificationEmailStyle, UserPoolClient, AccountRecovery } from '@aws-cdk/aws-cognito'; | |
| import { GraphqlApi, AuthorizationType, FieldLogLevel, MappingTemplate, Schema } from '@aws-cdk/aws-appsync'; | |
| import { AttributeType, BillingMode, Table } from '@aws-cdk/aws-dynamodb'; | |
| import { Role, ServicePrincipal, Effect, PolicyStatement } from '@aws-cdk/aws-iam'; |
您可以导入要使用的 API 的顶层结构,也可以导入各个 API 本身。在本例中,我们从每个库中分别导入了 API。
创建身份验证服务
接下来,我们将开始创建服务。首先,我们将使用 Amazon Cognito 创建身份验证服务。为此,请在constructor调用下方添加以下代码super:
| const userPool = new UserPool(this, 'chat-app-user-pool', { | |
| selfSignUpEnabled: true, | |
| accountRecovery: AccountRecovery.PHONE_AND_EMAIL, | |
| userVerification: { | |
| emailStyle: VerificationEmailStyle.CODE | |
| }, | |
| autoVerify: { | |
| email: true | |
| }, | |
| standardAttributes: { | |
| email: { | |
| required: true, | |
| mutable: true | |
| } | |
| } | |
| }); | |
| const userPoolClient = new UserPoolClient(this, "UserPoolClient", { | |
| userPool | |
| }); | |
| new cdk.CfnOutput(this, "UserPoolId", { | |
| value: userPool.userPoolId | |
| }); | |
| new cdk.CfnOutput(this, "UserPoolClientId", { | |
| value: userPoolClient.userPoolClientId | |
| }); |
CfnOutput是一种打印出您需要的有用值的方法,在我们的例子中,我们将在客户端应用程序中使用这些值。
此代码创建了身份验证服务并配置了一些内容:
selfSignUpEnabled通过设置让用户自行注册true- 注册时发送 MFA 电子邮件通知(
autoVerify) - 定义所需的注册属性(电子邮件)
- 创建了一个客户端 ID,供您在 React 客户端上使用
保存文件后,您现在应该能够看到通过diff从 CLI 运行命令将创建的基础架构:
cdk diff
创建 DynamoDB 表和 GSI
接下来,我们需要创建两个 DynamoDB 表并配置一个 GSI(全局二级索引)以便通过房间 ID 查询消息。
我们还需要授予 DynamoDB 权限,以允许使用 IAM 对全局二级索引进行查询。
| const messageTable = new Table(this, 'CDKMessageTable', { | |
| billingMode: BillingMode.PAY_PER_REQUEST, | |
| partitionKey: { | |
| name: 'id', | |
| type: AttributeType.STRING, | |
| }, | |
| }); | |
| const roomTable = new Table(this, 'CDKRoomTable', { | |
| billingMode: BillingMode.PAY_PER_REQUEST, | |
| partitionKey: { | |
| name: 'id', | |
| type: AttributeType.STRING, | |
| }, | |
| }); | |
| messageTable.addGlobalSecondaryIndex({ | |
| indexName: 'messages-by-room-id', | |
| partitionKey: { | |
| name: 'roomId', | |
| type: AttributeType.STRING | |
| }, | |
| sortKey: { | |
| name: 'createdAt', | |
| type: AttributeType.STRING | |
| } | |
| }) | |
| const messageTableServiceRole = new Role(this, 'MessageTableServiceRole', { | |
| assumedBy: new ServicePrincipal('dynamodb.amazonaws.com') | |
| }); | |
| messageTableServiceRole.addToPolicy( | |
| new PolicyStatement({ | |
| effect: Effect.ALLOW, | |
| resources: [`${messageTable.tableArn}/index/messages-by-room-id`], | |
| actions: [ | |
| 'dymamodb:Query' | |
| ] | |
| }) | |
| ); |
这在消息表上创建了两个 DynamoDB 表(CDKRoomTable和CDKMessageTable)以及一个 GSI( )。messages-by-room-id
创建 AppSync API
现在身份验证服务和数据库表已配置完毕,我们可以创建 API 了。AWS AppSync 是一项托管的 GraphQL 服务,我们将使用它来创建 GraphQL API。
创建 API 定义时,我们需要将模式中创建的突变、查询和订阅映射到 GraphQL 解析器。
使用 CDK 和 AppSync 创建解析器主要有两种方法:
- 使用以下方式将解析器写为字符串
MappingTemplate.fromString - 使用预定义模板(此处列出了可用的模板)。
在我们的应用程序中,我们将同时进行这两项操作。
| const api = new GraphqlApi(this, 'cdk-chat-app-api', { | |
| name: "cdk-chat-app", | |
| logConfig: { | |
| fieldLogLevel: FieldLogLevel.ALL, | |
| }, | |
| schema: Schema.fromAsset('graphql/schema.graphql'), | |
| authorizationConfig: { | |
| defaultAuthorization: { | |
| authorizationType: AuthorizationType.USER_POOL, | |
| userPoolConfig: { | |
| userPool | |
| } | |
| }, | |
| }, | |
| }); | |
| new cdk.CfnOutput(this, "GraphQLAPIURL", { | |
| value: api.graphqlUrl | |
| }); | |
| // Configure the two tables | |
| const messageTableDs = api.addDynamoDbDataSource('Message', messageTable); | |
| const roomTableDs = api.addDynamoDbDataSource('Room', roomTable); | |
| // Create the resolvers | |
| messageTableDs.createResolver({ | |
| typeName: 'Query', | |
| fieldName: 'listMessagesForRoom', | |
| requestMappingTemplate: MappingTemplate.fromString(` | |
| { | |
| "version" : "2017-02-28", | |
| "operation" : "Query", | |
| "index" : "messages-by-room-id", | |
| "query" : { | |
| "expression": "roomId = :roomId", | |
| "expressionValues" : { | |
| ":roomId" : $util.dynamodb.toDynamoDBJson($context.arguments.roomId) | |
| } | |
| } | |
| #if( !$util.isNull($ctx.arguments.sortDirection) | |
| && $ctx.arguments.sortDirection == "DESC" ) | |
| ,"scanIndexForward": false | |
| #else | |
| ,"scanIndexForward": true | |
| #end | |
| #if($context.arguments.nextToken) | |
| ,"nextToken": "$context.arguments.nextToken" | |
| #end | |
| } | |
| `), | |
| responseMappingTemplate: MappingTemplate.fromString(` | |
| #if( $ctx.error ) | |
| $util.error($ctx.error.message, $ctx.error.type) | |
| #else | |
| $util.toJson($ctx.result) | |
| #end` | |
| ) | |
| }) | |
| messageTableDs.createResolver({ | |
| typeName: 'Mutation', | |
| fieldName: 'createMessage', | |
| requestMappingTemplate: MappingTemplate.fromString(` | |
| ## Automatically set the id if it's not passed in. | |
| $util.qr($context.args.input.put("id", $util.defaultIfNull($ctx.args.input.id, $util.autoId()))) | |
| ## Automatically set the createdAt timestamp. | |
| #set( $createdAt = $util.time.nowISO8601() ) | |
| $util.qr($context.args.input.put("createdAt", $util.defaultIfNull($ctx.args.input.createdAt, $createdAt))) | |
| ## Automatically set the user's username on owner field. | |
| $util.qr($ctx.args.input.put("owner", $context.identity.username)) | |
| ## Create a condition that will error if the id already exists | |
| #set( $condition = { | |
| "expression": "attribute_not_exists(#id)", | |
| "expressionNames": { | |
| "#id": "id" | |
| } | |
| } ) | |
| { | |
| "version": "2018-05-29", | |
| "operation": "PutItem", | |
| "key": { | |
| "id": $util.dynamodb.toDynamoDBJson($ctx.args.input.id) | |
| }, | |
| "attributeValues": $util.dynamodb.toMapValuesJson($context.args.input), | |
| "condition": $util.toJson($condition) | |
| } | |
| `), | |
| responseMappingTemplate: MappingTemplate.dynamoDbResultItem() | |
| }) | |
| roomTableDs.createResolver({ | |
| typeName: 'Query', | |
| fieldName: 'listRooms', | |
| requestMappingTemplate: MappingTemplate.fromString(` | |
| #set( $limit = $util.defaultIfNull($context.args.limit, 1000) ) | |
| #set( $ListRequest = { | |
| "version": "2018-05-29", | |
| "limit": $limit | |
| } ) | |
| #if( $context.args.nextToken ) | |
| #set( $ListRequest.nextToken = $context.args.nextToken ) | |
| #end | |
| $util.qr($ListRequest.put("operation", "Scan")) | |
| $util.toJson($ListRequest) | |
| `), | |
| responseMappingTemplate: MappingTemplate.fromString(` | |
| #if( $ctx.error) | |
| $util.error($ctx.error.message, $ctx.error.type) | |
| #else | |
| $util.toJson($ctx.result) | |
| #end | |
| `) | |
| }) | |
| roomTableDs.createResolver({ | |
| typeName: 'Mutation', | |
| fieldName: 'createRoom', | |
| requestMappingTemplate: MappingTemplate.fromString(` | |
| $util.qr($context.args.input.put("id", $util.defaultIfNull($ctx.args.input.id, $util.autoId()))) | |
| { | |
| "version": "2018-05-29", | |
| "operation": "PutItem", | |
| "key": { | |
| "id": $util.dynamodb.toDynamoDBJson($ctx.args.input.id) | |
| }, | |
| "attributeValues": $util.dynamodb.toMapValuesJson($context.args.input), | |
| "condition": $util.toJson($condition) | |
| } | |
| `), | |
| responseMappingTemplate: MappingTemplate.dynamoDbResultItem() | |
| }) |
部署后端
这就是我们后端所需的全部代码。现在可以通过运行以下deploy命令来部署所有内容:
cdk deploy
在部署之前,系统会提示您输入一些如下所示的输出:
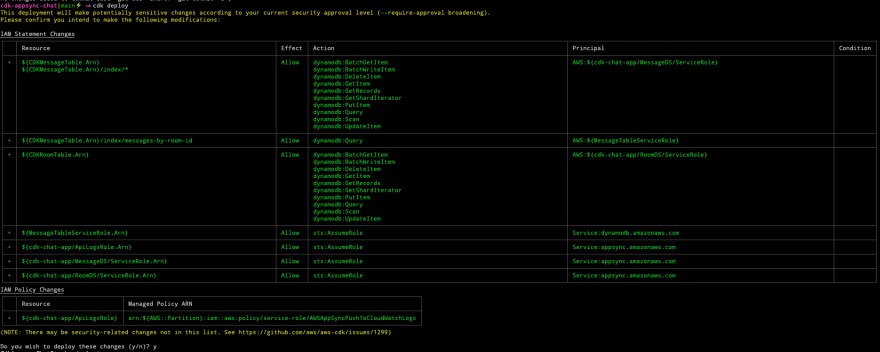
部署后端后,您应该会看到类似这样的输出:
Outputs:
CdkChatStack.UserPoolClientId = 6lcq9gl36cugj6ttq8eqh5cf9m
CdkChatStack.UserPoolId = us-east-1_7xli2V7Oq
CdkChatStack.GraphQLAPIURL = https://57vcrggstrf3xnve4c7isekyea.appsync-api.us-east-1.amazonaws.com/graphql

这些值是的结果CfnOutput。您将能够使用这些值连接到客户端应用程序。
客户端应用程序
本教程附带一个完整的前端,您现在可以将其与后端集成。
我们还将介绍用于与后端交互以进行用户身份验证以及与 GraphQL API 交互的各个 Amplify API。
使用预构建的客户端应用程序
将 React 聊天应用程序克隆到您的项目中并更改为新目录:
git clone https://github.com/full-stack-serverless/react-chat-app-aws

cd react-chat-app-aws
接下来安装依赖项:
npm install

# or

yarn
接下来,重命名aws-exports-example.js为aws-exports.js。
aws-exports.js最后,使用 CDK CLI 输出的值填充属性:
// aws-exports.js
const config = {
  Auth: {
    region: "us-east-1", // or your region
    userPoolId: "your-userpool-id",
    userPoolWebClientId: "your-client-id"
  },
  aws_appsync_graphqlEndpoint: "your-graphql-endpoint",
  aws_appsync_region: "us-east-1", // or your region
  aws_appsync_authenticationType: "AMAZON_COGNITO_USER_POOLS"
}

export default config;
CfnOutput要随时查看 CDK CLI 输出的值,您可以运行该cdk deploy命令(即使没有任何更改)。
最后,运行应用程序:
npm start
了解 API 调用
接下来,让我们看看如何通过客户端应用程序连接到后端。
验证
为了进行身份验证,您可以使用 React UI 组件或Auth类。
UI 组件
您可以使用Amplify React UI 组件来创建基本的身份验证流程。
例如withAuthenticator和AmplifyAuthenticator组件只需几行代码即可完成整个身份验证流程:
import React from 'react';
import { withAuthenticator, AmplifySignOut } from '@aws-amplify/ui-react';

const App = () => (
  <div>
    <AmplifySignOut />
    My App
  </div>
);

export default withAuthenticator(App);
授权类
该类Auth具有执行大多数典型身份管理操作的方法,如注册、登录、MFA 和管理密码恢复。
要注册用户,您可以使用该signUp方法:
import { Auth } from 'aws-amplify';

await Auth.signUp({
  username: "dabit3",
  password: "MyCoolPassword",
  attributes: { email: "you@yourdomain.com" }
});
查看此处的文档,了解注册和登录的整个流程。
API
为了与 GraphQL API 交互,我们将使用API类别。
发送查询
import { API } from 'aws-amplify';
import { listRooms } from './graphql/queries';

const roomData = await API.graphql({
  query: listRooms
});
发送带有变量的查询
import { API } from 'aws-amplify';
import { createRoom } from './graphql/mutations';

await API.graphql({
  query: createRoom,
  variables: {
    input: {
      name: "Cool cats"
    }
  }
})
实时 - GraphQL 订阅
可以设置订阅来监听一般的突变(创建、更新或删除),也可以设置订阅来接收参数。
使用 GraphQL 订阅的一个重要部分是了解何时以及如何使用参数,因为细微的变化使您能够修改客户端如何以及何时收到有关发生的突变的通知。
对于聊天应用来说,能够只订阅单个房间的新消息非常有意义。为了实现这一点,我们可以传入想要订阅的消息的房间 ID。
这是两种场景的示例,说明我们如何在应用程序中管理它们。
创建房间时监听更新并实时处理
import { API } from 'aws-amplify';
import { onCreateRoom } from './graphql/subscriptions';

API.graphql({
  query: OnCreateRoom
]})
.subscribe({
  next: roomData => {
    // roomData is the data from the mutation that triggered the subscription
  }
})
当特定房间中创建消息时监听更新并实时处理
API.graphql({
  query: OnCreateMessage,
  variables: {
    roomId: id
  }
})
.subscribe({
  next: async messageData => {
    // messageData is the data from the mutation that triggered the subscription
  }
})
查看此处的文档以了解有关如何使用该类与 GraphQL API 交互的更多详细信息API。
CDK API 涵盖范围非常广泛,让您能够以比传统基础设施即代码更简洁的方式完成大量工作。如需了解更多 CDK API,请查看此处的文档。
文章来源:https://dev.to/dabit3/full-stack-serverless-building-a-real-time-chat-app-with-graphql-cdk-appsync-and-react-1dbb