如何构建:与你的简历聊天(Next.js、OpenAI 和 CopilotKit)
TL;DR
TL;DR
在本文中,你将学习如何使用 Nextjs、CopilotKit 和 OpenAI 构建一个 AI 驱动的简历生成器应用程序。
我们将涵盖以下内容:
- 利用 ChatGPT 撰写你的简历和求职信📑
- 通过与简历聊天逐步完善你的简历💬
- 将您的简历和求职信导出为 PDF 🖨️
CopilotKit:构建深度集成的应用内 AI 聊天机器人💬
简单介绍一下我们。CopilotKit 是一个开源的 AI Copilot 平台。我们可以轻松地将强大的 AI 聊天机器人集成到您的 React 应用中。完全可定制,深度集成。
现在回到文章。
先决条件
要开始本教程,您需要在计算机上安装以下软件:
- 文本编辑器(例如 Visual Studio Code)
- Node.js
- 包管理器
使用 NextJS 创建简历应用程序前端
步骤1:打开命令提示符并执行以下命令。
npx create-next-app@latest
第 2 步:系统将提示您选择一些选项,如下所示。
步骤 3:使用您选择的文本编辑器打开新创建的 Nextjs 项目。然后,在命令行中运行以下命令,使用 Tailwind CSS 安装 Preline UI 和 NextJS。请按照本指南完成 Preline 设置。
npm install preline
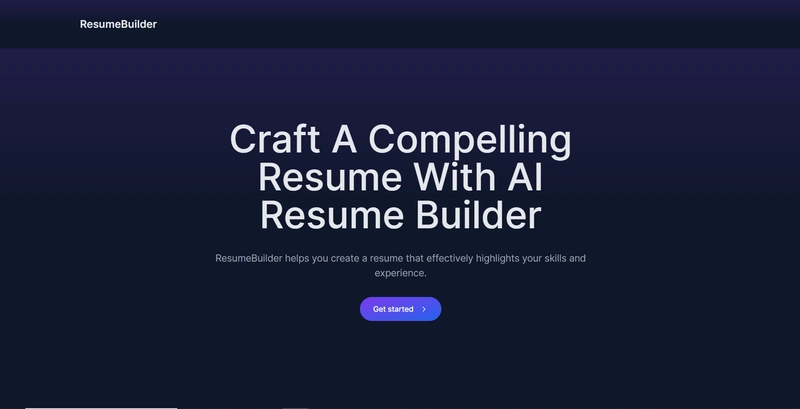
步骤4:在resume/app/page.tsx文件上,添加以下代码内容。
export default function Home() {
  return (
    <>
      <header className="flex flex-wrap sm:justify-start sm:flex-nowrap z-50 w-full bg-slate-900 bg-gradient-to-b from-violet-600/[.15] via-transparent text-sm py-3 sm:py-0 dark:bg-gray-800 dark:border-gray-700">
        <nav
          className="relative max-w-7xl w-full mx-auto px-4 sm:flex sm:items-center sm:justify-between sm:px-6 lg:px-8 "
          aria-label="Global">
          <div className="flex items-center justify-between">
            <a
              className="flex-none text-xl text-gray-200 font-semibold dark:text-white py-8"
              href="#"
              aria-label="Brand">
              ResumeBuilder
            </a>
          </div>
        </nav>
      </header>
      {/* <!-- Hero --> */}
      <div className="bg-slate-900 h-screen">
        <div className="bg-gradient-to-b from-violet-600/[.15] via-transparent">
          <div className="max-w-[85rem] mx-auto px-4 sm:px-6 lg:px-8 py-24 space-y-8">
            {/* <!-- Title --> */}
            <div className="max-w-3xl text-center mx-auto pt-10">
              <h1 className="block font-medium text-gray-200 text-4xl sm:text-5xl md:text-6xl lg:text-7xl">
                Craft A Compelling Resume With AI Resume Builder
              </h1>
            </div>
            {/* <!-- End Title --> */}

            <div className="max-w-3xl text-center mx-auto">
              <p className="text-lg text-gray-400">
                ResumeBuilder helps you create a resume that effectively
                highlights your skills and experience.
              </p>
            </div>

            {/* <!-- Buttons --> */}
            <div className="text-center">
              <a
                className="inline-flex justify-center items-center gap-x-3 text-center bg-gradient-to-tl from-blue-600 to-violet-600 shadow-lg shadow-transparent hover:shadow-blue-700/50 border border-transparent text-white text-sm font-medium rounded-full focus:outline-none focus:ring-2 focus:ring-blue-600 focus:ring-offset-2 focus:ring-offset-white py-3 px-6 dark:focus:ring-offset-gray-800"
                href="#">
                Get started
                <svg
                  className="flex-shrink-0 w-4 h-4"
                  xmlns="http://www.w3.org/2000/svg"
                  width="24"
                  height="24"
                  viewBox="0 0 24 24"
                  fill="none"
                  stroke="currentColor"
                  stroke-width="2"
                  stroke-linecap="round"
                  stroke-linejoin="round">
                  <path d="m9 18 6-6-6-6" />
                </svg>
              </a>
            </div>
            {/* <!-- End Buttons --> */}
          </div>
        </div>
      </div>
      {/* <!-- End Hero --> */}
    </>
  );
}
步骤 5:在命令行上运行命令npm run dev 。导航到http://localhost:3000/,您应该会看到新创建的 NextJS 项目。
使用 GitHub GraphQL 从 GitHub 获取简历数据
步骤 1:使用以下命令安装 Axios HTTP 客户端。
npm i axios
步骤 2:在 app 文件夹中,创建一个名为 API 的文件夹。然后在 API 文件夹中创建一个名为 GitHub 的文件夹。在 GitHub 文件夹中创建一个名为 route.ts 的文件,并添加以下代码。
import { NextResponse } from "next/server";
import axios from "axios";

// Environment variables for GitHub API token and user details
const GITHUB_TOKEN = "Your GitHub personal access token";
const GITHUB_USERNAME = "Your GitHub account username";

// Axios instance for GitHub GraphQL API
const githubApi = axios.create({
  baseURL: "https://api.github.com/graphql",
  headers: {
    Authorization: `bearer ${GITHUB_TOKEN}`,
    "Content-Type": "application/json",
  },
});

// GraphQL query to fetch user and repository data
const getUserAndReposQuery = `
  query {
    user(login: "${GITHUB_USERNAME}") {
      name
      email
      company
      bio
      repositories(first: 3, orderBy: {field: CREATED_AT, direction: DESC}) {
        edges {
          node {
            name
            url
            description
            createdAt
            ... on Repository {
              primaryLanguage{
                name
              }
                stargazers {
                  totalCount
                }
              }
          }
        }
      }
    }
  }
`;

// API route to handle resume data fetching
export async function GET(request: any) {
  try {
    // Fetch data from GitHub
    const response = await githubApi.post("", { query: getUserAndReposQuery });
    const userData = response.data.data.user;

    // Format resume data
    const resumeData = {
      name: userData.name,
      email: userData.email,
      company: userData.company,
      bio: userData.bio,
      repositories: userData.repositories.edges.map((repo: any) => ({
        name: repo.node.name,
        url: repo.node.url,
        created: repo.node.createdAt,
        description: repo.node.description,
        language: repo.node.primaryLanguage.name,
        stars: repo.node.stargazers.totalCount,
      })),
    };

    // Return formatted resume data
    return NextResponse.json(resumeData);
  } catch (error) {
    console.error("Error fetching data from GitHub:", error);
    return NextResponse.json({ message: "Internal Server Error" });
  }
}
步骤3:在app文件夹中,创建一个名为Components的文件夹。然后在components文件夹中创建一个名为githubdata.tsx的文件,并添加以下代码。
"use client";

import React, { useEffect, useState } from "react";
import axios from "axios";

// Resume data interface
interface ResumeData {
    name: string;
    email: string;
    company: string;
    bio: string;
    repositories: {
      name: string;
      url: string;
      created: string;
      description: string;
      language: string;
      stars: number;
    }[];
  }


  export const useGithubData = () => {
    const [resumeData, setResumeData] = useState<ResumeData | null>(null);

    // Fetch resume data from API
    useEffect(() => {
        axios
        .get("/api/github")
        .then((response) => {
            setResumeData(response.data);
        })
    }, []);

  return { resumeData, };
  }
创建求职信和简历功能
步骤 1:通过在命令行上运行以下命令来安装 CopilotKit 前端包。
npm i @copilotkit/react-core @copilotkit/react-ui @copilotkit/react-textarea
步骤 2:在 components 文件夹中创建一个名为 resume.tsx 的文件。然后在文件顶部导入 useMakeCopilotReadable、useMakeCopilotActionable 和 useGithubData 自定义钩子,如下所示。
import React, { useState } from "react";
import { useGithubData } from "./githubdata";
import {
    useMakeCopilotReadable,
    useMakeCopilotActionable,
  } from "@copilotkit/react-core";
步骤 3:创建一个名为 CoverLetterAndResume 的组件。在组件内部,使用 useGithubData 钩子检索从 GitHub 获取的数据。然后,声明一个名为 createCoverLetterAndResume 的状态变量,以及一个名为 setCreateCoverLetterAndResume 的函数来更新它。使用包含 letter 和 resume 两个属性的对象初始化 useState,如下所示。
export const CoverLetterAndResume = () => {
    const {resumeData } = useGithubData();
    const [createCoverLetterAndResume, setCreateCoverLetterAndResume] = useState({
      letter: "",
      resume: ""
    });
}
步骤 4:使用 useMakeCopilotReadable 钩子将从 GitHub 获取的数据添加为应用内聊天机器人的上下文。
useMakeCopilotReadable(JSON.stringify(resumeData));
步骤 5:使用 useMakeCopilotActionable 钩子设置一个名为 createCoverLetterAndResume 的操作,其中包含描述和实现函数,该函数使用提供的求职信和简历更新 createCoverLetterAndResume 状态,如下所示。
useMakeCopilotActionable(
    {
      name: "createCoverLetterAndResume",
      description:
        "Create a cover letter and resume for a software developer job application.",
      argumentAnnotations: [
        {
          name: "coverLetterMarkdown",
          type: "string",
          description:
            "Markdown text for a cover letter to introduce yourself and briefly summarize your professional background as a software developer.",
          required: true,
        },
        {
          name: "resumeMarkdown",
          type: "string",
          description:
            "Markdown text for a resume that displays your professional background and relevant skills.",
          required: true,
        },
      ],
      implementation: async (coverLetterMarkdown, resumeMarkdown) => {
        setCreateCoverLetterAndResume((prevState) => ({
          ...prevState,
          letter: coverLetterMarkdown,
          resume: resumeMarkdown,
        }));
      },
    },
    []
  );
第 6 步:在 CoverLetterAndResume 组件外部,创建一个名为 CoverLetterResume 的组件,在 Web 应用程序 UI 上显示求职信和简历。
type CoverLetterResumeProps = {
  letter: string;
  resume: string;
};

const CoverLetterResume = ({ letter, resume }: CoverLetterResumeProps) => {
  return (
    <div className="px-4 sm:px-6 lg:px-8 bg-slate-50 py-4">
      <div className="sm:flex sm:items-center">
        <div className="sm:flex-auto">
          <h1 className="text-3xl font-semibold leading-6 text-gray-900">
            ResumeBuilder
          </h1>
        </div>
      </div>
      {/* Cover Letter Start */}
      <div className="mt-8 flow-root bg-slate-200">
        <div className="-mx-4 -my-2 overflow-x-auto sm:-mx-6 lg:-mx-8">
          <div className="inline-block min-w-full py-2 align-middle sm:px-6 lg:px-8">
            <div>
              <h2 className="text-lg font-semibold leading-6 text-gray-900 mb-4 p-2">
                Cover Letter
              </h2>
              <div className="min-w-full divide-y divide-gray-300 p-2">
                {/* <Thead /> */}
                <div className="divide-y divide-gray-200 bg-white p-2">
                  <ReactMarkdown>{letter}</ReactMarkdown>
                </div>
              </div>
            </div>
          </div>
        </div>
      </div>
      {/* Cover Letter End */}
      {/* Cover Letter Preview Start */}
      <div className="mt-8 flow-root bg-slate-200">
        <div className="-mx-4 -my-2 overflow-x-auto sm:-mx-6 lg:-mx-8">
          <div className="inline-block min-w-full py-2 align-middle sm:px-6 lg:px-8">
            <div>
              <h2 className="text-lg font-semibold leading-6 text-gray-900 mb-4 p-2">
                Cover Letter Preview
              </h2>
              <div className="min-w-full divide-y divide-gray-300">
                {/* <Thead /> */}
                <div className="divide-y divide-gray-200 bg-white">
                  <textarea
                    className="p-2"
                    id="coverLetter"
                    value={letter}
                    rows={20}
                    cols={113}
                  />
                </div>
              </div>
            </div>
          </div>
        </div>
      </div>
      {/* Cover Letter Preview End */}
      {/* Resume Start */}
      <div className="mt-8 flow-root bg-slate-200">
        <div className="-mx-4 -my-2 overflow-x-auto sm:-mx-6 lg:-mx-8">
          <div className="inline-block min-w-full py-2 align-middle sm:px-6 lg:px-8">
            <h2 className="text-lg font-semibold leading-6 text-gray-900 mb-4 p-2">
              Resume
            </h2>
            <div className="min-w-full divide-y divide-gray-300">
              {/* <Thead /> */}
              <div className="divide-y divide-gray-200 bg-white">
                <ReactMarkdown>{resume}</ReactMarkdown>
              </div>
            </div>
          </div>
        </div>
      </div>
      {/* Resume End */}
      {/* Cover Letter Preview Start */}
      <div className="mt-8 flow-root bg-slate-200">
        <div className="-mx-4 -my-2 overflow-x-auto sm:-mx-6 lg:-mx-8">
          <div className="inline-block min-w-full py-2 align-middle sm:px-6 lg:px-8">
            <div>
              <h2 className="text-lg font-semibold leading-6 text-gray-900 mb-4 p-2">
                Cover Letter Preview
              </h2>
              <div className="min-w-full divide-y divide-gray-300">
                {/* <Thead /> */}
                <div className="divide-y divide-gray-200 bg-white">
                  {/* {letter} */}
                  {/* <ReactMarkdown>{letter}</ReactMarkdown> */}
                  <textarea
                    className="p-2"
                    id="resume"
                    value={resume}
                    rows={20}
                    cols={113}
                  />
                </div>
              </div>
            </div>
          </div>
        </div>
      </div>
      {/* Cover Letter Preview End */}
    </div>
  );
};
第七步:然后返回CoverLetterAndResume组件里面的CoverLetterResume组件,如下所示。
return <CoverLetterResume {...createCoverLetterAndResume}/>;
步骤 8:在 app 文件夹中创建一个名为 resumeandcoverletter 的文件夹。然后,创建一个名为 page.tsx 的文件并添加以下代码。
"use client";
import { CopilotProvider } from "@copilotkit/react-core";
import { CopilotSidebarUIProvider } from "@copilotkit/react-ui";
import "@copilotkit/react-textarea/styles.css"; // also import this if you want to use the CopilotTextarea component
import "@copilotkit/react-ui/styles.css"; // also import this if you want to use the chatbot component
import React, { useEffect, useState } from "react";
import { CoverLetterAndResume } from "../components/resume";

function buildResume () {
  return (
    <CopilotProvider chatApiEndpoint="./../api/copilotkit/chat">
      <CopilotSidebarUIProvider>
        <CoverLetterAndResume />
      </CopilotSidebarUIProvider>
    </CopilotProvider>
  );
}

export default buildResume;
步骤 9:使用以下命令安装 openai 包。
npm i openai
步骤 10:在 app 文件夹中,创建一个名为 API 的文件夹。然后在 API 文件夹中创建一个名为 copilotkit 的文件夹。在 copilotkit 文件夹中,创建一个名为 chat 的文件夹。然后在 chat 文件夹中创建一个名为 route.ts 的文件,并添加以下代码。
import OpenAI from "openai";

const openai = new OpenAI({
  apiKey: "Your ChatGPT API key",
});

export const runtime = "edge";

export async function POST(req: Request): Promise<Response> {
  try {
    const forwardedProps = await req.json();

    const stream = openai.beta.chat.completions
      .stream({
        model: "gpt-4-1106-preview",
        ...forwardedProps,
        stream: true,
      })
      .toReadableStream();

    return new Response(stream);
  } catch (error: any) {
    return new Response("", { status: 500, statusText: error.error.message });
  }
}
第 11 步:在 app 文件夹中的 page.tsx 文件中,在“开始”按钮中添加一个链接,导航到 resumeandcoverletter 页面,如下所示。
<div className="text-center">
              <Link
                className="inline-flex justify-center items-center gap-x-3 text-center bg-gradient-to-tl from-blue-600 to-violet-600 shadow-lg shadow-transparent hover:shadow-blue-700/50 border border-transparent text-white text-sm font-medium rounded-full focus:outline-none focus:ring-2 focus:ring-blue-600 focus:ring-offset-2 focus:ring-offset-white py-3 px-6 dark:focus:ring-offset-gray-800"
                href="/resumeandcoverletter">
                Get started
                <svg
                  className="flex-shrink-0 w-4 h-4"
                  xmlns="http://www.w3.org/2000/svg"
                  width="24"
                  height="24"
                  viewBox="0 0 24 24"
                  fill="none"
                  stroke="currentColor"
                  stroke-width="2"
                  stroke-linecap="round"
                  stroke-linejoin="round">
                  <path d="m9 18 6-6-6-6" />
                </svg>
              </Link>
            </div>
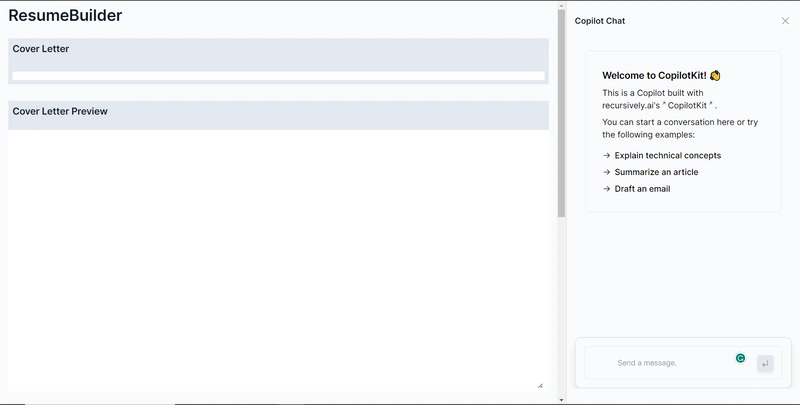
第 12 步:导航到http://localhost:3000/,单击“开始”按钮,您将被重定向到集成聊天机器人的简历和求职信页面,如下所示。
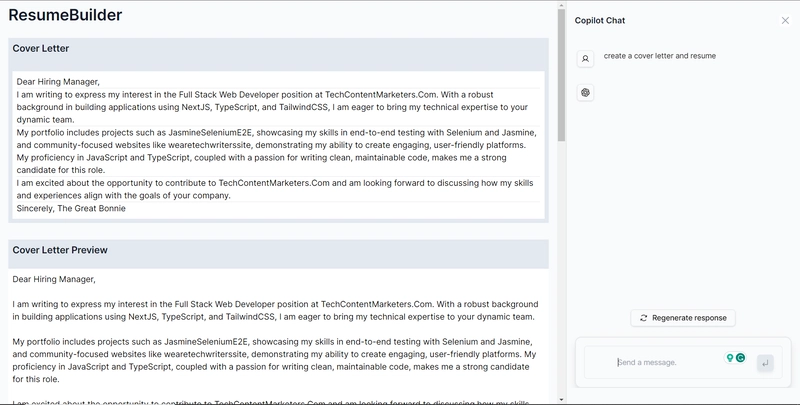
步骤13:向右侧的聊天机器人发出提示,例如“创建求职信和简历”。聊天机器人将开始生成回复,完成后,它将在页面左侧显示生成的求职信和简历,如下所示。
创建更新求职信功能
步骤 1:声明一个名为 updateLetter 的变量,用于保存之前生成的求职信。
const updateLetter = createCoverLetterAndResume.letter;
第 2 步:使用 useMakeCopilotReadable 钩子将 updateLetter 添加为应用内聊天机器人的上下文。
useMakeCopilotReadable("Cover Letter:" + JSON.stringify(updateLetter));
步骤 3:使用 useMakeCopilotActionable 钩子设置一个名为 updateCoverLetter 的操作,其中包含描述和实现函数,该函数使用提供的求职信更新来更新 createCoverLetterAndResume 状态,如下所示。
useMakeCopilotActionable(
    {
      name: "updateCoverLetter",
      description:
        "Update cover letter for a software developer job application.",
      argumentAnnotations: [
        {
          name: "updateCoverLetterMarkdown",
          type: "string",
          description:
            "Update markdown text for a cover letter to introduce yourself and briefly summarize your professional background as a software developer.",
          required: true,
        },
        {
          name: "resumeMarkdown",
          type: "string",
          description:
            "Markdown text for a resume that displays your professional background and relevant skills.",
          required: true,
        },
      ],
      implementation: async (updatedCoverLetterMarkdown) => {
        setCreateCoverLetterAndResume((prevState) => ({
          ...prevState,
          letter: updatedCoverLetterMarkdown,
        }));
      },
    },
    []
  );
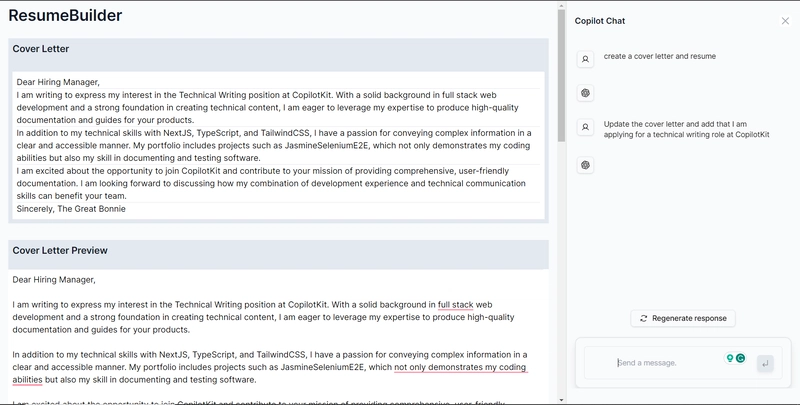
步骤4:向聊天机器人发出提示,例如“更新求职信并添加我正在申请CopilotKit的技术写作职位”。如下所示,您可以看到求职信已更新。
创建更新恢复功能
步骤 1:声明一个名为 updateResume 的变量,用于保存之前生成的求职信。
const updateResume = createCoverLetterAndResume.resume;
第 2 步:使用 useMakeCopilotReadable 钩子将 updateResume 添加为应用内聊天机器人的上下文。
useMakeCopilotReadable("Resume:" + JSON.stringify(updateResume));
步骤 3:使用 useMakeCopilotActionable 钩子设置一个名为 updateResume 的操作,其中包含描述和实现函数,该函数使用提供的求职信更新来更新 createCoverLetterAndResume 状态,如下所示。
useMakeCopilotActionable(
    {
      name: "updateResume",
      description: "Update resume for a software developer job application.",
      argumentAnnotations: [
        {
          name: "updateResumeMarkdown",
          type: "string",
          description:
            "Update markdown text for a resume that displays your professional background and relevant skills.",
          required: true,
        },
      ],
      implementation: async (updatedResumeMarkdown) => {
        setCreateCoverLetterAndResume((prevState) => ({
          ...prevState,
          resume: updatedResumeMarkdown,
        }));
      },
    },
    []
  );
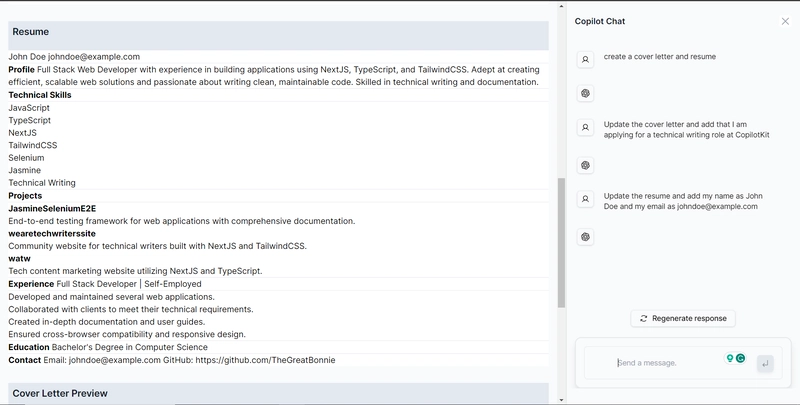
步骤4:向聊天机器人发出提示,例如“更新简历并将我的名字添加为John Doe,将我的电子邮件添加为johndoe@example.com ”。如下所示,您可以看到简历已更新。
创建下载求职信和简历 PDF 的功能
步骤 1:安装 jsPDF,一个用于在 JavaScript 中生成 PDF 的库。
npm i jspdf
步骤 2:在 CoverLetterAndResume 组件内部,使用 useMakeCopilotActionable 钩子设置一个名为“downloadPdfs”的操作,其中包含描述和实现函数,该函数使用 jsPDF 库为求职信和简历创建 PDF,然后保存它们,如下所示。
function addTextToPDF(doc: any, text: any, x: any, y: any, maxWidth: any) {
    // Split the text into lines
    const lines = doc.splitTextToSize(text, maxWidth);

    // Add lines to the document
    doc.text(lines, x, y);
  }

  useMakeCopilotActionable(
    {
      name: "downloadPdfs",
      description: "Download pdfs of the cover letter and resume.",
      argumentAnnotations: [
        {
          name: "coverLetterPdfA4",
          type: "string",
          description:
            "A Pdf that contains the cover letter converted from markdown text and fits A4 paper.",
          required: true,
        },
        {
          name: "resumePdfA4Paper",
          type: "string",
          description:
            "A Pdf that contains the resume converted from markdown text and fits A4 paper.",
          required: true,
        },
      ],
      implementation: async () => {

          const marginLeft = 10;
          const marginTop = 10;
          const maxWidth = 180;

          const coverLetterDoc = new jsPDF();
          addTextToPDF(
            coverLetterDoc,
            createCoverLetterAndResume.letter,
            marginLeft,
            marginTop,
            maxWidth
          );
          coverLetterDoc.save("coverLetter.pdf");

          const resumeDoc = new jsPDF();
          addTextToPDF(
            resumeDoc,
            createCoverLetterAndResume.resume,
            marginLeft,
            marginTop,
            maxWidth
          );
          resumeDoc.save("resume.pdf");
      },
    },
    [createCoverLetterAndResume]
  );
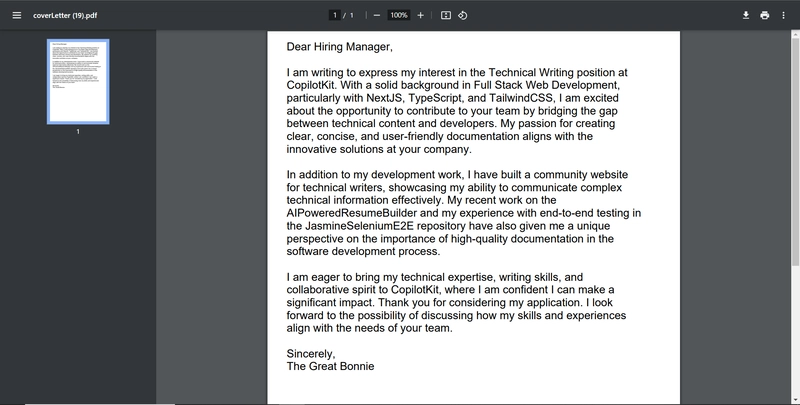
步骤3:返回网页应用中的聊天机器人,并提示其“下载求职信和简历的PDF文件”。PDF文件将开始下载,打开coverLetter.pdf文件,您应该会看到生成的求职信,如下所示。
结论
总而言之,您可以使用 CopilotKit 构建应用内 AI 聊天机器人,它可以查看当前应用状态并在应用内执行操作。该 AI 聊天机器人可以与您的应用前端、后端以及第三方服务进行通信。
完整源代码:
https://github.com/TheGreatBonnie/AIPoweredResumeBuilder
 后端开发教程 - Java、Spring Boot 实战 - msg200.com


