使用 Nest 进行 GraphQL 订阅:如何跨多个正在运行的服务器发布
今天我们将学习如何使用 Redis 和 NestJS 设置 GraphQL (GQL) 订阅。
本文的先决条件:
- GraphQL的使用体验
- NestJS 的一些基本知识(如果您不知道 NestJS 是什么,请尝试一下,然后再回来。)
- 您的机器上安装了Docker。
你可能会问自己:“我们为什么需要 Redis?” Apollo 提供的默认订阅实现开箱即用,不是吗?
嗯,这得看情况。当你的服务器只有一个实例时,你不需要 Redis。
但是,当你扩展应用程序并生成额外的服务器实例时,你需要确保在一个实例上发布的事件能够被另一个实例上的订阅者接收。这是默认订阅无法做到的。
因此,让我们首先使用默认(内存)订阅构建一个基本的 GQL 应用程序。
首先,安装@nestjs/cli:
npm i -g @nestjs/cli
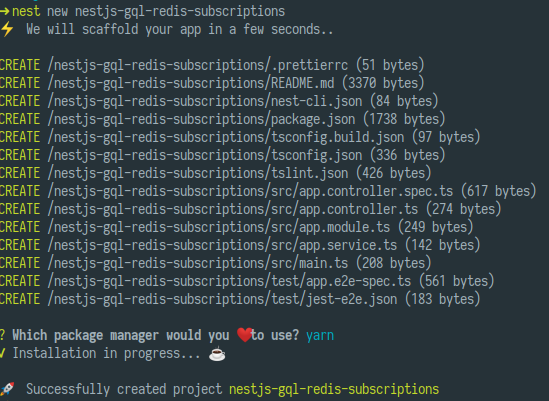
然后创建一个新的 NestJS 项目:
nest new nestjs-gql-redis-subscriptions
现在,打开nestjs-gql-redis-subscriptions/src/main.ts并更改
await app.listen(3000);
到:
await app.listen(process.env.PORT || 3000);
这允许我们在需要时通过环境变量指定端口。
NestJS 具有非常可靠的 GQL 支持,但我们需要安装一些额外的依赖项才能利用它:
cd nestjs-gql-redis-subscriptions
npm i @nestjs/graphql apollo-server-express graphql-tools graphql graphql-subscriptions
我们还安装了graphql-subscriptions,它可以为我们的应用程序提供订阅功能。
为了查看订阅的实际效果,我们将构建一个“乒乓”应用程序,该应用程序ping通过 GQL 发送mutation,并pong使用 GQL 交付subscription。
在该src目录下,创建一个types.graphql文件并将我们的模式放入其中:
type Query {
  noop: Boolean
}

type Mutation {
  ping: Ping
}

type Subscription {
  pong: Pong
}

type Ping {
  id: ID
}

type Pong {
  pingId: ID
}
然后转到app.module.ts,并按GraphQLModule如下方式导入:
// ... other imports
import { GraphQLModule } from '@nestjs/graphql';
import { PubSub } from 'graphql-subscriptions';

@Module({
  imports: [
    GraphQLModule.forRoot({
      playground: true,
      typePaths: ['./**/*.graphql'],
      installSubscriptionHandlers: true,
    }),
  ],
  providers: [
    {
      provide: 'PUB_SUB',
      useValue: new PubSub(),
    },
  ],
})
export class AppModule {}
让我们看一下传递给的选项GraphQLModule.forRoot:
playground-在 上公开GQL Playgroundhttp:localhost:${PORT}/graphql。我们将使用此工具订阅“pong”事件并发送“ping”突变。installSubscriptionHandlers- 启用订阅支持typePaths- 我们的 GQL 类型定义的路径。
另一个有趣的细节是:
{
  provide: 'PUB_SUB',
  useValue: new PubSub(),
}
这是发布/订阅引擎的默认(内存中)实现,它允许我们发布事件和创建订阅。
现在,配置好 GQL 服务器后,就该创建解析器了。在src文件夹下,创建一个文件ping-pong.resolvers.ts,并在其中输入以下内容:
import { Resolver, Mutation, Subscription } from '@nestjs/graphql';
import { Inject } from '@nestjs/common';
import { PubSubEngine } from 'graphql-subscriptions';

const PONG_EVENT_NAME = 'pong';

@Resolver('Ping')
export class PingPongResolvers {
  constructor(@Inject('PUB_SUB') private pubSub: PubSubEngine) {}

  @Mutation('ping')
  async ping() {
    const pingId = Date.now();
    this.pubSub.publish(PONG_EVENT_NAME, { [PONG_EVENT_NAME]: { pingId } });
    return { id: pingId };
  }

  @Subscription(PONG_EVENT_NAME)
  pong() {
    return this.pubSub.asyncIterator(PONG_EVENT_NAME);
  }
}
首先,我们需要PingPongResolvers用 装饰类@Resolver('Ping')。NestJS 官方文档很好地描述了它的用途:
您可以查阅 Nest.js 官方文档关于使用 GraphQL
装饰
@Resolver()器不会影响查询或修改(装饰器也不影响@Query())@Mutation()。它只会通知 Nest,@ResolveProperty()这个特定类中的每个元素都有一个父类,在本例中是一个Ping类型。
然后,我们定义我们的ping突变。它的主要职责是发布pong事件。
最后,我们有订阅定义,它负责将适当的已发布事件发送给订阅的客户端。
现在我们需要PingPongResolvers添加AppModule:
// ...
@Module({
  // ...
  providers: [
    PingPongResolvers,
    {
      provide: 'PUB_SUB',
      useValue: new PubSub(),
    },
  ],
})
export class AppModule {}
此时,我们已准备好启动应用程序,并查看实际的实施情况。
实际上,为了理解内存订阅的问题,让我们运行应用程序的两个实例:一个在端口:3000上,另一个在:3001上
在一个终端窗口中运行:
# port 3000 is the default port for our app
npm start
之后,在另一个中:
PORT=3001 npm start
下面是一个演示:
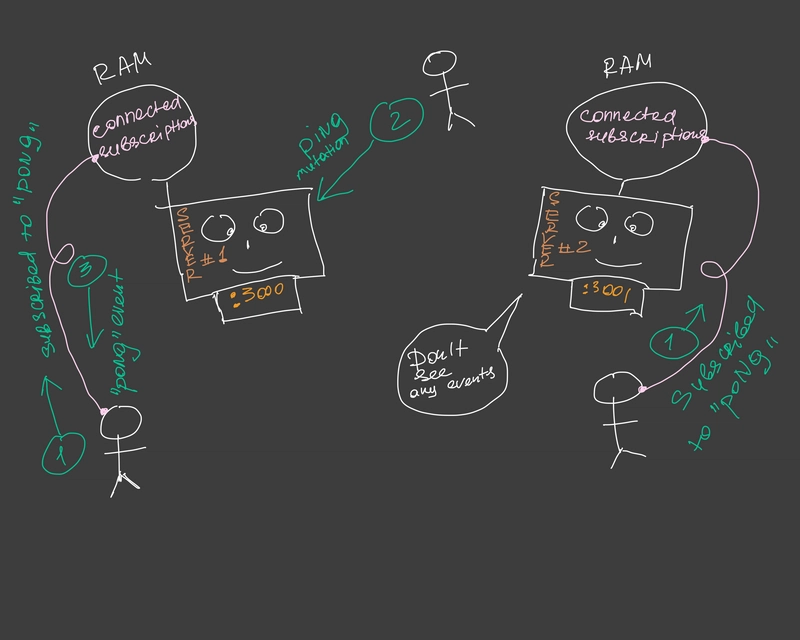
如您所见,在:3001上运行的实例没有收到在:3000实例上发布的任何事件。
只需看一下下面的图片就可以从不同的角度看到:
显然, :3001无法看到:3000上发布的事件
现在,让我们稍微调整一下我们的应用来解决这个问题。首先,我们需要安装 Redis 订阅依赖项
npm i graphql-redis-subscriptions ioredis
graphql-redis-subscriptions提供了 Redis 感知的PubSubEngine接口实现:RedisPubSub。您之前已经通过其内存实现使用过该接口 - PubSub。
ioredis- 是一个 Redis 客户端,由 使用graphql-redis-subscriptions。
要开始使用我们的RedisPubSub,我们只需要AppModule稍加调整。
改变这个:
// ...
{
  provide: 'PUB_SUB',
  useValue: new PubSub(),
}
// ...
对此:
// ...
import { RedisPubSub } from 'graphql-redis-subscriptions';
import * as Redis from 'ioredis';
//  ...

// ...
{
  provide: 'PUB_SUB',
  useFactory: () => {
    const options = {
      host: 'localhost',
      port: 6379
    };

    return new RedisPubSub({
      publisher: new Redis(options),
      subscriber: new Redis(options),
    });
  },
},
// ...
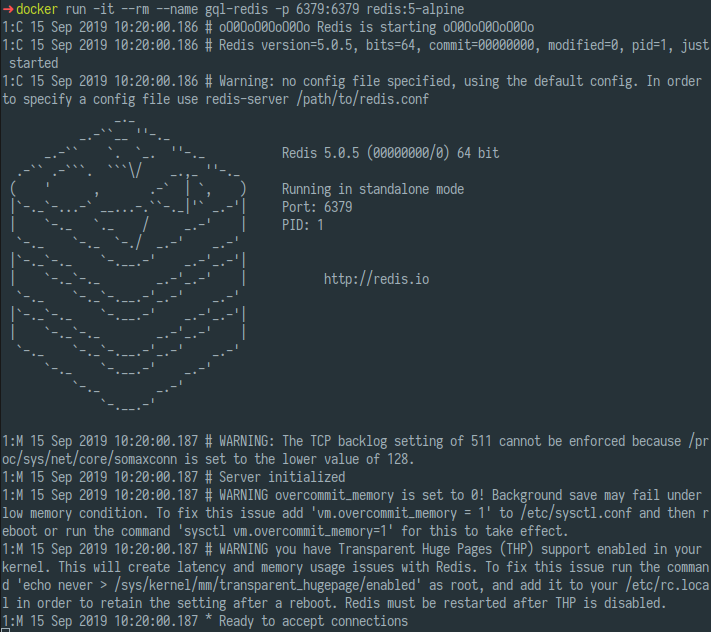
我们将在 docker 容器中启动 redis,并使其可用localhost:6379(这与我们传递给RedisPubSub上面实例的选项相对应):
docker run -it --rm --name gql-redis -p 6379:6379 redis:5-alpine
现在我们需要停止我们的应用程序,然后重新启动它们(在不同的终端会话中):
npm start
和
PORT=3001 npm start
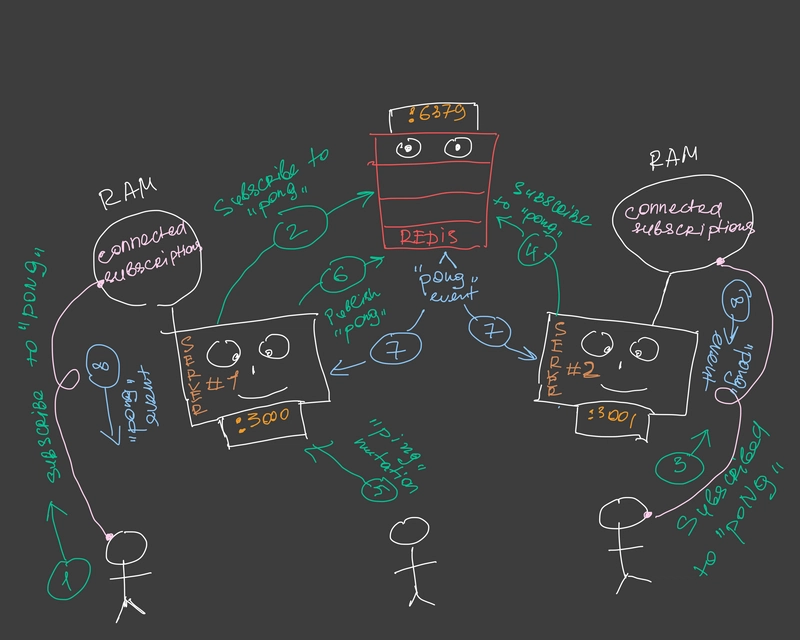
此时,订阅按预期工作,并且在应用程序的一个实例上发布的事件被客户端接收,并订阅另一个实例:
以下是幕后发生的事情:
概括:
在本文中,我们学习了如何使用 Redis 和 GQL 订阅在服务器应用程序的多个实例之间发布事件。
我们还应该更好地理解 GQL 订阅事件发布/订阅流。
源代码:
https://github.com/rychkog/gql-redis-subscriptions-article
喜欢这篇文章吗?快来This Dot Labs了解我们吧!我们是一家技术咨询公司,专注于 JavaScript 和前端领域。我们专注于 Angular、React 和 Vue 等开源软件。
鏂囩珷鏉ユ簮锛�https://dev.to/thisdotmedia/graphql-subscriptions-with-nest-how-to-publish-across-multiple-running-servers-15e 后端开发教程 - Java、Spring Boot 实战 - msg200.com


