使用 NodeJS 构建测验 REST API
大家好!今天我们将使用NodeJS和MongoDB构建一个简单的测验 REST API 。这意味着人们将能够通过这个项目在数据库中检索、更新、删除和创建测验问题。
您可以在github 存储库中找到已完成的项目。
笔记
我假设你已经安装了Node,并且至少了解 Node.js 和 JavaScript 的基础知识。如果不是这样,你可以在阅读本文之前先查看一下 Node.js 官方指南。
我还假设您熟悉API(应用程序编程接口)的概念。
如果您对MongoDB一无所知,但有数据库使用经验,那么您可以轻松阅读本文。但是,如果您对此感到好奇或一无所知,您可能需要查看MongoDB 文档。
目录
- 设置
- 服务器设置
- 数据库连接
- Dotenv文件
- 路线文件
- 测试我们的路线
- 建立模型
- 路线 - 创建问题
- 路线 - 获取所有问题
- 路线 - 提出一个问题
- 路线 - 更新一个问题
- 路线 - 删除一个问题
- 结论
设置
我们的第一步是打开终端并为项目创建一个新目录,然后使用 启动一个 Node 应用程序npm init。您可以按照自己想要的方式在 CLI 中回答所有问题。之后,我们终于可以开始安装依赖项了。这里我们将使用express和mongoose模块。第一个模块将为我们提供构建 API 所需的 HTTP 实用程序方法。现在,第二个模块将允许我们与数据库进行交互。我们cors还需要一个名为 的包。它将帮助我们解决cors问题。运行以下命令来安装它们:
npm i express mongoose cors
除此之外,我们还将使用nodemon来加快开发过程,并使用dotenv从文件中获取环境变量.env。您可以使用以下命令安装这些软件包:
npm i --save-dev nodemonnpm i dotenv
现在我们已经安装了 nodemon,是时候在文件中设置我们的脚本了package.json,该文件在我们第一次运行 时自动创建npm init。因此,打开此文件并查找键scripts,如果没有 scripts 键,则应添加一个。它应该是这样的:
"scripts": {
  "dev": "nodemon src/server.js"
}
现在,当我们希望运行项目时,我们只需要执行命令npm run dev。
服务器设置
现在我们已经安装了所有需要的软件包。因此,在项目根目录下,创建一个名为 的新目录,并在其中src添加一个名为 的新文件。server.js
在我们的文件中server.js,我们将导入 express 模块,然后创建它的一个实例。
const express = require('express')
const app = express()
现在我们需要告诉应用程序监听指定的端口。
但是该怎么做呢?
我们只需调用该listen方法,并将端口号和回调函数作为参数传递即可。在本例中,我们尝试从环境变量中获取端口号。
app.listen(process.env.PORT, () => {
    console.log("The API is running...")
})
这真是小菜一碟,不是吗?
好了!此时,文件应该如下所示:
const express = require('express')
const app = express()
app.listen(process.env.PORT, () => {
console.log("The API is running...")
})
```
## Database Connection
We are now going to connect to a mongodb database. If you wish, you can run a local database with [MongoDB Community Server](https://www.mongodb.com/download-center/community). In this example, we're going to use [Atlas](https://www.mongodb.com/cloud/atlas), a cloud hosted database, which has a free plan with a 512MB storage limit.
Still in `server.js` file, we'll include the `mongoose` module and make the connection with... Guess what? The connect method!. It will result in something like this:
````javascript
const express = require('express')
const app = express()
const mongoose = require('mongoose')
mongoose.connect(process.env.DATABASE_URL, { useNewUrlParser: true, useUnifiedTopology: true })
const db = mongoose.connection
db.on('error', (error) => console.error(error))
db.once('open', () => console.log('database connected'))
app.listen(process.env.PORT, () => {
console.log("The API is running...")
})
```
Okay! The `mongoose.connect` method receives two parameters, the database url and a object containing a few configurations. You don't have to worry much with the second parameter though. It was needed because the standard config is now depreceated. You can read more about it on the oficial [docs](https://mongoosejs.com/docs/guide.html) if you wish.
As you can see, the database URL is actually coming from a environment variable. So that's a good moment to set up our `.env` file.
## Dotenv File
So we'll now create a new file at root directory and name it `.env`. It's content should be something like the following:
```
DATABASE_URL=mongodb://xxxxxx/xxxxx
PORT=3333
```
So you can replace the variable value by the URL of your database. If you're using `Atlas` as well, you can find the database URL choosing the application connection method in [atlas](https://www.mongodb.com/cloud/atlas)'s dashboard section. We also defined our PORT number to 3333.
Now that we've created our `.env` file we must include it in `server.js`. This can be easily done by adding the line `require('dotenv').config()` right bellow the declaration of the mongoose constant.
So `server.js` should be similar to this:
```javascript
const express = require('express')
const app = express()
const mongoose = require('mongoose')
require('dotenv').config()
mongoose.connect(process.env.DATABASE_URL, { useNewUrlParser: true, useUnifiedTopology: true })
const db = mongoose.connection
db.on('error', (error) => console.error(error))
db.once('open', () => console.log('database connected'))
app.listen(process.env.PORT, () => {
console.log("The API is running...")
})
```
If everything is fine, you can run `npm run dev` and should see a log saying you've connected to the database.
## Routes File
It's now time to create our routes file. Inside the src folder, make a new file named `routes.js`. This file will be responsible for declaring all the routes in our API. So open it up and let's code:
```javascript
const express = require('express')
const router = express.Router()
module.exports = router
```
Until now, we've included the express module and made a router from its instance. In the end of the file, we've exported the router constant so we can import them in another file. It brings us to the routes themselves. The routes we're gonna build in this project are:
1. Route for getting all questions
2. Route for getting one question
3. Route for making one new question
4. Route for updating one question
5. Route for deleting one question
If you're not very familiar with http verbs and request methods, you can read about them [here](https://restfulapi.net/http-methods/#delete).
We're only going to make the **skeleton** of all the routes for now. That will make our `routes.js` file look like this:
```javascript
const express = require('express')
const router = express.Router()
// get all quiz questions
router.get('/questions', (req, res) => {
})
// get one quiz question
router.get('/questions/:id', (req, res) => {
})
// create one quiz question
router.post('/questions', (req, res) => {
})
// update one quiz question
router.put('/questions/:id', (req, res) => {
})
// delete one quiz question
router.delete('/questions/:id', (req, res) => {
})
// this one is just a test
router.get('/', (req, res) => {
res.send('H3ll0 W0RlD')
})
module.exports = router
```
I'm going to explain all these routes later. For now, I've put a extra route for testing purposes at the end of the file. When we make a get request for the '/' path, we're going to get *H3ll0 W0RlD* as a response.
But before we can test this route, we'll need to tell our server to use the routes in `routes.js`. That being said, let's modify our `server.js` file.
```javascript
const express = require('express')
const app = express()
const mongoose = require('mongoose')
const routes = require('./routes') // includes the routes.js file
const cors = require('cors') // includes cors module
require('dotenv').config()
app.use(cors()) // We're telling express to use CORS
app.use(express.json()) // we need to tell server to use json as well
app.use(routes) // tells the server to use the routes in routes.js
mongoose.connect(process.env.DATABASE_URL, { useNewUrlParser: true, useUnifiedTopology: true })
const db = mongoose.connection
db.on('error', (error) => console.error(error))
db.once('open', () => console.log('database connected'))
app.listen(process.env.PORT, () => {
console.log("The API is running...")
})
```
## Testing our Route
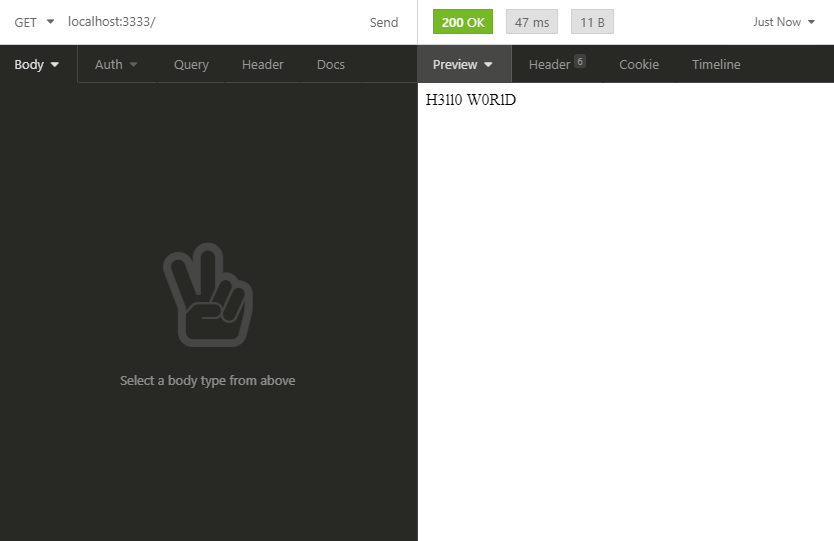
We can now make a few tests to guarantee everything is going okay. For that purpose we'll need a REST client such as [Postman](https://www.postman.com/) or [Insomnia](https://insomnia.rest/download/). However, in my case I'm going to use Insomnia.
Here I've tested the 'localhost:3333/' route, which successfully returned me *'H3ll0 W0RlD'*.
After testing the '/' route, I've deleted it from `routes.js`, since it was only for testing purposes. By the way, you are free to test the others routes if you do wish. Just remember to use the right HTTP method to each route.
## Building a Model
Now that we've got the `routes.js` file settled, we should worry about creating a model and its schema. For those who aren't aware of this, in this context, models are just a representation of a database entity. If that still doesn't make much sense, just follow along with this post. It'll become easier as we go.
So let's create a folder named `models`, inside of our `src` directory. I've already created a new collection (it's like the tables in MySQL) called `questions` in our database. That being said, let's create a new file inside the models folder with the name `Question.js`.
Inside this file, we'll make its schema. A Schema is like a blueprint of a database entity (in this specific case, a collection named `questions`). So the content of `Question.js` will be similar to these:
```javascript
const mongoose = require('mongoose')
const QuestionSchema = new mongoose.Schema({
description: String,
alternatives: [
{
text: {
type: String,
required: true
},
isCorrect: {
type: Boolean,
required: true,
default: false
}
}
]
})
module.exports = mongoose.model('Question', QuestionSchema)
```
Basically, what we've done is describe how are the fields (or columns in MySQL) inside a document (similar to rows in MySQL) that belongs to Questions. In the end of the file, we exported the model using the specific method for exportation from mongoose. We've also gave the model the name *Question*.
This part is more or less self-explanatory, so I'm not going to dive into it. But if you want to read more about MongoDB Schemas, you can learn more [here](https://docs.mongodb.com/stitch/mongodb/document-schemas/).
## Routes - Create Questions
Alright! We made the necessary models and schemas, which means we can build up our routes for real this time. So back in our `routes.js` file, we first need to import the we've created.
```javascript
const express = require('express')
const router = express.Router()
const Question = require('./models/Question') // includes our model
```
Now we're going to modify the route for creating a new question. Right now, this is how it looks:
````javascript
// create one quiz question
router.post('/questions', (req, res) => {
})
```
We're using the **post** method in this route because we want to create something new into the database.
This route will serve to insert a new question into the database, each question has its description and alternatives. So we'll consider the data we need for creating a new question will be sent as JSON in the request body. That being said we'll wrap our request with a try/catch statement and retrieve the request data. We'll also return a 500 status code (which means 'Internal Server Error') in case of a error.
```javascript
// create one quiz question
router.post('/questions', (req, res) => {
try {
const { description } = req.body
const { alternatives } = req.body
} catch (error) {
return res.status(500).json({"error":error})
}
})
```
Now that we've got the description and the alternatives for the question, we'll use the Question schema for creating a new question. In the end, we'll return a 201 status code (it means 'created') along with the the created question.
```javascript
// create one quiz question
router.post('/questions', async (req, res) => {
try {
const { description } = req.body
const { alternatives } = req.body
const question = await Question.create({
description,
alternatives
})
return res.status(201).json(question)
} catch (error) {
return res.status(500).json({"error":error})
}
})
```
I've also turned the callback an asynchronous function, that way we could use promises inside it. By the way, we used **[Object Destructuring](https://codeburst.io/es6-destructuring-the-complete-guide-7f842d08b98f)** in the parameters of Question's create method to simplify our code.
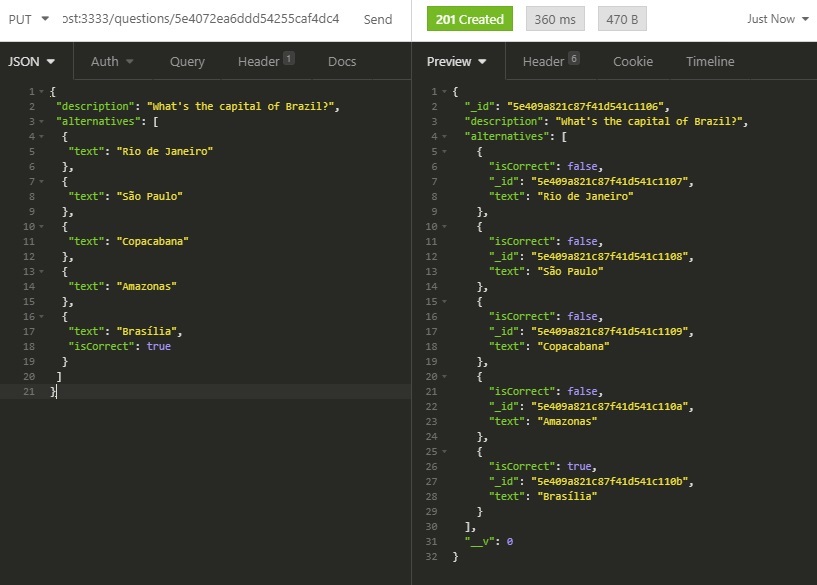
Now if we test this route with the help of a REST client we'll get something like this:
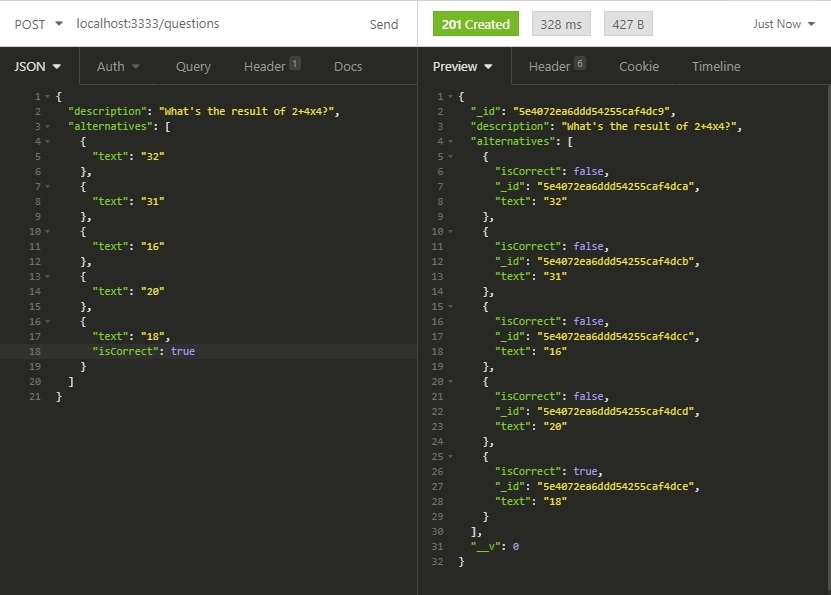
If you look to the right side, you'll notice there are a few extra fields, such as _id and __v. You don't have to worry much about them, they are automatically included by MongoDB. The _id field is just a ID and __v is the document version counter, which counts how many times that document was changed.
## Routes - Get All questions
It's now time to modify another route. This time will work with the route for getting all questions in the database. Since we're retrieving data from the database, we are using the get method. Right now, this is how the route is looking.
```javascript
// get all quiz questions
router.get('/questions', (req, res) => {
})
```
Just as the first one, we'll turn the callback a asynchronous function and wrap its inner side with a try/catch statement returning a 500 status code in case of error.
```javascript
// get all quiz questions
router.get('/questions', async (req, res) => {
try {
} catch (error) {
return res.status(500).json({"error":error})
}
})
```
With the same logic, we'll just use the Question schema to **find** all questions in the database. In the end, returning it to the client.
```javascript
// get all quiz questions
router.get('/questions', async (req, res) => {
try {
const questions = await Question.find()
return res.status(200).json(questions)
} catch (error) {
return res.status(500).json({"error":error})
}
})
```
Now when we make a get request to this route, this is what we get:
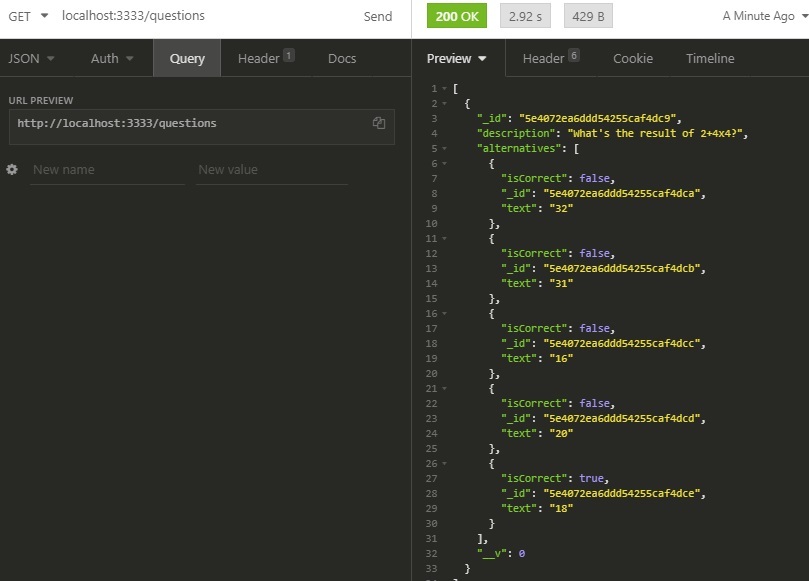
Since there were only one question in the database, just one was returned.
## Routes - Get One Question
Now that we've made a route for getting all questions, why not finish the route for getting just one specific question? Right now, this is how it's looking:
```javascript
// get one quiz question
router.get('/questions/:id', (req, res) => {
})
```
Notice that this route's path is a little bit different from the others, since it has *'/:id'* in the end. In a actual request, this part will be replaced by the question's id. So in some way it's similar to variables. We'll do the same process we've done in the other routes here.
```javascript
// get one quiz question
router.get('/questions/:id', async (req, res) => {
try {
const _id = req.params.id
const question = await Question.findOne({_id})
if(!question){
return res.status(404).json({})
}else{
return res.status(200).json(question)
}
} catch (error) {
return res.status(500).json({"error":error})
}
})
```
The difference here, is that we retrieved the request data from `req.params` since it's coming from the path. In contrast, we have used `Question.findOne` here considering we just one to get one question, we passed _id as the search parameter. So it'll look for a question with that specific _id. Below, we just tested if that question actually existis in the database and returned a properly answer.
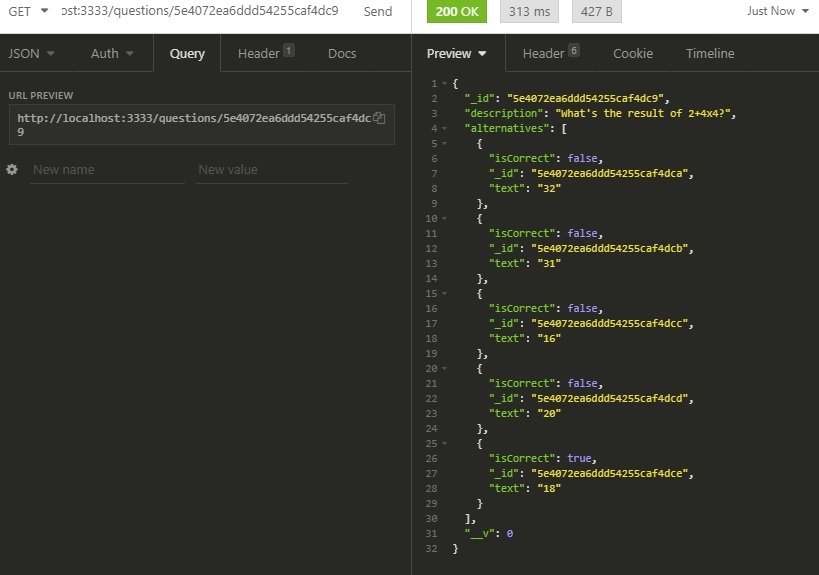
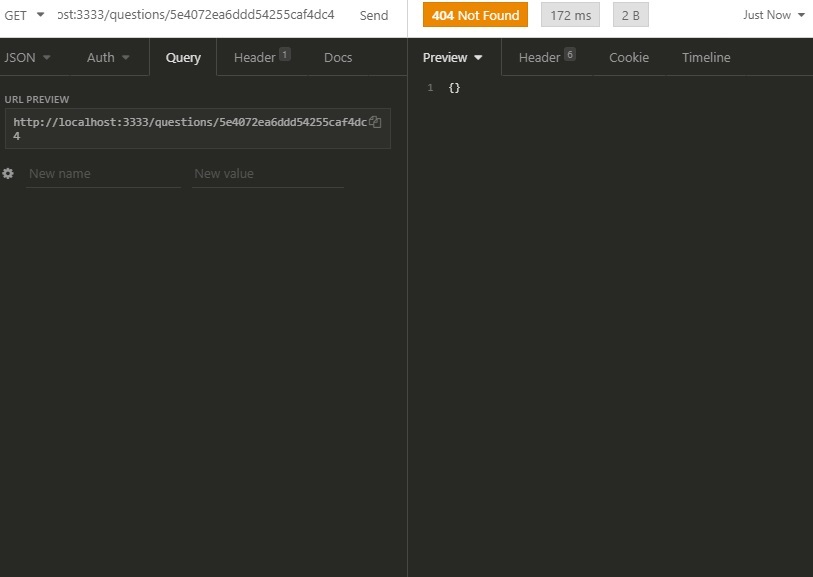
When you make a request with a real _id, this should be the result:
Now, if you use a incorrect _id:
## Routes - Update One Question
Now we're going to build up the route for updating a specific question. So we're using the *put* method for this one.
```javascript
// update one quiz question
router.put('/questions/:id', async (req, res) => {
try {
const _id = req.params.id
const { description, alternatives } = req.body
let question = await Question.findOne({_id})
if(!question){
question = await Question.create({
description,
alternatives
})
return res.status(201).json(question)
}else{
question.description = description
question.alternatives = alternatives
await question.save()
return res.status(200).json(question)
}
} catch (error) {
return res.status(500).json({"error":error})
}
})
```
We've done the same alterations in this route as well. We got the _id from the path and the new description and alternatives for that question from the request body. As said in the [docs](https://mongoosejs.com/docs/documents.html#updating) mongoose tracks document changes. So we first tried to find the question with the given _id. If the question doesn't exists, we then create it and return the data along with a 201 status code. If it does exists, we update the description and alternatives of the found document and calls the `save` method to update the actual document in the database. Finally, we return a 200 status code along with the question data.
When you pass **nonexistent** _id, a new question should be created. So the results should be something like this:
Now if you pass a **existing** _id, it will then update the contents of the question in the database. So it should end up like this:

## Routes - Delete One Question
It's finally the time for us to modify our last route. This route is responsible for deleting a specific question.
```javascript
// delete one quiz question
router.delete('/questions/:id', async (req, res) => {
try {
const _id = req.params.id
const question = await Question.deleteOne({_id})
if(question.deletedCount === 0){
return res.status(404).json()
}else{
return res.status(204).json()
}
} catch (error) {
return res.status(500).json({"error":error})
}
})
```
So as always, we've made the callback an asynchronous function and wrapped its contents in a try/catch statement. We've got the _id from the request parameters and called the `deleteOne` method to delete the question with that given _id.
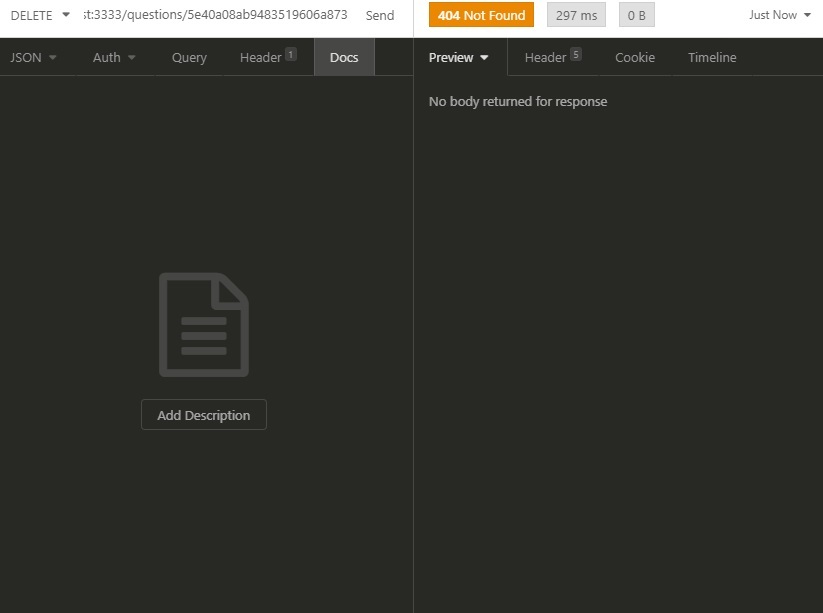
If the amount of deleted documents is equal to 0, it means the document doesn't exists. In that case, we return a 404 status code (not found):
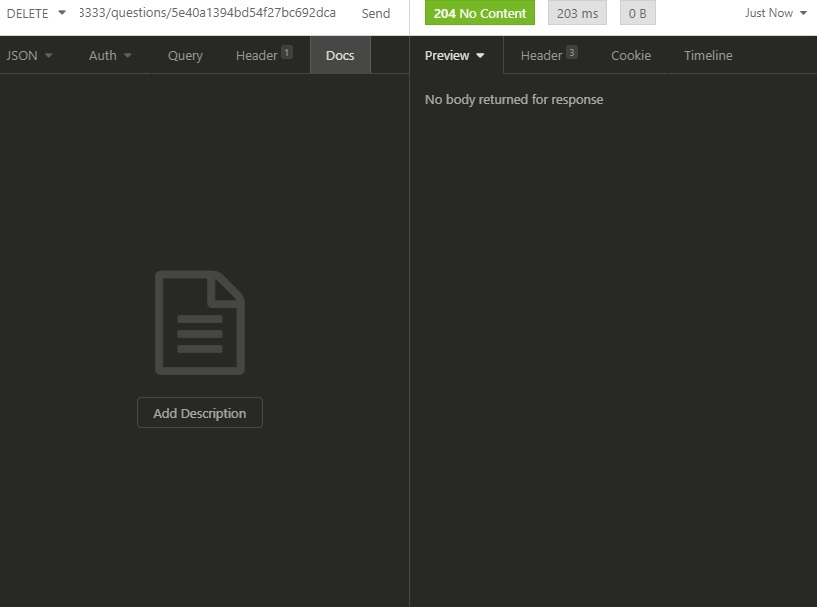
But if the document was really deleted, we return a 204 status code (no content):
## Conclusion
If you followed this article until here, it means we've finally **finished our API!**
Thank you for taking your time to read my post. I'm a newbie in writing articles, so if you have *any suggestions or corrections* about this post, I'd be glad to listen (read, in reality haha).
By the way, in **future**, I'll write another article about how to deploy this API to the cloud and another one for making a frontend to consume it.