Cypress - 端到端测试框架
柏树和硒
Cypress 安装
执行测试
Cypress 是前端测试市场的新生力量,在测试人员和开发人员中越来越受欢迎。它可以测试任何在浏览器中运行的应用程序。Cypress 是开源的,其社区非常活跃。Cypress 测试是用 JavaScript 编写的,但不要被吓到,即使你不熟悉 JavaScript,大多数时候你都会使用 Cypress 命令,这些命令非常直观易用。
但是了解 JavaScript 确实很有益......因此我写了一个博客并创建了一个YouTube 系列:JS for Testers来帮助你。
Cypress 可用于:
- 单元测试
- 集成测试
- 端到端测试
以下是 Cypress 所拥有的一些出色特性:
在探索柏树并获得益处的过程中,我们将讨论所有这些问题。
目录
柏树和硒
Cypress 和 Selenium 的用途非常相似,但它们之间却存在着巨大的差异。如果您熟悉 Selenium,您会惊讶于在 Cypress 中设置和运行是多么简单。
安装很轻松,编写测试很容易,测试很稳定,并且测试运行速度非常快。
这一切之所以成为可能,是因为 Cypress 并非像大多数端到端测试工具那样构建于 Selenium 之上。事实上,Cypress 的架构与 Selenium 截然不同。Selenium 通过网络执行远程命令,而 Cypress 则与您的应用程序在同一个运行循环中运行。
如果您更喜欢观看和学习,请跳转到Youtube 上的 Cypress 系列
订阅我的 Youtube 频道 - QA Camp!
Cypress 安装
Cypress 是一体化的。也许这会帮助你理解:

cypress 使用一个命令即可安装所有这些:

让我们设置 IDE,创建一个项目并安装 cypress。
安装 IDE
拥有一个 IDE 是个好主意。Visual Studio Code 是 Cypress 项目的首选 IDE。
您可以从此处下载 Visual Studio Code:https://code.visualstudio.com/download
安装 Node.js
我们需要安装 Node.js,因为我们需要使用 npm 和 npx,它们会随 node.js 一起下载。
您可以从此处下载 node.js:https://nodejs.org/en/download/
下载完成后,启动并运行安装程序。
要验证安装是否成功,请检查版本:
   node -v
   npm -v
创建项目
- 创建项目文件夹。
-
在终端中转到项目目录并运行以下命令:
npm init
    This will create a package.json file inside your project folder.
3. You can open this project in Visual Studio Code.


###Install Cypress

As promised, Cypress will install in a single command:
npm install cypress --save-dev
This will install Cypress desktop app and Cypress CLI. Cypress desktop app is GUI that can be used to run the test in browser. Cypress CLI helps you run cypress tests headlessly.


###Launch Cypress

To launch the Cypress desktop app (GUI), run the following command:
npx cypress 开放
The .js files that you see under examples folder are sample cypress tests downloaded to give you a jump start in the world of Cypress.
[Back to table of contents](#toc)
---
#Commands <a name="Commands"></a>
Now, I have been saying Cypress is easy but I don't want you to take my word for it. See for yourself. Read the below code line by line and see if it makes sense to you.
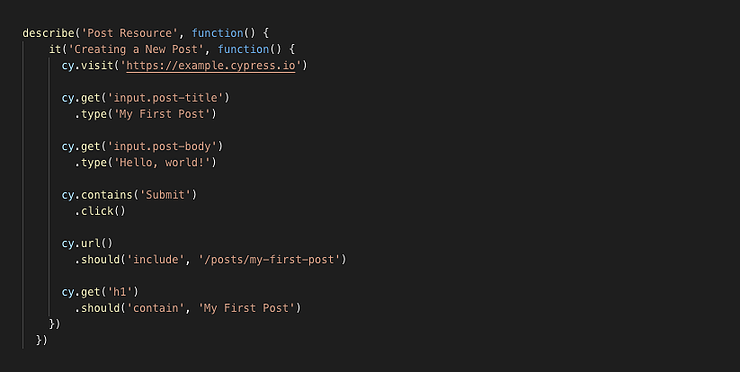
Cypress is intuitive because its English-like.
**describe** and **it** come from [Mocha] (https://mochajs.org/), which is a JavaScript test framework.
In the above code we are performing four operations that are most common and would be used in almost all the tests that you write. These are:
1. Visit a page
1. Query for an element
1. Perform an action on the element
1. Make an assertion
Now let's dive deep and explore the different commands cypress provides to perform these four tasks.
[Back to table of contents](#toc)
---
## 1. Launching / Navigating the application <a name="Command_1"></a>
###<mark>visit
**Purpose:** Visit a URL.
**Syntax:**
* <code>cy.visit(url)</code>
* <code>cy.visit(url,options)</code>
* <code>cy.visit(options)</code>
**Examples:**
```js
// Visit a local server running on http://localhost:8000/
cy.visit('http://localhost:8000/')
// Visit an application
cy.visit('https://www.acme.com/')
// Visit an application and wait for 30 seconds for the application to launch
cy.visit('https://www.acme.com/', { timeout: 30000 })
// Submit a form
cy.visit({
url: 'http://localhost:3000/cgi-bin/newsletterSignup',
method: 'POST',
body: {
name: 'George Burdell',
email: 'burdell@microsoft.com'
}
})
网址
目的:获取当前活动页面的URL。
句法:
cy.url()cy.url(options)
例子:
// Yield the current URL as a string
cy.url()

// verifies the curent url is equal to the given string
cy.url().should('eq', 'http://localhost:3000/cgi-bin/newsletterSignup')

// verifies the current url includes the given string
cy.url().should('include', '/newsletterSignup')
去
目的:在浏览器历史记录中向前或向后导航到上一个或下一个 URL。
句法:
cy.go(direction)cy.go(direction, options)
例子:
// Go back in browser’s history
cy.go('back')
cy.go(-1)

// Go forward in browser’s history
cy.go('forward')
cy.go(1)
重新加载
目的:重新加载页面。
句法:
cy.reload()cy.reload(forceReload)cy.reload(options)cy.reload(forceReload, options)
forceReload:是否不使用缓存重新加载当前页面。'true' 强制不使用缓存重新加载。
例子:
// Reload the page as if the user clicked ‘Refresh’
cy.visit('http://localhost:3000/admin')
cy.get('#undo-btn').click().should('not.be.visible')
cy.reload()
cy.get('#undo-btn').click().should('not.be.visible')

// Reload the page without using the cache
cy.visit('http://localhost:3000/admin')
cy.reload(true)
2.访问UI元素
得到
目的:获取一个或多个DOM元素。
句法:
cy.get(selector)cy.get(alias)cy.get(selector, options)cy.get(alias, options)
选择器:元素的属性,例如 id、class 等,用于筛选匹配的 DOM 元素。
别名:为 DOM 元素指定一个名称,以便后续引用。使用.as()命令定义,并使用 @ 字符和别名名称进行引用。
例子:
// Find the dropdown-menu with the given class name
cy.get('.dropdown-menu')

// Find element(s) with the given data attribute
cy.get('[data-test-id="test-example"]')

// Create and use an alias
cy.get('button[type=submit]').as('submitBtn')
//...hack hack hack...
cy.get('@submitBtn')     // later retrieve the submitBtn
包含
目的:获取包含文本的DOM元素。
句法:
.contains(content).contains(content, options).contains(selector, content).contains(selector, content, options)
注意事项:
contains()可以启动一系列命令,也可以链接到现有的一系列命令- 内容可以是:字符串、数字、正则表达式
例子:
<ul>
    <li>apples</li>
    <li>oranges</li>
    <li>bananas</li>
</ul>
// Find the first element containing some text
cy.contains('apples')       // yields <li>apples</li>

// Find the first element with text matching the regular expression
cy.contains(/^b\w+/)       // yields <li>bananas</li>

// Specify a selector to return a specific element
cy.contains('ul', 'apples')       // yields <ul>...</ul>

// When chained to an existing series of commands
cy.get('#checkout-container').contains('Buy Now')
//This will query inside of the <#checkout-container> element.
通过索引访问元素
first()您可以分别使用、last()和获取元素数组中的第一个、最后一个或特定索引处的元素eq()。
例子:
<ul>
    <li>one</li>
    <li>two</li>
    <li>three</li>
    <li>four</li>
    <li>five</li>
</ul>
// Get the first element
cy.get('li').first()      // yield <li>one</li>

// Get the last element
cy.get('li').last()      // yield <li>five</li>

// Get the second element
cy.get('li').eq(1)      // yield <li>two</li>

// Get the second last element
cy.get('li').eq(-2)      // yields <li>four</li>
通过关系访问元素
您可以访问元素的父母、孩子、兄弟。
parent- 获取一组 DOM 元素的父 DOM 元素(向上单级)。
parents- 获取一组 DOM 元素的父 DOM 元素(向上多层)。
parentsUntil- 获取一组匹配的 DOM 元素中每个 DOM 元素的所有祖先,但不包括所提供的元素。
children- 获取一组 DOM 元素中每个 DOM 元素的子元素。
siblings- 获取兄弟 DOM 元素。
prev- 获取元素集合中每个元素的紧邻前一个兄弟元素。
prevAll- 获取一组匹配的 DOM 元素中每个 DOM 元素的所有先前同级元素。
prevUntil- 获取一组匹配的 DOM 元素中每个 DOM 元素的所有先前同级元素,直至(但不包括)所提供的元素。
next- 获取一组 DOM 元素中每个 DOM 元素的紧随其后的同级元素。
nextAll- 获取一组匹配的 DOM 元素中每个 DOM 元素的所有后续同级元素。
nextUntil- 获取一组匹配的 DOM 元素中每个 DOM 元素的所有后续同级元素,直至(但不包括)所提供的元素。
例子:
<ul class='main-nav'>
    <li>Overview</li>
    <li>Getting started
        <ul class='sub-nav'>
            <li>Install</li>
            <li class='active'>Build</li>
            <li>Test</li>
        </ul>
    </li>
</ul>
// parent
cy.get('li.active').parent()           // yields .sub-nav

// parents
cy.get('li.active').parents()           // yields [.sub-nav, li, .main-nav]

// parentsUntil
cy.get('li.active').parentsUntil('.main-nav')           // yields [.sub-nav, li]

// children
cy.get('ul.sub-nav').children()              // yields [<li>Install</li>,
                                             //         <li class='active'>Build</li>,
                                             //         <li>Test</li>]

cy.get('ul.sub-nav').children('.active')      // yields [<li class='active'>Build</li>]

// siblings
cy.get('.active').siblings()              // yields [<li>Install</li>, <li>Test</li>]

cy.get('li').siblings('.active')          // yields [<li class='active'>Build</li>]
<ul>
    <li id="fruits" class="header">Fruits</li>
    <li>apples</li>
    <li>oranges</li>
    <li>bananas</li>
    <li id="veggies" class="header">Vegetables</li>
    <li>cucumbers</li>
    <li>carrots</li>
    <li>corn</li>
    <li id="nuts" class="header">Nuts</li>
    <li>walnuts</li>
    <li>cashews</li>
    <li>almonds</li>
</ul>
// prev
cy.get('#veggies').prev()         // yields <li>bananas</li>
cy.get('li').prev('#veggies')     // yields <li id="veggies" class="header">Vegetables</li>

// prevAll
cy.get('#veggies').prevAll()    // yields [<li>apples</li>, <li>oranges</li>, <li>bananas</li>]
cy.get('li').prevAll('#veggies')    // yields <li id="veggies" class="header">Vegetables</li>

// prevUntil
cy.get('#nuts').prevUntil('#veggies')      // yields [<li>cucumbers</li>
                                           // yields       <li>carrots</li>, <li>corn</li>]

 // next
cy.get('#veggies').next()         // yields <li>cucumbers</li>
cy.get('li').next('#veggies')     //        <li id="veggies" class="header">Vegetables</li>

// nextAll
cy.get('#nuts').nextAll()    // yields [<li>walnuts</li>, <li>cashews</li>, <li>almonds</li>]
cy.get('li').nextAll('#nuts')    // yields <li id="nuts" class="header">Nuts</li>

// prevUntil
cy.get('#veggies').prevUntil('#nuts')      // yields [<li>cucumbers</li>,
                                           //         <li>carrots</li>, <li>corn</li>]
通过位置访问元素
within- 将所有后续cy命令的范围限定在此元素内。在特定元素组(例如 )内工作时非常有用<form>。
root- 获取根 DOM 元素。
例子:
<form>
    <input name="email" type="email">
    <input name="password" type="password">
    <button type="submit">Login</button>
</form>
cy.get('form').within(($form) => {
    // cy.get() will only search for elements within form,
    // not within the entire document
    cy.get('input[name="email"]').type('john.doe@email.com')
    cy.get('input[name="password"]').type('password')
    cy.root().submit()   // submits the form yielded from 'within'
})
3. 对元素的操作
点击
目的:点击一个 DOM 元素。
句法:
.click().click(options).click(position).click(position, options).click(x, y).click(x, y, options)
例子:
// Click on button
cy.get('button').click()

// Click on first el containing 'Welcome'
cy.contains('Welcome').click()

// Click the top right corner of the button
cy.get('button').click('topRight')

// Specify explicit coordinates relative to the top left corner
cy.get('button').click(15, 40)

// Force a click regardless of its actionable state
// https://docs.cypress.io/guides/core-concepts/interacting-with-elements.html#Forcing
cy.get('button').click({ force: true })

// Click all buttons found on the page
cy.get('button').click({ multiple: true })
双击
目的:双击 DOM 元素。
句法:
.dblclick().dblclick(options)
例子:
// Double click on button
cy.get('button').dblclick()

// Double click on first el containing 'Welcome'
cy.contains('Welcome').dblclick()
类型
目的:输入 DOM 元素。
句法:
.type(text).type(text, options)
例子:
// Type 'Hello, World' into the 'input'
cy.get('input').type('Hello, World')

// Type a key combination
cy.get('input').type('{shift}{alt}Q')
// this is the same as a user holding down SHIFT and ALT, then pressing Q

// Special characters sequences
cy.get('#code-input').type('function (num) {return num * num;}',
                           { parseSpecialCharSequences: false })
// will not escape { } characters

// Implicit form submission behaviour
cy.get('#username').type('bob@burgers.com')
cy.get('#password').type('password123{enter}')
清除
用途:清除输入框或文本框的值。
它是.type({selectall}{backspace})
句法:
.clear().clear(options)
例子:
// Clear text input
cy.get('[type="text"]').clear()

// Clear the input and type a new value
cy.get('textarea').clear().type('Hello, World')
查看
目的:勾选复选框或单选按钮。元素必须是<input>复选框或单选按钮类型。
句法:
.check().check(value).check(values).check(options).check(value, options).check(values, options)
例子:
// Check all checkboxes
cy.get('[type="checkbox"]').check()

// Check the first checkbox
cy.get('[type="checkbox"]').first().check()

// Select all radios
cy.get('[type="radio"]').check()

// Select the radio with the value of ‘US’
cy.get('[type="radio"]').check('US')

// Check the checkboxes with the values ‘ga’ and ‘ca’
cy.get('[type="checkbox"]').check(['ga', 'ca'])
取消选中
目的:取消选中复选框或单选按钮。元素必须是<input>复选框或单选按钮类型。
句法:
.uncheck().uncheck(value).uncheck(values).uncheck(options).uncheck(value, options).uncheck(values, options)
例子:
// Uncheck all checkboxes
cy.get('[type="checkbox"]').uncheck()

// Uncheck the first checkbox
cy.get('[type="checkbox"]').first().uncheck()

// Uncheck the checkboxes with the values ‘ga’ and ‘ca’
cy.get('[type="checkbox"]').uncheck(['ga', 'ca'])
选择
目的:<option>在 中选择一个<select>。
句法:
.select(value).select(values).select(value, options).select(values, options)
例子:
<select multiple>
    <option value="456">apples</option>
    <option value="457">oranges</option>
    <option value="458">bananas</option>
</select>
// Select the '456' option
cy.get('select').select('456')

// Select the options with the texts “apples” and “bananas”
cy.get('select').select(['apples', 'bananas'])
4.断言
在我们深入研究并了解断言有哪些不同的 cammad 之前,有一个好消息 - 许多命令都有默认的内置断言,或者有可能导致它失败的要求,而不需要您添加的明确断言。
以下是一些示例:
cy.visit()期望页面发送带有 200 状态代码的文本/html 内容。cy.get()期望元素最终存在于 DOM 中。cy.contains()期望具有内容的元素最终存在于 DOM 中。.click()期望元素最终处于可操作状态。
在 Cypress 中有两种编写断言的方法:
- 隐式主语:使用
.should()和.and() - 明确主题:使用
expect
注意事项:
- Cypress 捆绑了 Chai、Chai-jQuery 和 Sinon-Chai 来提供内置断言。您可以在此处查看完整的列表。
- 使用
.should()和.and()是在 Cypress 中进行断言的首选方式。 - 断言会自动重试,直到通过或超时。
- 在大多数情况下,
.should()和.and()会返回与上一个命令相同的主题。然而,有些链接器会改变主题。来自 Chai 或 Chai-jQuery 的链接器会始终记录它们返回的内容,这将帮助您了解哪些断言会改变主题,哪些会使其保持不变。
应该
目的:创建一个断言。
句法:
.should(chainers).should(chainers, value).should(chainers, method, value).should(callbackFn)
例子:
cy.get('nav').should('be.visible')

cy.get('nav').should('be.disabled')

cy.get('nav').should('have.class', 'active')

cy.get('nav').should('not.have.id', 'Dashbaord')

cy.get('nav').should('have.attr', 'href', '/users')

cy.get('nav').children().should('have.length', 8)
回调函数:
假设我们需要确认出现的三个项目中的每一个项目内的文本。我们可以为三个断言设置三个命令:
cy.get('#app div:nth(0)').should('contain', 'first child')
cy.get('#app div:nth(1)').should('contain', 'second child')
cy.get('#app div:nth(2)').should('contain', 'third child')
这可以通过一个断言来完成:
cy.get('#app div')
   .should(($div) => {
      expect($div.eq(0)).to.contain('first child')
      expect($div.eq(1)).to.contain('second child')
      expect($div.eq(2)).to.contain('third child')
   })
和
目的:创建一个断言。.should() 的别名
句法:
.and(chainers).and(chainers, value).and(chainers, method, value).and(callbackFn)
例子:
cy.get('nav')
    .should('be.visible')
    .and('be.disabled')
    .and('have.class', 'active')

cy.get('nav')
    .should('not.have.id', 'Dashbaord')
    .and('have.attr', 'href', '/users')
执行测试
要运行测试,您有以下选项:
- 可以从 GUI 和命令行执行测试
- 测试可以在浏览器和无头模式下执行。此外,当您进行一些更改并保存时,测试会自动运行。当您编写测试并希望经常执行检查时,这非常方便。这称为“实时重新加载”。
1. 从 GUI 运行测试
从 GUI 运行测试很简单。
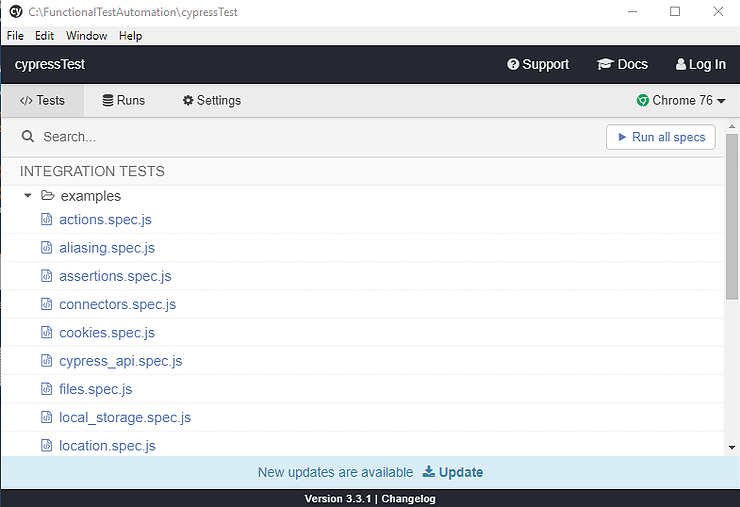
首先,让我们使用以下命令启动 Cypress GUI:
npx cypress open
它看起来是这样的:

所有.js文件都是测试文件。
要运行任何测试,只需点击它即可。Cypress Test Runner 将打开,并在其中运行测试。

这款测试运行器非常直观,功能强大。命令日志列出了所有运行过的命令,当你查看这些命令时,应用预览部分会显示命令执行时的应用状态。这就是 Cypress 提供的开箱即用的“时间旅行”功能,它备受好评。
2. 从命令行运行测试
使用命令行,测试可以在浏览器以及无头模式下执行。
2.1. 无头模式
使用命令行时,默认情况下,测试以无头模式运行。Cypress 会在无头模式下录制视频。
运行单个规范文件
npx cypress run --spec "cypress/integration/examples/actions.spec.js"
运行多个规范文件
npx cypress run --spec "cypress/integration/examples/actions.spec.js,
cypress/integration/examples/files.spec.js"
运行文件夹中的所有 spec 文件
npx cypress run --spec "cypress/integration/examples/**/*"
运行项目中的所有 spec 文件
npx cypress run
2.2. 在浏览器中
要使用命令行在浏览器中执行测试,只需添加“--headed”(用于 Electron 浏览器)或“--browser browserName”(用于其他浏览器)。“browser”参数可以设置为“chrome”、“canary”、“chromium”或“electron”,以启动系统上检测到的浏览器。Cypress 将尝试自动为您查找已安装的浏览器。
# for electron browser
npx cypress run --headed

# for specifying your prefered browser: chrome, canary, chromium, or electron
cypress run --browser chrome
如果您更喜欢观看和学习,请跳转到Youtube 上的 Cypress 系列
订阅我的 Youtube 频道 - QA Camp!
您可以在此处找到示例项目:https://github.com/bushralam/Cypress
文章来源:https://dev.to/bushraalam/cypress-end-to-end-testing-framework-3naa