使用 Heroku 部署 React-Django 应用
React-Django-Heroku Web 应用部署
方法一:分离后端和前端
参考
React-Django-Heroku Web 应用部署
介绍
这是一个使用React.js(前端)和Django(后端)构建的简单 Todo Web 应用程序。
部署此类 Web 应用程序主要有两种方式:
-
前后端分离:
在此方法中,您将分别提供后端和前端应用程序,它们使用各自的 URI 相互连接。此方法的一个主要缺点是您必须自行配置 CORS。本指南稍后将详细介绍 CORS。 -
从同一主机提供服务:
使用此方法,您将从同一 URI 为应用程序提供服务,从而消除了 CORS 开销。此外,它还使维护中小型应用程序变得更加容易。您肯定不想为一些简单的网站(例如博客、待办事项等)创建两个单独的存储库。
此方法需要先构建 React 应用程序(npm run build)并更新 Django 视图(views.py)和 url(urls.py)以直接呈现 index.html 模板。
在本指南中,我们将针对一个简单的待办事项应用演示这种更长、更复杂但更灵活的方法。以后我会尝试第二种更简单的方法。
技术堆栈
前端
- react@17.0.1
- axios@0.21.0
- 引导@4.5.3
- reactstrap@8.7.1
后端
- Django==3.1.3
- djangorestframework==3.12.2
- django-cors-headers==3.5.0
- dj-数据库-url==0.5.0
- django-heroku==0.3.1
- gunicorn==20.0.4
- 白噪声==5.2.0
- python-dotenv==0.15.0
- psycopg2==2.8.6
- psycopg2-binary==2.8.6
先决条件
1. 安装 Node.js
在此处下载 Node.js 和 Node 包管理器 (NPM) 。
2. 设置虚拟环境
a. 使用venv(首选)
-
创建虚拟环境:
$ python3 -m venv venv -
要激活虚拟环境(Linux / Mac OS):
$ source venv/bin/activate
b. 使用pipenv
-
安装 pipenv:
$ pip install pipenv # Python 2 $ pip3 install pipenv # Python 3 -
进入虚拟环境shell:
$ pipenv shell
已部署的 Web 应用程序
单击此处查看已部署的待办事项 Web 应用程序!
单击此处访问GitHub 存储库。
方法一:分离后端和前端
设置后端
1. 创建新的项目目录
$ mkdir (DIR_NAME)
$ cd (DIR_NAME)
2.安装依赖项
在虚拟环境中运行以下命令:
-
使用pipenv:
$ pipenv install -r requirements.txt # (Python 2) $ pipenv3 install -r requirements.txt # (Python 3) -
使用venv:
$ pip install -r requirements.txt # (Python 2)
$ pip3 install -r requirements.txt # (Python 3)
3.创建新的Django项目
在虚拟环境中运行以下命令:
$ django-admin startproject backend
4.将所有Django项目文件解压到根目录(推荐)
该目录应如下所示:
.
├── README.md
├── backend
│   ├── __init__.py
│   ├── __pycache__
│   ├── asgi.py
│   ├── settings.py
│   ├── urls.py
│   └── wsgi.py
├── db.sqlite3
├── manage.py
5.创建新的Django应用
首先,导航到新创建的 backend 文件夹。然后,启动一个新的 Django 应用,在本例中我们将其命名为 ,todo因为我们想要创建一个待办事项应用。我们还将运行迁移并启动服务器:
$ cd backend
$ python manage.py startapp todo
$ python manage.py migrate
$ python manage.py runserver
如果一切顺利,我们应该会看到一个 Django 应用程序实例在这个地址上运行 - http://localhost:8000

6. 注册新的 Django 应用
打开backend/settings.py文件并更新INSTALLED_APPS如下部分:
# backend/settings.py

# Application definition
INSTALLED_APPS = [
    'django.contrib.admin',
    'django.contrib.auth',
    'django.contrib.contenttypes',
    'django.contrib.sessions',
    'django.contrib.messages',
    'django.contrib.staticfiles',
    'todo' # Add this
]
7.设置 API
为了允许前端和后端之间的API CRUD 操作,我们需要利用Django REST 框架以及Django CORS Headers。
Django REST 框架是一个强大而灵活的工具包,用于构建 Web API,而Django CORS Headers是一个 Django 应用程序,用于处理跨域资源共享 (CORS)所需的服务器标头。
下图基本上总结了 React-Django 堆栈 Web 应用程序的应用程序架构:
- Django 使用 Django REST Framework 导出 REST API,并使用 Django Model 与数据库交互。
- React Client 使用 axios 发送 HTTP 请求并检索 HTTP 响应,在组件上显示数据。
在步骤 2 中安装所有必要的要求后,我们需要将rest_framework和添加corsheaders到已安装的应用程序列表中,因此打开backend/settings.py文件并相应地更新INSTALLED_APPS和MIDDLEWARE部分:
# backend/settings.py

# Application definition
INSTALLED_APPS = [
    'django.contrib.admin',
    'django.contrib.auth',
    'django.contrib.contenttypes',
    'django.contrib.sessions',
    'django.contrib.messages',
    'django.contrib.staticfiles',
    'corsheaders',                              # add this
    'rest_framework',                           # add this
    'todo',
  ]

MIDDLEWARE = [
    'corsheaders.middleware.CorsMiddleware',    # add this
    'django.middleware.security.SecurityMiddleware',
    'django.contrib.sessions.middleware.SessionMiddleware',
    'django.middleware.common.CommonMiddleware',
    'django.middleware.csrf.CsrfViewMiddleware',
    'django.contrib.auth.middleware.AuthenticationMiddleware',
    'django.contrib.messages.middleware.MessageMiddleware',
    'django.middleware.clickjacking.XFrameOptionsMiddleware',
]
在文件底部backend/settings.py,您需要选择添加以下内容:
# # Whitelist localhost:3000 because that's where frontend will be served

# Option 1
CORS_ORIGIN_WHITELIST = [
    'https://localhost:3000',
]

# Option 2
CORS_ORIGIN_ALLOW_ALL = True
CORS_ORIGIN_ALLOW_ALL:如果为 True,则接受所有来源(不使用下方白名单)。默认为 False。CORS_ORIGIN_WHITELIST:有权进行跨站 HTTP 请求的来源列表。默认为 []。
8. 为 Django 模型和视图创建序列化器
我们需要序列化器将模型实例转换为 JSON,以便前端可以轻松处理接收到的数据。我们将创建一个todo/serializers.py文件:
touch todo/serializers.py
打开todo/serializers.py文件并使用以下代码更新它:
# todo/serializers.py
from rest_framework import serializers # This is important
from .models import Todo

class TodoSerializer(serializers.ModelSerializer):
    class Meta:
        model = Todo
        fields = ('id', 'title', 'description', 'completed')
对于任何类型的 Django 应用程序,只要导入序列化器并serializers.ModelSerializer定义模型类参数,您就可以配置其自己的模型。
对于以下的观点todo/views.py:
# todo/views.py

from django.shortcuts import render
from rest_framework import viewsets          # add this
from .serializers import TodoSerializer      # add this
from .models import Todo                     # add this

class TodoView(viewsets.ModelViewSet):       # add this
    serializer_class = TodoSerializer          # add this
    queryset = Todo.objects.all()              # add this
视图集基类默认提供了 CRUD 操作的实现,我们要做的就是指定序列化器类和查询集。
最后,我们需要更新:backend/urls.py
# backend/urls.py

from django.contrib import admin
from django.urls import path, include                   # add this
from rest_framework import routers                      # add this
from todo import views                                  # add this

router = routers.DefaultRouter()                        # add this
router.register(r'todos', views.TodoView, 'todo')       # add this

urlpatterns = [
    path('admin/', admin.site.urls),
    path('api/', include(router.urls))                   # add this
]
路由器类允许我们进行以下查询:
/todos/- 这将返回所有待办事项的列表(可以在此处进行创建和读取操作)。/todos/id- 这将使用主键返回单个待办事项id(可以在此处完成更新和删除操作)。
设置前端
1.创建一个新的 React 应用程序
安装 Node.js 后,您可以使用以下命令快速开始创建您的第一个 React 应用程序:
$ npx create-react-app frontend
$ cd my-app
$ npm start
在本例中,我们创建的应用程序的名称与frontendDjango 的backend项目名称相符。这将需要几分钟才能完成。
一切完成后,将创建一个具有以下目录树的新文件夹:
.
├── README.md
├── backend
│   ├── __init__.py
│   ├── __pycache__
│   ├── asgi.py
│   ├── settings.py
│   ├── urls.py
│   └── wsgi.py
├── db.sqlite3
├── manage.py
└── frontend
    ├── README.md
    ├── node_modules
    ├── package.json
    ├── .gitignore
    ├── public
    │   ├── favicon.ico
    │   ├── index.html
    │   └── manifest.json
    └── src
        ├── App.css
        ├── App.js
        ├── App.test.js
        ├── index.css
        ├── index.js
        ├── logo.svg
        └── reportWebVitals.js
        └── setupTests.js
2. 将所有 React 项目文件解压到根目录(推荐)
为了使后续过程更加简单,建议您将所有文件移到
 to the **root directory** (same level as

  ```backend/```

 folder) as follows:


```shell
.
├── README.md
├── backend
│   ├── __init__.py
│   ├── __pycache__
│   ├── asgi.py
│   ├── settings.py
│   ├── urls.py
│   └── wsgi.py
├── db.sqlite3
├── manage.py
├── node_modules
├── package-lock.json
├── package.json
├── public
├── requirements.txt
├── runtime.txt
├── src
└── todo
3. 开发你的 React 应用程序
在这一步,如何开发 React 应用程序完全取决于你。你可以参考我GitHub 仓库( ) 中的 React 代码。react-dj-todoapp
4. 使用 axios 连接 Django 和 React
为了向 Django 后端服务器上的 API 端点发出请求,我们需要安装一个名为的 JavaScript 库axios。
axios是一款流行的、基于 Promise 的 HTTP 客户端,它拥有易于使用的 API,可在浏览器和 Node.js 中使用。有关 的更多信息,您可以在此处axios阅读。
首先,我们需要axios使用 NPM 安装:
$ npm install axios
一旦axios成功安装,请转到package.json文件并添加代理,如下所示:
// package.json

[...]
"name": "frontend",
"version": "0.1.0",
"private": true,
"proxy": "http://localhost:8000",
"dependencies": {
    "axios": "^0.18.0",
    "bootstrap": "^4.1.3",
    "react": "^16.5.2",
    "react-dom": "^16.5.2",
    "react-scripts": "2.0.5",
    "reactstrap": "^6.5.0"
},
[...]
代理将有助于将 API 请求传输到http://localhost:8000,Django 应用程序将在那里处理它们,因此我们可以简化在 React 中编写如下请求:
axios.get("/api/todos/")
而不是这样:
axios.get("http://localhost:8000/api/todos/")
之后,您需要修改 React 代码(App.js)
以下是如何使用的片段axios:
// src/App.js

handleSubmit = item => {
    this.toggle();
    if (item.id) {
    axios
        .put(`http://localhost:8000/api/todos/${item.id}/`, item)
        .then(res => this.refreshList());
    return;
    }
    axios
      .post("http://localhost:8000/api/todos/", item)
      .then(res => this.refreshList());
};

handleDelete = item => {
    axios
        .delete(`http://localhost:8000/api/todos/${item.id}`)
        .then(res => this.refreshList());
};
欲了解更多信息和示例,请参阅此Digital Ocean 指南。
5.测试Web应用程序
您可以通过在本地开发服务器上同时运行 React 和 Django来检查一切是否正常:
$ npm start
$ python manage.py runserver
测试 UI 和 API 请求是否正常工作。
使用 Heroku 部署 Web 应用
1. 设置 Heroku 帐户和 CLI
以下是Heroku 的从产品到生产的 Django 部署到 Heroku 的说明概要:
- 如果您没有现有帐户,请注册Heroku
- 安装Heroku CLI。对于 MacOS,使用
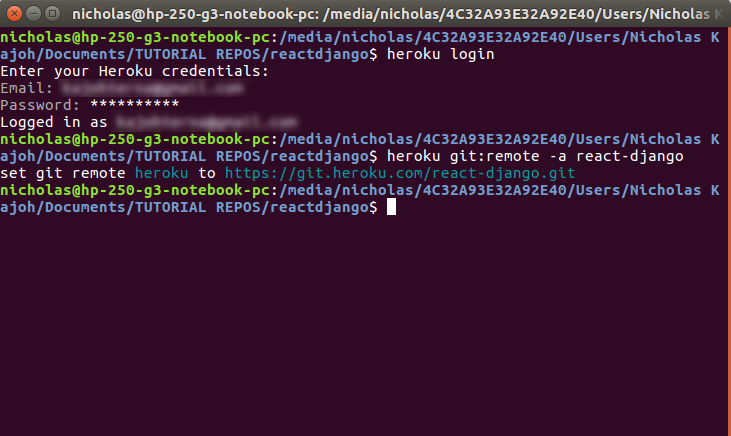
$ brew tap heroku/brew && brew install heroku: - 使用以下方式输入您的凭证登录您的 Heroku帐户
$ heroku login: -
通过 Heroku CLI()或直接在Heroku 仪表板中创建一个新的 Heroku 应用程序:
$ heroku create APP_NAME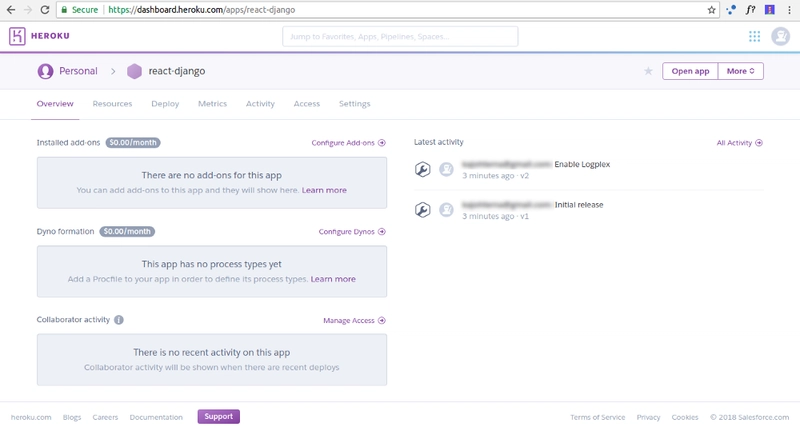
-
通过以下方式添加Heroku远程
$ heroku git:remote -a your-heroku-app. -
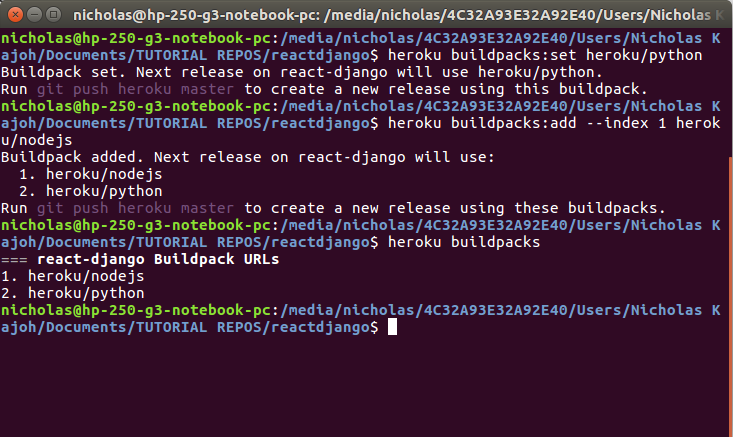
配置Heroku构建包


* The React app build process depends on NPM, so we need Node.js. We also need Python to run Django.

* Heroku uses **buildpacks** to **transform deployed code into slugs** which can be executed by Dynos (server instances on Heroku). We’ll be needing two buildpacks. One for Node and another for Python.

* Our app would run on a Python server, even though we will use Node/NPM to build/bundle the React frontend. So the Python buildpack will be the main one in our config. The main buildpack determines the process type of the Heroku app. You can read about multiple buildpacks to understand how they work.

* You can add buildpacks via the Heroku CLI. Head back to your terminal and run the following to set/add the buildpacks we need:
```shell
$ heroku buildpacks:add --index 1 heroku/nodejs
$ heroku buildpacks:add --index 2 heroku/python
```
* Note that the buildpacks **must be added in that order**. We can see the buildpacks we’ve added by running `$ heroku buildpacks`. The **last buildpack** on the list **determines the process type** of the app.
- 配置PostgreSQL Heroku 插件
* During production, Heroku will **not be using SQLite database**. Instead, we need to use **PostgreSQL** by configuring the addon to our app using `$ heroku addons:create heroku-postgresql:hobby-dev`
* You can check whether this is successful by running `$ heroku config`:
 ```shell
$ === APP_NAME Config Vars
DATABASE_URL: postgres://[DATABASE_INFO_HERE]
```
* The database info from the code snippet above refers to the URL containing your database’s location and access credentials all in one. Anyone with this URL can access your database, so be careful with it.
* You will notice that Heroku saves it as an **environment variable** called `DATABASE_URL` . This URL can and does change, so you should never hard code it. Instead, we’ll use the variable `DATABASE_URL` in  Django.
- 配置Heroku 配置变量
* According to Heroku, **config variables** are environment variables that can change the way your app behaves. In addition to creating your own, some add-ons come with their own.
* There are several environment variables that need to be set:
```shell
$ heroku config:set ALLOWED_HOSTS=APP_NAME.herokuapp.com
$ heroku config:set ALLOWED_HOSTS=APP_NAME.herokuapp.com
$ heroku config:set SECRET_KEY=DJANGO_SECRET_KEY
$ heroku config:set WEB_CONCURRENCY=1
```
- 进口
django-heroku内部settings.py
* `django-heroku` is a **Django library** for Heroku applications that ensures a more seamless deployment and development experience.
* This library provides:
    * **Settings configuration** (Static files / WhiteNoise)
    * **Logging configuration**
    * **Test runner** (important for Heroku CI)
* In `settings.py`, include the following at the very bottom:
```python
# backend/settings.py

# Configure Django App for Heroku.
import django_heroku
django_heroku.settings(locals())
```
2.配置Django后端
数据库配置
A.创建 .env
如上所述,Django 应用的本地版本使用 db.sqlite3 作为数据库。但是,当我们访问 Heroku 版本时,APP_NAME.herokuapp.comHeroku 将需要使用 PostgreSQL 数据库。
我们希望我们的应用在本地运行时能够使用 SQLite,在生产环境中运行时能够使用 Postgres。这可以通过安装python-dotenv库来实现。
然后,我们将使用一个名为的文件.env来告诉 Django 在本地运行时使用 SQLite。要创建.env该文件并将其指向 Django 到你的 SQLite 数据库,请执行以下操作:
$ echo 'DATABASE_URL=sqlite:///db.sqlite3' > .env
.env通过运行以下命令将文件包含到我们的 .gitignore 中:
$ echo '.env' >> .gitignore
B.更新settings.py
首先,导入部署所需的库:
# backend/settings.py

import django_heroku
import dotenv
import dj_database_url
接下来,我们需要设置数据库配置:
# backend/settings.py

# Build paths inside the project like this: BASE_DIR / 'subdir'.
BASE_DIR = Path(__file__).resolve().root.root

dotenv_file = os.path.join(BASE_DIR, ".env")
if os.path.isfile(dotenv_file):
    dotenv.load_dotenv(dotenv_file)
由于.env在 Heroku 上不存在,因此dotenv.load_dotenv(dotenv_file)永远不会在 Heroku 上被调用,并且 Heroku 将继续尝试寻找自己的数据库 - PostgreSQL。
我们还需要配置DATABASES如下所示的设置:
# backend/settings.py

DATABASES = {}
DATABASES['default'] = dj_database_url.config(conn_max_age=600)
这里的思路是先清除DATABASES变量,然后'default'使用dj_database_url模块设置键。DATABASE_URL如果是在 Heroku 上,则此模块使用 Heroku 的变量;如果是在本地工作,则使用DATABASE_URL我们在文件中设置的变量。.env
如果您按照上述说明运行了 Django 应用程序,则在本地运行时可能会出现错误,因为dj_database_url模块需要使用 SSL 登录。Heroku Postgres 需要 SSL,但 SQLite 不需要也不期望 SSL。以下是修复此问题的方法:
# backend/settings.py

# This should already be in your settings.py
django_heroku.settings(locals())

# Add these at the very last line of settings.py
options = DATABASES['default'].get('OPTIONS', {})
options.pop('sslmode', None)
通过使用运行本地 Django 服务器来测试一切python3 manage.py runserver。
静态文件服务(WhiteNoise)
A. WhiteNoise 设置
WhiteNoise允许您的 Web 应用提供自己的静态文件,使其成为一个独立的单元,可以部署在任何地方,而无需依赖 nginx、Amazon S3 或任何其他外部服务。(尤其适用于 Heroku、OpenShift 和其他 PaaS 提供商。)
由于这已经从requirements.txt之前的文件中安装了,我们需要更新settings.py:
# backend/settings.py

MIDDLEWARE = [
  'django.middleware.security.SecurityMiddleware',
  'whitenoise.middleware.WhiteNoiseMiddleware',
  # ...
]

STATICFILES_STORAGE = 'whitenoise.storage.CompressedManifestStaticFilesStorage'
B.静态文件和模板设置
为了正确地提供来自 Django 和 React 的静态文件,我们需要更新以下内容settings.py:
# backend/settings.py

STATIC_URL = '/static/'

STATICFILES_DIRS = [
    os.path.join(BASE_DIR, 'build/static')
]

STATIC_ROOT = os.path.join(BASE_DIR, 'staticfiles')
STATIC_ROOT指向包含所有静态文件的目录,而STATICFILES_DIRS指向 Django 也会收集静态文件的其他目录。在本例中,它指向 React 的'build/static'目录,该目录包含 Heroku 在部署期间构建 React 应用时使用的前端静态文件npm run build。
因此,当 Herokupython3 manage.py collectstatic在部署期间运行时,它将自动编译来自 React 和 Django 的所有静态文件。
同时对于Django的模板目录,我们需要包含build存储index.html里面内容的React目录TEMPLATES,如下所示:
# backend/settings.py

TEMPLATES = [
    {
        'BACKEND': 'django.template.backends.django.DjangoTemplates',
        'DIRS': [os.path.join(BASE_DIR, 'build')],
        'APP_DIRS': True,
        'OPTIONS': {
            'context_processors': [
                'django.template.context_processors.debug',
                'django.template.context_processors.request',
                'django.contrib.auth.context_processors.auth',
                'django.contrib.messages.context_processors.messages',
            ],
        },
    },
]
C. 静态文件 MIME 类型问题
在 Heroku 中部署 Web 应用时,经常会遇到的一个问题是静态文件由于 MIME 类型限制而无法加载。这个特定的 MIME 类型 ( text/html) 问题与您的 Django 配置有关。
views.py你的 React 前端需要一个参数。Heroku 需要知道静态文件在哪里content_type。HttpResponse
“拒绝执行脚本... MIME 类型('text/html')”问题源于 Django 的默认content_type设置HttpResponse,即text/html。
可以通过在名为insidecontent_type='application/javascript'的新基于类的视图的返回语句中包含一个参数来解决此问题,如下所示:Assets(View)views.py
# todo/views.py

from django.shortcuts import render
from rest_framework import viewsets
from .serializers import TodoSerializer
from .models import Todo
from django.views import View
from django.http import HttpResponse, HttpResponseNotFound
import os

# The viewsets base class provides the implementation for CRUD operations by default,
# what we had to do was specify the serializer class and the query set.
class TodoView(viewsets.ModelViewSet):
    serializer_class = TodoSerializer
    queryset = Todo.objects.all()

# Add this CBV
class Assets(View):

    def get(self, _request, filename):
        path = os.path.join(os.path.dirname(__file__), 'static', filename)

        if os.path.isfile(path):
            with open(path, 'rb') as file:
                return HttpResponse(file.read(), content_type='application/javascript')
        else:
            return HttpResponseNotFound()
3. 调试和访问
在生产过程中,强烈建议DEBUG将 设置为False。
对于ALLOWED_HOSTS,如果设置CORS_ORIGIN_ALLOW_ALL为True:
# backend/settings.py

ALLOWED_HOSTS = ['*'] # Set to open for all access
否则,您需要按如下方式指定 URL 访问权限:
# backend/settings.py

ALLOWED_HOSTS = ['react-dj-todoapp.herokuapp.com', '127.0.0.1:8000', 'localhost']
4.配置React前端
A.配置package.json
对于使用 Heroku 进行 React 部署,需要在内部进行一些更改package.json:
// package.json

// Add homepage and engine settings

{
    "name": "frontend",
    "homepage": ".",
    "version": "0.1.0",
    "private": true,
    "proxy": "http://localhost:8000",
    "dependencies": {
        "axios": "^0.18.0",
        "bootstrap": "^4.1.3",
        "react": "^16.5.2",
        "react-dom": "^16.5.2",
        "react-scripts": "2.0.5",
        "reactstrap": "^6.5.0"
    },
    "scripts": {
        "start": "react-scripts start",
        "build": "react-scripts build",
        "test": "react-scripts test",
        "eject": "react-scripts eject"
    },
    "engines": {
        "node": "14.6.0",
        "npm": "6.14.9"
    },
    [...]
该engines部分指的是 Node 和 NPM 的首选版本。
B. 修复Django的CSRF token验证冲突
Django 内置的CSRF 保护功能非常有用,可以保护您的服务器免受恶意网站利用访问者浏览器攻击的侵害。但是,使用现代 JavaScript 库时,您需要以不同的方式处理 CSRF。
回顾第一部分README.md,由于 React 和 Django 应用使用不同的 URL 和端口号,Django 的 CSRF 令牌验证机制将阻止 React 在生产期间向 Django 执行任何 API 请求。
为了解决这个问题,我们需要axios在 React 中处理 CSRF 令牌。对于axios客户端,您有三个选项:
- 在每个 Axios 调用的标头中手动附加 CSRF 令牌
AxiosxsrfHeaderName每次调用时使用- 使用默认值
xsrfHeaderName (axios.defaults.xsrfHeaderName = "X-CSRFToken")
下面介绍如何简单地将 CSRF 令牌与 Axios 一起使用,而无需进行任何进一步的配置:
// src/App.js

import axios from 'axios';

axios.defaults.xsrfCookieName = 'csrftoken'
axios.defaults.xsrfHeaderName = 'X-CSRFToken'
5. 设置 Heroku 特定文件
A.运行时.txt
如果您未指定,Heroku 将安装默认 Python 版本,但如果您想选择 Python 版本,则需要一个runtime.txt文件。
在根目录中创建一个requirements.txt,位于、manage.py和.gitignore其余目录旁边。使用您希望应用程序在其上运行的前缀指定 Python 版本:python-
python-3.9.0
B. 要求.txt
在部署 Web 应用程序时,Heroku 需要通过引用该文件来安装 Web 应用程序运行所需的所有依赖项requirements.txt。
为了确保所有依赖项都已包含,请考虑使用命令 冻结依赖项$ pip freeze > requirements.txt。通过将依赖项的确切版本锁定到 Git 仓库中,这将使您的构建更具可预测性。如果您的依赖项未锁定,您可能会发现自己今天部署了一个版本的 Django,明天又部署了一个新版本。
C. Procfile
Heroku 应用包含一个 Heroku 专用文件Procfile,用于指定应用程序应运行的进程。此文件中指定的进程将在部署到 Heroku 时自动启动。
Procfile使用命令在根目录下创建一个名为的文件,就在和文件$ touch Procfile旁边。(请确保 Procfile 的 P 大写,否则 Heroku 可能无法识别!):requirements.txtruntime.txt
然后填写以下代码:
release: python manage.py migrate
web: gunicorn backend.wsgi --log-file -
6. 提交并推送
一旦所有前面的步骤都完成,我们就可以最终提交并推送所有更改:
$ git add .
$ git commit -m "blah blah blah"
$ git push heroku master
构建完成并且您的应用程序发布后,请访问YOUR-APP-NAME.herokuapp.com。
7.数据库同步
成功部署后,可能出现的预期问题之一是500 服务器错误或以下错误:
ProgrammingError at /
relation "TABLE_NAME" does not exist
可以通过$ python3 manage.py migrate --run-syncdb使用Heroku run bash运行来解决此错误:
$ heroku run python3 manage.py migrate --run-syncdb
如果到目前为止一切顺利,恭喜你!您已经成功部署了第一个 React-Django Web 应用!
8.调试
如果一切进展不顺利,您可以使用$ heroku logs --tail来调查任何错误。
参考
- https://www.digitalocean.com/community/tutorials/build-a-to-do-application-using-django-and-react
- https://dev.to/shakib609/deploy-your-django-react-js-app-to-heroku-2bck
- https://alphacoder.xyz/deploy-react-django-app-on-heroku/
- https://alphacoder.xyz/dead-simple-react-django-setup/
- https://blog.usejournal.com/deploying-django-to-heroku-connecting-heroku-postgres-fcc960d290d1
- https://blog.usejournal.com/serving-react-and-django-together-2089645046e4
- https://stackoverflow.com/questions/24351052/relation-does-not-exist-on-heroku
- https://stackoverflow.com/questions/53265543/sending-x-csrf-token-with-axios-request-django-reactjs
- https://www.techiediaries.com/django-cors/
- https://bezkoder.com/django-react-axios-rest-framework/