使用内存数据库测试 Node.js + Mongoose
内存数据库的优缺点
让我们开始编码吧!
过去几周我一直在为Node.js 和 Mongoose应用程序创建单元测试,其中大部分逻辑由 mongoose 和 MongoDB 处理。
我尝试做的第一件事是创建模拟对象来匹配 Mongoose 中执行的每个操作及其不同的结果(起初这看起来是最合理的)。但进行到一半时,我开始意识到这太耗时了,而且如果查询语句发生变化怎么办?我是不是也得修改所有的模拟对象?
在谷歌搜索了一段时间后,我在 Github 上找到了这个包mongodb-memory-server,简单来说,它允许我们启动一个将数据存储在内存中的mongod进程。所以我决定尝试一下。
在本文中,我将向您介绍如何使用内存中的 MongoDB 进程来测试您的 Mongoose 逻辑,而无需创建任何模拟对象。
如果您想直接查看代码,我创建了一个Github 仓库,可以作为示例或样板。
内存数据库的优缺点
一开始我并不确定是否应该使用内存数据库来代替模拟,因此我做了一些调查,并列出了其优缺点:
优点:
- 无需模拟:您的代码直接使用内存数据库执行,与使用常规数据库完全相同。
- 更快的开发:鉴于我不需要为每个操作和结果构建模拟,而只需要测试查询,我发现开发过程更快、更直接。
- 更可靠的测试:您正在测试将在生产中执行的实际代码,而不是一些可能不正确、不完整或过时的模拟代码。
- 测试更容易构建:我不是单元测试专家,而且我只需要播种数据库并执行我需要测试的代码,这使得整个过程对我来说容易得多。
缺点:
- 内存数据库可能需要播种
- 更多的内存占用(dah)
- 测试需要更长时间才能运行(取决于您的硬件)。
总之,内存数据库非常适合测试应用程序,其中逻辑主要通过数据库操作来处理,并且内存和执行时间不是问题。
让我们开始编码吧!
在这个例子中,我们将创建一个 Mongoose 模式和一个使用该模式执行一些操作的服务。
稍后我们将测试该服务执行的操作。
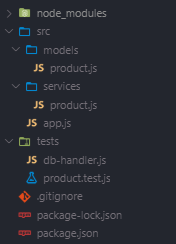
我们的项目完成后将会是这样的:
1. 设置并安装依赖项
运行npm init以设置您的项目,不要担心测试脚本,稍后会处理它。
然后执行以下命令安装所有依赖项:
npm install --save mongoose
npm install --save-dev jest mongodb-memory-server
注意:安装时,
mongodb-memory-servermongod 二进制文件会下载并安装到 中node_modules/.cache。您还可以尝试其他选项,例如,mongodb-memory-server-global这将下载二进制文件到 中%HOME/.cache,以便测试其他项目。或者,mongodb-memory-server-core如果服务器启动时找不到二进制文件,则仅下载到 中。选择最适合您需求的选项。
2.编写代码进行测试
现在我们将构建模型模式和稍后测试的服务。
2.a 产品架构
// src/models/product.js

const mongoose = require('mongoose');

/**
 * Product model schema.
 */
const productSchema = new mongoose.Schema({
    name: { type: String, required: true },
    price: { type: Number, required: true },
    description: { type: String }
});

module.exports = mongoose.model('product', productSchema);
2.b 产品服务
// src/services/product.js

const productModel = require('../models/product');

/**
 * Stores a new product into the database.
 * @param {Object} product product object to create.
 * @throws {Error} If the product is not provided.
 */
module.exports.create = async (product) => {
    if (!product)
        throw new Error('Missing product');

    await productModel.create(product);
}
3. 配置 jest
首先,我们将test脚本添加到package.json:
"scripts": {
    "test": "jest --runInBand ./test"
}
注意:该
--runInBand参数将确保所有测试按顺序运行。我这样做是为了确保一次只运行一个 mongod 服务器。
最后将其添加到您的package.json,因为我们正在运行一个节点应用程序。
"jest": {
    "testEnvironment": "node"
}
4.内存数据库处理
我编写了一个模块来执行一些基本操作,我将使用这些操作来处理内存数据库。
// tests/db-handler.js

const mongoose = require('mongoose');
const { MongoMemoryServer } = require('mongodb-memory-server');

const mongod = new MongoMemoryServer();

/**
 * Connect to the in-memory database.
 */
module.exports.connect = async () => {
    const uri = await mongod.getConnectionString();

    const mongooseOpts = {
        useNewUrlParser: true,
        autoReconnect: true,
        reconnectTries: Number.MAX_VALUE,
        reconnectInterval: 1000
    };

    await mongoose.connect(uri, mongooseOpts);
}

/**
 * Drop database, close the connection and stop mongod.
 */
module.exports.closeDatabase = async () => {
    await mongoose.connection.dropDatabase();
    await mongoose.connection.close();
    await mongod.stop();
}

/**
 * Remove all the data for all db collections.
 */
module.exports.clearDatabase = async () => {
    const collections = mongoose.connection.collections;

    for (const key in collections) {
        const collection = collections[key];
        await collection.deleteMany();
    }
}
5. 编写一些测试
最后,我们使用以下代码测试我们的产品服务:
// tests/product.test.js

const mongoose = require('mongoose');

const dbHandler = require('./db-handler');
const productService = require('../src/services/product');
const productModel = require('../src/models/product');

/**
 * Connect to a new in-memory database before running any tests.
 */
beforeAll(async () => await dbHandler.connect());

/**
 * Clear all test data after every test.
 */
afterEach(async () => await dbHandler.clearDatabase());

/**
 * Remove and close the db and server.
 */
afterAll(async () => await dbHandler.closeDatabase());

/**
 * Product test suite.
 */
describe('product ', () => {

    /**
     * Tests that a valid product can be created through the productService without throwing any errors.
     */
    it('can be created correctly', async () => {
        expect(async () => await productService.create(productComplete))
            .not
            .toThrow();
    });
});

/**
 * Complete product example.
 */
const productComplete = {
    name: 'iPhone 11',
    price: 699,
    description: 'A new dual‑camera system captures more of what you see and love. '
};
如果您想查看,repo中还有更多测试示例。
6. 尝试一下!
要尝试我们的新测试,只需npm test在终端👩💻中运行并观察您的测试是否生动!
 后端开发教程 - Java、Spring Boot 实战 - msg200.com
