如何在 Vercel 上托管 RESTful API
Vercel是一个出色的云平台,凭借其简洁性和卓越的开发者体验脱颖而出。其成功的原因之一是其对全栈 JavaScript Web 应用的高度关注。然而,这并不意味着您无法在 Vercel 上部署无头服务。
在本文中,我们将使用 Express.js、Prisma和ZenStack构建一个以数据库为中心的安全 RESTful API ,并将其部署到 Vercel 上。我们还将利用Vercel 的全新 Postgres产品实现数据持久化。
设想
我们将在这里构建一个非常简单的宠物商店服务。它的 API 将包含以下资源:
- 用户:可以注册、登录和订购宠物。
- 宠物:可供用户列出并排序。
- 订单:由用户创建,包含宠物列表。
业务规则:
- 匿名用户可以注册并登录。
- 匿名用户可以列出未售出的宠物。
- 经过认证的用户可以列出未售出的宠物和他们订购的宠物。
- 经过身份验证的用户可以为未售出的宠物创建订单。
- 经过身份验证的用户可以查看他们的订单。
您可以在此处找到完成的项目。
构建服务
指导我们完成整个过程的主要参考文档是将 Express.js 与 Vercel 结合使用。
1.创建项目
让我们首先创建一个支持 Typescript 的新 Express.js 项目。
mkdir vercel-petstore
cd vercel-petstore
npm init -y
npm install express
npm install -D typescript tsx @types/node @types/express
npx tsc --init
创建无服务器函数入口点(根据 Vercel 的要求),/api/index.ts其内容如下:
import express from 'express';

const app = express();

// enable JSON body parser
app.use(express.json());

app.get('/', (req, res) => {
    res.send('Hello World!');
});

export default app;
然后创建/api/app.ts以启动 Express 服务器并在本地进行测试:
import app from '.';

app.listen(3000, () => console.log('🚀 Server ready at: http://localhost:3000'));
启动服务器:
npx tsx watch api/app.ts
现在在新的 shell 窗口中,点击服务端点并验证其是否正常工作:
curl localhost:3000
你好世界!
2.创建 Vercel Postgres 数据库
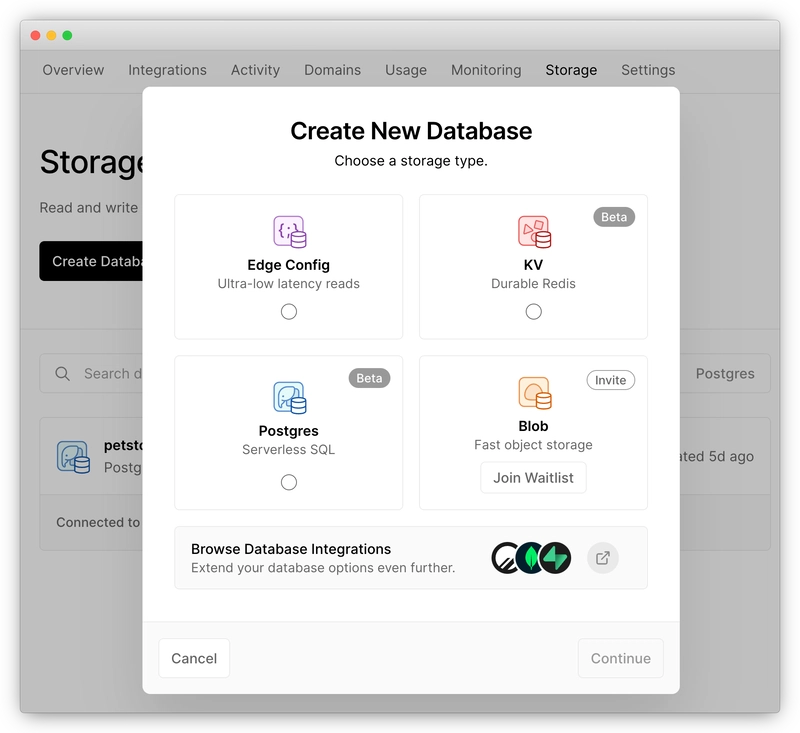
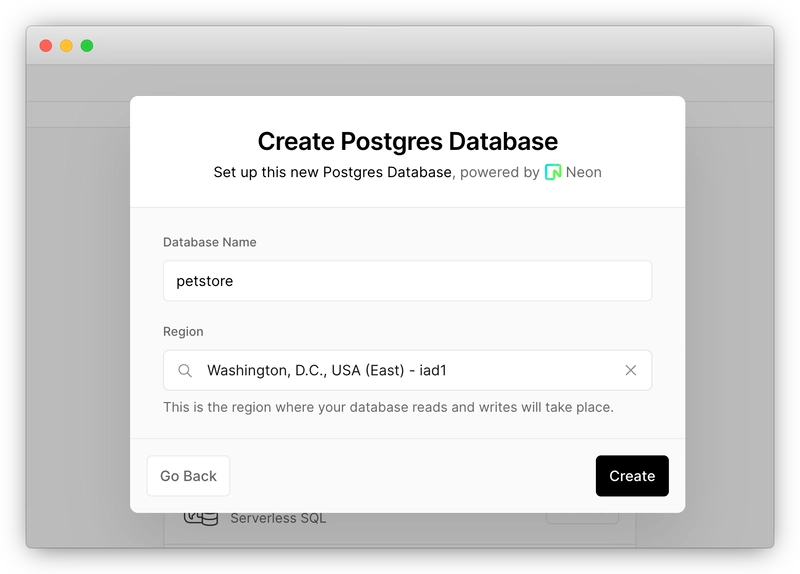
登录您的 Vercel 帐户,前往“存储”页面,然后创建一个新的“Postgres”数据库。
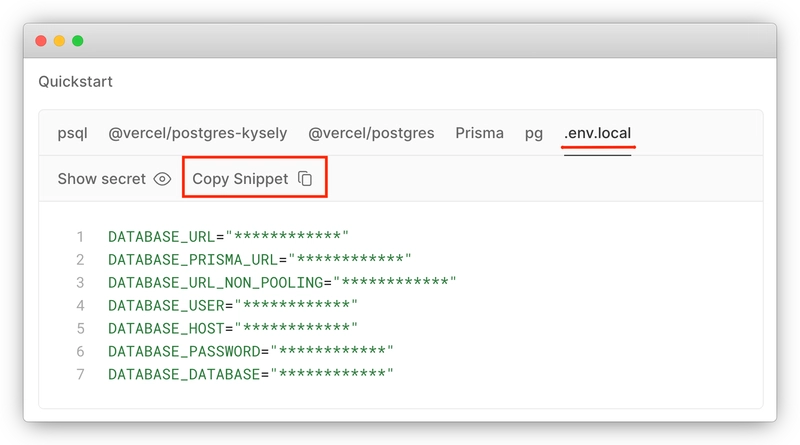
创建后,进入数据库页面,切换到“.env.local”选项卡,复制其内容:
.env在项目根目录下创建一个文件并将复制的内容粘贴到其中。
Vercel 的存储服务让启动关系数据库变得非常容易。它是一个标准的 Postgres DB,因此您可以继续使用您已知的工具。
3. 建模数据
数据建模是构建以资源为中心的 API 的最关键部分。在本指南中,我们将使用Prisma和ZenStack来建模数据库。Prisma 是一个提供声明式数据建模体验的工具包。ZenStack 是 Prisma 的强大套件,提供访问控制、规范生成、自动服务生成等增强功能以及许多其他改进。
让我们首先初始化我们的数据建模项目:
npx zenstack@latest init
CLIzenstack安装 Prisma 和其他依赖项并创建样板schema.zmodel文件。使用以下内容更新它以反映我们的要求:
datasource db {
    provider = "postgresql"
    url = env("POSTGRES_PRISMA_URL")
    directUrl = env("POSTGRES_URL_NON_POOLING")
}

generator client {
    provider = "prisma-client-js"
}

model User {
    id String @id @default(cuid())
    email String @unique
    password String
    orders Order[]
}

model Pet {
    id String @id @default(cuid())
    createdAt DateTime @default(now())
    updatedAt DateTime @updatedAt
    name String
    category String
    order Order? @relation(fields: [orderId], references: [id])
    orderId String?
}

model Order {
    id String @id @default(cuid())
    createdAt DateTime @default(now())
    updatedAt DateTime @updatedAt
    pets Pet[]
    user User @relation(fields: [userId], references: [id])
    userId String
}
运行以下命令生成 Prisma 模式并将其推送到数据库:
npx zenstack generate
npx prisma db push
CLI
zenstack从中生成 Prisma 模式和其他工件,例如访问控制清单、OpenAPI 规范等schema.zmodel。
另外,创建一个prisma/seed.ts文件,用一些数据填充数据库。然后,当您重置本地数据库时,您可以重新运行该脚本来填充数据。
import { PrismaClient, Prisma } from '@prisma/client';

const prisma = new PrismaClient();

const petData: Prisma.PetCreateInput[] = [
    {
        id: 'luna',
        name: 'Luna',
        category: 'kitten',
    },
    {
        id: 'max',
        name: 'Max',
        category: 'doggie',
    },
    {
        id: 'cooper',
        name: 'Cooper',
        category: 'reptile',
    },
];

async function main() {
    console.log(`Start seeding ...`);
    for (const p of petData) {
        // create pet if not exists
        const pet = await prisma.pet.upsert({
            where: { id: p.id },
            create: p,
            update: {},
        });
        console.log(`Upserted Pet with id: ${pet.id}`);
    }
    console.log(`Seeding finished.`);
}

main()
    .then(async () => {
        await prisma.$disconnect();
    })
    .catch(async (e) => {
        console.error(e);
        await prisma.$disconnect();
        process.exit(1);
    });
运行脚本来为我们的数据库提供种子:
npx tsx prisma/seed.ts
4.实现 API
ZenStack 通过提供内置的 RESTful 实现,显著简化了以数据库为中心的 API 的开发。您可以使用特定于框架的适配器将 RESTful 服务安装到您的应用程序中。让我们看看如何使用 Express.js 来实现。
安装服务器适配器包:
npm install @zenstackhq/server
将 的内容替换/api/index.ts为以下内容:
import { PrismaClient } from '@prisma/client';
import { ZenStackMiddleware } from '@zenstackhq/server/express';
import RestApiHandler from '@zenstackhq/server/api/rest';
import express from 'express';

const app = express();
app.use(express.json());

const prisma = new PrismaClient();

// create a RESTful-style API handler
const apiHandler = RestApiHandler({ endpoint: 'http://localhost:3000/api' });

app.use('/api', ZenStackMiddleware({
    getPrisma: () => prisma,
    handler: apiHandler
}));

export default app;
与 Express.js 的集成是通过ZenStackMiddleware中间件工厂实现的。使用它可以将 RESTful API 挂载到你选择的路径上。getPrisma回调用于获取当前请求的 Prisma 客户端实例。目前,我们只返回全局 Prisma 客户端。
该
endpoint选项用于生成响应主体中的资源链接。
重新启动开发服务器以反映我们的更改。
通过这几行代码,RESTful CRUD API 即可针对所有资源(User、Pet和)运行Order。通过获取所有宠物进行测试:
curl localhost:3000/api/pet
输出:
{
   "data" : [
      {
         "attributes" : {
            "category" : "reptile",
            "createdAt" : "2023-05-28T11:42:24.355Z",
            "name" : "Cooper",
            "orderId" : null,
            "updatedAt" : "2023-05-28T11:42:24.355Z"
         },
         "id" : "cooper",
         "links" : {
            "self" : "http://localhost:3000/api/pet/cooper"
         },
         "relationships" : {
            "order" : {
               "data" : null,
               "links" : {
                  "related" : "http://localhost:3000/api/pet/cooper/order",
                  "self" : "http://localhost:3000/api/pet/cooper/relationships/order"
               }
            }
         },
         "type" : "pet"
      },
      ...
   ],
   "jsonapi" : {
      "version" : "1.1"
   },
   "links" : {
      ...
   }
}
是不是很简单?自动生成的 API 使用JSON:API作为传输格式,提供以资源为中心的 RESTful 端点。以下是一些更高级的 API 使用示例:
-
过滤
curl -g 'localhost:3000/api/pet?filter[category]=kitten'需要 -g 选项来防止 curl 解释方括号。
-
排序
curl 'localhost:3000/api/pet?sort=-createdAt' -
分页
curl -g 'localhost:3000/api/pet?page[offset]=1&page[limit]=2' -
包括相关资源
curl 'localhost:3000/api/pet?include=order'
点击此处查看完整的端点和功能列表。稍后,您还将了解如何生成详尽记录 API 的 OpenAPI 规范。
我们的 API 已启动并运行,但它有一个大问题:它没有任何安全措施保护。因此,任何人都可以读取和更新任何数据。我们将在接下来的部分中分两步解决这个问题:身份验证和授权。
5.添加身份验证
我们将采用基于邮箱/密码的身份验证,并在每次成功登录后发放一个 JWT 令牌。您可能希望在实际应用中使用身份验证框架或服务,但在本教程中,一个自制的框架或服务就足够了。
我们先来看看注册部分。由于User资源本身已经自带 CRUD API,注册过程其实就是创建一个 ,因此我们无需再单独实现注册 API User。我们唯一需要注意的是,确保存储的是经过哈希处理的密码,而不是纯文本。实现这一点很简单,只需在字段@password中添加一个属性即可password。ZenStack 会在将字段存储到数据库之前自动对其进行哈希处理。需要注意的是,我们还添加了一个@omit属性,用于标记password将从响应中删除的字段,因为我们不希望该字段返回给客户端。
User将模型替换schema.zmodel为以下内容:
model User {
    id String @id @default(cuid())
    email String @unique
    password String @password @omit
    orders Order[]
}
登录需要验证凭证并发放 JWT 令牌;我们需要手动实现它。安装几个新的依赖项:
npm install bcryptjs jsonwebtoken dotenv
npm install -D @types/jsonwebtoken
将JWT_SECRET环境变量添加到.env项目根目录下的文件。在生产环境中,应始终使用强密钥。
JWT_SECRET=abc123
将路线添加/api/login到文件开头/api/index.ts:
import dotenv from 'dotenv';
import jwt from 'jsonwebtoken';
import { compareSync } from 'bcryptjs';

// load .env environment variables
dotenv.config();

app.post('/api/login', async (req, res) => {
    const { email, password } = req.body;
    const user = await prisma.user.findFirst({
        where: { email },
    });
    if (!user || !compareSync(password, user.password)) {
        res.status(401).json({ error: 'Invalid credentials' });
    } else {
        // sign a JWT token and return it in the response
        const token = jwt.sign({ sub: user.id }, process.env.JWT_SECRET!);
        res.json({ id: user.id, email: user.email, token });
    }
});
最后,将getPrisma中的回调改为ZenStackMiddleware调用返回的增强型Prisma客户端,withPresets使得@password和@omit属性能够生效。
将代码中的相应部分替换/api/app.ts为以下内容:
import { withPresets } from '@zenstackhq/runtime';

app.use(
    '/api',
    ZenStackMiddleware({
        getPrisma: () => withPresets(prisma),
        handler: apiHandler,
    })
);
请注意,使用增强型 Prisma 客户端时,所有 CRUD 操作默认都会被拒绝,除非您明确开放它们。让我们开放create和read操作以User支持注册/登录流程:
model User {
    id String @id @default(cuid())
    email String @unique
    password String @password @omit
    orders Order[]

    // everybody can signup
    @@allow('create', true)

    // user profile is publicly readable
    @@allow('read', true)
}
现在重新生成 Prisma 模式并将更改推送到数据库:
npx zenstack generate && npx prisma db push
重新启动开发服务器,我们就可以测试我们的注册/登录流程。
注册用户:
curl -X POST localhost:3000/api/user \
    -H 'Content-Type: application/json' \
    -d '{ "data": { "type": "user", "attributes": { "email": "tom@pet.inc", "password": "abc123" } } }'
输出:
{
    "jsonapi": { "version": "1.1" },
    "links": {
        "self": "http://localhost:3000/api/user/clied1aij0000vh3lgdn0g2xt"
    },
    "data": {
        "type": "user",
        "id": "clied1aij0000vh3lgdn0g2xt",
        "attributes": { "email": "tom@pet.inc" },
        "links": {
            "self": "http://localhost:3000/api/user/clied1aij0000vh3lgdn0g2xt"
        },
        "relationships": {
            "orders": {
                "links": {
                    "self": "http://localhost:3000/api/user/clied1aij0000vh3lgdn0g2xt/relationships/orders",
                    "related": "http://localhost:3000/api/user/clied1aij0000vh3lgdn0g2xt/orders"
                }
            }
        }
    }
}
登录:
curl -X POST localhost:3000/api/login \
    -H 'Content-Type: application/json' \
    -d '{ "email": "tom@pet.inc", "password": "abc123" }'
{
    "id": "clfan0lys0000vhtktutornel",
    "email": "tom@pet.inc",
    "token": "..."
}
6.添加授权
Pet现在我们已经完成了身份验证,我们可以向架构中添加访问控制规则,以保护我们的 CRUD 服务。对和模型进行以下更改Order:
model Pet {
    id String @id @default(cuid())
    createdAt DateTime @default(now())
    updatedAt DateTime @updatedAt
    name String
    category String
    order Order? @relation(fields: [orderId], references: [id])
    orderId String?

    // unsold pets are readable to all; sold ones are readable to buyers only
    @@allow('read', orderId == null || order.user == auth())

    // only allow update to 'orderId' field if it's not set yet (unsold)
    @@allow('update', name == future().name && category == future().category && orderId == null )
}

model Order {
    id String @id @default(cuid())
    createdAt DateTime @default(now())
    updatedAt DateTime @updatedAt
    pets Pet[]
    user User @relation(fields: [userId], references: [id])
    userId String

    // users can read their orders
    @@allow('read,create', auth() == user)
}
@@allowand的语法@@deny非常直观。以下几点需要注意:
- 该
auth()函数返回当前已验证的用户。你很快就会看到它是如何实现的。 - 该
future()函数返回应用更新后的实体值。 - 模型的第二条
@@allow规则Pet看起来有点复杂。之所以需要这条规则,是因为我们想要禁止创建包含已售宠物的订单。在数据库层面,这意味着只有当orderId字段为 时(即尚未售出)Pet才能更新。我们还使用了该函数来禁止更新其他字段。nullfuture()
您可以在此处了解有关访问政策的更多信息。
通过在架构中以声明方式定义访问策略,您不再需要在 API 中实现这些规则。这样可以更轻松地确保一致性,并使架构成为数据形态和安全规则的单一真实来源。
不过,还缺少一点:我们需要将经过身份验证的用户身份挂接到系统中,以便该auth()功能正常工作。为此,我们要求 API 调用者在Authorization标头中携带 JWT 令牌作为持有者令牌。然后,在服务器端,我们从当前请求中提取它,并将其withPresets作为上下文传递给调用者。
添加一个getUser助手来从令牌中解码用户,并将其传递给调用withPresets:
import type { Request } from 'express';

function getUser(req: Request) {
    const token = req.headers.authorization?.split(' ')[1];
    console.log('TOKEN:', token);
    if (!token) {
        return undefined;
    }
    try {
        const decoded: any = jwt.verify(token, process.env.JWT_SECRET!);
        return { id: decoded.sub };
    } catch {
        // bad token
        return undefined;
    }
}

const apiHandler = RestApiHandler({ endpoint: 'http://localhost:3000/api' });

app.use(
    '/api',
    ZenStackMiddleware({
        getPrisma: (req) => {
            return withPresets(prisma, { user: getUser(req) });
        },
        handler: apiHandler
    })
);
现在,策略引擎可以访问经过身份验证的用户,并可以执行授权规则。重新运行代码生成并重启开发服务器。现在让我们测试一下授权。
npx zenstack generate && npx prisma db push
重新启动开发服务器以反映我们的更改。
7. 测试授权
登录获取令牌:
curl -X POST localhost:3000/api/login \
    -H 'Content-Type: application/json' \
    -d '{ "email": "tom@pet.inc", "password": "abc123" }'
{
    "id": "<user id>",
    "email": "tom@pet.inc",
    "token": "<token>"
}
将返回的用户 ID 和令牌存储在环境变量中以供将来使用:
userId=<user id>
token=<token>
创建订单:
下单购买“露娜”猫。注意,我们在Authorization标头中传递了 token。
curl -X POST localhost:3000/api/order \
    -H 'Content-Type: application/json' -H "Authorization: Bearer $token"  \
    -d "{ \"data\": { \"type\": \"order\", \"attributes\": {}, \"relationships\": { \"user\": { \"data\": { \"type\": \"user\", \"id\": \"$userId\" } } , \"pets\": { \"data\": [ { \"type\": \"pet\", \"id\": \"luna\" } ] } } } }"
输出:
{
    ...
    "data": {
        "type": "order",
        "id": "clifiu32u0004vh2j0wvt4d22",
        "attributes": {
            "createdAt": "2023-06-03T04:55:57.460Z",
            "updatedAt": "2023-06-03T04:55:57.460Z",
            "userId": "clieksn490003vhl3raj0ad6p"
        },
        "links": {
            "self": "http://localhost:3000/api/order/clifiu32u0004vh2j0wvt4d22"
        },
        "relationships": {
            "pets": {
                "links": {
                    "self": "http://localhost:3000/api/order/clifiu32u0004vh2j0wvt4d22/relationships/pets",
                    "related": "http://localhost:3000/api/order/clifiu32u0004vh2j0wvt4d22/pets"
                },
                "data": [{ "type": "pet", "id": "luna" }]
            },
            "user": {
                "links": {
                    "self": "http://localhost:3000/api/order/clifiu32u0004vh2j0wvt4d22/relationships/user/clieksn490003vhl3raj0ad6p",
                    "related": "http://localhost:3000/api/order/clifiu32u0004vh2j0wvt4d22/user/clieksn490003vhl3raj0ad6p"
                },
                "data": { "type": "user", "id": "clieksn490003vhl3raj0ad6p" }
            }
        }
    }
}
匿名列出宠物:
“Luna”现在已经不存在了,因为它被卖掉了。
curl localhost:3000/api/pet
{
   "data" : [
      {
         "id" : "cooper",
         "type" : "pet",
         ...
      },
      {
         "id" : "max",
         "type" : "pet",
         ...
      }
   ],
   ...
}
列出具有凭证的宠物:
“Luna” 再次可见(orderId上面有一个),因为下订单的用户可以读取其中的宠物。
curl localhost:3000/api/pet -H "Authorization: Bearer $token"
{
   "data" : [
      {
         "id" : "cooper",
         "type" : "pet",
         ...
      },
      {
         "id" : "luna",
         "type" : "pet",
         "orderId": "clifp72900007vhlky654nari",
         ...
      },
      {
         "id" : "max",
         "type" : "pet",
         ...
      }
   ],
   ...
}
再次创建“Luna”的订单将会导致错误:
curl -X POST localhost:3000/api/order \
    -H 'Content-Type: application/json' -H "Authorization: Bearer $token"  \
    -d "{ \"data\": { \"type\": \"order\", \"attributes\": {}, \"relationships\": { \"user\": { \"data\": { \"type\": \"user\", \"id\": \"$userId\" } } , \"pets\": { \"data\": [ { \"type\": \"pet\", \"id\": \"luna\" } ] } } } }"
{
   "errors" : [
      {
         "code" : "forbidden",
         "status" : 403,
         "title" : "Operation is forbidden"
      }
   ]
}
您可以继续使用该模型进行测试Order,看看其行为是否符合访问策略。
生成 OpenAPI 规范
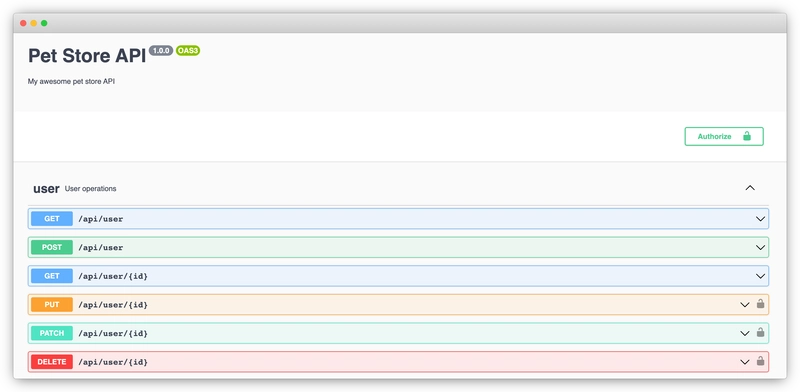
到目前为止,我们已经实现了一个安全的 RESTful API,但只有记录下来才算完整。幸运的是,ZenStack 提供了一个插件,可以从 ZModel 生成 OpenAPI V3 规范。您只需在您的架构中启用该插件即可(完整文档请见此处):
首先,安装插件包:
npm install -D @zenstackhq/openapi
然后在文件中启用 OpenAPI 插件schema.zmodel:
plugin openapi {
    provider = '@zenstackhq/openapi'
    prefix = '/api'
    flavor = 'rest'
    title = 'Pet Store API'
    specVersion = '3.0.0'
    version = '0.1.0'
    description = 'My awesome pet store API'
    output = 'petstore-api.json'
    securitySchemes = {
        myBearer: { type: 'http', scheme: 'bearer', bearerFormat: 'JWT' }
    }
}
当您运行时,它将为您zenstack generate生成一个文件。petstore-api.json
npx zenstack generate
然后,您可以使用Swagger UI将规范提供给 API 使用者。
npm install swagger-ui-express
npm i -D @types/swagger-ui-express
将以下内容添加到 的开头/api/index.ts:
import swaggerUI from 'swagger-ui-express';
import fs from 'fs';
import path from 'path';

// Vercel can't properly serve the Swagger UI CSS from its npm package, here we
// load it from a public location
const options = { customCssUrl: 'https://cdnjs.cloudflare.com/ajax/libs/swagger-ui/4.18.3/swagger-ui.css' };
const spec = JSON.parse(
    fs.readFileSync(path.join(__dirname, '../petstore-api.json'), 'utf8')
);
app.use('/api/docs', swaggerUI.serve, swaggerUI.setup(spec, options));
现在,如果您访问http://localhost:3000/api/docs,您将看到 API 文档 UI。您可以使用它来熟悉 JSON API 请求和响应格式。
部署到 Vercel
部署到 Vercel 只需几个步骤。
1. 设置构建命令
我们需要先设置构建命令。在package.json下添加以下“vercel-build”命令scripts:
  "scripts": {
    ...
    "vercel-build": "zenstack generate && tsc && prisma db push && tsx prisma/seed.ts"
  }
它运行 ZenStack 生成器,编译项目,将模式同步到数据库,并使用宠物数据为数据库播种。
在实际应用中,您应该在生产中使用Prisma Migrate而不是
prisma db push。
2.配置请求重写
vercel.json在项目根目录下创建一个文件并添加以下内容以重写/api对我们的无服务器功能的所有请求:
{
    "rewrites": [{ "source": "/api/(.*)", "destination": "/api" }]
}
3.创建Vercel项目
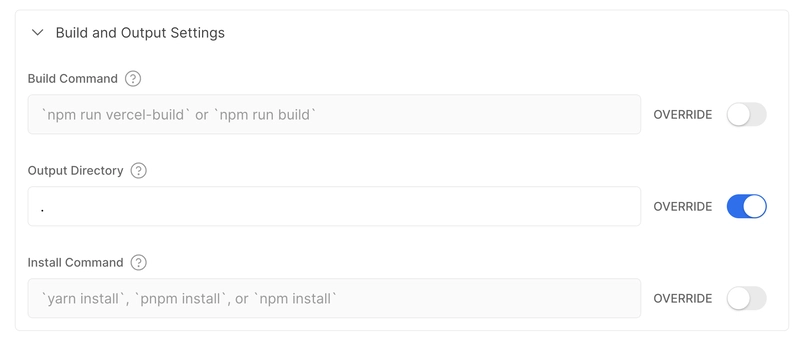
现在,您可以将代码推送到 GitHub,并将其作为新项目导入 Vercel。在“构建和开发设置”部分,将“输出目录”设置覆盖为“.”。
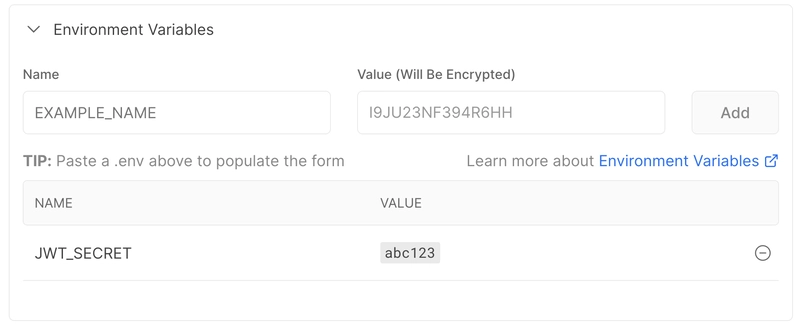
还要确保添加JWT_SECRET环境变量。
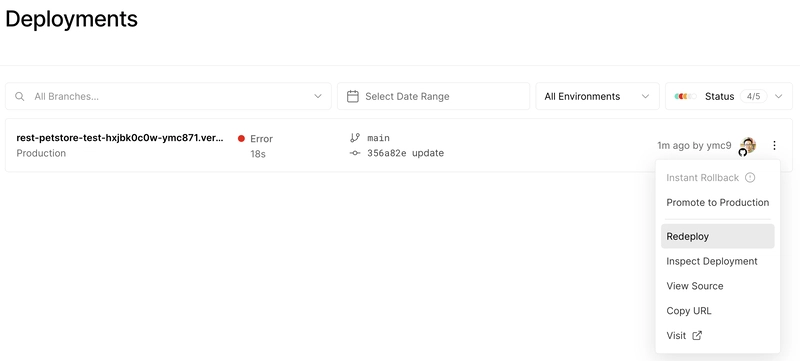
暂时忽略部署失败,因为我们尚未连接数据库。
4.连接数据库
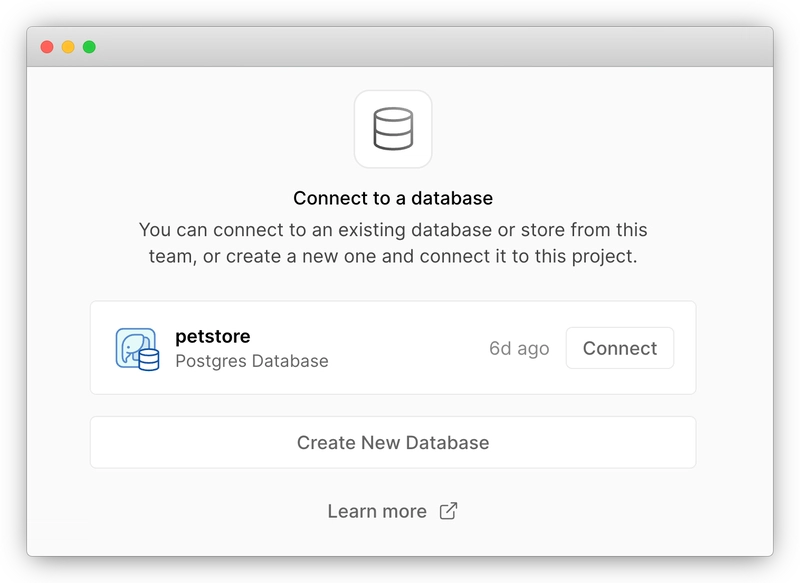
进入我们刚刚创建的项目主页,然后切换到“存储”选项卡。在那里,您可以找到并连接到我们在本教程开始时创建的 Postgres 数据库。
保留默认设置并连接。数据库凭据环境变量将自动添加到您的项目中。
前往项目主页的“部署”选项卡,找到失败的部署,然后重新部署。这次应该会成功。
在实际产品中,您应该为开发环境和生产环境使用单独的数据库
5. 完成
恭喜!您刚刚将一个安全的 RESTful API 部署到 Vercel。您可以使用 Vercel 生成的域名访问 Swagger UI ( /api/docs) 和 API 端点。
如果您在执行这些步骤时遇到困难,可以在此处找到完成的项目。
包起来
Vercel 是部署全栈 JavaScript Web 应用的热门选择。它托管纯后端 API 的能力听起来可能微不足道。然而,当你已经拥有后端代码库并希望享受统一的云平台时,它可能会派上用场。
在本教程中,您已经了解了实现和部署安全的 RESTful API 涉及许多任务。但是,借助合适的工具集:Prisma、ZenStack、Vercel Postgres,这一切并不会变得复杂和耗时。
我们正在构建 ZenStack,旨在让更多人能够接触到全栈 Web 开发,无论其背景如何。如果您认同我们的愿景,并觉得我们的方法有趣,请加入我们的 Discord并 Star 我们的GitHub 代码库。谢谢!
文章来源:https://dev.to/zenstack/how-to-host-a-restful-api-on-vercel-3bk7 后端开发教程 - Java、Spring Boot 实战 - msg200.com
