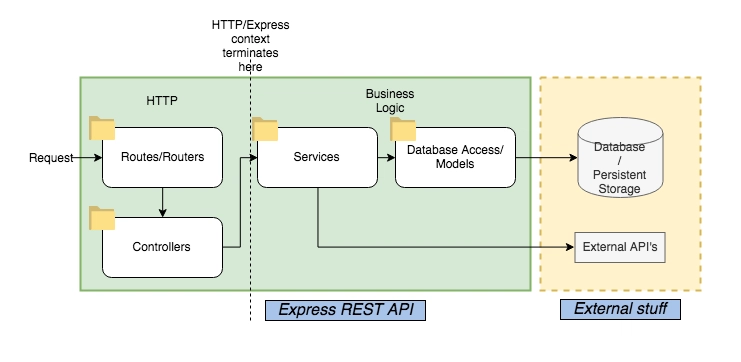
如何在 Express JS 中创建后端 API

要在 Express JS 中创建后端 API,我们需要执行以下步骤:
- 安装 Node JS 和 Express JS
- 创建项目文件夹和服务器文件
- 定义数据模型和数据数组
- 为 API 创建路由和处理程序
- 使用 Postman 等工具测试 API
安装 Node JS 和 Express JS
Node JS 是一个运行时环境,允许您在 Web 浏览器之外运行 JavaScript 代码。Express JS 是一个 Web 框架,它提供了一组使用 Node JS 构建 Web 应用程序的功能和工具。
要安装 Node JS,您可以从官方网站下载并按照您的操作系统的说明进行操作。要安装 Express JS,您可以使用 Node 包管理器 (npm),它是 Node JS 附带的工具,允许您为项目安装和管理各种包和模块。要安装 Express JS,您可以在终端中运行以下命令:
npm install express
这将在您的项目目录中创建一个名为 node_modules 的文件夹,并在那里安装 Express JS 及其依赖项。
创建项目文件夹和服务器文件
要创建项目文件夹,您可以使用任何您喜欢的名称,例如 express-api。要创建服务器文件,您可以使用任何您喜欢的名称,例如 app.js。此文件将包含后端 API 的代码。要创建该文件,您可以使用任何您喜欢的文本编辑器或 IDE,例如 Visual Studio Code、Sublime Text 或 Atom。
要启动服务器文件,您需要导入 express 模块并创建 express 应用的实例。您还需要指定服务器监听的端口号。您可以使用任何您喜欢的端口号,只要该端口号尚未被其他应用使用即可。例如,您可以使用端口 5000。为此,您可以在服务器文件中编写以下代码:
// Import the express module
const express=require('express');
// Create an instance of the express application
const app=express();
// Specify a port number for the server
const port=5000;
// Start the server and listen to the port
app.listen(port, () => {
  console.log(`Server is running on port ${port}`);
});
要运行服务器,你可以在终端中使用 node 命令,后跟服务器文件的名称。例如:
node app.js
这将启动服务器并在控制台中打印一条消息。您可以在终端中按 Ctrl+C 来停止服务器。
定义数据模型和数据数组
要创建后端 API,您需要一些数据。在本例中,我们将使用博客文章的简单数据模型,该模型具有以下属性:
- id:帖子的唯一标识符
- 标题:文章的标题
- 内容:帖子的内容
- author:文章作者的姓名。为了存储数据,我们将使用一个简单的对象数组,它将充当模拟数据库。您可以在服务器文件中定义数据模型和数据数组,如下所示:``` // 定义用于创建博客文章的数据函数 function createPost(id, title, content, author) { return { id: id, title: title, content: content, author: author, }; }
// 定义博客文章的数据数组
const posts = [
createPost(1, 'Hello World', '这是我的第一篇博客文章', 'Alice'),
createPost(2, 'Express JS', '这是一篇关于 Express JS 的博客文章', 'Bob'),
createPost(3, 'RESTful API', '这是一篇关于 RESTful API 的博客文章', 'Charlie'),
];
## Create the routes and the handlers for the API

To create the routes and the handlers for the API, you need to use the app object that you created earlier. The app object has methods that correspond to the HTTP methods, such as app.get, app.post, app.put, and app.delete. These methods take two arguments: a path and a callback function. The path is a string that defines the URL for the route, and the callback function is a function that handles the request and sends the response. The callback function has two parameters: req and res. The req object represents the incoming request, and the res object represents the outgoing response.

To create the routes and the handlers for the API, you can write the following code in your server file:
// 为 GET /posts 创建路由和处理程序
app.get('/posts', (req, res) => {
// 将 posts 数组作为 JSON 响应发送
res.status(200).json(posts);
});
// 为 GET /posts/:id 创建路由和处理程序
app.get('/posts/:id', (req, res) => {
// 从请求中获取 id 参数
const id = req.params.id;
// 在帖子数组中查找具有给定 id 的帖子
const post = posts.find((p) => p.id == id);
// 如果帖子存在,则将其作为 JSON 响应发送
if (post) {
res.json(post);
} else {
// 如果帖子不存在,则发送 404 状态代码和消息
res.status(404).send('未找到帖子');
}
});
// 为 POST /posts 创建路由和处理程序
app.post('/posts', (req, res) => {
// 要处理请求正文,我们需要使用名为 express.json 的中间件
// 此中间件将请求正文解析为 JSON 并将其添加到 req 对象
app.use(express.json());
// 从请求体中获取数据
const data = req.body;
// 验证数据
if (data.title && data.content && data.author) {
// 如果数据有效,则创建一个具有新 id 的新帖子对象
const newId = posts.length + 1;
const newPost = new Post(newId, data.title, data.content, data.author);
// Add the new post to the posts array
posts.push(newPost);

// Send a 201 status code and the new post as a JSON response
res.status(201).json(newPost);
} else {
// 如果数据无效,则发送 400 状态代码和消息
res.status(400).send('Invalid data');
}
});
// 为 PUT /posts/:id 创建路由和处理程序
app.put('/posts/:id', (req, res) => {
// 要处理请求正文,我们需要使用 express.json 中间件
app.use(express.json());
// 从请求中获取 id 参数
const id = req.params.id;
// 从请求体中获取数据
const data = req.body;
// 验证数据
if (data.title && data.content && data.author) {
// 如果数据有效,则在帖子数组中查找具有给定 id 的帖子
const post = posts.find((p) => p.id == id);
// If the post exists, update its properties with the data
if (post) {
  post.title = data.title;
  post.content = data.content;
  post.author = data.author;

  // Send a 200 status code and the updated post as a JSON response
  res.status(200).json(post);
} else {
  // If the post does not exist, send a 404 status code and a message
  res.status(404).send('Post not found');
}
} else {
res.status(400).send('无效数据');
}
## Test the API with a tool like Postman

To test the API, you can use a tool like Postman, which is a software that allows you to send and receive HTTP requests and responses. You can download Postman from official website and follow the instructions for your operating system.

To test the API, you need to do the following steps:

- Open Postman and create a new request tab
- Select the HTTP method that matches the route you want to test, such as GET, POST, PUT, or DELETE
- Enter the URL for the route you want to test, such as http://localhost:5000/posts or http://localhost:5000/posts/1
- If the route requires a request body, such as POST or PUT, click on the Body tab and select the raw option and the JSON format
- Enter the data for the request body in JSON format, such as {"title": "New Post", "content": "This is a new post", "author": "Dan"}
- Click on the Send button and see the response in the lower panel
- You can also see the status code, the headers, and the time of the response in the upper panel

You can test different scenarios and see how the API behaves. For example, you can try to create a new post, update an existing post, delete an existing post, get a list of all posts, get a single post, or get a non-existing post. You can also try to send invalid data or invalid URLs and see the error messages.

## Conclusion

In this blog, I have shown you how to create a simple backend API in Express JS that can handle GET and POST requests, and return JSON data. You have learned how to install Node JS and Express JS, how to create a project folder and a server file, how to define the data model and the data array, how to create the routes and the handlers for the API, and how to test the API with a tool like Postman. I hope you have enjoyed this blog and learned something new. If you have any questions or feedback, please leave a comment below. Thank you for reading!
 后端开发教程 - Java、Spring Boot 实战 - msg200.com