使用 CSS 和 JavaScript 实现社交媒体嵌入的骨架加载🔥
注意:这篇文章的灵感来自Web Dev Simplified。
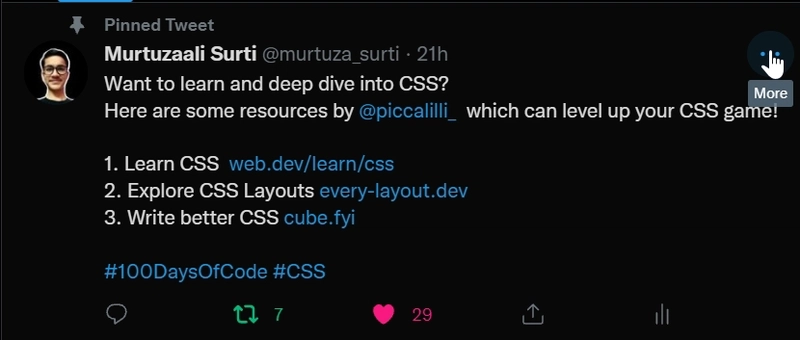
社交媒体嵌入需要一些时间来加载和渲染,因此用户体验不太好!以下是 Twitter 嵌入的示例:
不施加骨架载荷:

应用骨架加载后:

你可能已经注意到了,没有骨架加载的用户体验不太好!那么,让我们看看如何在 Twitter 嵌入中实现骨架加载!
嵌入推文
<div class="tweets">
    //tweets
</div>
在这里,我们创建了一个容器,它将包含我们所有的 Twitter 嵌入。
<div class="tweets">
    <div class="tweet">
        //tweet 1 (paste the twitter embed code here without the script tag)
    </div>
    <div class="tweet">
        //tweet 2 (paste the twitter embed code here without the script tag)
    </div>
    .
    .
    .
</div>
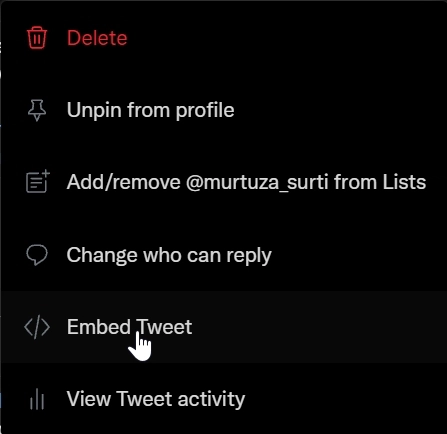
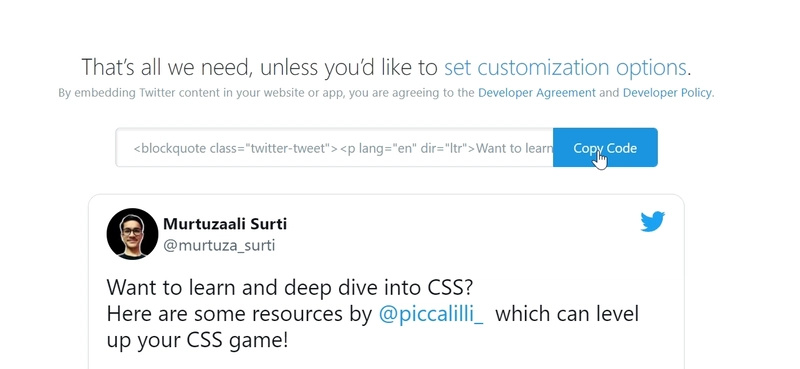
粘贴推文的嵌入代码,如上所示。获取嵌入代码的方法如下:
-
转到您的推文
-
点击更多菜单
-
选择“嵌入推文”选项
-
您将被重定向到一个新选项卡,您可以从那里复制嵌入代码。


请注意,您不需要为不同的推文添加多个脚本标签。您只需在 body 元素的底部添加一个脚本标签即可。
//add this just before the </body> tag.
<script async src="https://platform.twitter.com/widgets.js" charset="utf-8"></script>
现在您已经完成了,是时候使用 CSS 来设置嵌入样式了!
使用 CSS 设置嵌入样式!
您可以通过将 Flexbox 属性应用到容器来实现这一点,就像这样!
.tweets{
    display: flex;
    flex-flow: row wrap;
    width: 100%;
    justify-content: center;
    padding: 0 3rem;
}
您还可以自定义嵌入的宽度!但请注意,推文嵌入的宽度只能缩小到一定限度。如果超出该阈值,嵌入就会溢出,所以请记住这一点。
.tweet{
    width: 30rem;
    margin: 0 1.5rem;
}
现在,是时候为这些推文创建一个骨架了!
创建嵌入骨架
<div class="tweets-skeleton">
    <div class="tweet-skeleton">
        <div class="img"></div>
        <div class="content-1">
            <div class="line"></div>
            <div class="line"></div>
            <div class="line"></div>
        </div>
        <div class="content-2">
            <div class="line"></div>
            <div class="line"></div>
        </div>
    </div>
</div>
接下来,让我们使用 CSS 来设计这个骨架。
.tweets, .tweets-skeleton{
    display: flex;
    flex-flow: row wrap;
    width: 100%;
    justify-content: center;
    padding: 0 3rem;
}
.tweet, .tweet-skeleton{
    width: 30rem;
    margin: 0 1.5rem;
}
.tweet-skeleton{
    border: 0.05rem solid rgb(190, 190, 190);
    border-radius: 1rem;
    height: 30rem;
    margin-bottom: 2rem;
    padding: 1.5rem;
}
.tweet-skeleton .img{
    height: 5rem;
    width: 5rem;
    border-radius: 50%;
    background-color: rgb(209, 209, 209);
}
.tweet-skeleton .content-1, .tweet-skeleton .content-2{
    height: 25%;
    margin-top: 1rem;
}
.tweet-skeleton .line{
    height: 15%;
    margin: 0.5rem 0;
    width: 100%;
    border-radius: 0.3rem;
    background-color: rgb(209, 209, 209);
}
.tweet-skeleton .line:last-child{
    width: 75%;
}
你的推文框架看起来应该是这样的:
让我们为这个骨架添加动画效果,让它看起来像是后台正在加载某些内容!我们将利用 CSS 中的“关键帧”概念,并为文本行和图像的背景颜色添加动画效果!
@keyframes tweet-skeleton {
    0%{
        background-color: rgb(209, 209, 209);
    }
    100%{
        background-color: rgb(243, 243, 243);
    }
}
然后,我们将定义相同的动画属性。
.tweet-skeleton .img{
    height: 5rem;
    width: 5rem;
    border-radius: 50%;
    background-color: rgb(209, 209, 209);
    animation: tweet-skeleton 1s linear infinite alternate;
}

.tweet-skeleton .line{
    height: 15%;
    margin: 0.5rem 0;
    width: 100%;
    border-radius: 0.3rem;
    background-color: rgb(209, 209, 209);
    animation: tweet-skeleton 1s linear infinite alternate;
}
输出如下:

正如 Kyle Cook 在他的视频中精彩解释的那样,下面是如何根据您的要求使用 JavaScript 创建多个骨架模板!
const tweets_skeleton = document.querySelector(".tweets-skeleton");
const tweet_skeleton = document.querySelector(".tweet-skeleton");

for (let i = 0; i < 5; i++) {
  tweets_skeleton.append(tweet_skeleton.cloneNode(true));
}
有趣的部分来了!如何在推文嵌入渲染时显示骨架?我们将使用setTimeoutJavaScript 中的函数来实现。
这个想法是隐藏推文嵌入一段时间,直到它们被渲染iframes并显示骨架。在指定的时间之后,骨架将自动隐藏,推文嵌入将显示出来。这当然不是最好的方法。另一种方法是检测客户端的网速,并据此决定显示时间。
但为了简单起见,我们将使用setTimeout4 秒后执行的函数。
将这些样式添加到推文容器中。
<div class="tweets" style="visibility: hidden; display: none;">
setTimeout(() => {
  document.querySelector(".tweets").style = "visibility: hidden;";
  tweets_skeleton.style = "display: none;";
}, 4000);
如果推文数量较多,加载时间可能会增加。
这是最终的输出:
就这些了!我的推特账号是murtuza_surti。
文章来源:https://dev.to/murtuzaalisurti/sculpture-loading-for-social-media-embeds-using-css-and-javascript-4njb