🚀 精通 NextJS:使用 Stripe 和 Airtable 构建销售页面🧙♂️🪄✨
TL;DR
TL;DR
在本教程中,您将学习如何构建销售登陆页面:
- 使用 NextJS 构建整个销售页面。
- 通过 Stripe 付款。
- 将他们的详细信息保存到 Airtable 数据库。
NextJS 的后台作业管理
Trigger.dev 是一个开源库,可让您使用 NextJS、Remix、Astro 等为您的应用程序创建和监控长时间运行的作业!
如果您能花 10 秒钟给我们一颗星,我将非常感激 💖
https://github.com/triggerdotdev/trigger.dev
让我们开始吧🔥
在这里,我将引导您创建课程登陆页面的用户界面。
通过运行下面的代码片段创建一个新的 TypeScript Next.js 项目。
npx create-next-app course-page
安装 React Icons 包使我们能够在应用程序内使用不同类型的图标。
npm install react-icons --save
该应用程序分为两个页面:主页(代表课程登陆页面)和成功页面(付款后显示给用户)。
主页🏠
主页分为五个部分 - 导航栏、页眉、功能、购买和页脚部分。
更新index.tsx文件,如下所示。占位符代表着陆页的各个部分。
import { Inter } from "next/font/google";
const inter = Inter({ subsets: ["latin"] });

export default function Home() {
    return (
        <main className={` ${inter.className}`}>
            {/* --- Navigation bar --- */}
            <p>Hello world</p>
            {/* --- Header --- */}

            {/* --- Features Section --- */}

            {/* --- Purchase Now Section--- */}

            {/* --- Footer Section --- */}
        </main>
    );
}
Navigation bar用下面的代码片段替换占位符。
<nav className='md:h-[12vh] w-full md:p-8 p-4 flex items-center justify-between border-b-[1px] border-b-gray-200 bg-white sticky top-0 z-20'>
    <h2 className='text-2xl font-bold text-purple-600'>TechGrow</h2>
    <button className='bg-purple-600 hover:bg-purple-800 text-white px-5 py-3 rounded-2xl'>
        Get Started
    </button>
</nav>
将下面的代码片段复制到该Header部分。您可以 从其 GitHub 存储库获取图像。
<header className='min-h-[88vh] w-full md:px-8 px-4 py-12 flex md:flex-row flex-col items-center justify-between'>
    <div className='md:w-[60%] w-full md:pr-6 md:mb-0 mb-8'>
        <h2 className='font-extrabold text-5xl mb-4'>
            Future-Proof Your Career with Top Digital Skills!
        </h2>
        <p className='opacity-60 mb-4'>
            Unlock your full potential of a future-proof career through the power of
            top digital skills with our all-in-one growth package.
        </p>
        <button className='bg-purple-600 hover:bg-purple-800 w-[200px] text-white px-5 py-3 rounded-2xl text-lg font-semibold'>
            Get Started
        </button>
    </div>
    <div className='md:w-[40%] w-full'>
        <Image src={headerImage} alt='Man smiling' className='rounded-lg' />
    </div>
</header>
显示Features Section了客户应该购买该课程的一些原因。
<section className='w-full min-h-[88vh] bg-purple-50 md:px-8 px-4 py-14 '>
    <h2 className='font-extrabold text-3xl text-center mb-4'>Why Choose Us?</h2>
    <p className='opacity-50 text-center'>
        Unlock your full potential of a future-proof career
    </p>
    <p className='opacity-50 mb-14 text-center'>
        that surpasses your expectation.
    </p>
    <div className='flex w-full items-center justify-between md:space-x-6 md:flex-row flex-col'>
        <div className='md:w-1/3 md:mb-0 mb-6 w-full bg-white rounded-xl px-5 py-8 hover:border-[1px] hover:border-purple-600 hover:shadow-md'>
            <div className='rounded-full p-4 bg-purple-50 max-w-max mb-2'>
                <FaChalkboardTeacher className='text-2xl text-purple-800' />
            </div>
            <p className='font-bold text-lg mb-2'>Expert instructors</p>
            <p className='text-sm opacity-50'>
                Learn from industry experts, gaining unique insights which cannot be
                found elsewhere.
            </p>
        </div>
        <div className='md:w-1/3 md:mb-0 mb-6 w-full bg-white rounded-xl px-5 py-8 hover:border-[1px] hover:border-purple-600 hover:shadow-md'>
            <div className='rounded-full p-4 bg-purple-50 max-w-max mb-2'>
                <IoDocumentTextSharp className='text-2xl text-purple-800' />
            </div>
            <p className='font-bold text-lg mb-2'>Hands-On Projects</p>
            <p className='text-sm opacity-50'>
                Learn practical, real-world digital skills through relevant projects and
                interactive sessions.
            </p>
        </div>
        <div className='md:w-1/3 md:mb-0 mb-6 w-full bg-white rounded-xl px-5 py-8 hover:border-[1px] hover:border-purple-600 hover:shadow-md'>
            <div className='rounded-full p-4 bg-purple-50 max-w-max mb-2'>
                <BsFillClockFill className='text-2xl text-purple-800' />
            </div>
            <p className='font-bold text-lg mb-2'>Lifetime Access</p>
            <p className='text-sm opacity-50'>
                Unlimited lifetime access for continuous learning and personal growth.
            </p>
        </div>
    </div>
</section>
将下面的代码片段复制到Purchase Now Section占位符中。
<div className='w-full min-h-[70vh] py-14 md:px-12 px-4 bg-purple-700 flex md:flex-row flex-col items-center justify-between'>
    <div className='md:w-[50%] w-full md:pr-6 md:mb-0 mb-8'>
        <h2 className='font-extrabold text-5xl mb-4 text-purple-50'>
            Start learning and grow your skills today!{" "}
        </h2>
        <p className='mb-4 text-purple-300'>
            Unlock your full potential of a future-proof career through the power of
            top digital skills with our all-in-one growth package.
        </p>
        <div className='mb-6'>
            <div className='flex items-center space-x-3 mb-2'>
                <AiFillCheckCircle className='text-2xl text-green-300' />
                <p className='text-purple-50 text-sm opacity-80'>24/7 availability</p>
            </div>
            <div className='flex items-center space-x-3 mb-2'>
                <AiFillCheckCircle className='text-2xl text-green-300' />
                <p className='text-purple-50 text-sm opacity-80 '>
                    Expert-led tutorials
                </p>
            </div>
            <div className='flex items-center space-x-3 mb-2'>
                <AiFillCheckCircle className='text-2xl text-green-300' />
                <p className='text-purple-50 text-sm opacity-80 '>
                    High-quality contents
                </p>
            </div>
            <div className='flex items-center space-x-3 mb-2'>
                <AiFillCheckCircle className='text-2xl text-green-300' />
                <p className='text-purple-50 text-sm opacity-80 '>
                    Hands-on practical and interactive sessions
                </p>
            </div>
        </div>
        <button className='bg-purple-50 hover:bg-purple-100 w-[200px] text-purple-600 px-5 py-3 rounded-2xl text-lg font-semibold'>
            Purchase Now
        </button>
    </div>
    <div className='md:w-[50%] w-full flex items-center justify-center'>
        <Image src={buy} alt='Man smiling' className='rounded-lg' />
    </div>
</div>
最后,Footer section按如下所示进行更新。
<footer className='w-full flex items-center justify-center min-h-[10vh] bg-white'>
<p className='text-purple-800 text-sm'>
Copyright, © {new Date().getFullYear()} All Rights Reserved Tech Grow
</p>
</footer>
成功🚀
付款成功后,用户将被重定向到成功页面。
创建一个success.tsx文件并将以下代码复制到文件中。
import React from "react";
import Link from "next/link";

export default function Success() {
    return (
        <div className='w-full min-h-[100vh] flex flex-col items-center justify-center'>
            <h2 className='text-3xl font-bold mb-4'>Payment Sucessful!</h2>
            <Link
                href='/'
                className='bg-purple-50 hover:bg-purple-100 text-purple-600 px-5 py-3 rounded-2xl text-lg font-semibold'
            >
                Go Home
            </Link>
        </div>
    );
}
恭喜!🎉您已成功为应用程序创建用户界面。
开始收款💰
Stripe 是一个流行的在线支付处理平台,可让您创建产品并将一次性和定期支付方式集成到您的应用程序中。
在这里,我将引导您了解如何在 Stripe 上创建产品以及如何将 Stripe 结帐页面添加到您的 Next.js 应用程序。
首先,您需要 创建一个 Stripe 帐户。本教程中,您可以使用测试模式帐户。
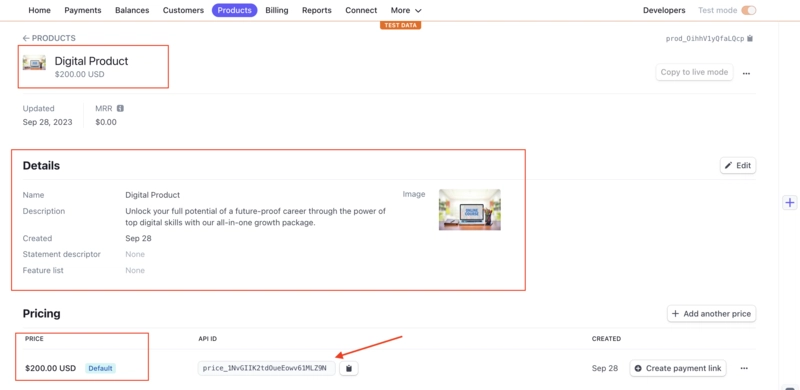
Products从顶部菜单中选择,然后点击Add Product按钮创建新产品。提供产品名称、价格、描述和付款方式。选择one-time作为付款方式。
创建一个.env.local文件并将产品 ID 复制到该文件中。
PRODUCT_ID=<YOUR_PRODUCT_ID>
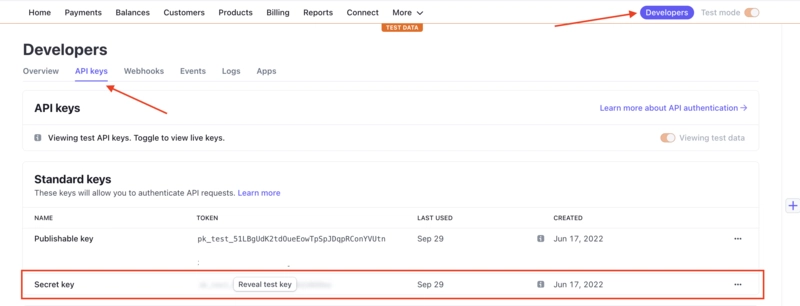
接下来,单击Developers顶部菜单,选择API keys,并创建一个新的密钥。
将密钥保存到.env.local文件中。它用于验证身份,并允许您从应用程序访问 Stripe。
STRIPE_API_KEY=<YOUR_STRIPE_SECRET_KEY>
将 Stripe 结账页面添加到 Next.js
为此,请安装 Stripe Node.js 库。
npm install stripe
在 Next.js 应用程序内创建一个 API 端点 -api/payment并将以下代码复制到文件中。
//👉🏻  Within the api/payment.ts file
import type { NextApiRequest, NextApiResponse } from "next";
import Stripe from "stripe";

const stripe = new Stripe(process.env.STRIPE_API_KEY!, {} as any);

export default async function handler(
    req: NextApiRequest,
    res: NextApiResponse
) {
    const session = await stripe.checkout.sessions.create({
        line_items: [
            {
                price: process.env.PRODUCT_ID,
                quantity: 1,
            },
        ],
        mode: "payment",
        success_url: `http://localhost:3000/success?session_id={CHECKOUT_SESSION_ID}`,
        cancel_url: "http://localhost:3000",
    });

    res.status(200).json({ session: session.url });
}
上面的代码片段为产品创建了一个结账会话,并返回了会话 URL。会话 URL 是收取产品付款的链接,您需要将用户重定向到此 URL。
在文件中创建一个函数index.tsx,用于从 API 端点检索会话 URL,并将用户重定向到该页面。当用户点击网页上的任何按钮时,执行该函数。
const handlePayment = async () => {
    try {
        const data = await fetch("/api/payment");
        const response = await data.json();
        window.location.assign(response.session);
    } catch (err) {
        console.error(err);
    }
};
恭喜!🎉 您已成功将 Stripe 结账页面添加到您的应用程序中。
在接下来的部分中,您将学习如何使用 Trigger.dev 处理付款并将用户详细信息保存到 Airtable 数据库。
使用 Trigger.dev 处理付款
Trigger.dev 是一个开源库,它支持你使用 NextJS、Remix、Astro 等众多工具为应用创建和监控长时间运行的作业!使用 Trigger.dev,你可以在代码库以及 GitHub 仓库、Slack 频道等服务中自动执行、安排和延迟任务。
将 Stripe 连接到 Trigger.dev ✨
在这里,您将学习如何使用 Trigger.dev webhook 在您的应用程序中处理 Stripe 付款。
Trigger.dev 的 webhook 界面 友好,可为您管理注册和取消注册流程。此外,如果出现错误,它会尝试重新发送事件,直到成功为止。
您所要做的就是 指定您想要监听的服务 和事件;Trigger.dev 会负责配置。
将 Trigger.dev 添加到 Next.js 应用
在我们继续之前,您需要创建一个 Trigger.dev 帐户。
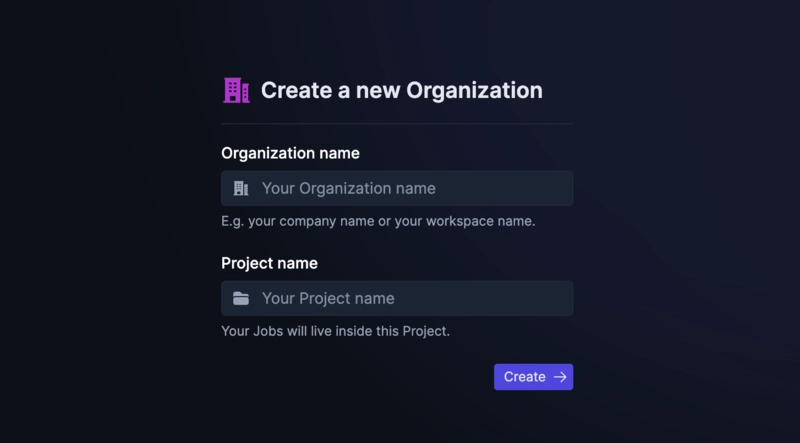
为您的工作创建一个组织和项目名称。
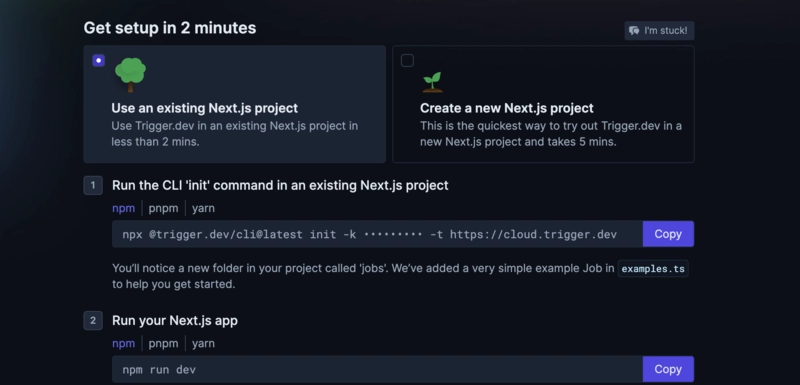
按照提供的步骤操作。完成后,请继续阅读本文的下一部分。
否则,请单击Environments & API Keys项目仪表板的侧边栏菜单。
复制您的 DEV 服务器 API 密钥,并运行以下代码片段来安装 Trigger.dev。请仔细按照说明操作。
npx @trigger.dev/cli@latest init
启动您的 Next.js 项目。
npm run dev
在另一个终端中,运行以下代码片段以在 Trigger.dev 和 Next.js 项目之间建立隧道。
npx @trigger.dev/cli@latest dev
最后,将jobs/examples.ts文件重命名为jobs/functions.ts。所有作业都在这里处理。
恭喜!🎉您已成功将 Trigger.dev 添加到您的 Next.js 应用程序。
收听 Stripe 付款成功
安装 Trigger.dev 提供的 Stripe 包。
npm install @trigger.dev/stripe@latest
jobs/functions.ts如下所示更新文件。
import { client } from "@/trigger";
import { Stripe } from "@trigger.dev/stripe";

const stripe = new Stripe({
    id: "stripe",
    apiKey: process.env.STRIPE_API_KEY!,
});

client.defineJob({
    //👇🏻 job properties
    id: "save-customer",
    name: "Save Customer Details",
    version: "0.0.1",
    //👇🏻 event trigger
    trigger: stripe.onCheckoutSessionCompleted(),

    run: async (payload, io, ctx) => {
        const { customer_details } = payload;
        await io.logger.info("Getting event from Stripe!🎉");
        //👇🏻 logs customer's details
        await io.logger.info(JSON.stringify(customer_details));

        await io.logger.info("✨ Congratulations, A customer just paid! ✨");
    },
});
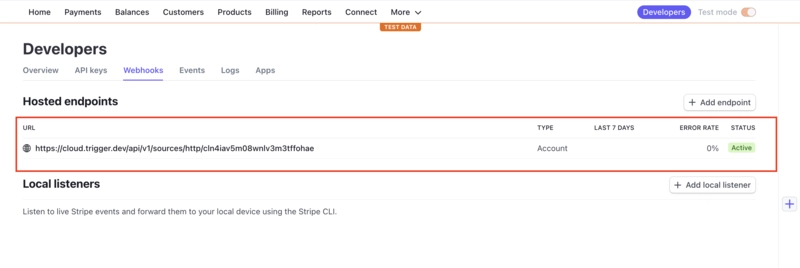
该代码片段会自动创建一个 Stripe webhook,用于监听结帐完成事件,并在用户付款时触发。
用户付款后,他们的详细信息将被记录到 Trigger.dev 上的作业控制台。
保存客户信息💾
从 Stripe webhook 检索客户详细信息后,下一步是将这些详细信息保存到数据库。在本节中,您将学习如何将 Airtable 集成到 Next.js 应用程序中,并使用 Trigger.dev 与其进行交互。
Airtable 是一款易于使用的云端软件,可帮助您将信息整理成可自定义的表格。它就像电子表格和数据库的结合体,让您能够以美观的方式协作管理数据、任务或项目。
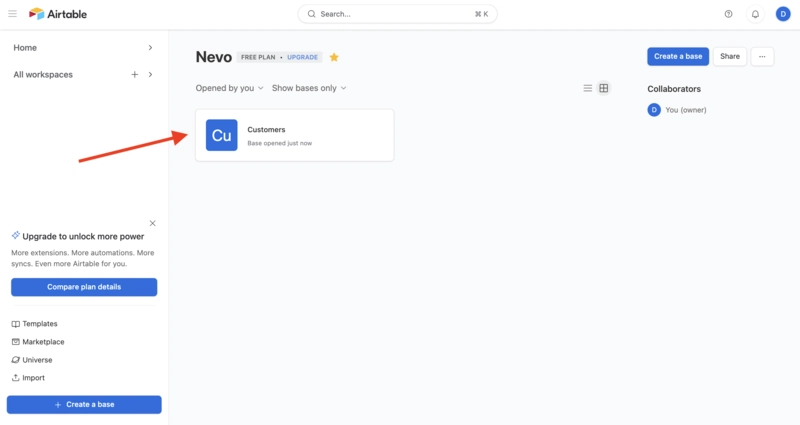
首先,创建一个 Airtable 帐户 ,并设置一个工作区和一个基础数据库。Airtable 工作区是一个包含多个数据库(称为基础数据库)的文件夹。每个基础数据库可以包含多个表。
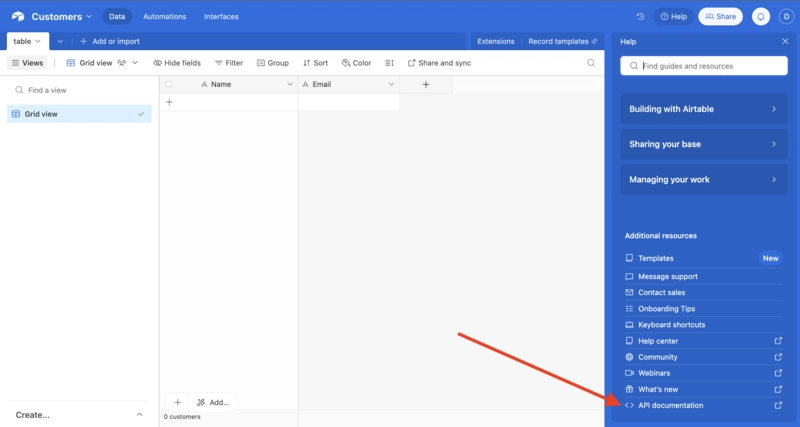
在基础结构中,创建一个包含Name和Email列的表。从 Stripe 检索到的客户姓名和电子邮件将存储在此处。
点击Help导航栏上的 按钮,然后选择API Documentation。
滚动页面,找到并复制基础和表 ID,然后将其保存到.env.local文件中。
AIRTABLE_BASE_ID=<YOUR_AIRTABLE_BASE_ID>
AIRTABLE_TABLE_ID=<YOUR_AIRTABLE_TABLE_ID>
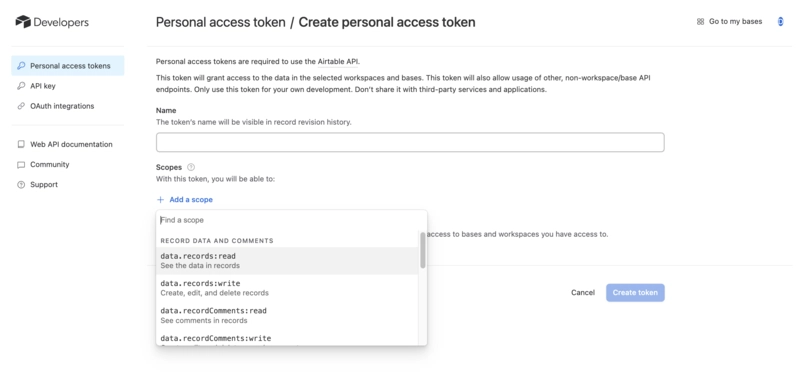
接下来,点击你的头像并选择 ,创建一个个人访问令牌Developer Hub。赋予该令牌读写权限。
将新生成的令牌保存到.env.local文件中。
AIRTABLE_TOKEN=<YOUR_PERSONAL_ACCESS_TOKEN>
然后,安装 Trigger.dev 提供的 Airtable 包。
npm install @trigger.dev/airtable
完成付款结账后,更新jobs/functions.js文件以将用户的姓名和电子邮件保存到 Airtable。
import { Airtable } from "@trigger.dev/airtable";
import { client } from "@/trigger";
import { Stripe } from "@trigger.dev/stripe";

// -- 👇🏻 Airtable instance --
const airtable = new Airtable({
    id: "airtable",
    token: process.env.AIRTABLE_TOKEN,
});
// -- 👇🏻 Stripe instance --
const stripe = new Stripe({
    id: "stripe",
    apiKey: process.env.STRIPE_API_KEY!,
});

client.defineJob({
    id: "save-customer",
    name: "Save Customer Details",
    version: "0.0.1",
    // -- 👇🏻 integrates Airtable --
    integrations: { airtable },
    trigger: stripe.onCheckoutSessionCompleted(),

    run: async (payload, io, ctx) => {
        const { customer_details } = payload;
        await io.logger.info("Getting event from Stripe!🎉");
        await io.logger.info(JSON.stringify(customer_details));

        await io.logger.info("Adding data to Airtable🎉");

        // --👇🏻 access the exact table via its ID --
        const table = io.airtable
            .base(process.env.AIRTABLE_BASE_ID!)
            .table(process.env.AIRTABLE_TABLE_ID!);

        // -- 👇🏻 adds a new record to the table --
        await table.createRecords("create records", [
            {
                fields: {
                    Name: customer_details?.name!,
                    Email: customer_details?.email!,
                },
            },
        ]);

        await io.logger.info("✨ Congratulations, New customer added! ✨");
    },
});
上面的代码片段将 Airtable 集成到 Trigger.dev,访问表,并将其与客户的姓名和电子邮件一起提供。
恭喜!您已完成本教程的项目。
结论
到目前为止,你已经学会了如何
- 将 Stripe 结账页面添加到您的 Next.js 应用,
- 使用 Trigger.dev 处理付款,以及
- 通过 Trigger.dev 将数据保存到 Airtable。
Trigger.dev 提供三种通信方式:webhook、schedule 和 event。schedule 适用于重复执行的任务,event 会在发送有效负载时激活作业,而 webhook 会在特定事件发生时触发实时作业。
作为开源开发者,我们诚邀您加入我们的 社区 ,贡献力量并与维护人员互动。欢迎访问我们的 GitHub 代码库 ,贡献代码并创建与 Trigger.dev 相关的问题。
本教程的源代码可以在这里找到:https://github.com/triggerdotdev/blog/tree/main/sales-page
感谢您的阅读!
文章来源:https://dev.to/triggerdotdev/achieve-nextjs-mastery-build-a-sales-page-with-stripe-and-airtable-1p5m 后端开发教程 - Java、Spring Boot 实战 - msg200.com


