⚡️ 5 分钟教程:使用 AWS Amplify Hosting 部署 NextJS 应用程序
封面图片由Lubo Minar提供
在本教程中,您将学习如何使用Amplify Hosting将Next应用程序部署到 AWS 。
有两种选择:一种是使用 Amplify CLI,另一种是使用 Git 仓库。我们将分别介绍这两种方式。
CLI 工作流程
首先,创建一个新的下一个站点:
$ npm init next-app

✔ What is your project named? my-app
✔ Pick a template › Default starter app
接下来,进入新目录并更新package.json以将脚本添加export到现有build脚本中:
"scripts": {
  "dev": "next dev",
  "build": "next build && next export",
  "start": "next start"
},
next export允许您将应用程序导出为静态 HTML,无需 Node.js 服务器即可独立运行。
添加 Amplify 托管
如果您还没有安装并配置最新版本的 Amplify CLI:
$ npm install -g @aws-amplify/cli

$ amplify configure
要观看如何配置 CLI 的视频演示,请单击此处。
接下来,初始化一个新的 Amplify 项目。请确保将分发目录路径设置为out。
$ amplify init

? Enter a name for the project: mynextapp
? Enter a name for the environment: dev
? Choose your default editor: Visual Studio Code (or your preferred editor)
? Choose the type of app that youre building: javascript
? What javascript framework are you using: react
? Source Directory Path: src
? Distribution Directory Path: out
? Build Command: npm run-script build
? Start Command: npm run-script start
? Do you want to use an AWS profile? Y
? Please choose the profile you want to use: <your profile>
现在,使用 Amplify 命令添加软管add:
$ amplify add hosting

? Select the plugin module to execute: Hosting with Amplify Console
? Choose a type: Manual deployment
接下来,部署应用程序:
$ amplify publish

? Are you sure you want to continue? Yes
⚡️ 恭喜,你的应用现已成功部署!应用的 URL 应该会显示在你的终端中。

要随时在 Amplify 控制台中查看您的应用程序,请运行以下命令:
$ amplify console
要了解完整操作方法,请观看此视频:
部署更新
一旦您对应用程序进行更改并准备部署它们,您可以publish再次运行该命令:
$ amplify publish
删除应用程序
要删除应用程序和部署,请运行以下delete命令:
$ amplify delete
基于 Git 的部署
Amplify 还提供基于 Git 的部署,具有 CI/CD 和分支预览等功能。
要使用基于 Git 的部署进行托管,请按照以下步骤操作。
1.创建您的应用
$ npm init next-app

✔ What is your project named? my-app
✔ Pick a template › Default starter app
2.确保build在 package.json 中设置新脚本:
"scripts": {
  "dev": "next dev",
  "build": "next build && next export",
  "start": "next start"
},
3.创建一个Git存储库,然后将您的代码推送到Git。
$ git init
$ git remote add origin git@github.com:your-name/my-next-app.git
$ git add .
$ git commit -m 'initial commit'
$ git push origin master
4.前往Amplify 控制台并点击“连接应用程序”
5.按照步骤选择您的 Git 提供商和分支。
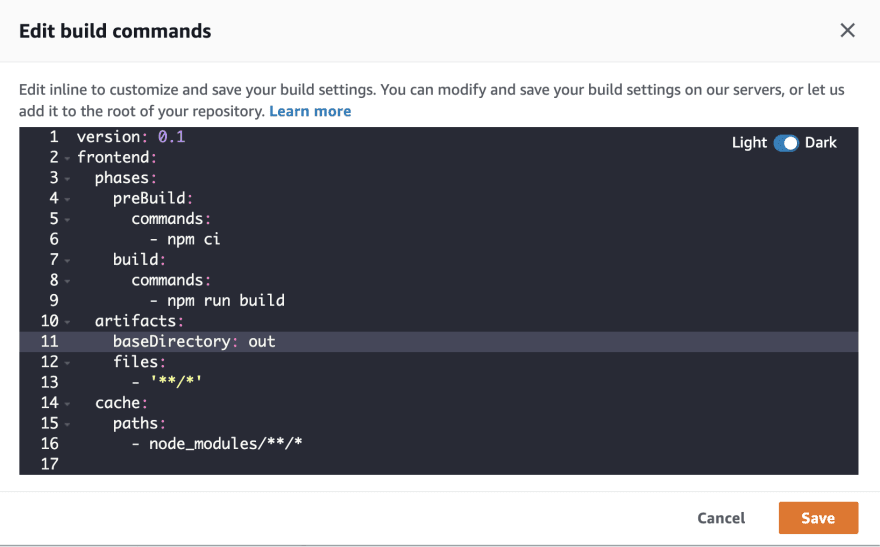
6.将baseDirectory设置为out。
7.单击“下一步”,然后单击“保存并部署”。
要了解完整操作方法,请观看此视频:
开始新的构建
您可以直接从 Amplify 控制台启动新构建,也可以通过将更改推送到主控制台来启动新构建。
-
对您的代码进行一些更改
-
将更改推送到 git
$ git add .
$ git commit -m 'updates'
$ git push origin master
动态路由
Next 还支持动态路由。
假设您有一个如下所示的文件夹和文件结构:
/pages/posts/[id].js
此组件需要读取 URL 参数的 ID,并在应用中以某种方式使用此数据。为此,我们可以使用next/router:
// /pages/posts/[id].js
import { useRouter } from 'next/router'

const Post = () => {
  const router = useRouter()
  const { id } = router.query

  return <p>Post: {id}</p>
}

export default Post
要启用此功能,您需要在Amplify 控制台的“重写和重定向”部分中为/pages/posts/[id].html设置重写:

API 路由
目前,Amplify 托管不支持使用 NextJS 的 API 路由。
如果您对此功能感兴趣,我建议您查看Vercel或无服务器 NextJS 组件。
文章来源:https://dev.to/dabit3/5-minute-tutorial-deploying-a-next-app-with-aws-amplify-hosting-5199