如何将 Flutterwave 支付集成到 Node.js 应用程序中,构建钱包系统
如今,许多网站所有者都希望拥有在线支付网关,尤其是在该行业飞速发展的今天。在为医疗、金融或其他行业设计应用程序时,创建钱包系统简直是一场噩梦。
在本教程中,我们将学习如何创建钱包系统以及如何集成 Flutterwave 支付系统。
先决条件
为了学习本教程,我们需要:
- 具备 JavaScript 的工作知识。
- 对 Node.js 有很好的理解。
- 对 MongoDB 或我们选择的任何数据库有基本的了解。
- Postman以及一些有关如何使用 Postman 的知识。
我们还需要一个Flutterwave帐户来接收或接受来自我们应用程序的付款。
什么是钱包系统?
数字钱包,通常称为电子钱包,是一种电子设备、互联网服务或软件应用程序,允许一方用数字货币单位与另一方交换产品和服务。这包括使用电脑在线购物或使用智能手机在商店购物。
在进行任何交易之前,可以将钱存入数字钱包,或者在其他情况下可以将个人银行账户链接到数字钱包。
数字钱包有哪些好处?
-
每次进行网上交易时,您无需从鼓鼓囊囊的钱包里掏出卡片,只需拿着智能手机,登录您的账户,就可以开始交易了。
-
大多数应用程序允许您以易于访问的方式组织所有信息,从而节省您在钱包里翻找所需东西的时间。
-
许多数字钱包应用程序为用户提供各种奖金和奖品,这可能有助于您在特定交易中获得更多“收益”。
Flutterwave 是什么?
从在线收款到付款以及其间的一切,Flutterwave可以帮助您针对特定用例开发任何形式的支付流程。
他们还提供多种服务,让您在几分钟内即可在全球范围内转账和收款。
创建目录、安装依赖项并设置身份验证
首先,我们需要设置我们的项目。
通过导航到我们机器上选择的目录并在终端上打开它来打开 Visual Studio Code。
然后执行:
code.
注意:
code .如果我们的系统上没有安装 Visual Studio Code,它将无法工作。
创建目录并初始化npm.
通过输入以下命令创建目录并初始化 npm:
- Windows 电源外壳
   mkdir wallet-demo-with-flutterwave

   cd wallet-demo-with-flutterwave

   npm init -y
- Linux
   mkdir wallet-demo-with-flutterwave

   cd wallet-demo-with-flutterwave

   npm init -y
创建文件和目录
在前面的步骤中,我们npm使用命令进行了初始化npm init -y,该命令自动创建了一个package.json。
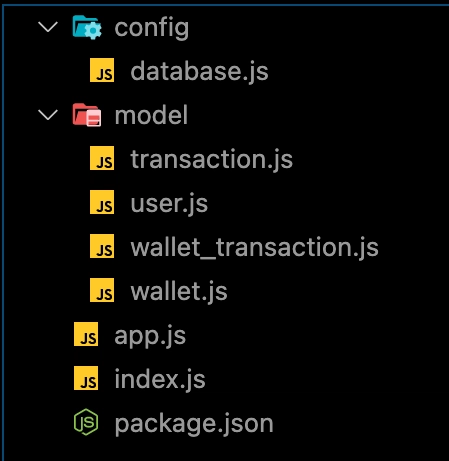
我们需要创建模型、配置目录和文件,例如,wallet.js, wallet_transaction.js, transaction.js, database.js使用以下命令。
   mkdir model config

   touch config/database.js model/wallet.js
   model/wallet_transaction.js model/transaction.js
   model/user.js
我们现在可以使用命令在项目的根目录中创建index.js和文件。app.js
touch app.js index.js
如下图所示:
安装依赖项
我们将安装几个依赖项,例如mongoose, jsonwebtoken, express, dotenv, axios, bcryptjs,开发依赖项,以便nodemon在我们自动进行更改时重新启动服务器。
我们将安装 mongoose,因为我将在本教程中使用 MongoDB。
我们将根据数据库中的信息检查用户凭证。因此,整个身份验证过程并不局限于本教程中使用的数据库。
  npm install jsonwebtoken dotenv mongoose express bcryptjs axios

  npm install nodemon -D
创建 Node.js 服务器并连接数据库
通过按顺序将以下代码片段添加到我们的 app.js、index.js、database.js、.env 中,我们现在可以创建我们的 Node.js 服务器并将其连接到我们的数据库。
在我们的database.js.
config/database.js:
const mongoose = require("mongoose");

const { MONGO_URI } = process.env;

exports.connect = () => {
  // Connecting to the database
  mongoose
    .connect(MONGO_URI, {
      useNewUrlParser: true,
      useUnifiedTopology: true,
    })
    .then(() => {
      console.log("Successfully connected to database");
    })
    .catch((error) => {
      console.log("database connection failed. exiting now...");
      console.error(error);
      process.exit(1);
    });
};
在我们的 app.js 中:
wallet-demo-with-flutterwave/app.js
require("dotenv").config();
require("./config/database").connect();
const express = require("express");
const bcrypt = require("bcryptjs");
const jwt = require("jsonwebtoken");

const app = express();

app.use(express.json());

// Logic here

module.exports = app;
在我们的index.js中:
wallet-demo-with-flutterwave/index.js
const http = require("http");
const app = require("./app");
const server = http.createServer(app);

const { API_PORT } = process.env;
const port = process.env.PORT || API_PORT;

// server listening
server.listen(port, () => {
  console.log(`Server running on port ${port}`);
});
如果你注意到,我们的文件需要一些环境变量。我们将.env在启动应用程序之前创建一个新文件并添加变量。
在我们的 .env 中。
API_PORT=4001

MONGO_URI= //Your database URI here
要启动我们的服务器,请编辑 package.json 中的脚本对象,使其看起来像下面这样。
"scripts": {
    "start": "node index.js",
    "dev": "nodemon index.js",
    "test": "echo \"Error: no test specified\" && exit 1"
  }
上面的代码片段已成功插入app.js, index.js, and database.js.首先,我们构建了我们的 node.js 服务器index.js并导入了app.js配置了路由的文件。
然后,正如所示,database.js,我们使用 mongoose 创建与数据库的连接。
执行命令npm run dev。
服务器和数据库都应该正常运行并且不会崩溃。
创建用户模型和路线
我们将在用户首次注册时定义用户详细信息的模式,并在登录时根据保存的凭据对其进行验证。
将以下代码片段添加到模型文件夹内的 user.js 中。
model/user.js
const mongoose = require("mongoose");

const userSchema = new mongoose.Schema({
  first_name: { type: String, default: null },
  last_name: { type: String, default: null },
  email: { type: String, unique: true },
  password: { type: String },
});

module.exports = mongoose.model("user", userSchema);
现在让我们分别创建注册和登录的路由。
app.js根目录中的文件,我们将添加以下代码片段用于用户注册和登录。
// importing user context
const User = require("./model/user");

// Register
app.post("/register", (req, res) => {
// our register logic goes here...
});

// Login
app.post("/login", (req, res) => {
// our login logic goes here
});
实现注册和登录功能
我们将在应用程序中实现这两个路由。我们将使用 JWT 签名凭证,并使用 bycrypt 加密密码,然后再将其存储到数据库中。
从 /register 路线,我们将:
- 获取用户输入。
- 验证用户输入。
- 验证用户是否已经存在。
- 对用户密码进行加密。
- 在我们的数据库中创建一个用户。
- 最后,创建一个签名的 JWT 令牌。
修改我们之前创建的 /register 路由结构,使其如下所示。
// ...

app.post("/register", async (req, res) => {

  // Our register logic starts here
  try {
    // Get user input
    const { first_name, last_name, email, password } = req.body;

    // Validate user input
    if (!(email && password && first_name && last_name)) {
      res.status(400).send("All input is required");
    }

    // check if user already exist
    // Validate if user exist in our database
    const oldUser = await User.findOne({ email });

    if (oldUser) {
      return res.status(409).send("User Already Exist. Please Login");
    }

    //Encrypt user password
    encryptedPassword = await bcrypt.hash(password, 10);

    // Create user in our database
    const user = await User.create({
      first_name,
      last_name,
      email: email.toLowerCase(), // sanitize: convert email to lowercase
      password: encryptedPassword,
    });

    // Create token
    const token = jwt.sign(
      { user_id: user._id, email },
      process.env.TOKEN_KEY,
      {
        expiresIn: "2h",
      }
    );
    // save user token
    user.token = token;

    // return new user
    res.status(201).json(user);
  } catch (err) {
    console.log(err);
  }
  // Our register logic ends here
});

// ...
注意:使用 TOKEN_KEY 更新您的 .env 文件,它可以是一个随机字符串。
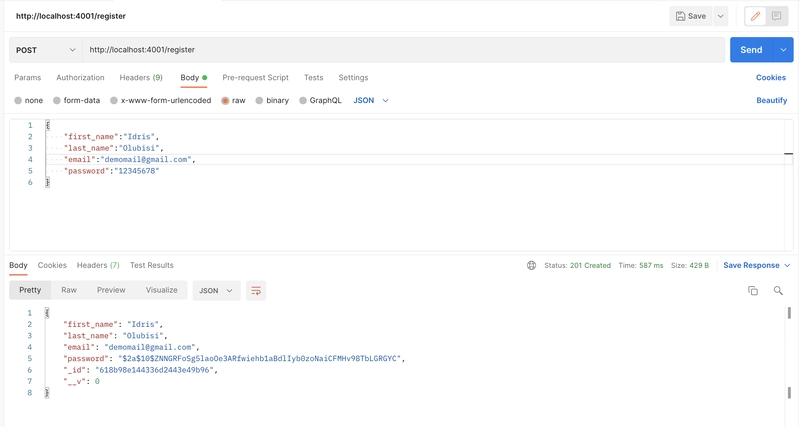
使用Postman测试端点,注册成功后我们将得到如下所示的响应。
/login
// ...

app.post("/login", async (req, res) => {

  // Our login logic starts here
  try {
    // Get user input
    const { email, password } = req.body;

    // Validate user input
    if (!(email && password)) {
      res.status(400).send("All input is required");
    }
    // Validate if user exist in our database
    const user = await User.findOne({ email });

    if (user && (await bcrypt.compare(password, user.password))) {
      // Create token
      const token = jwt.sign(
        { user_id: user._id, email },
        process.env.TOKEN_KEY,
        {
          expiresIn: "2h",
        }
      );

      // save user token
      user.token = token;

      // user
      res.status(200).json(user);
    }
    res.status(400).send("Invalid Credentials");
  } catch (err) {
    console.log(err);
  }
  // Our login logic ends here
});

// ...
单击此处了解有关如何在 Node.js 中使用 JWT 令牌构建身份验证 API 的更多信息
使用 Flutterwave 支付集成构建钱包系统
既然我们已经在上一步中成功创建了用户收集和身份验证功能,那么我们现在可以利用用户详细信息来构建钱包、保存钱包交易以及在系统中执行其他操作。
让我们使用以下代码更新我们的 wallet.js、wallet_transaction 和 transaction。
model/wallet.js
const { Schema, model } = require("mongoose");

const walletSchema = Schema(
  {
    balance: { type: Number, default: 0 },
    userId: {
      type: Schema.Types.ObjectId,
      required: true,
      ref: "users",
    },
  },
  { timestamps: true }
);

module.exports = model("wallet", walletSchema);
model/wallet_transaction.js
const mongoose = require("mongoose");

const walletTransactionSchema = new mongoose.Schema(
  {
    amount: { type: Number, default: 0 },

    // Even though user can be implied from wallet, let us
    // double save it for security
    userId: {
      type: String,
      ref: "users",
      required: true,
    },

    isInflow: { type: Boolean },

    paymentMethod: { type: String, default: "flutterwave" },

    currency: {
      type: String,
      required: [true, "currency is required"],
      enum: ["NGN", "USD", "EUR", "GBP"],
    },

    status: {
      type: String,
      required: [true, "payment status is required"],
      enum: ["successful", "pending", "failed"],
    },
  },
  { timestamp: true }
);

module.exports = mongoose.model("walletTransaction", walletTransactionSchema);
model/transaction.js
const mongoose = require("mongoose");

const transactionSchema =new mongoose.Schema(
  {
    userId: {
      type: Schema.Types.ObjectId,
      ref: "user",
    },
    transactionId: {
      type: Number,
      trim: true,
    },
    name: {
      type: String,
      required: [true, "name is required"],
      trim: true,
    },
    email: {
      type: String,
      required: [true, "email is required"],
      trim: true,
    },
    phone: {
      type: String,
    },
    amount: {
      type: Number,
      required: [true, "amount is required"],
    },
    currency: {
      type: String,
      required: [true, "currency is required"],
      enum: ["NGN", "USD", "EUR", "GBP"],
    },
    paymentStatus: {
      type: String,
      enum: ["successful", "pending", "failed"],
      default: "pending",
    },
    paymentGateway: {
      type: String,
      required: [true, "payment gateway is required"],
      enum: ["flutterwave"], // Payment gateway might differs as the application grows
    },
  },
  {
    timestamps: true,
  }
);

module.exports = mongoose.model("Transaction", transactionSchema);
我们已经创建了钱包、钱包交易和交易模式,这意味着我们现在可以从客户端接收资金,在后端使用 flutterwave 验证付款,分别在钱包、钱包交易和交易集合中记录和更新付款详细信息。
让我们让前端客户端准备好接受来自客户的付款。
我们将使用以下命令index.html在我们的根目录中创建一个文件。
touch index.html
index.html使用下面的代码片段更新我们刚刚创建的内容:
<!DOCTYPE html>
<html lang="en">
  <head>
    <meta charset="UTF-8" />
    <meta name="viewport" content="width=device-width, initial-scale=1.0" />
    <title>Receive Payment</title>
  </head>
  <body>
    <form>
      <script src="https://checkout.flutterwave.com/v3.js"></script>
      <button type="button" onClick="makePayment()">Pay Now</button>
    </form>

    <script>
      function makePayment() {
        FlutterwaveCheckout({
          public_key: "YOUR_PUBLIC_KEY_HERE",
          tx_ref: "hooli-tx-1920bbtyt",
          amount: 1000,
          currency: "NGN",
          country: "NG",
          payment_options: "card",

          // specified redirect URL
          redirect_url: "http://localhost:4001/response",

          // use customer details if user is not logged in, else add user_id to the request
          customer: {
            email: "demomail@gmail.com",
            phone_number: "08088098622",
            name: "Idris Olubisi",
          },
          callback: function (data) {
            console.log(data);
          },
          onclose: function () {
            // close modal
          },
          customizations: {
            title: "Flutterwave Demo",
            description: "Flutterwave Payment Demo",
            logo: "https://cdn.iconscout.com/icon/premium/png-256-thumb/payment-2193968-1855546.png",
          },
        });
      }
    </script>
  </body>
</html>
您可以从Flutterwave 文档中了解有关上述代码片段的更多信息
更新我们的从服务器端app.js呈现文件,我们将使用以下代码片段:index.html
const path = require('path');

// ...

app.post("/login", async (req, res) => {
//...
}

// Add the route below
app.get("/pay", (req, res) => {
  res.sendFile(path.join(__dirname + "/index.html"));
  //__dirname : It will resolve to your project folder.
});

//...
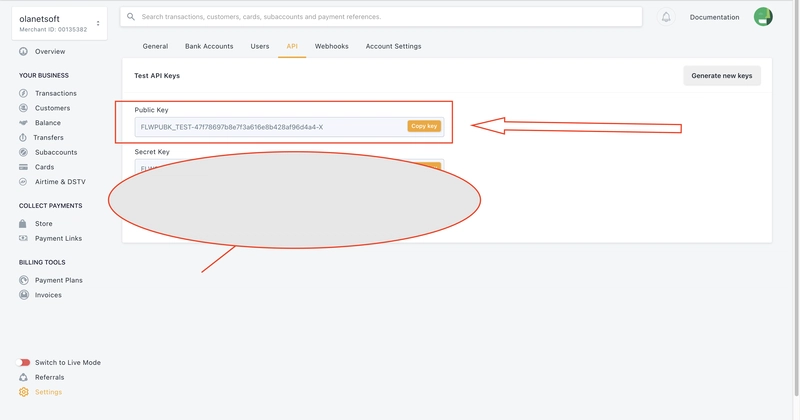
在测试应用程序之前,我们会在之前创建的“index.html”中看到“YOUR_PUBLIC_KEY_HERE”这句话,这意味着我们需要一个来自Flutterwave 仪表板的公钥。让我们前往仪表板来检索我们的公钥。
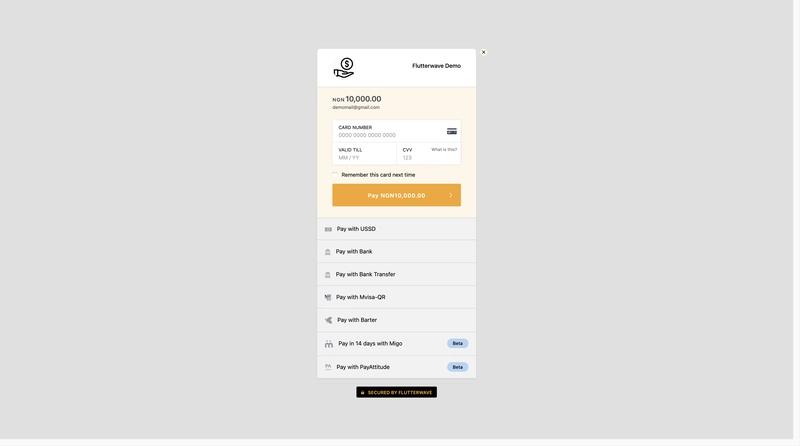
让我们在浏览器中输入 来测试一下http://localhost:4001/pay。点击按钮后,我们应该看到类似下面的内容Pay Now:
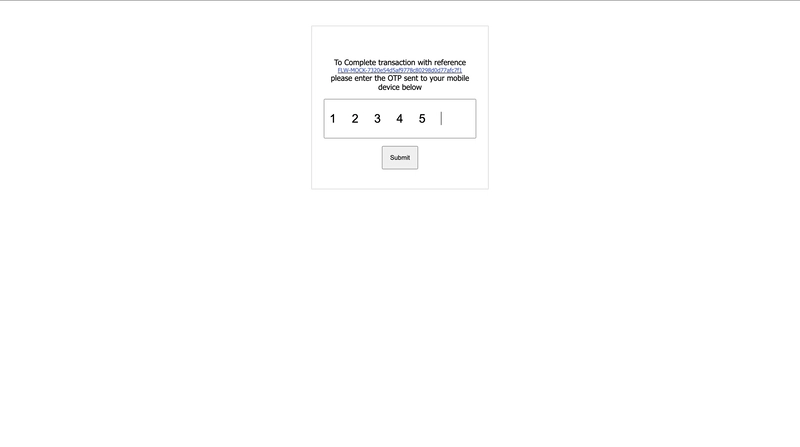
我们将使用测试卡号:4242424242424242、有效期:04/25和 CVV:。由于我们使用的是测试卡202,因此我们将被重定向到下面的页面以输入 OTP 。12345
输入 OTP 后,我们会被重定向到 localhost:3000/response,但什么也不会发生。让我们通过实现处理接下来发生的逻辑来解决这个问题。
创建 ./response端点后,我们将使用以下代码片段更新我们的 app.js:
//...

app.get("/response", async (req, res) => {
  const { transaction_id } = req.query;

  // URL with transaction ID of which will be used to confirm transaction status
  const url = `https://api.flutterwave.com/v3/transactions/${transaction_id}/verify`;

  // Network call to confirm transaction status
  const response = await axios({
    url,
    method: "get",
    headers: {
      "Content-Type": "application/json",
      Accept: "application/json",
      Authorization: `${process.env.FLUTTERWAVE_V3_SECRET_KEY}`,
    },
  });

  console.log(response.data.data)
});
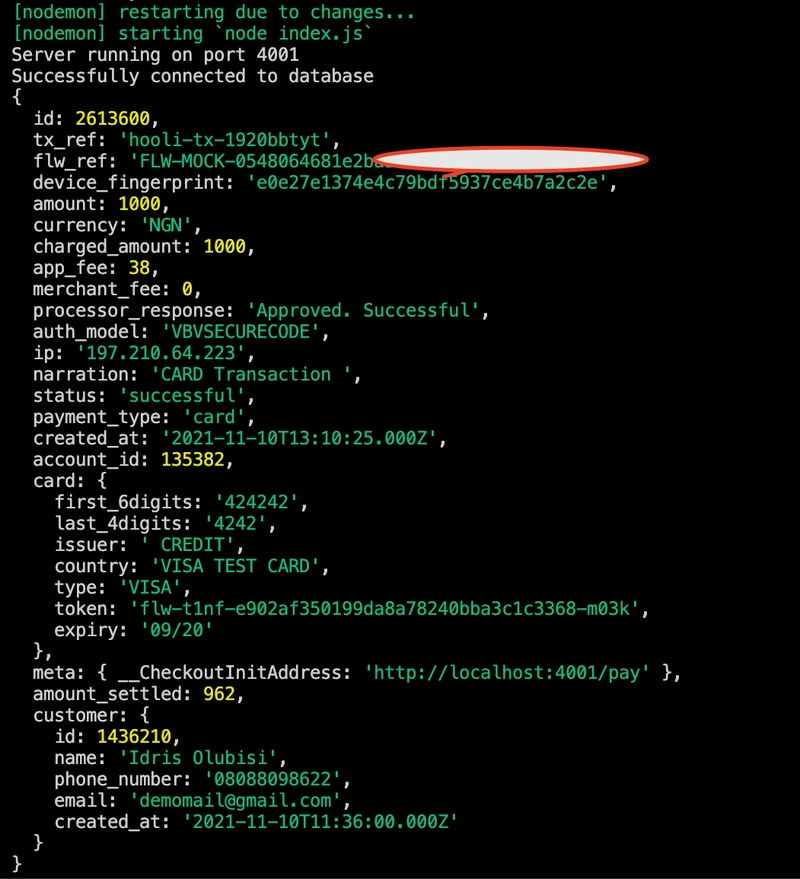
transaction_id我们从上面代码中回调的查询参数中获取,并通过向 Flutterwave 端点发送请求来验证交易。我们应该在日志中看到类似以下截图的内容。
让我们创建一个逻辑来管理诸如验证用户钱包、创建钱包交易和交易等操作。
在我们的中app.js,让我们导入钱包、钱包交易和交易模型。
//...

// importing user context
const User = require("./model/user");

const Wallet = require("./model/wallet");
const WalletTransaction = require("./model/wallet_transaction");
const Transaction = require("./model/transaction");

//...
使用管理操作的逻辑更新 app.js:
app.get("/response", async (req, res) => {
 //....
});

// Validating User wallet
const validateUserWallet = async (userId) => {
  try {
    // check if user have a wallet, else create wallet
    const userWallet = await Wallet.findOne({ userId });

    // If user wallet doesn't exist, create a new one
    if (!userWallet) {
      // create wallet
      const wallet = await Wallet.create({
        userId,
      });
      return wallet;
    }
    return userWallet;
  } catch (error) {
    console.log(error);
  }
};

// Create Wallet Transaction
const createWalletTransaction = async (userId, status, currency, amount) => {
  try {
    // create wallet transaction
    const walletTransaction = await WalletTransaction.create({
      amount,
      userId,
      isInflow: true,
      currency,
      status,
    });
    return walletTransaction;
  } catch (error) {
    console.log(error);
  }
};

// Create Transaction
const createTransaction = async (
  userId,
  id,
  status,
  currency,
  amount,
  customer
) => {
  try {
    // create transaction
    const transaction = await Transaction.create({
      userId,
      transactionId: id,
      name: customer.name,
      email: customer.email,
      phone: customer.phone_number,
      amount,
      currency,
      paymentStatus: status,
      paymentGateway: "flutterwave",
    });
    return transaction;
  } catch (error) {
    console.log(error);
  }
};

// Update wallet
const updateWallet = async (userId, amount) => {
  try {
    // update wallet
    const wallet = await Wallet.findOneAndUpdate(
      { userId },
      { $inc: { balance: amount } },
      { new: true }
    );
    return wallet;
  } catch (error) {
    console.log(error);
  }
};
我们现在可以/response使用我们创建的所有函数来更新端点,以管理不同的操作。
//...

app.get("/response", async (req, res) => {
  const { transaction_id } = req.query;

  // URL with transaction ID of which will be used to confirm transaction status
  const url = `https://api.flutterwave.com/v3/transactions/${transaction_id}/verify`;

  // Network call to confirm transaction status
  const response = await axios({
    url,
    method: "get",
    headers: {
      "Content-Type": "application/json",
      Accept: "application/json",
      Authorization: `${process.env.FLUTTERWAVE_V3_SECRET_KEY}`,
    },
  });

  const { status, currency, id, amount, customer } = response.data.data;

  // check if customer exist in our database
  const user = await User.findOne({ email: customer.email });

  // check if user have a wallet, else create wallet
  const wallet = await validateUserWallet(user._id);

  // create wallet transaction
  await createWalletTransaction(user._id, status, currency, amount);

  // create transaction
  await createTransaction(user._id, id, status, currency, amount, customer);

  await updateWallet(user._id, amount);

  return res.status(200).json({
    response: "wallet funded successfully",
    data: wallet,
  });
});

//...
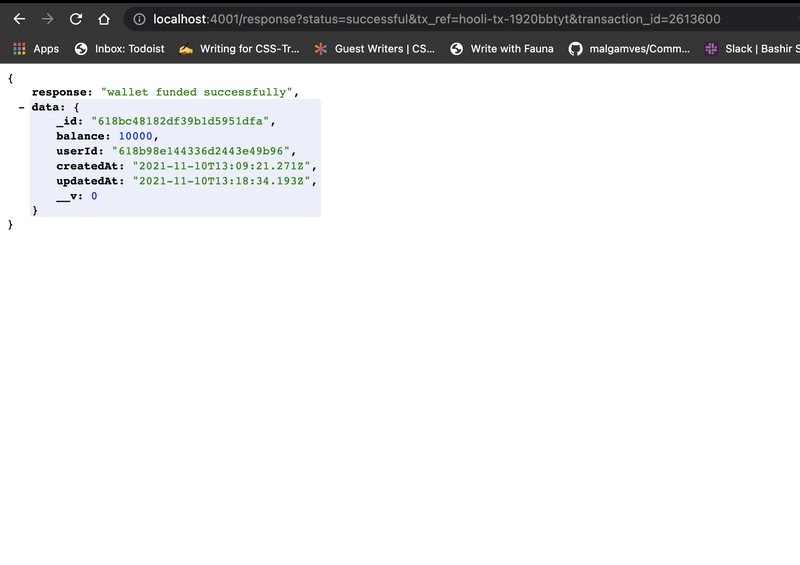
瞧🥳我们快完成了,让我们测试一下我们的应用程序。完成付款后,我们应该得到类似下面的内容:
由于经过多次尝试,在尝试为我们的钱包注资时,我们在上面的屏幕截图中拥有余额10,000;但是,如果仔细完成这些程序,这个数字可能会有所不同。
让我们使用下面的代码片段创建一个端点来检索用户余额:
//...

app.get("/wallet/:userId/balance", async (req, res) => {
  try {
    const { userId } = req.params;

    const wallet = await Wallet.findOne({ userId });
    // user
    res.status(200).json(wallet.balance);
  } catch (err) {
    console.log(err);
  }
});

//...
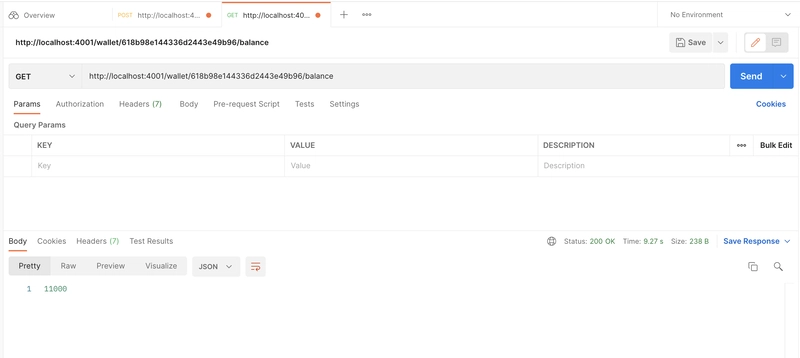
测试返回用户余额的端点:
注意:我们可能注意到,如果在重定向到“/response”端点后重新加载页面,相同金额的相同交易会更新到我们的钱包中。为了防止这种情况,我们必须验证
transaction_id系统中是否存在此类交易;否则,我们将收到重复交易错误。
我们可以修改我们的逻辑,如下所示:
//...

app.get("/response", async (req, res) => {
  const { transaction_id } = req.query;

  //...

  const { status, currency, id, amount, customer } = response.data.data;

  // check if transaction id already exist
  const transactionExist = await Transaction.findOne({ transactionId: id });

  if (transactionExist) {
    return res.status(409).send("Transaction Already Exist");
  }

  //...

  return res.status(200).json({
    response: "wallet funded successfully",
    data: wallet,
  });
});
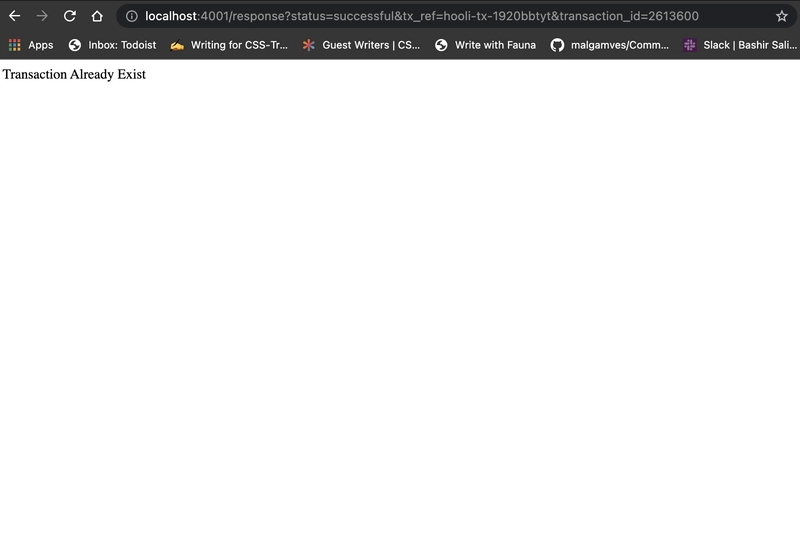
接下来,当我们刷新页面时,我们应该会看到类似于下面的屏幕截图的内容。
完整代码可在GitHub上获取
结论
在本文中,我们学习了如何在 Node.js 应用程序中构建一个简单的身份验证、钱包系统和 Flutterwave 支付集成
参考
我很乐意通过Twitter | LinkedIn | GitHub | Portfolio与您联系
下篇博文再见!保重!!!
文章来源:https://dev.to/olanetsoft/how-to-build-a-wallet-system-with-flutterwave- payment-integration-into-nodejs-application-175b 后端开发教程 - Java、Spring Boot 实战 - msg200.com
