掌握 Angular 8:了解这五件事可以节省您的时间。
这篇文章是为ng-newsletter创建的,最初发布在www.newline.co
Angular 中有一些边缘情况,如果不熟悉细节,有时会浪费你的时间。
我使用 Angular 已经 3.5 年多了,以下是我学到的一些有趣的东西,可以节省你的时间。我们将讨论:
-
HTTPInterceptors 如何与功能模块协同工作
-
角度路由器重定向时查询参数丢失
-
::ng-deep span - 避免对特定元素进行封装(以搜索词高亮为例)
-
没有订阅的 Http
-
在相同的 URL 导航上重新加载组件
让我们深入研究一下。
您可以在 Stackblitz 中查看可运行的演示,并在此 Github repo中查看代码。
#1. HTTPInterceptors 如何与功能模块协同工作
曾经有一次,我在 codementor.io 上做过一次指导课程,我们集成了一个独立的 Angular 应用程序,作为主项目应用的功能模块。代码被复制到项目功能文件夹中,添加了一个惰性加载模块,并添加到主应用的路由配置中。
主要app.routing.ts内容如下:
const routes: Routes = [
  {path: '', redirectTo: 'home', pathMatch: 'full'},
  {path: 'home', component: HomeComponent},
  { path: 'feature',
    loadChildren: './some-feature/some-feature.module#SomeFeatureModule'}
];
和feature.module:
@NgModule({
  declarations: [
    SomeComponentComponent
  ],
  imports: [
    CommonModule,
    SomeFeatureRoutingModule,
    HttpClientModule
  ],
  bootstrap: [
    SomeComponentComponent
  ]
})
export class SomeFeatureModule { }
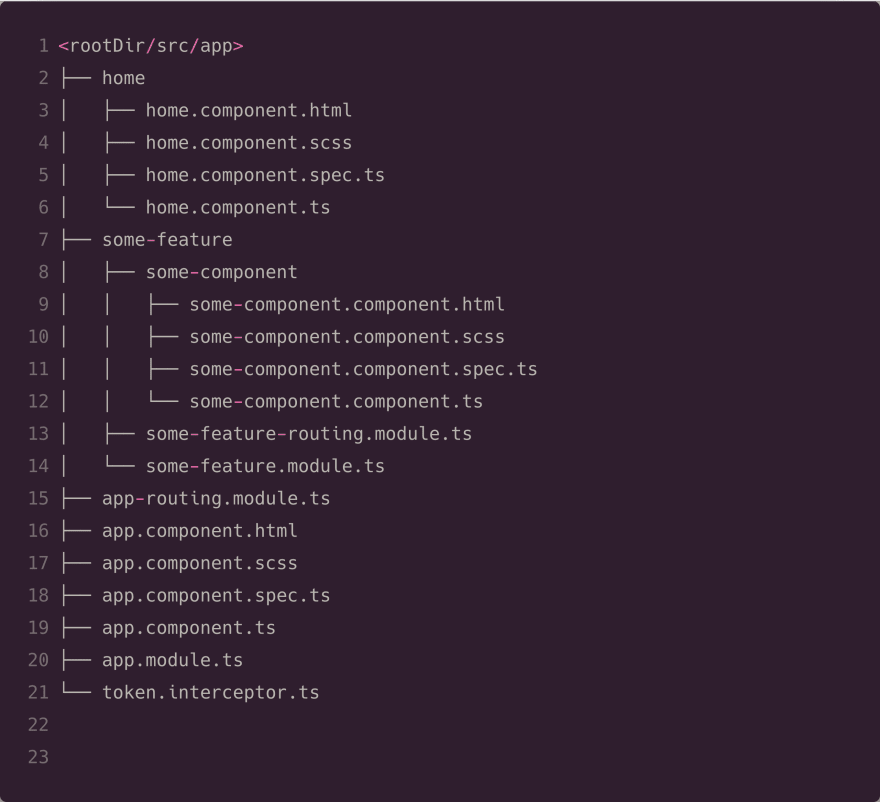
最后的目录结构看起来与我们的演示项目中的代码非常相似:
乍一看,它应该会非常有效。事实上,它确实有效。
 除了一件小事。
主应用程序组件以及功能模块组件使用标准 Angular 执行一些 HTTP 调用,HttpClientModule并且特定的令牌拦截器将授权标头附加到所有传出的网络请求。
但不知何故,功能模块网络请求并未由主应用程序的令牌拦截器处理。
 但为什么?!
好吧,我就不拿阴谋来折磨你了。问题在于,在功能独立开发期间,一个单独的HTTPClientModule被添加到了的imports数组中feature.module.ts。这导致 Angular 创建了另一个HttpModule带有空的自定义拦截器列表的 实例。
如何避免?只需注释掉HTTPClientModule主应用模块之外的所有其他 Angular 模块即可。( App.module.ts)
现在,功能模块如下所示:
@NgModule({
  declarations: [
    SomeComponentComponent
  ],
  imports: [
    CommonModule,
    SomeFeatureRoutingModule,
    // HttpClientModule  <-- commented out
  ],
  bootstrap: [
    SomeComponentComponent
  ]
})
export class SomeFeatureModule { }
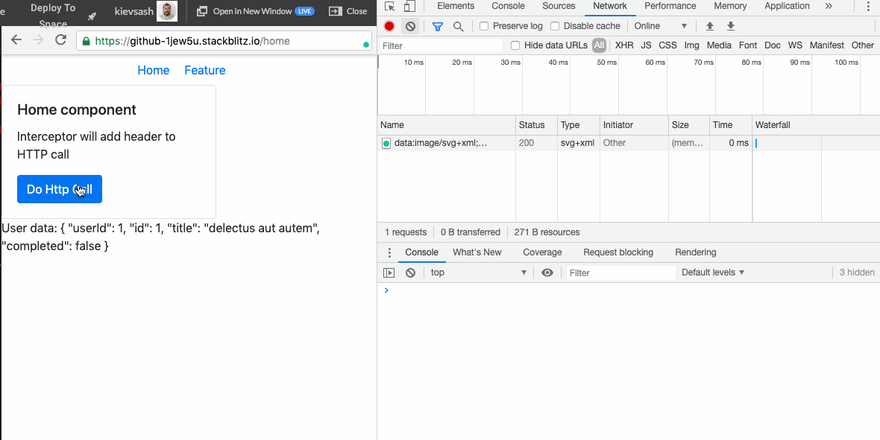
了解了这些特性,你就可以针对特定的功能模块实现特定的功能HTTPInterceptors。你只需添加HTTPClientModule到特定的 Angular 功能模块,并HTTP_INTERCEPTORS在同一个模块中定义提供程序即可。现在,在你的功能模块中,只有它自己的拦截器会被使用,而所有其他应用程序模块都将使用根应用模块的拦截器。
@NgModule({
  declarations: [
    SomeComponentComponent
  ],
  imports: [
    CommonModule,
    SomeFeatureRoutingModule,
    HttpClientModule // separate feture module HTTPClientModule
  ],
  bootstrap: [
    SomeComponentComponent
  ],
  providers: [
    {
      provide: HTTP_INTERCEPTORS,
      useClass: FeatureInterceptor, // Hey, we have specific module interceptor now
      multi: true
    }
  ],
})
export class SomeFeatureModule { }
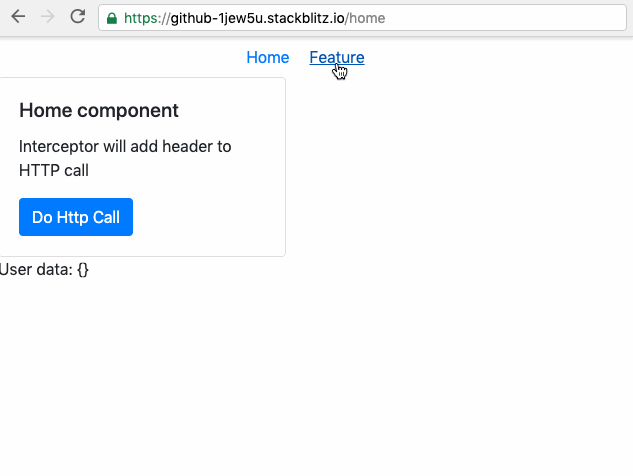
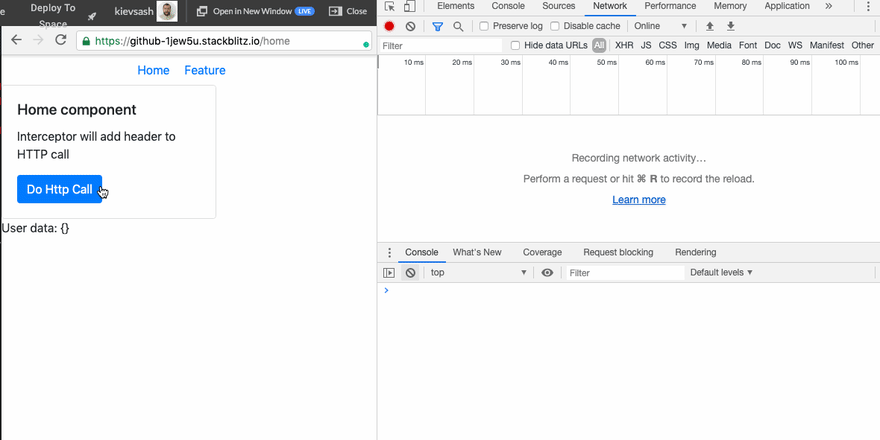
让我们检查一下它是如何工作的:
您可以在 Stackblitz游乐场中试用代码。此外,完整的项目代码已上传到 GitHub “Mastering Angular” repo。
#2. 查询参数在 Angular 路由器重定向时丢失
有时我们必须为 Angular SPA 指定查询参数。在这种情况下,我们的应用程序 URL 可能如下所示:
http://yourdomain.com/?serach=text&page=3
它应该能正常工作。但是 Angular 路由配置经常使用redirectTo指令将请求引导到特定的 home 组件:
const routes: Routes = [
  {path: '', redirectTo: '/home', pathMatch: 'full'},
  {path: 'home', component: HomeComponent}
]
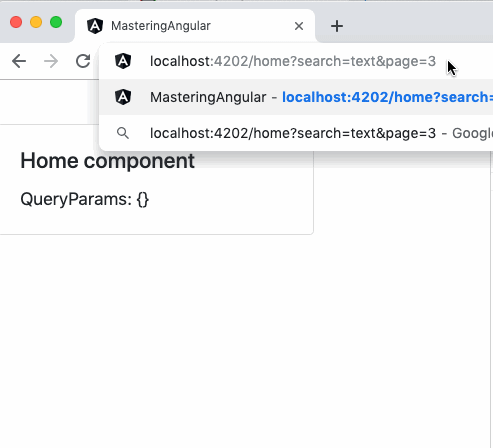
我们期望 Angular 将 URL 更改为:http://yourdomain.com/home?search
=text&page=3 但实际上 Angular 将其更改为:http://yourdomain.com/home。

查询参数丢失。HomeComponent将无法获取它们
如何处理?
有三种方法:
- 最简单的。只需使用带有所有参数的直接HomeComponent路由 URL:
http://yourdomain.com/home?search=text&page=3
在这种情况下不会发生重定向,因此 queryParams 不会丢失。
- 最难的。监听所有路由事件,如果发生重定向,只需复制查询参数并恢复/分配给 /home 页面即可。
import {Component, OnInit} from '@angular/core';
import {NavigationEnd, Router} from '@angular/router';
import {filter, take, tap} from 'rxjs/operators';

@Component({
  selector: 'app-root',
  templateUrl: './app.component.html',
  styleUrls: ['./app.component.scss']
})
export class AppComponent implements OnInit {
  title = 'Mastering-angular';

  constructor(private route: Router) {
  }

  ngOnInit() {
    this.route.events.pipe(
      tap(() => console.log('tap')),
      filter((event) => event instanceof NavigationEnd
        && event.urlAfterRedirects === '/home'
        && event.url.search(/\?/) > -1 // look for '?'
      ),
      take(1) // run handler once
    ).subscribe((event: NavigationEnd) => {
      console.log('Test')
      // extract queryParams as value: pair object.
      const queryParams = event.url.split('?')[1]
        .split('&')
        .reduce((acc, item) => ({...acc, [item.split('=')[0]]: item.split('=')[1]}), {});

      this.route.navigate([], {
        queryParams, // reload current route and add queryParams
        queryParamsHandling: 'merge'
      });
    });
  }
}
- 还有一个更好的解决方案 - 如果我们只是删除路由路径中的“/”符号,查询参数就不会丢失,如下所示:
const routes: Routes = [
  {path: '', redirectTo: 'home', pathMatch: 'full'},
  {path: 'home', component: HomeComponent}
]

哪种方法最适合你?请在评论区留下你的选择。
#3. ::ng-deep span - 避免对特定元素进行封装(以搜索词高亮为例)
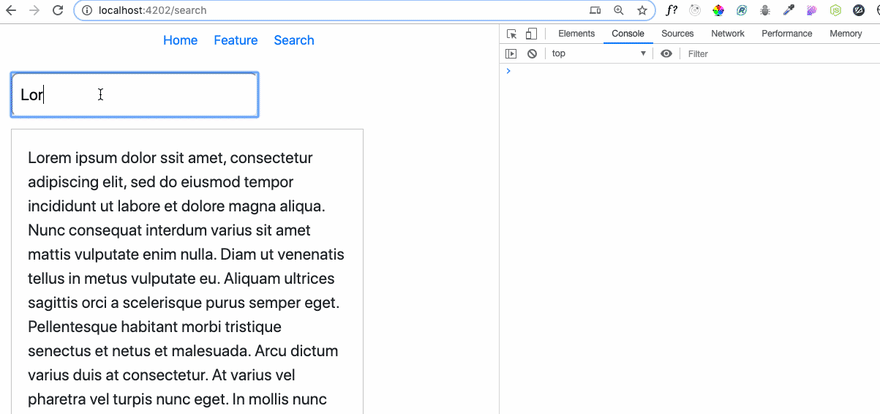
好的,假设您有一项任务,使搜索文本在特定段落中突出显示。
你会怎么做?最简单的方法——保存原始文本。每次搜索时,只需将我们要查找的文本替换为<span class="highlight">textToSearch</span>
  getHighlightedText(searchText) {
    const regexp = new RegExp(searchText, 'gi');
    const highlightedText = originalText.replace(regexp, '<span class="highlight">$&</span>');
    return highlightedText;
  }
为了在component.scss文件中突出显示它,我们制定了以下规则:
.highlight { background-color: yellow;}
你运行它但是...它不起作用:
 你凭什么觉得它不起作用?我首先想到的是,我们的 CSS 规则不知怎么地没有包含在最终的打包文件中。所以我决定搜索一下,结果如下:
.highlight[_ngcontent-tls-c1] {
  background-color: yellow;
}
Angular 对所有组件的 CSS 规则都进行了 CSS 封装。这就是为什么我们的元素没有被高亮显示的原因。该如何解决这个问题?只需使用::ng-deep前缀来告诉 Angular 这条特定的规则不应该被修改:
::ng-deep .highlight {
  background-color: yellow;
}
现在,如果我们用高亮显示检查我们的搜索 - 它会运行良好:
 您可以在Stackblitz 页面上试用代码,也可以在 GitHub 仓库中查看。您可以在此处阅读有关::ng-deep和样式封装的更多信息。
#4. 没有订阅的 Http
如果您在 Twitter 上关注Angular 社区,那么您可能会注意到模板驱动开发正在成为一种新趋势。
这种方法的很好的例子是:
- @NikPoltoratsky 的Async-pipeline - 一组有趣的管道,在模板中应用不同的 RxJS 操作符,例如:
   // app.component.ts
   @Component({
     template: <code>
       {{ title$ | debounceTime:1000 | async }}
     </code>,
   })
   export class AppComponent {
     title$: Observable<string> = of('Hello, Async Pipeline!');
   }
- Dominic Elm的ngx-template-streams - 允许以反应方式将域事件分配给组件类中的特定属性:
   //html
   <button (*click)="clicks$">Click Me (Stream)</button>

   //ts
   import { Component, OnInit } from '@angular/core';
   import { ObservableEvent } from '@typebytes/ngx-template-streams';
   import { Observable } from 'rxjs';

   @Component({...})
   export class AppComponent implements OnInit {
     @ObservableEvent()
     clicks$: Observable<any>;

     ngOnInit() {
       // we can either manually subscribe or use the async pipe
       this.clicks$.subscribe(console.log);
     }
   }
- ReactiveFox的ngxf/platform具有非常好的文档- 一组结构化指令,用于减少角度代码样板,例如:
   <ng-container *route="let route">
       {{ route }} // is ActivatedRoute instance
   </ng-container>
- Michael Hladky提出了有趣的“RFC:组件提案”问题线程,讨论如何使 Angular 更具响应性。
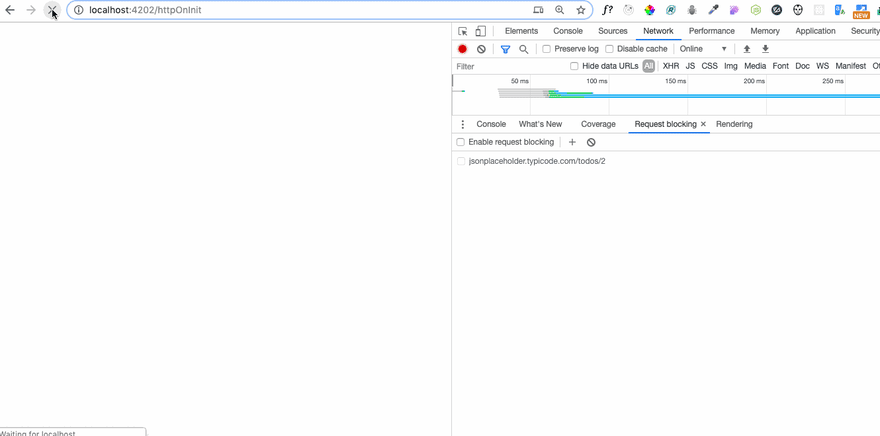
让我们将这种方法应用到一个相当常规的任务中,当我们的 Angular 组件在ngOnInit钩子内部执行一些网络请求时。通常情况下,这样的代码如下所示:
export class SomeComponentComponent implements OnInit {

  data = {};

  constructor(private http: HttpClient) { }

  ngOnInit() {
    this.http.get('https://jsonplaceholder.typicode.com/todos/2')
      .subscribe((data) => {
        this.data = data;
    });
  }

}
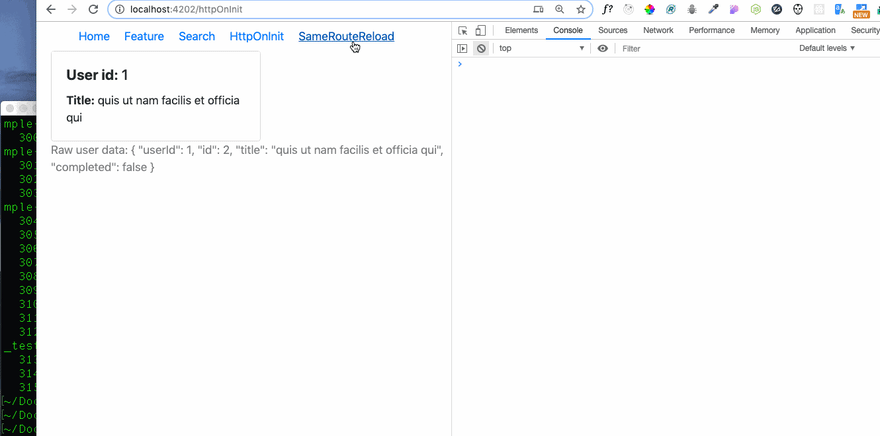
  <div class="card" style="width: 18rem;">
    <div class="card-body">
      <h5 class="card-title"><b>User id:</b> {{data.userId}} </h5>
      <p class="card-text"><b>Title:</b> {{data.title}}</p>
    </div>
  </div>
  <div class="wrapper">Raw user data: {{data | json}}</div>
但是,正如Michael Hladky在他的文章“如何在 Angular 中避免可观察对象”中提到的那样 - 它不是反应式编程:)。我想说 - 它不是一种模板驱动的方法。
我们可以做得更好吗?
是的,我们可以省略中间变量/属性,并使用 Angular 异步管道。现在我们的代码如下所示:
export class HttpCallComponent {
  data$ = this.http.get('https://jsonplaceholder.typicode.com/todos/2');
  constructor(private http: HttpClient, private snackBar: MatSnackBar) { }
}
<ng-container *ngIf="data$ | async as data">
  <div class="card" style="width: 18rem;">
    <div class="card-body">
      <h5 class="card-title"><b>User id:</b> {{data.userId}} </h5>
      <p class="card-text"><b>Title:</b> {{data.title}}</p>
    </div>
  </div>
  <div class="wrapper">Raw user data: {{data | json}}</div>
</ng-container>
但是如果网络出现 404 响应,该如何处理错误呢?让我们使用catchError运算符来处理网络请求失败——我们将从其回调中显示一条错误消息,以通知用户发生了什么。
export class HttpCallComponent {

  data$ = this.http.get('https://jsonplaceholder.typicode.com/todos/2').pipe(
    catchError((err) => {
      this.snackBar.open('Network request is failed', 'Failed', {
        duration: 1500,
      });
      return of();
    })
  );

  constructor(private http: HttpClient, private snackBar: MatSnackBar) { }

}
是时候检查它是如何工作的了:
太棒了!你可以在 Stackblitz游乐场中试用此示例,并在文章的GitHub repo中查看代码。
#5. 在相同的 URL 导航上重新加载组件
好的,所以你得到了一个遗留代码,其中主要的组件逻辑是在ngOninit()生命周期方法中设置的。这意味着,如果时间紧迫——如果我们需要将组件值重置为初始值——从头开始重新创建整个组件会更容易。但问题隐藏在这里:当我们尝试导航到已经激活的相同 URL 时,Angular 不会重新实例化组件。
好吧,这确实是一个问题。我首先想办法找到了解决方案——我读了一篇很棒的文章《Angular:在相同的 URL 导航中重新获取数据》。但它并没有提供完全重新初始化组件实例的解决方案——只是提供了一些方法来捕捉激活路由再次被点击的事件。这不是我们想要的。
如果可以加载其他路由,然后返回当前活动路由会怎么样?但这可能会导致页面上出现一些视觉瑕疵,以便用户能够注意到。我们能否以某种方式做到这一点,而不会产生任何视觉瑕疵?
答案是“是”,我在这里找到了。简而言之,解决方案代码简洁美观:
this.router.navigateByUrl('/', {skipLocationChange: true})
  .then(()=>this.router.navigate([<route>]));
为了应用它,我们应该将routeLInk函数调用更改为app.component.html:
  <div class="col-12 text-center">
      <a [routerLink]="['/home']" >Home</a>
      <a [routerLink]="['/feature']" >Feature</a>
      <a [routerLink]="['/search']" >Search</a>
      <a [routerLink]="['/httpOnInit']" >HttpOnInit</a>
<!--      <a [routerLink]="['/sameRoute']" >SameRouteReload</a>-->
      <a class="route_link" (click)="goToRandomNUmberPage($event)" >SameRouteReload</a>
  </div>
并将此代码应用于app.component.ts:
  goToRandomNumberPage(event) {
    event.preventDefault();

    this.router.navigateByUrl('/', {skipLocationChange: true})
      .then(() => this.router.navigate(['/sameRoute']));
  }
现在它应该可以按照我们想要的方式工作了:
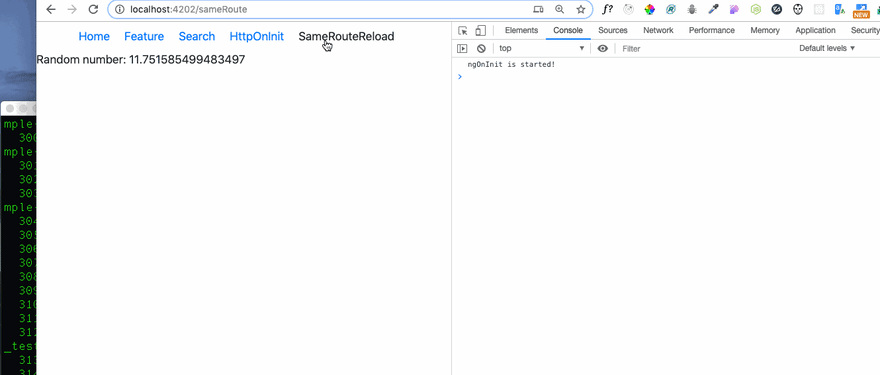 凉爽的!
凉爽的!
您可以在 Stackblitz codepen中进行检查,并在文章 github repo中查看代码。
概括
无论您是初学者还是经验丰富的开发人员,Angular City 的街道对每个人来说都是一个安全的地方,但在黑暗的角落里,总有一些实体在等待机会浪费您的时间。我希望本文能帮助您消除时间浪费,并快速高质量地交付可维护的干净代码。
如果您喜欢这篇文章 - 在Twitter上关注我并给我买杯咖啡☕️🤓。
更多阅读和观看内容:
-
“Angular 会浪费你的时间” YouTube 视频系列。