像建筑师一样构建 Angular(第一部分)
@angular-devkit/architect 很稳定!
伟大的斯科特!
捆绑包大小减少约 14%
我🤓 了解构建工具。
自从 Angular 2 发布以来,我一直在尝试不同的应用构建方式。大多数开发者无需担心他们的应用是如何构建的,因为 @angular/cli 让这一切变得非常简单。cli 隐藏了所有的复杂性,这是有原因的。工程师只需专注于功能实现和错误修复。坦白说,构建复杂的企业级应用并非易事。将所有组件整合在一起可能非常耗时,更不用说使用构建工具来拆分应用程序了。
在《像架构师一样构建 Angular(第一部分)》中,我们简要介绍了为什么有人想要编写自定义 Angular 构建版本以及我们是如何实现这一目标的。然后,我们使用 @angular-devkit/architect 包中提供的 API 搭建了一个新的 Builder,并使用 RxJS Observables 编写了构建代码,并学习如何使用新的生产构建版本扩展 @angular/cli,该构建版本将 Angular 与 Closure Compiler(而非 Webpack)捆绑在一起。
您可以查看此 Github 存储库中的代码。
我们是怎么走到这一步的?
自从 @angular/cli 迁移到 webpack 后,很难与其他构建工具集成,同时又能保留 cli 的优势。目前只有少数人尝试扩展 cli。nx就是一个例子,它甚至在单一仓库中实现了更快的开发速度,只增量构建已更改的代码。cli 有时会与 webpack 紧密耦合,导致 webpack 本身的定制变得非常繁琐。
在 Angular 6 之前,您可以弹出 webpack 配置来对其ng eject进行自定义。
随着 Angular 6 的发布,@angular/cli 的完全重写抽象了该工具的部分功能,此 API 已被弃用。cli 成为了 @angular-devkit 的包装器。运行ng命令实际上意味着触发了运行“构建器”的“架构师”目标。这种抽象使得 nx 这样的工具成为可能。
API 的有用部分如下:
- 构建器使您可以使用 TypeScript 和 RxJS 编写自定义构建代码
- Architect 允许您定义运行 Builders 的目标
- Architect CLI 提供了一种在工作区中测试构建器的方法
高级用户可以充分定制自己的工具,通过编写 Builder 代码并使用 Architect 来设置执行 Builder 的目标,从而提供自定义的 webpack 配置。但是,如果这样做,可能会破坏 API 中的变更,而 API 的变更将在 Angular 8 中稳定下来。@angular-devkit/architect 被认为是实验性的,直到类似这样的提交出现在 Github 上的 @angular/cli 仓库中。
@angular-devkit/architect 很稳定!
仅出于一个原因,这就会改变游戏规则。@angular/cli 变得可扩展。
构建器允许我们扩展 Angular CLI 来完成我们以前从未想过可能实现的事情!
以下是一些如何使用 Builder 扩展 CLI 的示例。
- 使用 Jest 而不是 Karma 运行单元测试
- 使用 TestCafe 而不是 Selenium 和 Protractor 执行 e2e 测试
- 使用 Webpack 以外的工具优化生产环境的 bundles
- 使用自定义节点服务器
- 提供自定义 Webpack 配置,例如@angular-devkit/build-webpack
当使用 Builder API 时,我们可以获得所有这些出色的功能/行为!
- RxJS 可观察对象
- 可组合
- 可测试
- 伐木工
- 进度追踪
- 错误报告器
- 调度器
在本教程中,我们将通过编写一个使用 Closure Compiler 优化应用程序的 Builder 来构建 Angular。
进入 Closure Compiler
@angular/cli 依赖于 webpack 和 terser 来打包和优化 JavaScript。这两个工具已经做得非常出色,但还有一个更胜一筹的工具。
Closure Compiler是 Google 用于优化 JavaScript 以适应生产环境的工具。其官方网站信息如下:
Closure Compiler 是一款加速 JavaScript 下载和运行的工具。它不是将源语言编译为机器码,而是将 JavaScript 编译为更高效的 JavaScript。它会解析和分析 JavaScript,移除死代码,并重写和最小化剩余代码。它还会检查语法、变量引用和类型,并对常见的 JavaScript 错误发出警告。
在 2017 年 ng-conf 大会上,Angular 团队宣布 AOT 编译器与 Angular 4 中的 Closure Compiler 兼容。AOT 编译器将 TypeScript 类型注解转换为 Closure Compiler 可以解释的 JSDoc 风格注解。您可以使用编译器标志来解锁此功能。后台有一个名为 tsickle 的工具负责转换注解。此功能将使 Google 团队能够广泛采用 Angular,因为 Google 要求所有团队都使用 Closure Compiler 来优化 JavaScript。
在 2017 年 ng-conf 大会上,Angular 社区正围绕着 Webpack 展开热烈讨论,而我自然对 Closure Compiler 也充满了好奇。在开发者大会上,你可能会看到我一边旁听演讲,一边在笔记本电脑上敲代码,尝试着我刚学到的东西。在 ng-conf 大会上,我编写了一个概念验证代码,可以将 Angular 与 Closure Compiler 捆绑在一起。结果令人印象深刻。
我交给 Closure Compiler 的每个包都比 Webpack 和 Uglify(以及 Terser)优化得更好。
Angular 必须提前构建 (AOT),并且代码必须提前编译。闭包编译器必须处于 ADVANCED_OPTIMIZATIONS 模式,以确保尽可能最小化打包体积。使用 @angular-devkit/build-optimizer 也无妨。当新的 Ivy 编译器最终发布(Angular 9)时,我们将看到更好的优化,但目前我们使用的是 AOT 编译器。
Angular 社区非常幸运,Angular 与 Closure Compiler 兼容,但由于 Angular CLI 仅支持 Webpack,因此采用速度缓慢。很少有其他库或框架能够声称能够生成完全使用 Closure Compiler 优化的包。React团队放弃了以最激进的方式支持 Closure Compiler 来优化 JavaScript。
您必须对 JavaScript 进行大量注解才能充分发挥 Closure Compiler 的 ADVANCED_OPTIMIZATIONS 模式的优势,该模式致力于实现尽可能高的压缩率。Angular 本身已经带有注解,并且按照 Angular 包格式规范构建的库也兼容。这是因为开发人员已经使用 TypeScript 编写了 Angular,AOT 编译器会将我们的类型转换为 Closure Compiler 可以解释的注解。如果您维护一个类型安全的应用程序,您将获得一个使用 Closure Compiler 进行高度优化的包!
现在,我们可以扩展 Angular CLI,使用 Closure Compiler 和 Architect API 进行构建,这将使应用更容易上手。让我们来看看如何在 CLI 中将应用程序与 Closure Compiler 打包!
如何使用 Architect CLI 构建 Angular
在下一节中,我们将介绍构建 Builder 所需的基本文件,以及使用 Closure Compiler 捆绑一个简单的 Angular 应用所需的 Architect 目标。本节介绍的概念可以扩展到任何 Builder。如果将来出现一个让构建 Builder 变得更容易的原理图,我也不会感到惊讶,但现在我们将自己创建这些文件。
简介
首先,让我们概述一下构建 Angular 的步骤。
| 步 | 描述 | 工具 |
|---|---|---|
| 编译 | 提前编译应用程序 | @angular/编译器 |
| 优化 | 删除编译过程中不必要的副产品(可选) | @angular-devkit/build_optimizer |
| 处理环境 | 使用 cli 提供的环境(可选) | cp |
| 捆 | 捆绑和合并 AOT 编译代码 | google-closure-编译器 |
要构建用于生产的 Angular 应用,我们需要使用 @angular/compiler-cli。如果我们手动执行此操作,则可以使用以下ngc命令调用编译器。
ngc -p src/tsconfig.app.json
这会将 AOT 编译后的应用程序输出到 out-tsc 目录中,巧合的是,CLI 在生产构建中默认将其放在该目录中。这是因为outDirsrc/tsconfig.app.json 中的配置就是这样的:"outDir": "../out-tsc",
我们可以在打包之前使用 @angular-devkit/build-optimizer 来优化应用程序。这个包会删除编译器生成的一些不必要的代码,比如我们在开发过程中使用的装饰器。
@angular/cli 有环境的概念,工程师可以在其中import { environment } from './environment'。environment是一个包含每个环境配置的对象。为了使自定义构建与 @angular/cli 兼容,我们也应该支持此 API。基本上,需要做的就是将 out-tsc 目录中的内容environment.js替换为environment.${env}.js。
要与 Closure Compiler 捆绑,我们需要一个新的配置文件:closure.conf。稍后会详细介绍。Closure Compiler 是一个 Java 应用程序,发布在 google-closure-compiler-java 包中。Closure Compiler 也提供了 JavaScript API,但实践证明,Java 实现更可靠。
要手动运行 Closure Compiler 应用程序,我们可以在命令行上使用参数。
java -jar ${jarPath} --flagFile ${confFile} --js_output_file ${outFile}
就是这样!在本教程中,我们将完成必需的步骤 1 和 4,运行 AOT 编译器并使用 Closure Compiler 优化单个包。
在《像架构师一样构建 Angular(第二部分)》中,我们使用 @angular-devkit/build-optimizer 添加环境并进一步优化了 bundle。如果您想提前了解具体操作,请查看 Github 仓库。
入门
使用版本全局安装最新的 cli 和 architecture 软件包next。稳定的 Architect CLI 仅在最新版本中可用。
架构开发依赖于 Node 10.14.1 及以上版本。请检查您正在运行的 Node 版本which node,并进行相应的更新。
npm i -g @angular/cli@next @angular-devkit/core@next @angular-devkit/architect@next @angular-devkit/architect-cli@next
使用@angular/cli创建一个新的应用程序工作区。
ng new build_repo
我们将该应用程序命名为 build_repo。
如果您尚未安装,请从 Oracle 下载并安装最新的 Java SDK。现在您可以运行 Closure Compiler Java 应用程序。
在项目工作区中安装 Closure Compiler 和 tsickle。
npm i google-closure-compiler tsickle --save-dev
构建工具
在项目根目录中创建一个名为“build_tools”的新目录。
让我们回顾一下根目录中应该有哪些文件。
| 文件 | 描述 |
|---|---|
| 构建工具 | 编码构建器的工作区 |
| 角度.json | Angular 应用工作区配置 |
在 build_tools 目录中创建几个新文件。以下是每个文件的功能说明。
| 文件 | 描述 |
|---|---|
| 包.json | 安装依赖项,为 Builder 提供上下文 |
| tsconfig.json | typescript 项目配置 |
| builders.json | 此包中可用的构建器的架构 |
| src/closure/schema.json | 闭包编译器构建器的模式 |
| src/closure/index.ts | Closure Compiler Builder 的根文件 |
| src/index.ts | Builder 包源的根文件 |
在 build_tools 目录中创建一个 package.json 文件。该文件应类似于以下示例。
包.json
{
  "name": "build_tools",
  "version": "1.0.0",
  "description": "",
  "main": "src/index.js",
  "scripts": {
    "test": "echo \"Error: no test specified\" && exit 1"
  },
  "author": "",
  "license": "MIT",
  "devDependencies": {
    "@angular-devkit/architect": "^0.800.0-beta.10",
    "@angular-devkit/core": "^8.0.0-beta.10",
    "@types/node": "^11.12.1"
  },
  "builders": "builders.json"
}
package.json 是 @angular/cli 建立 builders.json 位置以及安装开发 Builder 所需的依赖项所必需的。
npm install在 build_tools 目录中运行。
在 src 目录中创建一个新的 index.ts 文件。这里从 src/closure/index.ts 导出所有内容。
export * from './closure';
在 build_tools 目录中创建一个新的 builder.json 文件。
builders.json
该文件介绍了此包中可用的构建器的模式。
builders.json 建立了架构师需要指向每个构建器的目标。在本例中,目标名为 closure,它指向位于 ./src/closure/index.js 的构建器,而构建器的 schema 位于 ./src/closure/schema.json。
{
  "$schema": "@angular-devkit/architect/src/builders-schema.json",
  "builders": {
    "closure": {
      "implementation": "./src/closure/index",
      "class": "./src/closure",
      "schema": "./src/closure/schema.json",
      "description": "Build a Closure app."
    }
  }
}
src/closure/schema.json
说到模式,我们不妨先声明一下 Closure Compiler Builder 的模式。Builder 模式为 Builder 建立了面向外部的 API。
在 ./src/closure/schema.json 中,我们定义了工程师需要在其工作区 angular.json 中提供的两个必需属性:tsConfig和closureConfig。这两个属性映射到每个配置文件的路径:用于使用 AOT 编译器构建 Angular 的 tsconfig.json 和用于捆绑应用程序的 closure.conf。
{
  "$schema": "http://json-schema.org/schema",
  "title": "Closure Compiler Builder.",
  "description": "Closure Compiler Builder schema for Architect.",
  "type": "object",
  "properties": {
    "tsConfig": {
      "type": "string",
      "description": "The path to the Closure configuration file."
    },
    "closureConfig": {
      "type": "string",
      "description": "The path to the Closure configuration file."
    },
  },
  "additionalProperties": false,
  "required": [
    "tsConfig",
    "closureConfig"
  ]
}
Builder API 简介
src/closure/index.ts 是 Builder 逻辑所在的位置。
构建器是用 TypeScript 编写的。我们需要使用的 API 主要由 @angular-devkit/architect 和 node 提供。构建器编写的妙处在于,它的语法对于任何编写过 Angular 应用程序的人来说都非常熟悉。构建器大量使用了 rxjs 的 Observable 模式。
首先,让我们设置我们的导入。
BuilderContext将传递到构建过程的每个步骤。
BuilderOutput是流程结束时从 Observable 最终返回的内容。
createBuilder是我们调用来创建 Builder 实例的方法。Builder 拥有一套 API,可用于日志记录、进度跟踪和构建计划。
我们将利用rxjs 中的Observable、of、catchError、mapTo和。concatMap
exec,normalize并readFileSync从标准 node 包(分别为 child_process、path 和 fs)导入。这些工具允许我们像在命令行(“exec”)中输入命令一样执行命令,使用类似 的方法实现跨平台处理文件路径normalize,并使readFileSync我们能够同步读取文件。
import { BuilderContext, BuilderOutput, createBuilder } from '@angular-devkit/architect/src/index2';
import { Observable, of } from 'rxjs';
import { catchError, mapTo, concatMap } from 'rxjs/operators';
import { exec } from 'child_process';
import { normalize } from 'path';
import { readFileSync } from 'fs';
接下来,在 build_tools/src/closure 目录下创建一个名为 schema.interface.ts 的新文件,并声明一个 TypeScript 接口,该接口与我们之前创建的 json-schema 对应。虽然有很多方法可以使用 json-schema 代替 TypeScript 接口,但为了简单起见,我们先将 schema 声明为接口。
export interface ClosureBuilderSchema {
  tsConfig: string;
  closureConfig: string;
}
导入新模式。
import { ClosureBuilderSchema } from './schema.interface';
接下来为 Builder 声明一个导出以及执行构建的回调函数。
export function executeClosure(
  options: ClosureBuilderSchema,
  context: BuilderContext
): Observable<BuilderOutput> {
  return of(context).pipe(
    mapTo({ success: true }),
    catchError(error => {
      context.reportStatus('Error: ' + error);
      return [{ success: false }];
    }),
  );
}

export default createBuilder<Record<string, string> & ClosureBuilderSchema>(executeClosure);
executeClosure接受两个参数:options和context。
| 争论 | 描述 |
|---|---|
| 选项 | 从 angular.json 传递的选项 |
| 语境 | 当前执行的 Builder 的上下文 |
executeClosure返回一个 rxjs Observable。
如果构建成功mapTo则{success: true}在终端中显示反馈。
如果构建过程中的任何步骤抛出错误,catchError就会被调用。
编译项目源代码
在 build_tools 目录中添加 tsconfig.json,以便我们可以编译刚刚编写的 TypeScript。
{
  "compileOnSave": false,
  "buildOnSave": false,
  "compilerOptions": {
    "baseUrl": "",
    "rootDir": ".",
    "target": "es2018",
    "module": "commonjs",
    "moduleResolution": "node",
    "noEmitOnError": true,
    "noImplicitAny": false,
    "removeComments": false,
    "resolveJsonModule": true,
    "esModuleInterop": true,
    "skipLibCheck": true,
    "strictNullChecks": true,
    "declaration": true
  },
  "lib": [
    "es2018"
  ],
  "typeRoots": [
    "./node_modules/@types"
  ],
  "types": [
    "node",
    "json-schema"
  ],
  "include": [
    "./src/**/*.ts"
  ],
  "exclude": [
    "./src/closure/schema.interface.ts"
  ]
}
在 build_tools 目录中使用tsc命令来构建项目。
tsc -p tsconfig.json
或者,您也可以运行观察器来构建每个文件更改。
tsc -p tsconfig.json --watch
现在项目已经建成了!
为了简单起见,本例中的文件是在原地编译的,但我们可以通过设置outDir上的参数来解决这个问题compilerOptions。我们还需要将所有 schema.json 和 package.json 复制到分发文件夹中。
配置angular.json
回到我们搭建的项目工作区,配置angular.json。我们需要告诉项目将刚刚创建的ClosureBuilder指向哪里。
在“architect”配置中创建一个名为“closure_build”的新属性。
将新的“closure_build”对象“builder”属性设置为“./build_tools:closure”。
之所以使用 './build_tools',是因为这是我们 Architect 项目的 package.json 文件所在位置;之所以使用 'closure',是因为我们要运行名为 'closure' 的 Builder。我们在之前的步骤中已经配置了 './build_tools' 目录下的 builders.json 文件。如果 './build_tools' 目录已发布,并且我们通过 npm 安装包,则可以将此处的 './build_tools' 替换为包名称。
在“closure”对象上创建另一个属性,并将其命名为“options”。在此对象中,配置闭包配置(我们尚未创建)的路径以及 Angular 项目的 tsconfig 文件。
完成后,angular.json 应该看起来像这样。
"architect": {
  "closure_build": {
    "builder": "./build_tools:closure",
    "options": {
      "closureConfig": "closure.conf",
      "tsConfig": "src/tsconfig.app.json"
    }
  }
...
architect使用我们之前全局安装的@angular-devkit/architect-cli 包,通过向命令传递工作区名称(build_repo)和我们刚刚在 angular.json 中建立的目标(closure_build)来测试 Builder 是否正常工作。
architect build_repo:closure_build
Architect 应该会在终端中打印 SUCCESS。你应该看到类似这样的内容。
SUCCESS
Result: {
    "success": true,
    "target": {
        "project": "build_repo",
        "target": "closure_build"
    }
}
这里发生了什么?
Architect CLI 允许我们在工作区中测试构建器是否正常工作。该architect命令与任何典型的 @angular/cli 工作区中的命令相同ng run。我们之所以看到 SUCCESS,是因为构建器所做的就是将我们创建的 Observable 映射到 ./build_tools/src/closure/index.ts 中的成功消息。
return of(context).pipe(
  mapTo({ success: true }),
  catchError(error => {
    context.reportStatus('Error: ' + error);
    return [{ success: false }];
  }),
);
我们仍然需要编写我们的构建代码,但至少我们知道脚手架是有效的!
要继续测试构建运行,请在build_tools目录 run中运行tsc -p tsconfig.json --watch。
在项目的根目录中,architect build_repo:closure_build在每次增量构建 TypeScript 后运行。
使用 RxJS Observables 和 Node.js 编写构建器
之前我们定义了 ClosureBuilder 会使用返回 RxJS Observable 对象的方法执行构建executeClosure。这种方法存在一个问题,我们需要考虑。Observable 对象是异步的,而构建通常包含一组必须同步执行的指令。当然,也存在异步执行构建任务的用例,这时 Observable 对象就派上用场了。我们将在后续文章中探讨异步用例。目前我们只需要执行一系列步骤。要使用 RxJS 执行同步任务,我们需要使用concatMap如下例所示的运算符:
  return of(context).pipe(
    concatMap( results => ngc(options, context)),
    concatMap( results => compileMain(options, context)),
    concatMap( results => closure(options, context) ),
    mapTo({ success: true }),
    catchError(error => {
      context.reportStatus('Error: ' + error);
      return [{ success: false }];
    }),
  );
在上面的例子中,将执行 AOT 编译器,然后执行格式化的步骤main.js,最后执行 Closure Compiler 来捆绑和优化应用程序。
@angular/cli 团队显然认为,任何编写过 Angular 应用的人都应该觉得 Builder 的编写过程很熟悉。同构的粉丝们都为这个 API 而疯狂!
尽管我们因为这种观点而遇到了问题,但这个问题很容易解决。
问题:
Node.js ❤️ 承诺。
建设者❤️RxJS Observables。
解决方案 1:
RxJS Observables 可与 Promises 互操作。
of(new Promise())是真的。RxJs 会在后台帮我们将 Promises 转换为 Observables。
解决方案 2:
我们可以将基于 Promise 的工作流转换为 Observables。
考虑这个例子,我们将用它来通过 Node.js 方法调用 AOT 编译器exec。该ngc方法返回一个Observable。
在Observable回调中,我们传递了观察者。程序运行 exec,执行ngc -p tsconfig.app.json命令,就像我们在终端中输入命令一样。
如果 AOT 编译导致错误,我们会调用observer.error()。
如果 AOT 编译成功,我们将调用observer.next()。
export function ngc(
  options: AbstractBuilderSchema | RollupBuilderSchema | ClosureBuilderSchema,
  context: BuilderContext
): Observable<{}> {

    return new Observable((observer) => {

        exec(normalize(context.workspaceRoot +'/node_modules/.bin/ngc') +
             ' -p ' + options.tsConfig,
             {},
             (error, stdout, stderr) => {
              if (stderr) {
                  observer.error(stderr);
              } else {
                  observer.next(stdout);
              }
        });

    });

}
当上述方法插入到中的 Observable map 操作符中时executeClosure,该步骤将会运行!
  return of(context).pipe(
    concatMap( results => ngc(options, context)),
让我们看一些使用 Closure Compiler 构建应用程序时执行的构建步骤的示例。
我们之前在概念层面概述了构建步骤,但让我们再次更详细地看一下。
Angular 编译器
Angular 是使用 AOT 编译器预先构建的,用于生产环境。AOT 编译可以生成更小的 bundle,比 JIT 更安全,而且对于我们的示例来说,最重要的是,它可以与 Closure Compiler 兼容!AOT 编译器使用名为 tsickle 的工具来转换 TypeScript 类型注解。
为了配置 AOT 编译器以输出 Closure Compiler 在 ADVANCED_OPTIMIZATIONS 模式下需要优化的注释,我们在 Angular 工作区 tsconfig.app.json 中添加了两个配置选项。
"angularCompilerOptions": {
    "annotationsAs": "static fields",
    "annotateForClosureCompiler": true
}
回到 build_tools/src/closure/index.ts,导入exec以便我们可以执行 AOT 编译器,normalize这样我们使用的任何路径都是跨平台兼容的,这意味着在 Windows 上运行构建的用户也可以使用我们的脚本。
import { exec } from 'child_process';
import { normalize } from 'path';
创建一个名为 ngc 的新函数,并为其传入两个参数:options和context。在我们的示例中,每个构建步骤都会传入这两个参数。options是用户通过 angular.json 传入的选项,而context提供了当前BuilderContext我们可以使用的方法。我们将在第二部分详细介绍其中一些方法。
现在我们返回一个Observable调用exec,将绝对路径传递到ngc我们的工作区,然后使用-p参数传递 TypeScript 配置。
export function ngc(
  options: AbstractBuilderSchema | RollupBuilderSchema | ClosureBuilderSchema,
  context: BuilderContext
): Observable<{}> {

  return new Observable((observer) => {

    exec(`${normalize(context.workspaceRoot +'/node_modules/.bin/ngc')} -p ${options.tsConfig}`,
          {},
          (error, stdout, stderr) => {
          if (stderr) {
              observer.error(stderr);
          } else {
              observer.next(stdout);
          }
    });

  });

}
如果我们将这个操作添加到executeClosure函数中。
  return of(context).pipe(
    concatMap( results => ngc(options, context)),
构建项目。
tsc -p tsconfig.json
在 Angular 工作区中,我们应该能够看到out-tsc运行 Architect CLI 后名为 的新目录。
architect build_repo:closure_build
此目录将填充具有文件扩展名的 AOT 编译代码ngfactory.js。我们所有的应用程序逻辑都已编译到这些文件中。
如果我们仔细查看提前编译的代码,我们会发现 out-tsc/src/main.js 中 Angular 应用程序的入口点存在问题。
platformBrowserDynamic().bootstrapModule(AppModule)
入口点仍然引用AppModuleout-tsc/src/app/app.module.js 中的代码。我们需要使用 out-tsc/src/app/app.module.ngfactory.js 中预先编译好的代码来引导应用AppModuleNgFactory。
ng serve当我们运行或时, @angular/cli 会自动为我们处理这个问题ng build,因为我们正在编写自定义构建,所以我们需要自己转换 main.js。
格式化 main.js
我们需要一种方法从磁盘读取源main.ts,查找和替换文件内容的部分,编译 TypeScript,然后将转换后的文件写入磁盘。
幸运的是,typescript 已经是项目的依赖项了。我们只需将其导入到 build_tools/src/closure/index.ts 即可。
对于所有文件管理任务,我们在 fs 中找到了一些方便的 Node.js 函数( readFileSync、、writeFile和)。readFile
import * as ts from 'typescript';
import { readFileSync, writeFile, readFile } from 'fs';
这个操作比上一个示例稍微复杂一些,但格式相同。在compileMain函数中,我们再次返回一个 Observable。源 main.ts 文件从磁盘读取,文件内容被替换,然后使用我们在 tsconfig 中配置的编译器选项进行转译,最后将文件写入磁盘的 out-tsc 目录,替换 AOT 编译器最初输出的文件。
export function compileMain(
  options: AbstractBuilderSchema | RollupBuilderSchema | ClosureBuilderSchema,
  context: BuilderContext
): Observable<{}> {

  return new Observable((observer) => {

      const inFile = normalize(context.workspaceRoot+'/src/main.ts');
      const outFile = normalize('out-tsc/src/main.js');
      const tsConfig = JSON.parse(readFileSync(join(context.workspaceRoot, options.tsConfig), 'utf8'));

      readFile(inFile, 'utf8', (err, contents) => {

          if (err) observer.error(err);

          contents = contents.replace(/platformBrowserDynamic/g, 'platformBrowser');
          contents = contents.replace(/platform-browser-dynamic/g, 'platform-browser');
          contents = contents.replace(/bootstrapModule/g, 'bootstrapModuleFactory');
          contents = contents.replace(/AppModule/g, 'AppModuleNgFactory');
          contents = contents.replace(/.module/g, '.module.ngfactory');

          const outputContent = ts.transpileModule(contents, {
            compilerOptions: tsConfig.compilerOptions,
            moduleName: 'app'
          })

          writeFile(outFile, outputContent.outputText, (err) => {
              if (err) observer.error(err);
              observer.next(outputContent.outputText);
          });

      });

  });
}
将方法添加compileMain到管道。
return of(context).pipe(
  concatMap( results => ngc(options, context) ),
  concatMap( results => compileMain(options, context) ),
}
构建项目。
tsc -p tsconfig.json
运行 Architect CLI。
architect build_repo:closure_build
out-tsc/src/main.js 处的文件应该调用一个bootstrapModuleFactory方法platformBrowser并传入AppModuleNgFactory。
platformBrowser().bootstrapModuleFactory(AppModuleNgFactory)
现在,我们的包的入口点已正确格式化以进行 AOT 编译,我们可以运行 Closure Compiler。
闭包编译器
为了使用 Closure Compiler 进行构建,我们首先需要在 Angular 工作区的根目录中编写一个名为 closure.conf 的配置文件。
closure.conf
closure.conf 文件通过以下方式配置 Closure Compiler:
- 设置构建的可选参数(--compilation_level、--create_source_map 等)
- 声明依赖项和外部文件(--js 和 --externs)
- 源文件的位置(AOT 编译的应用程序位于 /out-tsc 目录中)
- 捆绑包的入口点(--entry_point)
- 解析节点包的选项(--module_resolution、--package_json_entry_names)
这个特定的 closure.conf 与 angular 包 ~8.0.0-beta.10 一起使用。
--compilation_level=ADVANCED_OPTIMIZATIONS
--language_out=ECMASCRIPT5
--variable_renaming_report=closure/variable_renaming_report
--property_renaming_report=closure/property_renaming_report
--create_source_map=%outname%.map

--warning_level=QUIET
--dependency_mode=STRICT
--rewrite_polyfills=false
--jscomp_off=checkVars

--externs node_modules/zone.js/dist/zone_externs.js

--js node_modules/tslib/package.json
--js node_modules/tslib/tslib.es6.js

--js node_modules/rxjs/package.json
--js node_modules/rxjs/_esm2015/index.js
--js node_modules/rxjs/_esm2015/internal/**.js
--js node_modules/rxjs/operators/package.json
--js node_modules/rxjs/_esm2015/operators/index.js

--js node_modules/@angular/core/package.json
--js node_modules/@angular/core/fesm2015/core.js

--js node_modules/@angular/common/package.json
--js node_modules/@angular/common/fesm2015/common.js

--js node_modules/@angular/platform-browser/package.json
--js node_modules/@angular/platform-browser/fesm2015/platform-browser.js

--js node_modules/@angular/forms/package.json
--js node_modules/@angular/forms/fesm2015/forms.js

--js node_modules/@angular/common/http/package.json
--js node_modules/@angular/common/fesm2015/http.js

--js node_modules/@angular/router/package.json
--js node_modules/@angular/router/fesm2015/router.js

--js node_modules/@angular/animations/package.json
--js node_modules/@angular/animations/fesm2015/animations.js

--js node_modules/@angular/animations/browser/package.json
--js node_modules/@angular/animations/fesm2015/browser.js

--js node_modules/@angular/platform-browser/animations/package.json
--js node_modules/@angular/platform-browser/fesm2015/animations.js

--js out-tsc/**.js

--module_resolution=node
--package_json_entry_names jsnext:main,es2015
--process_common_js_modules

--entry_point=./out-tsc/src/main.js
有了 closure.conf,我们可以在 build_tools/src/closure/index.ts 中编写一个函数,执行我们之前安装的 google-closure-compiler-java 包中的 Java 应用程序。
在这个例子中,我们开始使用BuilderContext。我们引用当前的target和,project并根据angular.json中的配置来配置最终包的输出位置。
export function closure(
   options: ClosureBuilderSchema,
   context: BuilderContext
): Observable<{}> {

  return new Observable((observer) => {

    const target = context.target ? context.target : { project: 'app' };
    const jarPath = options.jarPath ? options.jarPath : join('node_modules', 'google-closure-compiler-java', 'compiler.jar');
    const confPath = options.closureConfig;
    const outFile = `./dist/${target.project}/main.js`;

    exec(`java -jar ${jarPath} --flagfile ${confPath} --js_output_file ${outFile}`,
        {},
        (error, stdout, stderr) => {
          if (stderr.includes('ERROR')) {
            observer.error(error);
          }
          observer.next(stdout);
        });
    })
}
将新closure功能添加到中的管道executeClosure。
return of(context).pipe(
  concatMap( results => ngc(options, context) ),
  concatMap( results => compileMain(options, context) ),
  concatMap( results => closure(options, context) )
}
构建项目。
tsc -p tsconfig.json
运行 Architect CLI。
architect build_repo:closure_build
伟大的斯科特!
@angular/cli 正在使用 Closure Compiler 优化捆绑包!
让我们分析一下这场历经岁月的斗争所创造的捆绑。
Webpack 与 Closure 编译器
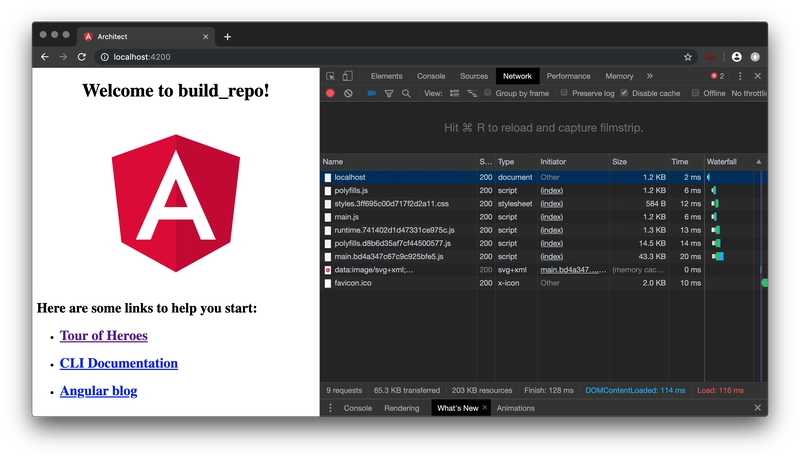
Webpack 和 Terser 捆绑并优化了应用程序~43.3Kb(gzip 压缩)。
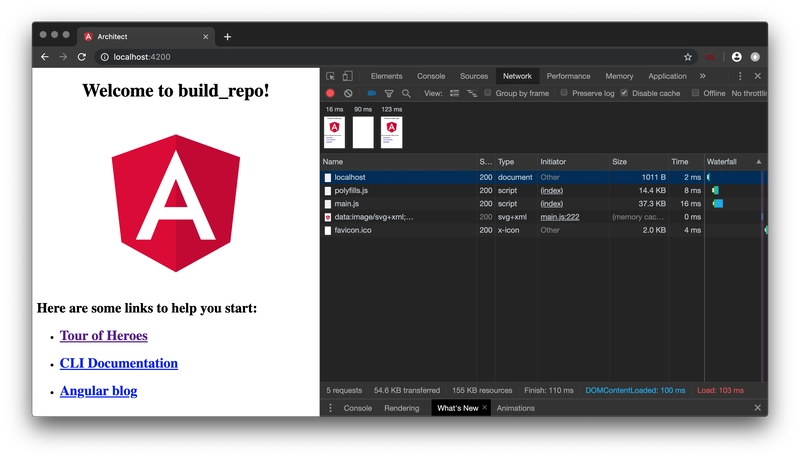
Closure Compiler 捆绑并优化了应用程序~37.3Kb(gzip 压缩)。
捆绑包大小减少约 14%
对于这个简单的应用来说,打包体积缩小了约 14%!从规模上来看,这 14% 的压缩效果确实非常显著。这些估算值包含使用 @angular-devkit/build-optimizer 进行的优化,并使用了 gzip 压缩。我见过其他应用,使用 Closure Compiler 后,打包体积比使用 Uglify 压缩后的打包体积缩小了约 20%。
使用 Closure Compiler 替代 Webpack 还有其他优势。Closure 会针对潜在危险漏洞发出警告,这有助于保障 Web 应用程序的安全。Closure Compiler 还会以各种巧妙的方式优化 JavaScript,转换实际代码,使其在浏览器中的运行性能更佳。
结论
在《像架构师一样构建 Angular(第一部分)》中,我们学习了如何编写 Builder 并使用 Architect CLI 执行构建。我们扩展了 @angular/cli,以便使用 Closure Compiler 优化生产环境的 bundle。
《像建筑师一样构建 Angular》的源代码可在 Github 上找到。
在我看来,@angular-devkit/architect 是自 Schematics 发布以来 Angular CLI 最大的改进。Angular CLI 的可扩展性越来越强,甚至可以构建任何 JavaScript 项目,而不仅仅是 Angular。现在我们可以扩展 CLI 来执行任何我们能想到的任务!这对 Angular CLI 团队来说是一个了不起的成就!
在像建筑师一样构建 Angular(第 2 部分)中,我们研究了 angular-devkit/build-optimizer,并弄清楚如何实现环境。
你怎么认为?
您对新的 Architect CLI 有何看法?
您认为@angular/cli 的可扩展性如何?
文章来源:https://dev.to/steveblue/build-angular-like-an-architect-part-1-3ph2 后端开发教程 - Java、Spring Boot 实战 - msg200.com


