在 Next.js 中构建功能性搜索栏
搜索栏是移动或网络应用程序集成的最重要组件之一,尤其是那些处理用户从网站消费大量数据的应用程序,例如电子商务网站、博客、招聘平台等。
如果您正在开发需要在 Nextjs 中集成搜索功能的流程,那么这篇博文将为您提供帮助。您不仅可以构建一个功能齐全的搜索栏,在后续文章中,您还将学习如何处理分页以及如何基于数据结构过滤搜索结果。
为了清楚地了解我们将要构建的内容,我们将以 Google 搜索网站为例。并使用 Nextjs、Tailwind 和 Typescript 对其进行建模。
如果你访问www.google.com,它会加载你的主页。在主页上,你会看到一个输入框,你可以在其中输入任何你想搜索的内容。如果你按下回车键,你会看到你搜索过的关键词的搜索结果页面。
当您在 Google 搜索中搜索关键字时,关键字(您想要在搜索栏中输入的内容)被称为“搜索参数”,这些参数被发送到后端以从数据库中获取符合输入关键字的结果,并最终显示给用户。
这就是我们要做的。
总而言之,我们将:
-
将搜索查询推送到 URL - 使用
useRouter钩子 -
获取搜索查询并使用它来查找相关数据 - 使用
useSearchParams钩子
但在本文中,我们不使用任何后端或数据库,而是使用原始数据。此外,我们将在一个页面上处理所有内容。不用担心,体验仍然相同。
目录
如果你只想查看代码,这里是存储库
现在我们开始吧!
步骤 1 — 创建下一个应用程序
在您的终端中运行npx create-next-app以引导 Nextjs 应用程序。
像往常一样按照提示操作。但请注意,我将使用 new App router、Typescript 和 Tailwindcss 进行样式设置。
cd进入项目文件夹,然后yarn在终端中运行以安装所有包和依赖项。
之后,运行npm dev以启动应用程序并localhost:3000在任何浏览器中检查以查看网站是否正在运行。
如果您已成功完成,请进入下一步。
第 2 步 — 设置启动文件
在文件夹中创建两个文件夹src:components和services。我们将所有可重复使用的UI放在组件文件夹中,并将所有模型数据放在服务文件夹中。
注意:如果您不使用src文件夹结构,您仍然可以创建组件和服务文件夹。
在services文件夹中:
创建一个data.ts文件来处理我们的模拟 API 数据。
把这段代码放在这里
| export interface iProfile { | |
| name: string; | |
| email: string; | |
| photo: string; | |
| username: string; | |
| role: "Frontend Developer" | "Backend Developer" | "Fullstack Developer"; | |
| } | |
| export const data: iProfile[] = []; | |
| // generate random names | |
| const RandomNames = [ | |
| "Alice", | |
| "Bob", | |
| "Charlie", | |
| "David", | |
| "Eve", | |
| "Frank", | |
| "Grace", | |
| "Henry", | |
| "Ivy", | |
| "Jack", | |
| "Kate", | |
| "Liam", | |
| "Mia", | |
| "Noah", | |
| "Olivia", | |
| "Peter", | |
| "Quinn", | |
| "Rose", | |
| "Sam", | |
| "Tina", | |
| "Uma", | |
| "Victor", | |
| "Wendy", | |
| "Xander", | |
| "Yara", | |
| "Zane", | |
| "Abigail", | |
| "Benjamin", | |
| "Chloe", | |
| "Daniel", | |
| "Emily", | |
| "Fiona", | |
| "George", | |
| "Hannah", | |
| "Isaac", | |
| "Julia", | |
| "Kevin", | |
| "Lily", | |
| "Mason", | |
| "Nora", | |
| "Oscar", | |
| "Penelope", | |
| "Quentin", | |
| "Rachel", | |
| "Simon", | |
| "Tiffany", | |
| "Ulysses", | |
| "Violet", | |
| "William", | |
| "Xavier", | |
| "Yasmine", | |
| "Zoey", | |
| "Stephen", | |
| "Gerrard", | |
| "Adewale", | |
| ]; | |
| // Generate 50 sample profiles | |
| for (let i = 1; i <= RandomNames.length; i++) { | |
| if (RandomNames[i]) { | |
| const profile: iProfile = { | |
| name: RandomNames[i], | |
| role: | |
| i % 3 === 0 | |
| ? "Backend Developer" | |
| : i % 2 === 0 | |
| ? "Frontend Developer" | |
| : "Fullstack Developer", | |
| email: `${RandomNames[i].toLowerCase()}@example.com`, | |
| username: `user${RandomNames[i].toLowerCase()}_username`, | |
| photo: `https://source.unsplash.com/random/200x200?sig=${i}`, | |
| }; | |
| data.push(profile); | |
| } else { | |
| console.error("Please wait..."); | |
| } | |
| } |
我们不使用复制随机数据,而是使用for loop来生成 50 个样本数据。
请理解,我们只是在模拟数据如何从 API 响应中获取。我们为此定义了一个 Typescript 接口。
文件夹内components:
-
创建一个
SearchInput.tsx文件来处理搜索栏 -
创建一个
ProfileCard.tsx文件来处理我们的用户资料卡 UI
步骤 3 — 构建 SearchInput UI
从 SearchInput 开始,代码如下:
import { useRouter } from "next/navigation";
import { useState, ChangeEvent } from "react";

interface iDefault {
    defaultValue: string | null
}


export const SearchInput = ({ defaultValue }: iDefault) => {
    // initiate the router from next/navigation

    const router = useRouter()

    // We need to grab the current search parameters and use it as default value for the search input

    const [inputValue, setValue] = useState(defaultValue)

    const handleChange = (event: ChangeEvent<HTMLInputElement>) =>{

        const inputValue = event.target.value;

        setValue(inputValue);

    }


    // If the user clicks enter on the keyboard, the input value should be submitted for search

    // We are now routing the search results to another page but still on the same page


    const handleSearch = () => {

        if (inputValue) return router.push(`/?q=${inputValue}`);

        if (!inputValue) return router.push("/")

    }


    const handleKeyPress = (event: { key: any; }) => {

        if (event.key === "Enter") return handleSearch()

    }


    return (

        <div className="search__input border-[2px] border-solid border-slate-500 flex flex-row items-center gap-5 p-1 rounded-[15px]">

            <label htmlFor="inputId">searchIcon</label>


            <input type="text"

                id="inputId"

                placeholder="Enter your keywords"

                value={inputValue ?? ""} onChange={handleChange}

                onKeyDown={handleKeyPress}

                className="bg-[transparent] outline-none border-none w-full py-3 pl-2 pr-3" />


        </div>

    )

}
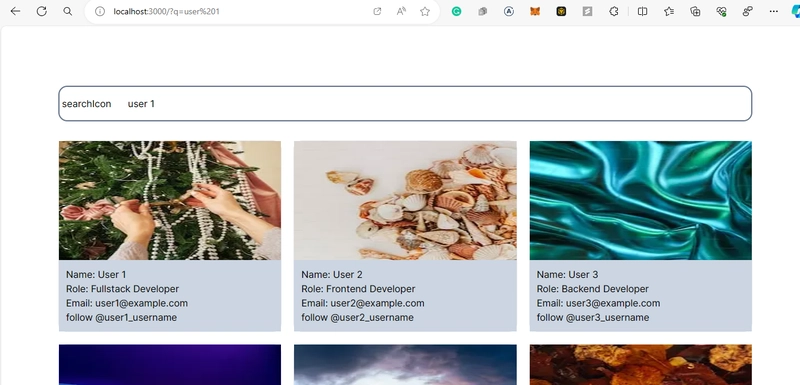
每当我们在输入字段中输入内容并按 Enter 键时,URL 中就会有搜索查询。
例如:localhost:3000变成localhost:3000?q={query}
当我们处理搜索逻辑时,我们将抓取此查询并使用它来过滤我们的数据。
这基本上就是我们输入组件所需要的,但您可以根据自己的喜好进一步定制它来处理错误状态和验证。
步骤 4 — 构建 ProfileCard UI
个人资料卡还传递了一些道具,我们在处理逻辑时将值传递给它。
以下是代码:
import Image from 'next/image'


//Import the profile interface from data.js


import { iProfile } from "../services/data";


export const ProfileCard = (props: iProfile) => {


    const { name, email, username, role, photo } = props;


    return (

        <div className="profile__card rounded-[15px] border border-solid">

            <Image src={photo} alt={username} className="h-[200px]" height={1000} width={400} />


            <div className=" bg-slate-300 p-3">

                <h2 className="">Name: {name}</h2>

                <p>Role: {role}</p>

                <p>Email: {email}</p>

                <p>follow @{username}</p>


            </div>

        </div>

    )

}
个人资料 UI 已准备就绪,现在让我们进入下一步。
步骤 5:更新 UI
创建一个src名为“pages”的新文件夹
在 pages 文件夹中,创建一个名为 的新文件Homepage.tsx。我们将在这里连接所有组件。现在,只需返回以下内容:
const Home = () => {
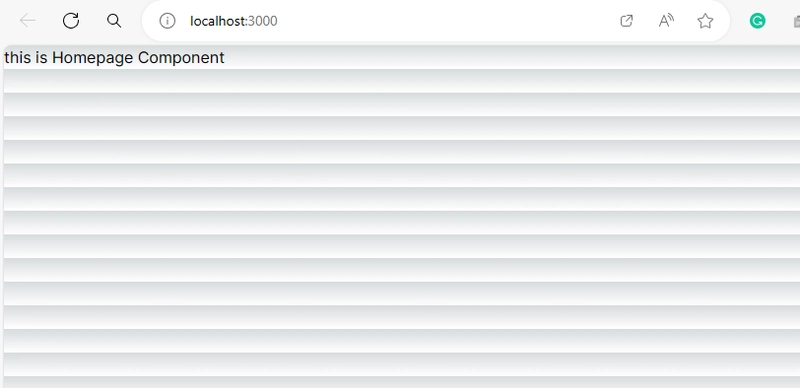
   return (<>this is Homepage Component</> )
}

export default Home
如果您使用的是 Nextjs 应用路由器,请打开app文件夹,找到该page.tsx文件,打开它,然后清除其中的所有内容。然后只需将以下代码放入其中:
// import the Homepage component


 const App = () => {

  return <Homepage />

 }


export default App
现在检查你的浏览器,你应该会看到类似这样的内容:
步骤 6:处理逻辑
让我们更新并处理文件中的逻辑Homepage。请继续:
// change this component to client component


'use client'


// import the data

// import the searchBar

// import the profile UI

import { useState, useEffect } from "react"

import { ProfileCard } from "@/components/ProfileCard"

import { SearchInput } from "@/components/SearchInput"

import { data, iProfile } from "@/services/data"


const Home = () => {


  // initialize useState for the data

  const [profileData, setProfileData] = useState<iProfile[]>([])


  useEffect(() => {

    // will be updated soon

     setProfileData(data)

    },[])


  // get total users

  const totalUser = profileData.length;

  return (

    <section className="h-[100vh] w-screen px-[2rem] md:px-[6rem] mt-[100px]">

      <p className="mb-10 ">Showing {totalUser} {totalUser > 1 ? "Users" : "User"}</p>

      <SearchInput defaultValue={searchQuery} />

      {/* // Conditionally render the profile cards */}

      <div className="mt-8">

        {totalUser === 0 ? <p>No result returned</p> : (

          // return the profile cards here

          <div className="grid grid-cols-1 md:grid-cols-3 items-center gap-5">

            {profileData.map(({ username, role, name, photo, email }: iProfile) => {

              return (

                <div key={username}>

                  <ProfileCard name={name} role={role} photo={photo} email={email} username={username} />

                </div>

              )

            })}


          </div>


          // End of profile data UI

        )}


      </div>

    </section>

  )


}

export default Home
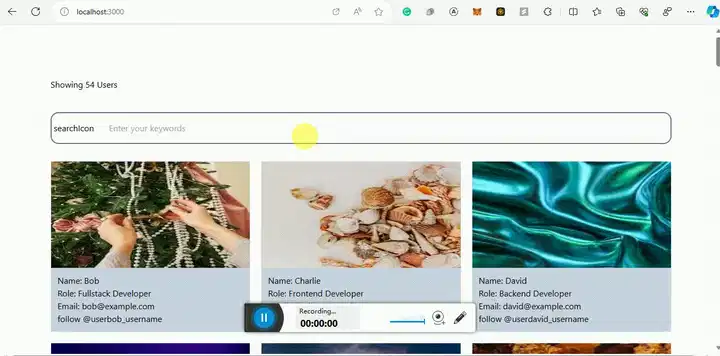
如果您再次检查浏览器,您可以看到我们的搜索输入组件和页面上显示的所有 50 个用户。
如果你执行搜索,什么也没有发生。让我们来解决这个问题。
现在搜索查询已设置为 URL,我们现在需要做的就是获取该查询并使用它来从后端获取数据。在本例中,我们仅使用它来过滤模型数据。
为了获取搜索查询,我们将使用useSearchParams下一个/导航。
// import the useSearchParams hook

import {useSearchParams} from 'next/navigation'

// And replace your useEffect code with this:

 const searchParams = useSearchParams()

  // Now get the query

  const searchQuery = searchParams && searchParams.get("q"); // we use `q` to set the query to the browser, it could be anything

  useEffect(() => {

    const handleSearch = () => {

      // Filter the data based on search query

      const findUser = data.filter((user) => {

        if (searchQuery) {

          return (


 user.name.toLowerCase().includes(searchQuery.toLowerCase()) ||

            user.role.toLowerCase().includes(searchQuery.toLowerCase()) ||

            user.username.toLowerCase().includes(searchQuery.toLowerCase()) ||

            user.email.toLowerCase().includes(searchQuery.toLowerCase())

          );

        } else {

          // If no search query, return the original data

          return true;

        }

      });


      // Update profileData based on search results

      setProfileData(findUser);

    };


    // Call handleSearch when searchQuery changes

    handleSearch();

  }, [searchQuery]); // Only rerun the effect if searchQuery changes
如果你加入此代码Homepage.tsx并测试你的应用程序,它应该可以正常工作
您可以按用户名、电子邮件地址、姓名和角色进行搜索。
根据数据和 UI 流的结构,您可能需要对数据进行分页和过滤。
我将在下一篇文章中处理这个问题,敬请关注。
鏂囩珷鏉ユ簮锛�https://dev.to/stephengade/build-a-function-search-bar-in-nextjs-mig 后端开发教程 - Java、Spring Boot 实战 - msg200.com


