如何使用 React Native 和 Socket.io 构建最漂亮的 Todolist 🎉
这篇文章是关于什么的?
Todolist 是一个简单的任务列表,您可以在其中标记需要做的所有事情及其状态“完成/未完成”。
在本文中,您将学习如何使用 React Native 和 Socket.io 构建待办事项列表应用程序,该应用程序允许您登录、创建和删除待办事项以及为每个待办事项添加评论。
为什么选择 Socket.io?
如果你正在读这篇文章,你可能会想——我可以用 Restful API 来实现。那么为什么我需要使用 Socket.io 呢?
我们想创建一个待办事项列表,用户可以为其他用户创建待办事项列表,并让他们无需刷新页面就能在线查看状态。
Socket.io 是一个高性能的 JavaScript 库,它允许我们在 Web 浏览器和 Node.js 服务器之间创建实时的双向通信。它遵循 WebSocket 协议,并提供更强大的功能,例如回退到 HTTP 长轮询或自动重新连接,这使我们能够构建高效的实时应用程序。
Novu——第一个开源通知基础设施
简单介绍一下我们。Novu 是第一个开源通知基础设施。我们主要负责管理所有产品通知。这些通知可以是应用内通知(类似 Facebook 的铃铛图标 - Websockets)、电子邮件、短信等等。
如果你能给我们一颗星,我会非常高兴!也请在评论区告诉我❤️
https://github.com/novuhq/novu
如何将 React Native 连接到 Socket.io 服务器
在这里,你将学习如何将待办事项列表应用程序连接到 Socket.io 服务器。在本指南中,我将使用 Expo——一款能够更轻松地构建 React Native 应用程序的工具。
使用 Expo 创建 React Native 应用
Expo使我们免于使用React Native CLI 创建本机应用程序所需的复杂配置 ,使其成为构建和发布 React Native 应用程序最简单、最快捷的方式。
确保你 的计算机上安装了Expo CLI、Node.js 和 Git 。然后,通过运行以下代码创建项目文件夹和 Expo React Native 应用。
mkdir todolist-app
cd todolist-app
expo init app
Expo 允许我们使用托管工作流或 裸工作流创建原生应用程序 。在本教程中,我们将使用空白的托管工作流。
? Choose a template: › - Use arrow-keys. Return to submit.
    ----- Managed workflow -----
❯   blank               a minimal app as clean as an empty canvas
    blank (TypeScript)  same as blank but with TypeScript configuration
    tabs (TypeScript)   several example screens and tabs using react-navigation and TypeScript
    ----- Bare workflow -----
    minimal             bare and minimal, just the essentials to get you started
将 Socket.io 客户端 API 安装到 React Native 应用程序。
cd app
expo install socket.io-client
socket.js在 utils 文件夹中创建一个文件。
mkdir utils
touch socket.js
然后,将下面的代码复制到socket.js文件中。
import { io } from "socket.io-client";

const socket = io.connect("http://localhost:4000");
export default socket;
上面的代码片段创建了与该 URL 上托管的服务器的实时连接。(我们将在接下来的部分中设置服务器)。
在 utils 文件夹中创建一个styles.js文件,并将以下代码复制到该文件中。它包含应用程序的所有样式。
import { StyleSheet } from "react-native";

export const styles = StyleSheet.create({
    screen: {
        flex: 1,
        backgroundColor: "#fff",
        padding: 10,
    },
    header: {
        padding: 10,
        justifyContent: "space-between",
        flexDirection: "row",
        marginBottom: 20,
    },
    heading: {
        fontSize: 24,
        fontWeight: "bold",
    },
    container: {
        padding: 15,
    },
    loginScreen: {
        flex: 1,
    },
    loginContainer: {
        flex: 1,
        padding: 10,
        flexDirection: "column",
        justifyContent: "center",
    },
    textInput: {
        borderWidth: 1,
        width: "100%",
        padding: 12,
        marginBottom: 10,
    },
    loginButton: {
        width: 150,
        backgroundColor: "#0D4C92",
        padding: 15,
    },
    todoContainer: {
        flexDirection: "row",
        justifyContent: "space-between",
        backgroundColor: "#CDF0EA",
        padding: 15,
        borderRadius: 10,
        marginBottom: 10,
    },
    todoTitle: {
        fontWeight: "bold",
        fontSize: 18,
        marginBottom: 8,
    },
    subTitle: {
        opacity: 0.6,
    },
    form: {
        flexDirection: "row",
        marginBottom: 40,
    },
    input: {
        borderWidth: 1,
        padding: 12,
        flex: 1,
        justifyContent: "center",
    },
    modalScreen: {
        backgroundColor: "#fff",
        flex: 1,
        padding: 10,
        alignItems: "center",
    },
    textInput: {
        borderWidth: 1,
        padding: 10,
        width: "95%",
        marginBottom: 15,
    },
    modalButton: {
        backgroundColor: "#0D4C92",
        padding: 10,
    },
    buttonText: {
        fontSize: 18,
        textAlign: "center",
        color: "#fff",
    },
    comment: { marginBottom: 20 },
    message: {
        padding: 15,
        backgroundColor: "#CDF0EA",
        width: "80%",
        borderRadius: 10,
    },
});
安装 React Navigation 及其依赖项。React Navigation允许我们在 React Native 应用程序中从一个屏幕移动到另一个屏幕。
npm install @react-navigation/native
npx expo install react-native-screens react-native-safe-area-context
设置 Node.js 服务器
在这里,我将指导您创建用于实时通信的 Socket.io Node.js 服务器。
server在项目文件夹中创建一个文件夹。
cd todolist-app
mkdir server
导航到server文件夹并创建一个package.json文件。
cd server & npm init -y
安装 Express.js、CORS、Nodemon 和Socket.io服务器 API。
npm install express cors nodemon socket.io
Express 是一个快速、简约的框架,它提供了多种使用 Node.js 构建 Web 应用程序的功能。CORS 是一个 Node.js包 ,允许不同域之间进行通信。
Nodemon 是一个 Node.js 工具,它在检测到文件更改后会自动重启服务器,而 Socket.io 允许我们在服务器上配置实时连接。
创建一个index.js文件 - Node.js 服务器的入口点。
touch index.js
使用 Express.js 设置一个简单的 Node.js 服务器。下面的代码片段会在浏览器中访问时返回一个 JSON 对象http://localhost:4000/api。
//👇🏻 index.js
const express = require("express");
const app = express();
const PORT = 4000;

app.use(express.urlencoded({ extended: true }));
app.use(express.json());

app.get("/api", (req, res) => {
    res.json({
        message: "Hello world",
    });
});

app.listen(PORT, () => {
    console.log(`Server listening on ${PORT}`);
});
接下来,将 Socket.io 添加到项目中,以创建实时连接。在app.get()代码块之前,复制以下代码。
//👇🏻 New imports
.....
const socketIO = require('socket.io')(http, {
    cors: {
        origin: "http://localhost:3000"
    }
});

//👇🏻 Add this before the app.get() block
socketIO.on('connection', (socket) => {
    console.log(`⚡: ${socket.id} user just connected!`);

    socket.on('disconnect', () => {
      socket.disconnect()
      console.log('🔥: A user disconnected');
    });
});
从上面的代码片段中可以看出,该socket.io("connection")函数与 React 应用程序建立连接,为每个套接字创建唯一的 ID,并在刷新应用程序时将 ID 记录到控制台。
当您刷新或关闭应用程序时,套接字会触发断开事件,表明用户已与套接字断开连接。
通过将启动命令添加到package.json文件中的脚本列表中来配置 Nodemon。下面的代码片段使用 Nodemon 启动服务器。
//👇🏻 In server/package.json

"scripts": {
    "test": "echo \\"Error: no test specified\\" && exit 1",
    "start": "nodemon index.js"
  },
您现在可以使用以下命令通过 Nodemon 运行服务器。
npm start
构建应用程序用户界面
在本节中,我们将为待办事项列表应用程序创建用户界面,以允许用户登录应用程序、创建和删除待办事项以及为每个待办事项添加注释。
首先,让我们设置 React Navigation。
在 app 文件夹中创建一个 screens 文件夹,并添加 Home、Login 和 Comments 组件。并在其中渲染“Hello World”文本。
mkdir screens
cd screens
touch Home.js Login.js Comments.js
将以下代码复制到App.js应用程序文件夹内的文件中。
//👇🏻 the app components
import Home from "./screens/Home";
import Comments from "./screens/Comments";
import Login from "./screens/Login";

//👇🏻 React Navigation configurations
import { NavigationContainer } from "@react-navigation/native";
import { createNativeStackNavigator } from "@react-navigation/native-stack";

const Stack = createNativeStackNavigator();

export default function App() {
    return (
        <NavigationContainer>
            <Stack.Navigator>
                <Stack.Screen
                    name='Login'
                    component={Login}
                    options={{ headerShown: false }}
                />
                <Stack.Screen
                    name='Home'
                    component={Home}
                    options={{ headerShown: false }}
                />
                <Stack.Screen name='Comments' component={Comments} />
            </Stack.Navigator>
        </NavigationContainer>
    );
}
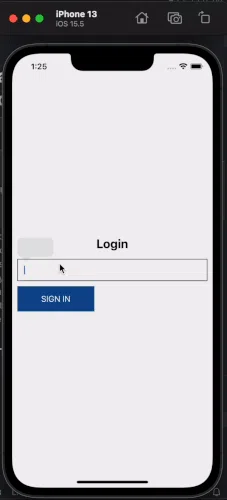
登录屏幕
将下面的代码复制到Login.js文件中。
import {
    View,
    Text,
    SafeAreaView,
    StyleSheet,
    TextInput,
    Pressable,
} from "react-native";

import React, { useState } from "react";

const Login = ({ navigation }) => {
    const [username, setUsername] = useState("");

    const handleLogin = () => {
        if (username.trim()) {
            console.log({ username });
        } else {
            Alert.alert("Username is required.");
        }
    };

    return (
        <SafeAreaView style={styles.loginScreen}>
            <View style={styles.loginContainer}>
                <Text
                    style={{
                        fontSize: 24,
                        fontWeight: "bold",
                        marginBottom: 15,
                        textAlign: "center",
                    }}
                >
                    Login
                </Text>
                <View style={{ width: "100%" }}>
                    <TextInput
                        style={styles.textInput}
                        value={username}
                        onChangeText={(value) => setUsername(value)}
                    />
                </View>
                <Pressable onPress={handleLogin} style={styles.loginButton}>
                    <View>
                        <Text style={{ color: "#fff", textAlign: "center", fontSize: 16 }}>
                            SIGN IN
                        </Text>
                    </View>
                </Pressable>
            </View>
        </SafeAreaView>
    );
};

export default Login;
代码片段接受用户的用户名并将其记录在控制台上。
接下来,更新代码并使用异步存储保存用户名以便于识别。
Async Storage是 React Native 的一个包,用于在原生应用中存储字符串数据。它类似于 Web 上的本地存储,可用于存储 token 和字符串格式的数据。
运行以下代码来安装异步存储。
expo install @react-native-async-storage/async-storage
更新handleLogin通过 AsyncStorage 保存用户名的功能。
import AsyncStorage from "@react-native-async-storage/async-storage";

const storeUsername = async () => {
    try {
        await AsyncStorage.setItem("username", username);
        navigation.navigate("Home");
    } catch (e) {
        Alert.alert("Error! While saving username");
    }
};

const handleLogin = () => {
    if (username.trim()) {
        //👇🏻 calls AsyncStorage function
        storeUsername();
    } else {
        Alert.alert("Username is required.");
    }
};
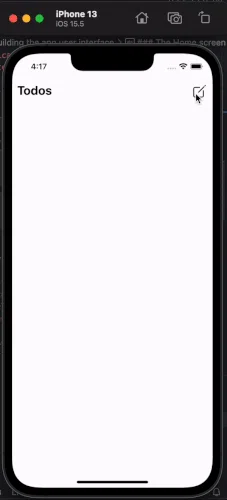
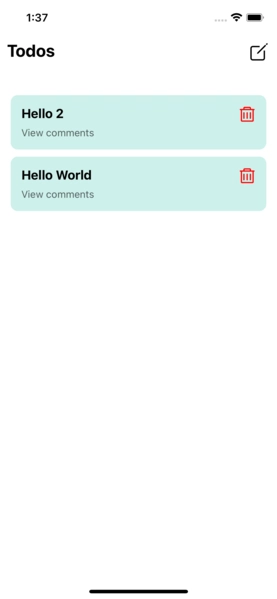
主屏幕
更新Home.js文件以包含以下代码片段:
import { SafeAreaView, Text, StyleSheet, View, FlatList } from "react-native";
import { Ionicons } from "@expo/vector-icons";
import React, { useState } from "react";
import Todo from "./Todo";
import ShowModal from "./ShowModal";

const Home = () => {
    const [visible, setVisible] = useState(false);

//👇🏻 demo to-do lists
    const [data, setData] = useState([
        { _id: "1", title: "Hello World", comments: [] },
        { _id: "2", title: "Hello 2", comments: [] },
    ]);

    return (
        <SafeAreaView style={styles.screen}>
            <View style={styles.header}>
                <Text style={styles.heading}>Todos</Text>
                <Ionicons
                    name='create-outline'
                    size={30}
                    color='black'
                    onPress={() => setVisible(!visible)}
                />
            </View>
            <View style={styles.container}>
                <FlatList
                    data={data}
                    keyExtractor={(item) => item._id}
                    renderItem={({ item }) => <Todo item={item} />}
                />
            </View>
            <ShowModal setVisible={setVisible} visible={visible} />
        </SafeAreaView>
    );
};

export default Home;
从上面的代码片段中,我们导入了两个组件,Todo和ShowModal作为 Home 组件中的子组件。接下来,让我们创建Todo和ShowModal组件。
touch Todo.js ShowModal.js
更新Todo.js文件以包含以下代码。它描述了每个待办事项的布局。
import { View, Text, StyleSheet } from "react-native";
import { React } from "react";
import { AntDesign } from "@expo/vector-icons";

const Todo = ({ item }) => {
    return (
        <View style={styles.todoContainer}>
            <View>
                <Text style={styles.todoTitle}>{item.title}</Text>
                <Text style={styles.subTitle}>View comments</Text>
            </View>
            <View>
                <AntDesign name='delete' size={24} color='red' />
            </View>
        </View>
    );
};

export default Todo;
更新ShowModal.js文件以包含以下代码:
import {
    Modal,
    View,
    Text,
    StyleSheet,
    SafeAreaView,
    TextInput,
    Pressable,
} from "react-native";
import React, { useState } from "react";

const ShowModal = ({ setVisible, visible }) => {
    const [input, setInput] = useState("");

    const handleSubmit = () => {
        if (input.trim()) {
            console.log({ input });
            setVisible(!visible);
        }
    };

    return (
        <Modal
            animationType='slide'
            transparent={true}
            visible={visible}
            onRequestClose={() => {
                Alert.alert("Modal has been closed.");
                setVisible(!visible);
            }}
        >
            <SafeAreaView style={styles.modalScreen}>
                <TextInput
                    style={styles.textInput}
                    value={input}
                    onChangeText={(value) => setInput(value)}
                />

                <Pressable onPress={handleSubmit} style={styles.modalButton}>
                    <View>
                        <Text style={styles.buttonText}>Add Todo</Text>
                    </View>
                </Pressable>
            </SafeAreaView>
        </Modal>
    );
};

export default ShowModal;
上面的代码片段代表按下创建新待办事项的图标时弹出的模式。
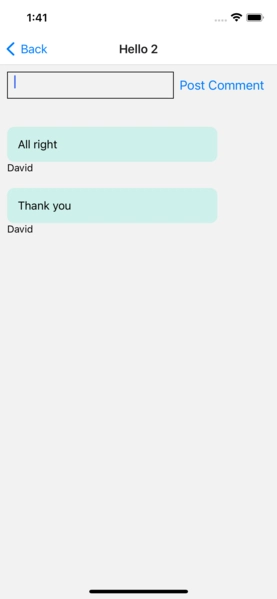
评论屏幕
将下面的代码片段复制到Comments.js文件中。
import React, { useLayoutEffect, useState } from "react";
import { View, StyleSheet, TextInput, Button, FlatList } from "react-native";
import AsyncStorage from "@react-native-async-storage/async-storage";
import CommentUI from "./CommentUI";

const Comments = ({ navigation, route }) => {
    const [comment, setComment] = useState("");
    const [commentsList, setCommentsList] = useState([
        {
            id: "1",
            title: "Thank you",
            user: "David",
        },
        {
            id: "2",
            title: "All right",
            user: "David",
        },
    ]);
    const [user, setUser] = useState("");

    // fetches the username from AsyncStorage
    const getUsername = async () => {
        try {
            const username = await AsyncStorage.getItem("username");
            if (username !== null) {
                setUser(username);
            }
        } catch (err) {
            console.error(err);
        }
    };

    // runs on page load
    useLayoutEffect(() => {
        getUsername();
    }, []);

    // logs the comment details to the console
    const addComment = () => console.log({ comment, user });

    return (
        <View style={styles.screen}>
            <View style={styles.form}>
                <TextInput
                    style={styles.input}
                    value={comment}
                    onChangeText={(value) => setComment(value)}
                    multiline={true}
                />
                <Button title='Post Comment' onPress={addComment} />
            </View>

            <View>
                <FlatList
                    data={commentsList}
                    keyExtractor={(item) => item.id}
                    renderItem={({ item }) => <CommentUI item={item} />}
                />
            </View>
        </View>
    );
};

export default Comments;
上面的代码片段包含一个子组件,CommentUI它代表每个评论的布局。
更新CommentUI组件如下:
import { View, Text, StyleSheet } from "react-native";
import React from "react";

const CommentUI = ({ item }) => {
    return (
        <View style={styles.comment}>
            <View style={styles.message}>
                <Text style={{ fontSize: 16 }}>{item.title}</Text>
            </View>

            <View>
                <Text>{item.user}</Text>
            </View>
        </View>
    );
};

export default CommentUI;
通过 Socket.io 发送实时数据
在本节中,您将学习如何在 React Native 应用程序和 Socket.io 服务器之间发送数据。
如何创建新的待办事项
将套接字从socket.js文件导入到ShowModal.js文件中。
import socket from "../utils/socket";
更新handleSubmit函数以将新的待办事项发送到服务器。
//👇🏻 Within ShowModal.js
const handleSubmit = () => {
    if (input.trim()) {
        //👇🏻 sends the input to the server
        socket.emit("addTodo", input);
        setVisible(!visible);
    }
};
创建一个监听器来addTodo监听服务器上的事件,将待办事项添加到后端的数组中。
//👇🏻 array of todos
const todoList = [];

//👇🏻 function that generates a random string as ID
const generateID = () => Math.random().toString(36).substring(2, 10);

socketIO.on("connection", (socket) => {
    console.log(`⚡: ${socket.id} user just connected!`);

    //👇🏻 listener to the addTodo event
    socket.on("addTodo", (todo) => {
        //👇🏻 adds the todo to a list of todos
        todoList.unshift({ _id: generateID(), title: todo, comments: [] });
        //👇🏻 sends a new event containing the todos
        socket.emit("todos", todoList);
    });

    socket.on("disconnect", () => {
        socket.disconnect();
        console.log("🔥: A user disconnected");
    });
});
如何显示待办事项
将套接字从socket.js文件导入到Home.js文件中。
import socket from "../utils/socket";
为服务器上创建的待办事项创建一个事件监听器,并在客户端上呈现它们。
const [data, setData] = useState([]);

useLayoutEffect(() => {
    socket.on("todos", (data) => setData(data));
}, [socket]);
todos仅当您创建新的待办事项时才会触发此事件。接下来,在服务器上创建一个路由,该路由返回待办事项数组,以便您可以通过应用内的 API 请求获取它们。
更新index.js服务器上的文件以通过下面的 API 路由发送待办事项列表。
app.get("/todos", (req, res) => {
    res.json(todoList);
});
将下面的代码片段添加到Home.js文件中:
//👇🏻 fetch the to-do list on page load
useLayoutEffect(() => {
    function fetchTodos() {
        fetch("http://localhost:4000/todos")
            .then((res) => res.json())
            .then((data) => setData(data))
            .catch((err) => console.error(err));
    }
    fetchTodos();
}, []);
如何删除待办事项
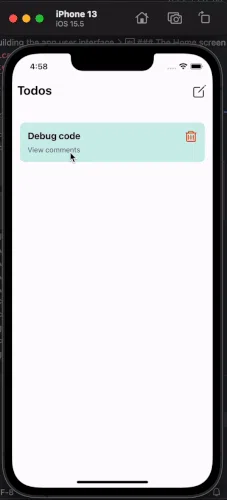
下图中,每个待办事项旁边都有一个删除图标。按下该按钮后,所选待办事项会在服务器和应用内同时被删除。
导航到该Todo.js文件并导入 Socket.io。
import socket from "../utils/socket";
创建一个函数 -deleteTodo当您按下删除图标时接受待办事项 ID 并将其发送到服务器。
import { View, Text, StyleSheet } from "react-native";
import { React } from "react";
import { AntDesign } from "@expo/vector-icons";
import { useNavigation } from "@react-navigation/native";
import socket from "../utils/socket";

const Todo = ({ item }) => {
    const navigation = useNavigation();

    //👇🏻 deleteTodo function
    const deleteTodo = (id) => socket.emit("deleteTodo", id);

    return (
        <View style={styles.todoContainer}>
            <View>
                <Text style={styles.todoTitle}>{item.title}</Text>
                <Text
                    style={styles.subTitle}
                    onPress={() =>
                        navigation.navigate("Comments", {
                            title: item.title,
                            id: item._id,
                        })
                    }
                >
                    View comments
                </Text>
            </View>
            <View>
                <AntDesign
                    name='delete'
                    size={24}
                    color='red'
                    onPress={() => deleteTodo(item._id)}
                />
            </View>
        </View>
    );
};

export default Todo;
通过 ID 删除待办事项。
socket.on("deleteTodo", (id) => {
    let result = todoList.filter((todo) => todo._id !== id);
    todoList = result;
    //👇🏻 sends the new todo list to the app
    socket.emit("todos", todoList);
});
添加和显示评论
当您单击View comments文本时,它会导航到“评论”页面 - 您可以在其中查看与待办事项相关的所有评论。
<Text
    style={styles.subTitle}
    onPress={() =>
        navigation.navigate("Comments", {
            title: item.title,
            id: item._id,
        })
    }
>
    View comments
</Text>
导航功能接受所选待办事项的标题和 ID 作为参数;因为我们希望待办事项标题位于路线的顶部,并通过其 ID 从服务器获取其注释。
为了实现这一点,更新文件useLayoutEffect中的钩子Comments.js以更改路线的标题并将 ID 发送到服务器。
useLayoutEffect(() => {
    //👇🏻 update the screen's title
    navigation.setOptions({
        title: route.params.title,
    });
    //👇🏻 sends the todo's id to the server
    socket.emit("retrieveComments", route.params.id);

    getUsername();
}, []);
收听retrieveComments事件并返回待办事项的评论。
socket.on("retrieveComments", (id) => {
    let result = todoList.filter((todo) => todo._id === id);
    socket.emit("displayComments", result[0].comments);
});
在文件中添加另一个useLayoutEffect钩子Comments.js,当从服务器检索到注释时,该钩子会更新注释。
useLayoutEffect(() => {
    socket.on("displayComments", (data) => setCommentsList(data));
}, [socket]);
要创建新评论,addComment请通过将评论详细信息发送到服务器来更新功能。
const addComment = () =>{
    socket.emit("addComment", { comment, todo_id: route.params.id, user });
}
在服务器上创建事件监听器,并将评论添加到评论列表中。
socket.on("addComment", (data) => {
    //👇🏻 Filters the todo list
    let result = todoList.filter((todo) => todo._id === data.todo_id);
    //👇🏻 Adds the comment to the list of comments
    result[0].comments.unshift({
        id: generateID(),
        title: data.comment,
        user: data.user,
    });
    //👇🏻 Triggers this event to update the comments on the UI
    socket.emit("displayComments", result[0].comments);
});
恭喜!🥂您已完成本教程的项目。
结论
到目前为止,您已经学习了如何在 React Native 和 Node.js 应用程序中设置 Socket.io,使用 Async Storage保存数据,以及如何通过 Socket.io 在服务器和 Expo 应用程序之间进行通信。
该项目演示了如何使用 React Native 和 Socket.io 构建项目。您可以随意使用身份验证库和支持实时存储的数据库来改进该项目。
该应用程序的源代码可以在这里找到:https://github.com/novuhq/blog/tree/main/build-todolist-with-reactnative
感谢您的阅读!
帮帮我!
如果您觉得这篇文章帮助您更好地理解了 WebSocket!请给我们一个 Star,我会非常高兴!也请在评论区告诉我❤️
https://github.com/novuhq/novu
感谢您的阅读!
文章来源:https://dev.to/novu/how-to-build-the-most-beautiful-todolist-with-react-native-and-socketio-df5 后端开发教程 - Java、Spring Boot 实战 - msg200.com


