开始构建 Web 组件!第三部分:原生组件
如今,基于组件的UI风靡一时。你知道 Web 有自己的原生组件模块,无需使用任何库吗?真的!你可以编写、发布和复用单文件组件,这些组件可以在任何优秀的浏览器和框架(如果你喜欢的话)上运行。
在我们上一篇文章中,我们了解了 JavaScript polyfill,它让我们能够将组件发送到不支持规范的浏览器。

今天,我们开始实践👷♂️,我们将构建一个无需任何库或框架代码的单文件 Web 组件。我们将编写一个元素,用于延迟加载图像,以便浏览器仅在图像出现在屏幕上(或即将出现)时才获取图像。我们将使该元素可访问,并利用 Web API使其IntersectionObserver轻量级且性能卓越。如果我们愿意,我们甚至可以添加一些额外的功能。
让我们开始吧!打开编辑器并创建一个名为的文件,lazy-image.js该文件将包含我们的组件。
自定义元素类
正如我们在第一篇关于 Web 组件标准的文章中提到的,我们的第一步是初始化并注册一个自定义元素类,并为其提供一个基础模板。稍后我们将改进该模板,添加自定义行为。
const tagName = 'lazy-image';
const template = document.createElement('template');
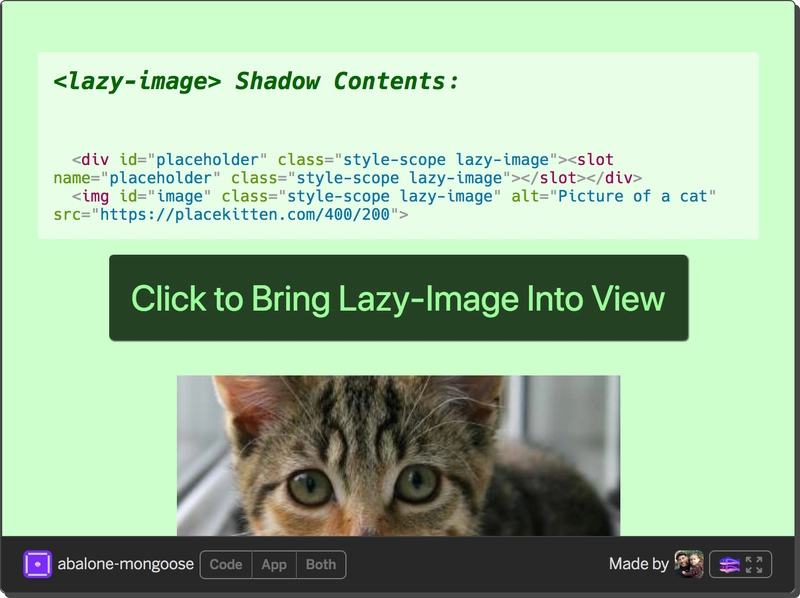
template.innerHTML = `<img id="image"/>`;
class LazyImage extends HTMLElement {
connectedCallback() {
if (!this.shadowRoot) {
this.attachShadow({mode: 'open'});
this.shadowRoot.appendChild(template.content.cloneNode(true));
}
}
}
const register = () => customElements.define(tagName, LazyImage);
window.WebComponents ? window.WebComponents.waitFor(register) : register();
好吧。如果你一直关注我们之前的帖子,这些内容应该看起来很熟悉,但还是需要稍微回顾一下:
- 我们创建一个模板元素并在其中定义元素的影子DOM 。
- 我们在中定义自定义元素的行为
class。 - 我们的元素的
connectedCallback方法创建一个阴影根并将模板印入其中。
将其放入您的文档并给出:
<!doctype html>
<html lang="en">
  <head>
    <script src="https://unpkg.com/@webcomponents/webcomponentsjs/webcomponents-loader.js"></script>
    <script type="module" src="./lazy-image.js"></script>
  </head>
  <body>
    <lazy-image></lazy-image>
  </body>
</html>
是不是感觉很激动?好吧,虽然开头有点简陋,但至少它能正常工作。如果我们用开发工具检查元素,就会发现它包含我们的影子 DOM,并且与我们的自定义元素类关联。

这个小custom徽章是 Firefox 用来告诉我们这是一个自定义元素的方式。点击徽章后,调试器就会弹出,跳转到元素的定义页面。Firefox 开发者工具团队,干得好!
在下一节中我们将真正开始烹饪。
生命周期回调
自定义元素有四种特殊的实例方法,它们将在不同的时间运行:
默认情况下全部定义为null。这些以及 是constructor自定义元素生命周期回调。
这constructor
第一个是构造函数。每当元素被创建时,在元素被附加到文档之前,它都会运行。
// CustomElement's constructor runs
const el = document.createElement('custom-element');
自定义元素的构造函数不得包含任何参数,并且必须super()在其主体的第一行调用,以便将行为委托给HTMLElement、Node等;并绑定this到元素实例。构造函数不应返回undefined或以外的任何值this;
// Don't do this
class BustedElement extends HTMLElement {
  constructor(bar) {
    this.foo = bar;
    return bar;
  }
}

// Do This
class DecentElement extends HTMLElement {
  constructor() {
    super();
    if (!window.bar) return;
    this.foo = window.bar;
  }
}
您可能想parentNode在构造函数中访问元素的属性、子元素等,但不要屈服于诱惑:如果您的元素尚未连接(即附加)到 DOM 树,它就尚未升级,这意味着它还没有任何子元素或属性。如果元素在定义之前已在文档中定义,您的代码将正常工作,但如果 JavaScript 创建该元素,代码将失败。
也可以在构造函数中附加影子根,并将元素附加到其中。但由于 polyfill 需要将类添加到 light DOM,而元素可能尚未连接,因此我们将在本教程中继续执行此操作connectedCallback。
出于这些原因,最好将构造函数的活动限制为设置内部状态(包括默认值),并在使用 polyfill 时附加影子根并调用styleElement。connectedCallback只需确保检查 是否shadowRoot已存在,否则下次元素连接(例如通过 )时会抛出错误document.body.append(myLazyImage)。
// Don't do this
class BustedImage extends HTMLElement {
  constructor() {
    super();
    this.attachShadow({mode: 'open'});
    this.shadowRoot.appendChild(template.content.cloneNode(true));
    this.shadowImage = this.shadowRoot.getElementById('image');
    // OOPS! Light DOM attributes may not yet exist!
    this.shadowImage.src = this.getAttribute('src');
  }
}

// Do This
class LazyImage extends HTMLElement {
  constructor() {
    super();
    // Set default values of properties, as needed.
    this.src = '';
    // In order to work well with the polyfill,
    // We'll set up the DOM later on, when the element connects.
  }
}
这connectedCallback
connectedCallback每次元素连接到 DOM 时(包括首次升级时)都会触发。这是设置影子子元素和属性的绝佳时机。
const lazyImage = document.createElement('lazy-image'); // constructor runs
document.appendChild(lazyImage); // connectedCallback runs

const container = document.getElementById('container');
container.appendChild(lazyImage); // connectedCallback runs again
class LazyImage extends HTMLElement {
  constructor() {
    super();
    this.src = '';
    this.alt = '';
  }

  connectedCallback() {
    // Initialize properties that depend on light DOM
    this.src = this.getAttribute('src') || this.src;
    this.alt = this.getAttribute('alt') || this.alt;
    // Check if shadowRoot exists first
    if (!this.shadowRoot) {
      this.attachShadow({mode: 'open'});
      this.shadowRoot.appendChild(template.content.cloneNode(true));
      this.shadowImage = this.shadowRoot.getElementById('image')
    }
    // Set the shadow img attributes.
    this.shadowImage.src = this.src;
    this.shadowImage.alt = this.alt;
  }
}
嗯,这真是令人振奋。我们已经设置好了影子 DOM,并进行了一些基本的管道操作,可以根据元素升级时的状态设置内部img元素src和属性。alt
我们希望shadowImage的src属性与元素的属性同步,并且也希望这些属性与srcDOM 属性同步。借助attributeChangedCallback和一些类的设置器,我们可以实现这一点。
这attributeChangedCallback
当你更改src普通<img/>元素的属性时,浏览器会响应并显示新的图像URL。同样,当你使用 JavaScript 设置src该元素 DOM 对象的属性时,新值也会反映在属性中。我们希望我们的元素也能如此。HTML规范attributeChangedCallback为这类用途提供了。
每当元素的属性发生变化时,回调函数都会以属性名称、旧值和新值作为参数运行。但浏览器不会监听任何属性。您必须提前指定要响应哪些属性,方法是在名为 的静态属性中定义一个属性名称列表observedAttributes:
static get observedAttributes() {
  return ['src', 'alt'];
}
attributeChangedCallback定义完此规则后,只要src或属性中的任何一个发生变化,你的元素就会运行alt。目前,我们只将值作为属性进行转发。
attributeChangedCallback(name, oldVal, newVal) {
  this[name] = newVal
}
我们还希望元素能够响应属性变化,更新其 shadowImage 的值,并将新值反射到属性中。为此,我们将使用 setter 方法:
class LazyImage extends HTMLElement {
  /**
   * Guards against loops when reflecting observed attributes.
   * @param  {String} name Attribute name
   * @param  {any} value
   * @protected
   */
  safeSetAttribute(name, value) {
    if (this.getAttribute(name) !== value) this.setAttribute(name, value);
  }

  /**
   * Image URI.
   * @type {String}
   */
  set src(value) {
    this.safeSetAttribute('src', value);
    // Set image src
    if (this.shadowImage) this.shadowImage.src = value;
  }

  get src() {
    return this.getAttribute('src')
  }

  /**
   * Image Alt tag.
   * @type {String}
   */
  set alt(value) {
    this.safeSetAttribute('alt', value);
    // Set image alt
    if (this.shadowImage) this.shadowImage.alt = value;
  }

  get alt() {
    return this.getAttribute('alt')
  }

  static get observedAttributes() {
    return ['src', 'alt'];
  }

  connectedCallback() {
    this.src = this.getAttribute('src');
    this.alt = this.getAttribute('alt');
    if (!this.shadowRoot) {
      this.attachShadow({mode: 'open'});
      this.shadowRoot.appendChild(template.content.cloneNode(true));
      this.shadowImage = this.shadowRoot.getElementById('image');
    }
  }

  attributeChangedCallback(name, oldVal, newVal) {
    this[name] = newVal;
  }
}
按下按钮会更新自定义元素及其影子子元素上的属性和特性src。alt

现在,我们的元素已经透明地暴露了原生元素的主要功能<img>。下一步是添加我们的延迟加载功能。在此之前,我们先简单讨论一下规范中的最后两个生命周期回调。
这disconnectedCallback
每当您的元素在从 DOM 中删除之前需要执行任何清理工作时,请定义一个disconnectedCallback来处理您的清理工作。
disconnectedCallback() {
  /* do cleanup stuff here */
}
稍后我们IntersectionObserver为每个元素创建实例时,这将非常方便。目前,我们先将其保留为存根。
这adoptedCallback
自定义元素也有一个 ,adoptedCallback每当您调用adoptNode另一个文档或文档片段中的自定义元素时,它都会运行。在这种情况下,元素的disconnectedCallback会在它与原始文档断开连接时首先运行,然后是adoptedCallback,最后是connectedCallback会在它连接到您的文档时运行。

我认为这主要是针对已失效的 HTML Imports 规范。如果 HTML Modules 提案被采纳,它可能会变得更有意义。如果您有任何用例想法,我们将在评论区见。
页面生命周期
因此,您的页面生命周期可能看起来像这样:
- 获取关键资源,包括 polyfill
- 构建 DOM
- 获取延迟脚本和模块,包括
lazy-image.js - DOMContentLoaded - 文档解析完成
- Polyfill 完成设置,
WebComponents.waitFor调用其回调 - 自定义元素升级 -
<lazy-image>文档中的每个实例都升级为自定义元素。constructor并connectedCallback运行。 - 如果 JavaScript 创建了 的实例
<lazy-image>,则构造函数将运行。当该实例连接到 DOM 树时,connectedCallback将会运行。 <lazy-image>如果 JavaScript从 DOM 中删除一个实例,disconnectedCallback则将运行。
延迟加载
我们将使用IntersectionObserverAPI来实现延迟加载。当图像与略大于屏幕的矩形相交时,我们就会开始加载它,并希望在图像滚动到视图时它能够完全加载。connectedCallback是执行这项工作的最佳位置。
首先,让我们在模块范围的根部定义一个快速谓词:
// isIntersecting :: IntersectionObserverEntry -> Boolean
const isIntersecting = ({isIntersecting}) => isIntersecting
然后我们可以在元素实例化时设置观察者:
constructor() {
  super();
  // Bind the observerCallback so it can access the element with `this`.
  this.observerCallback = this.observerCallback.bind(this);
}

connectedCallback() {
  // initialize pre-upgrade attributes
  this.src = this.getAttribute('src')
  this.alt = this.getAttribute('alt')
  // Set up shadow root.
  if (!this.shadowRoot) {
    this.attachShadow({mode: 'open'});
    this.shadowRoot.appendChild(template.content.cloneNode(true));
    this.shadowImage = this.shadowRoot.getElementById('image');
  }
  // If IntersectionObserver is available, initialize it.
  // otherwise, simply load the image.
  if ('IntersectionObserver' in window) this.initIntersectionObserver()
  else this.intersecting = true
}

/**
 * Sets the `intersecting` property when the element is on screen.
 * @param  {[IntersectionObserverEntry]} entries
 * @protected
 */
observerCallback(entries) {
  // The observer simply sets a property
  if (entries.some(isIntersecting)) this.intersecting = true
}

/**
 * Initializes the IntersectionObserver when the element instantiates.
 * @protected
 */
initIntersectionObserver() {
  if (this.observer) return;
  // Start loading the image 10px before it appears on screen
  const rootMargin = '10px';
  this.observer =
    new IntersectionObserver(this.observerCallback, { rootMargin });
  this.observer.observe(this);
}
当观察者触发并设置intersecting属性时,我们将其反射为属性 (attribute),并开始加载图像。由于此观察者只需触发一次,因此我们可以在它完成后断开连接并卸载它。
/**
 * Whether the element is on screen.
 * @type {Boolean}
 */
set intersecting(value) {
  if (value) {
    this.shadowImage.src = this.src;
    this.setAttribute('intersecting', '');
    this.disconnectObserver();
  } else {
    this.removeAttribute('intersecting')
  }
}

get intersecting() {
  return this.hasAttribute('intersecting')
}

/**
 * Disconnects and unloads the IntersectionObserver.
 * @protected
 */
disconnectObserver() {
  this.observer.disconnect();
  this.observer = null;
  delete this.observer;
}
如果元素从 DOM 中移除,我们需要卸载观察者,否则可能会泄漏内存。我们可以用 来实现disconnectedCallback这一点。
disconnectedCallback() {
  this.disconnectObserver()
}
组件样式
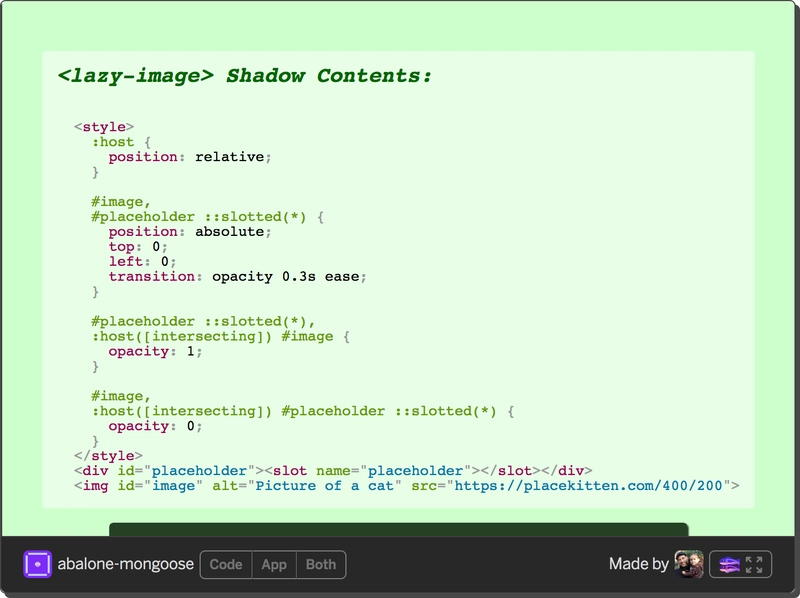
现在,我们已经足够做到在图片出现在屏幕上后进行惰性加载,但我们希望元素也能提供良好的用户体验<style>,例如,内联加载占位符图片。为此,我们将通过在元素的影子根中添加一个标签来设置组件的样式。
const tagName = 'lazy-image';
const template = document.createElement('template');
template.innerHTML = `
  <style>
    :host {
      position: relative;
    }

    #image,
    #placeholder ::slotted(*) {
      position: absolute;
      top: 0;
      left: 0;
      transition: opacity 0.3s ease;
    }

    #placeholder ::slotted(*),
    :host([intersecting]) #image {
      opacity: 1;
    }

    #image,
    :host([intersecting]) #placeholder ::slotted(*) {
      opacity: 0;
    }
  </style>

  <div id="placeholder">
    <slot name="placeholder"></slot>
  </div>

  <img id="image"/>
`;

window.ShadyCSS && window.ShadyCSS.prepareTemplate(template, tagName);
:host和<slot>
哇!新东西来了!:host CSS选择器引用的是影子宿主,也就是<lazy-image>元素本身。这不仅仅是一个伪元素,还是一个函数,正如我们所见,如果从 shadow-root 之外选择,则:host([intersecting])其等同于。lazy-image[intersecting]
元素<slot>及其相关的::slotted()CSS 函数是规范的一部分,它们允许我们将 DOM 片段从轻量级树传递到影子树。你可以<slot>像上面一样在影子树内部使用它们。然后,你可以像影子树一样将轻量级 DOM 中的内容向下传递,如下所示:
<!-- light DOM -->
<svg>
  <defs>
    <g id="placeholder-svg">
      <!-- ... -->
    </g>
  </defs>
</svg>

<lazy-image alt="Picture of a cat" src="https://placekitten.com/400/200">
  <svg slot="placeholder"><use xlink:href="#placeholder-svg"/></svg>
</lazy-image>
请注意,我们如何牢记polyfill 的限制并将我们的包裹<slot>在中,然后在我们的 CSS 中<div>选择它的子项。<div>
<slot>实际上并不会移动或附加插入元素,它只是将它们显示为如同位于影子根中一样。因此,外部文档中应用于插入元素的样式在插入元素时仍然有效。您的元素可以借助::slotted()CSS 函数为插入元素添加自己的样式。
::slotted(svg) {
  /* applies to any slotted svg element */
}

::slotted(img) {
  /* applies to any slotted img element */
}
注意:仅::slotted(*)选择元素,不选择文本节点。它也仅选择顶级节点,不选择子节点:
/* Don't do this */
.wrapper ::slotted(.outer .inner) { /*...*/ }
.wrapper ::slotted(.inner) { /*...*/ }

/* Do this */
.wrapper ::slotted(.outer) { /*...*/ }
这是浏览器性能优化,在某些情况下可能会很烦人,但通过创造性的 DOM 工作和智能应用程序分解,可以解决这个问题。
name="slotname"插槽可以是命名的,也可以是匿名的。通过在 shadow DOM 中为插槽添加属性来命名插槽,并<div slot="slotname"></div>在 light DOM 中指定来使用它。如果您想提供多个特定的可自定义功能,命名插槽会很有帮助。在本例中,为了明确起见,我们使用了命名插槽<slot name="placeholder"></slot>,但我们也可以使用匿名插槽<slot></slot>。
<!-- shadow DOM template -->

<style>
  #title-container ::slotted(*) {
    /* styles for title element */
  }
  #content-container ::slotted(*) {
    /* styles for body content */
  }
</style>
<article>
  <div id="title-container">
    <!-- named slot -->
    <slot name="title"></slot>
  </div>

  <div id="content-container">
    <!-- anonymous slot -->
    <slot></slot>
  </div>
</article>

<!-- light DOM -->
<super-article>
  <h2 slot="title">I'm the article title</h2>
  <p>I'm the article content</p>
  <p>I get slotted into the anonymous slot, too</p>
</super-article>
现在我们已经将轻量级 DOM 占位符传递到了影子树中,让我们更新类的方法来处理占位符:
set intersecting(value) {
  if (value) {
    // Wait to apply the `intersecting` attribute until the image
    // finishes loading, then update the styles for polyfill browsers
    this.shadowImage.onload = this.setIntersecting;
    this.shadowImage.src = this.src;
    this.disconnectObserver();
  } else {
    this.removeAttribute('intersecting');
  }
}

constructor() {
  super();
  this.setIntersecting = this.setIntersecting.bind(this);
}

/**
 * Sets the intersecting attribute and reload styles if the polyfill is at play.
 * @protected
 */
setIntersecting() {
  this.setAttribute('intersecting', '');
  this.updateShadyStyles();
}

connectedCallback() {
  this.updateShadyStyles();
  /* etc. */
}

/**
 * When the polyfill is at play, ensure that styles are updated.
 * @protected
 */
updateShadyStyles() {
  window.ShadyCSS && window.ShadyCSS.styleElement(this);
}
😎 太棒了!我们自主、可重复使用的单文件自定义元素会在屏幕上加载图像,然后从占位符处淡出。
顺便说一句,这是一个近距离了解 polyfill 工作原理的绝佳机会。如果您在支持的浏览器上加载此页面,您会在元素的影子树中看到一个样式标签;但如果在 Edge 或 Firefox 62 等已支持 polyfill 的浏览器上加载,您将看不到任何样式,因为 ShadyCSS polyfill 会将影子样式提升到文档的头部。
| Polyfilled | 本国的 |
|---|---|
 |
 |
CSS 自定义属性
影子 DOM 将我们的样式与文档的其余部分隔离开来,但这意味着用户更难自定义我们的组件。幸运的是,CSS 自定义属性可以突破影子边界,因此我们可以用它们在元素上暴露可自定义的样式。
我们只需使用自定义属性定义样式即可。自定义属性的语法允许在分配默认值时使用声明变量:
.selector {
  rule: var(--custom-property-name, default);
}
因此,我们可以使用合理的默认值来设置元素的样式,同时仍为用户提供一些灵活性:
#image,
#placeholder ::slotted(*) {
  position: absolute;
  top: 0;
  left: 0;
  transition:
    opacity
    var(--lazy-image-fade-duration, 0.3s)
    var(--lazy-image-fade-easing, ease);
  object-fit: var(--lazy-image-fit, contain);
  width: var(--lazy-image-width, 100%);
  height: var(--lazy-image-height, 100%);
}
然后,我们可以通过在文档样式中定义这些变量来全局或特定元素上调整这些样式:
/* applies to the whole document. */
html {
  --lazy-image-width: 400px;
  --lazy-image-height: 200px;
}

/* applies to specific elements */
lazy-image:last-of-type {
  width: 400px;
  height: 200px;
  --lazy-image-width: 100%;
  --lazy-image-height: 100%;
  --lazy-image-fade-duration: 2s;
  --lazy-image-fade-easing: linear;
}
可访问性
在发布组件之前,让我们确保它尊重所有用户。你不会在端上美味的烤牛小排(还有谁饿了?)时,不去掉多余的肉块和软骨。没人想吃这些!让我们把组件的a11y树上的脂肪去掉。
扩展内置元素
自定义元素规范提供了自定义内置元素的功能。作为参考,自定义内置元素如下所示:
<script>
  customElements.define(
    'lazy-image',
    class LazyImage extends HTMLImageElement {/*...*/},
    { extends: 'img' }
  );
</script>

<img is="lazy-image"/>
这看起来很棒,可以解决很多与可访问性相关的问题,但截至本文撰写时,苹果的官方立场是他们不会实现它,所以我们暂时将编写自主自定义元素。
可访问的自治元素
由于我们的组件是包裹<img>元素,而不是扩展它,因此我们应该尝试使所有包裹的 DOM 对屏幕阅读器透明。首先,我们将更新起始标记,以便占位符显示在 a11y 树中,而不是图像。
<div id="placeholder" aria-hidden="false" role="presentation">
  <slot name="placeholder"></slot>
</div>

<img id="image" aria-hidden="true"/>
接下来,我们将设置presentation角色,以便屏幕阅读器忽略元素的包装器而只阅读其内容。
connectedCallback() {
  // Remove the wrapping `<lazy-image>` element from the a11y tree.
  this.setAttribute('role', 'presentation');
  /* etc. */
  this.shadowPlaceholder = this.shadowRoot.getElementById('placeholder');
}
最后,aria-hidden图像加载后,我们将交换阴影图像和占位符上的属性。
setIntersecting() {
  /* etc. */
  this.shadowImage.setAttribute('aria-hidden', 'false')
  this.shadowPlaceholder.setAttribute('aria-hidden', 'true')
}
现在我们的 a11y 树整洁美观,我们的屏幕阅读器用户不会被多余的 DOM 所困扰。

杀手。这是我们的完整模块:
const isIntersecting = ({isIntersecting}) => isIntersecting;

const tagName = 'lazy-image';
const template = document.createElement('template');
template.innerHTML = `
  <style>
    :host {
      position: relative;
    }

    #image,
    #placeholder ::slotted(*) {
      position: absolute;
      top: 0;
      left: 0;
      transition:
        opacity
        var(--lazy-image-fade-duration, 0.3s)
        var(--lazy-image-fade-easing, ease);
      object-fit: var(--lazy-image-fit, contain);
      width: var(--lazy-image-width, 100%);
      height: var(--lazy-image-height, 100%);
    }

    #placeholder ::slotted(*),
    :host([intersecting]) #image {
      opacity: 1;
    }

    #image,
    :host([intersecting]) #placeholder ::slotted(*) {
      opacity: 0;
    }
  </style>
  <div id="placeholder" aria-hidden="false">
    <slot name="placeholder"></slot>
  </div>
  <img id="image" aria-hidden="true"/>
`;

window.ShadyCSS && window.ShadyCSS.prepareTemplate(template, tagName);

class LazyImage extends HTMLElement {
  /**
   * Guards against loops when reflecting observed attributes.
   * @param  {String} name Attribute name
   * @param  {any} value
   * @protected
   */
  safeSetAttribute(name, value) {
    if (this.getAttribute(name) !== value) this.setAttribute(name, value);
  }

  static get observedAttributes() {
    return ['src', 'alt'];
  }

  /**
   * Image URI.
   * @type {String}
   */
  set src(value) {
    this.safeSetAttribute('src', value);
    if (this.shadowImage && this.intersecting) this.shadowImage.src = value;
  }

  get src() {
    return this.getAttribute('src');
  }

  /**
   * Image alt-text.
   * @type {String}
   */
  set alt(value) {
    this.safeSetAttribute('alt', value);
    if (this.shadowImage) this.shadowImage.alt = value;
  }

  get alt() {
    return this.getAttribute('alt');
  }

  set intersecting(value) {
    if (value) {
      this.shadowImage.onload = this.setIntersecting;
      this.shadowImage.src = this.src;
      this.disconnectObserver();
    } else {
      this.removeAttribute('intersecting');
    }
  }

  /**
   * Whether the element is on screen.
   * @type {Boolean}
   */
  get intersecting() {
    return this.hasAttribute('intersecting');
  }

  constructor() {
    super();
    this.observerCallback = this.observerCallback.bind(this);
    this.setIntersecting = this.setIntersecting.bind(this);
  }

  connectedCallback() {
    this.setAttribute('role', 'presentation');
    this.updateShadyStyles();
    if (!this.shadowRoot) {
      this.attachShadow({mode: 'open'});
      this.shadowRoot.appendChild(template.content.cloneNode(true));
      this.shadowImage = this.shadowRoot.getElementById('image');
      this.shadowPlaceholder = this.shadowRoot.getElementById('placeholder');
      this.src = this.getAttribute('src');
      this.alt = this.getAttribute('alt');
      this.placeholder = this.getAttribute('placeholder');
    }
    if ('IntersectionObserver' in window) this.initIntersectionObserver();
    else this.intersecting = true;
  }

  attributeChangedCallback(name, oldVal, newVal) {
    this[name] = newVal;
  }

  disconnectedCallback() {
    this.disconnectObserver();
  }

  /**
   * When the polyfill is at play, ensure that styles are updated.
   * @protected
   */
  updateShadyStyles() {
    window.ShadyCSS && window.ShadyCSS.styleElement(this);
  }

  /**
   * Sets the intersecting attribute and reload styles if the polyfill is at play.
   * @protected
   */
  setIntersecting(event) {
    this.shadowImage.removeAttribute('aria-hidden');
    this.shadowPlaceholder.setAttribute('aria-hidden', 'true');
    this.setAttribute('intersecting', '');
    this.updateShadyStyles();
  }

  /**
   * Sets the `intersecting` property when the element is on screen.
   * @param  {[IntersectionObserverEntry]} entries
   * @protected
   */
  observerCallback(entries) {
    if (entries.some(isIntersecting)) this.intersecting = true;
  }

  /**
   * Initializes the IntersectionObserver when the element instantiates.
   * @protected
   */
  initIntersectionObserver() {
    if (this.observer) return;
    // Start loading the image 10px before it appears on screen
    const rootMargin = '10px';
    this.observer = new IntersectionObserver(this.observerCallback, { rootMargin });
    this.observer.observe(this);
  }


  /**
   * Disconnects and unloads the IntersectionObserver.
   * @protected
   */
  disconnectObserver() {
    this.observer.disconnect();
    this.observer = null;
    delete this.observer;
  }
}

const register = () => customElements.define(tagName, LazyImage);
window.WebComponents ? window.WebComponents.waitFor(register) : register();
您可以<lazy-image>通过从npm安装或从unpkg加载来在您的项目中使用。
npm i -S @power-elements/lazy-image
<script type="module" src="https://unpkg.com/@power-elements/lazy-image/lazy-image.js"></script>
欢迎在GitHub上做出贡献。
结论
我们实现了编写一个简洁、可复用、易于访问、无依赖、单文件、延迟加载的图片组件的目标。而且它压缩后只有 1.94kb,总大小 4.50kb。我们学到了什么?
Vanilla 组件的优缺点
| 优点 | 缺点 |
|---|---|
| 无需依赖。您的代码面向未来,因为它基于 Web 标准,而非库变更。 | 您需要提供自己的辅助函数。同步属性 (Property) 和特性 (Attribute) 可能会很麻烦。 |
| 由于不需要额外的库代码往返,因此加载占用空间较小 | 0-dep 组件不利用 mixins 或辅助库来减少大型项目中的文件大小。 |
| 无需学习、维护或适应非标准 API。一切就只是 Web。 | 低级 Web 原语有时会很麻烦。 |
| 低级电源为您提供控制力和灵活性。您可以随心所欲地设计组件。 | 您必须不遗余力地支持 polyfill 浏览器,而使用库,polyfill 限制和已知问题就被抽象出来了。 |
自己动手肯定有优点也有缺点。看来我们可以大致确定这条通用规则:如果你正在构建一个简单、可重用、独立的自定义元素来公开某些特定功能,那么原生库是一个不错的选择;但对于较大的项目和团队来说,使用库(无论是现成的还是定制的)的优势很快就会显现出来。
需要考虑的一点是,有些框架会强制统一。对某些团队来说,这或许是个优势,但组件模型允许独立团队独立处理较小的抽象,同时向大型团队隐藏这些实现细节。在任何大型项目中,在为某个组件或一组组件选择合适的抽象级别时,都必须考虑这些因素。
在接下来的几篇文章中,我们将探讨一些可以简化 Web 组件开发流程并提升应用性能的库、工具和优化策略。首先,我们将从最经典的Web 组件库 Polymer 开始。
到时候见🕵️♂️🕵️♀️
您想参加关于这里涉及的任何主题的一对一辅导课程吗?![]()
致谢
感谢 John Teague、Westbrook Johnson、 @ruphin、Matt Gawarecki 和 Daniel Turner 提出的建议和更正(无特别顺序) 。
勘误表
- 10 月 5 日,Edge 团队(!)提出了他们自己的 HTML 模块版本
- 自本文最初发布以来,微软已开始在 Edge 中开发 Web 组件标准。狂欢时间到了!
查看本系列的下一篇文章
文章来源:https://dev.to/bennypowers/lets-build-web-components-part-3-vanilla-components-4on3