使用无服务器框架构建 RESTful API
今天,我们将使用“无服务器框架”实现无服务器 RESTful API 服务。许多云服务提供商都提供无服务器功能,例如 AWS Lambda、Azure Functions 和 Google CloudFunctions,但在本文中,我将坚持使用 AWS Lambda 作为云服务提供商。
如果您不了解无服务器的想法,那么我强烈建议您先观看此视频,看完后再回来。
无服务器框架
无服务器框架是一个开源 CLI 工具,允许我们构建、配置和部署无服务器功能(在我们的例子中是 AWS Lambda 功能)。
如果没有“无服务器框架”,我们就必须手动在控制台上创建和配置必要的资源。当项目规模较小且功能有限时,这还好,但一旦项目规模扩大,创建和配置资源就变得非常困难,很多情况下甚至无法维护。在控制台上编写代码和管理团队工作流程变得非常繁琐。
借助“无服务器框架”,我们只需几条命令即可快速构建、配置和部署资源。我们可以将代码和配置存储到一个集中式存储库中,以便设计合理的工作流程,方便开发人员日后编写、重用和引用其他开发人员的代码库。
使用无服务器框架而不是手动工作有很多显著的优势。
在本文中,我们将使用“无服务器框架”构建一个无服务器的 Pokemon RESTful API 服务。请参阅下表以供参考。
本文的代码可以在这里找到:https://github.com/sagar-gavhane/pokemon-app
| # | 端点 | 方法 | 描述 |
|---|---|---|---|
| 1 | 口袋妖怪/ | 得到 | 从数据库中获取所有口袋妖怪的列表 |
| 2 | 口袋妖怪/{id} | 得到 | 获得一只特定的神奇宝贝。 |
| 3 | 口袋妖怪/ | 邮政 | 将新的口袋妖怪添加到数据库。 |
| 4 | 口袋妖怪/{id} | 放 | 更新现有的口袋妖怪。 |
| 5 | 口袋妖怪/{id} | 删除 | 删除现有的口袋妖怪。 |
先决条件
安装以下工具和框架:
- Node.js 8.10 或更高版本
- MySQL
- Visual Studio Code(首选)或任何代码编辑器
- 邮差
接下来,创建项目文件夹并使用 npm 初始化它。
mkdir pokemon-app
cd pokemon-app
npm init -f
依赖项
安装以下软件包以使用“无服务器框架”
- express - 快速、不固执己见、极简的 Node.js Web 框架。
- body-parser - 在处理程序之前的中间件中解析传入的请求主体,可在 req.body 属性下使用。
- mysql - 一个实现 MySql 协议的纯 node.js JavaScript 客户端。
- serverless - 用于实现无服务器开发的框架。
- serverless-http - 插件允许您包装快速 API 以供无服务器使用。
- serverless-offline - 用于模拟 AWS Lambda 和 API Gateway 的插件,以加快本地开发。
首先,我们将安装无服务器 CLI:
npm install -g serverless
现在,让我们一步一步安装插件和库。
npm install express body-parser mysql serverless-http --save # app dependancies
npm install serverless-offline --save-dev # development dependancies
应用程序结构
在开始编写处理程序代码之前,我们将构建项目文件夹并配置我们的工具。
在根级别创建以下结构:
/pokemon-app/
|--/configs
|----/dbConfig.js
|--/node_modules
|--.gitignore
|--index.js
|--package.json
|--serverless.yml
确保将私有文件列到.gitignore文件中,以免我们意外将其提交到公共仓库。将原始材料从https://www.gitignore.io/api/node复制粘贴到.gitignore文件中。
serverless.yml该文件作为我们 RESTful API 服务的清单。我们在这里定义函数、事件和必要的资源。之后,我们使用 Serverless CLI 配置并将服务部署到 AWS 基础设施。
# serverless.yml
service: pokemon-service

provider:
  name: aws
  runtime: nodejs8.10
  stage: dev
  region: us-east-1
  memorySize: 512

functions:
  pokemonFunc:
    handler: index.handler
    events:
      - http:
          path: pokemon
          method: get
      - http:
          path: pokemon/{id}
          method: get
      - http:
          path: pokemon
          method: post
      - http:
          path: pokemon/{id}
          method: put
      - http:
          path: pokemon/{id}
          method: delete

plugins:
  - serverless-offline
我们在这里做了一些事情:
- service:
pokemon-service服务的名称。您可以为服务指定任意类型名称。 - provider:我们在此处指定所使用的名称
provider(AWS 作为云服务提供商)及其特定配置。在本例中,我们将运行时(Node.js)配置为 8.10 版本,并将区域设置为us-east-1。 - functions:我们指定服务提供的函数,这里我指定了
pokemonFunc带有事件的函数名称http。我们也可以说这是我们的 AWS Lambda 函数。
我们需要把我们的 Pokemon 存储在某个地方,为了简单起见,我选择了 MySQL,但你也可以使用其他类型的数据库。我已经创建了一个名为 pokemon_db 的数据库,并在其中创建了表 pokemon_tb,其中包含 id、name、height、weight、avatar 和 createAt 列。
CREATE TABLE `pokemon_tb` (
  `id` int(11) NOT NULL,
  `name` varchar(255) NOT NULL,
  `height` float NOT NULL,
  `weight` float NOT NULL,
  `avatar` varchar(255) NOT NULL,
  `createdAt` timestamp NOT NULL DEFAULT CURRENT_TIMESTAMP
) ENGINE=InnoDB DEFAULT CHARSET=latin1;

ALTER TABLE `pokemon_tb` ADD PRIMARY KEY (`id`);

ALTER TABLE `pokemon_tb` MODIFY `id` int(11) NOT NULL AUTO_INCREMENT, AUTO_INCREMENT=1;
我们不是每次都创建和管理连接,而是在dbConfig.js文件中配置一次池连接并多次重复使用。
// dbConfig.js
const mysql = require('mysql')
const pool  = mysql.createPool({
  host            : 'localhost',
  user            : 'root',
  password        : '12345',
  database        : 'pokemon_app_db',
})

module.exports = pool
编写处理程序函数
让我们专注于使用 express 处理 index.js 文件中的 RESTful API 路由。首先,我们serverless-http在顶部导入了包。其次,我们导出了一个处理函数,它是我们用 serverless 包包装的应用程序。
在这里,我们实现了处理crudpokemon 操作的基本五条路线(无需任何验证)。
const express = require('express')
const serverless = require('serverless-http')
const bodyParser = require('body-parser')
const pool = require('./configs/dbConfig')

const app = express()

app.use(bodyParser.json())
app.use(bodyParser.urlencoded({ extended: true }))

// Handle pokemon GET route for all pokemon
app.get('/pokemon/', (req, res) => {
  const query = 'SELECT * FROM pokemon_tb'
  pool.query(query, (err, results, fields) => {
    if (err) {
      const response = { data: null, message: err.message, }
      res.send(response)
    }

    const pokemons = [...results]
    const response = {
      data: pokemons,
      message: 'All pokemons successfully retrieved.',
    }
    res.send(response)
  })
})

// Handle pokemon GET route for specific pokemon
app.get('/pokemon/:id', (req, res) => {
  const id = req.params.id
  const query = `SELECT * FROM pokemon_tb WHERE id=${id}`
  pool.query(query, (err, results, fields) => {
    if (err) {
      const response = { data: null, message: err.message, }
      res.send(response)
    }

    const pokemon = results[0]
    const response = {
      data: pokemon,
      message: `Pokemon ${pokemon.name} successfully retrieved.`,
    }
    res.status(200).send(response)
  })
})

// Handle pokemon POST route
app.post('/pokemon/', (req, res) => {
  const { name, height, weight, avatar } = req.body

  const query = `INSERT INTO pokemon_tb (name, height, weight, avatar) VALUES ('${name}', '${height}', '${weight}', '${avatar}')`
  pool.query(query, (err, results, fields) => {
    if (err) {
      const response = { data: null, message: err.message, }
      res.send(response)
    }

    const { insertId } = results
    const pokemon = { id: insertId, name, height, weight, avatar }
    const response = {
      data: pokemon,
      message: `Pokemon ${name} successfully added.`,
    }
    res.status(201).send(response)
  })
})

// Handle pokemon PUT route
app.put('/pokemon/:id', (req, res) => {
  const { id } = req.params
  const query = `SELECT * FROM pokemon_tb WHERE id=${id} LIMIT 1`
  pool.query(query, (err, results, fields) => {
    if (err) {
      const response = { data: null, message: err.message, }
      res.send(response)
    }

    const { id, name, height, weight, avatar } = { ...results[0], ...req.body }
    const query = `UPDATE pokemon_tb SET name='${name}', height='${height}', weight='${weight}', avatar='${avatar}' WHERE id='${id}'`
    pool.query(query, (err, results, fields) => {
      if (err) {
        const response = { data: null, message: err.message, }
        res.send(response)
      }

      const pokemon = {
        id,
        name,
        height,
        weight,
        avatar,
      }
      const response = {
        data: pokemon,
        message: `Pokemon ${name} is successfully updated.`,
      }
      res.send(response)
    })
  })
})

// Handler pokemon DELETE route
app.delete('/pokemon/:id', (req, res) => {
  const { id } = req.params
  const query = `DELETE FROM pokemon_tb WHERE id=${id}`
  pool.query(query, (err, results, fields) => {
    if (err) {
      const response = { data: null, message: err.message }
      res.send(response)
    }

    const response = {
      data: null,
      message: `Pokemon with id: ${id} successfully deleted.`,
    }
    res.send(response)
  })
})

// Handle in-valid route
app.all('*', function(req, res) {
  const response = { data: null, message: 'Route not found!!' }
  res.status(400).send(response)
})

// wrap express app instance with serverless http function
module.exports.handler = serverless(app)
终端快照:
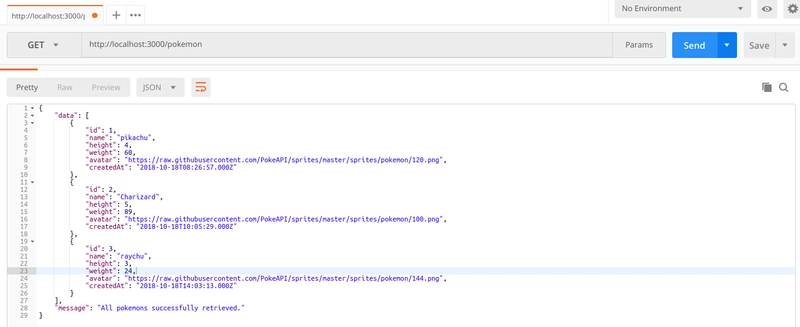
获得所有口袋妖怪:
通过 ID 获取口袋妖怪:
添加新的神奇宝贝:
更新现有的口袋妖怪:
删除现有的口袋妖怪:
部署
使用无服务器框架部署服务非常简单,我们只需点击部署命令即可。
serverless deploy
我尚未在我的 AWS 账户上设置 MySQL 数据库,因此 RESTful 服务无法在我的 AWS 基础架构上运行。稍后,我会将 RESTful 服务部署到 AWS 基础架构上。
结论
使用无服务器框架创建 RESTful API 非常简单。对于无服务器,我们必须切换开发工作流程。我发现很多公司正在转向创建和管理微服务架构,而不是单体应用。这听起来很棒。
结束语
感谢阅读。希望你喜欢这篇文章,欢迎点赞、评论或分享给你的朋友。想要更深入地了解 Serverless 框架,请查看 serverless.com 的官方文档和博客。
文章来源:https://dev.to/sagar/build-a-restful-api-with-the-serverless-framework-ene 后端开发教程 - Java、Spring Boot 实战 - msg200.com


