JavaScript——原型链详解
通过原型链学习继承的概念
最初发布在我的个人博客debuggr.io
在本文中,我们将学习 JavaScript 的原型链。我们将了解对象如何连接到其他对象,以及如何实现这些对象之间的“继承”和关系。
我们的目标
作为开发者,我们编写代码的主要任务通常是操作数据。我们获取数据并将其存储在某个地方,然后基于这些数据运行相应的功能。如果
能将功能和相关数据捆绑到一起,岂不是更好?这会让我们的工作轻松很多。
想象一个Player物体:
{
  userName: 'sag1v',
  score: '700'
}
如果我们想在该对象上运行一些功能,比如更改分数,该怎么办?我们应该把setScore方法放在哪里?
对象
当我们想要存储相关数据时,我们通常使用对象,就像一个盒子,里面放着相关的数据。
在深入探讨之前,我们先来了解一下什么Object是对象,并探索一些创建对象的方法。
对象字面量
const player1 = {
  userName: 'sag1v',
  score: '700',
  setScore(newScore){
    player1.score = newScore;
  }
}
具有文字符号(或“对象初始化器”)的对象是一个表达式,每个对象初始化器都会导致在执行其出现的语句时创建一个新对象。
我们还可以使用点符号或括号符号创建或访问对象的属性:
const player1 = {
  name: 'Sagiv',
}

player1.userName = 'sag1v';
player1['score'] = 700;
player1.setScore = function(newScore) {
  player1.score = newScore;
}
对象.create
创建的另一种选择Object是使用该Object.create方法:
const player1 = Object.create(null)
player1.userName = 'sag1v';
player1['score'] = 700;
player1.setScore = function(newScore) {
  player1.score = newScore;
}
Object.create总是会返回一个新的空对象,但如果我们向其传递一个不同的对象,则会获得额外的好处。我们稍后会再讨论这个问题。
自动化
显然,我们不想每次都手动创建这些对象,我们可能希望自动化此操作。因此,让Player我们创建一个可以自动创建对象的函数。
工厂函数
function createPlayer(userName, score) {
  const newPlayer = {
    userName,
    score,
    setScore(newScore) {
      newPlayer.score = newScore;
    }
  }
  return newPlayer;
}

const player1 = createPlayer('sag1v', 700);
这种模式通常被称为“工厂功能”,就像工厂中输出对象的传送带一样,我们传入相关参数并取回Object我们需要的对象。
如果我们运行这个函数两次会发生什么?
function createPlayer(userName, score) {
  const newPlayer = {
    userName,
    score,
    setScore(newScore) {
      newPlayer.score = newScore;
    }
  }
  return newPlayer;
}

const player1 = createPlayer('sag1v', 700);
const player2 = createPlayer('sarah', 900);
我们将得到两个具有这种形状的物体:
{
  userName: 'sag1v',
  score: 700,
  setScore: ƒ
}

{
  userName: 'sarah',
  score: 900,
  setScore: ƒ
}
你注意到一些重复了吗?我们的setScore代码是为每个实例存储的,这违反了 DRY(不要重复自己)原则。
如果我们可以将它存储在其他地方,并且仍然能够通过对象实例访问它,那会怎样player1.setScore(1000)?
OLOO——链接到其他对象的对象
让我们回到Object.create,我们说过它将始终创建一个空对象,但如果我们将一个对象传递给它,我们将获得一个额外的功能。
const playerFunctions = {
  setScore(newScore) {
    this.score = newScore;
  }
}

function createPlayer(userName, score) {
  const newPlayer = Object.create(playerFunctions);
  newPlayer.userName = userName;
  newPlayer.score = score;
  return newPlayer;
}

const player1 = createPlayer('sag1v', 700);
const player2 = createPlayer('sarah', 900);
该代码的工作方式与我们之前的代码完全相同,但有一个重要的区别,我们的新对象实例不包含该setScore方法,而是在中有一个指向它的链接playerFunctions。
事实证明, JavaScript 中的所有对象都具有一个称为(发音为“dunder proto”)的特殊隐藏属性__proto__。如果该属性指向一个对象,那么引擎会将该对象的属性视为该实例本身的属性。换句话说,每个对象都可以通过该__proto__属性链接到另一个对象,并像访问自己的属性一样访问该对象的属性。
️️⚠️ 注意
不要__proto__与prototype属性混淆,prototype属性是仅存在于函数中的属性。__proto__另一方面,属性是仅存在于对象中的属性。更令人困惑的是,EcmaScript 规范中__proto__将该属性称为。[[Prototype]]
我们稍后会再讨论这个问题🤔
让我们通过代码来看一个示例,以便更好地进行可视化:
const playerFunctions = {
  setScore(newScore) {
    this.score = newScore;
  }
}

function createPlayer(userName, score) {
  const newPlayer = Object.create(playerFunctions);
  newPlayer.userName = userName;
  newPlayer.score = score;
  return newPlayer;
}

const player1 = createPlayer('sag1v', 700);
const player2 = createPlayer('sarah', 900);

console.log(player1)
console.log(player2)
这将输出:
player1: {
  userName: 'sag1v',
  score: 700,
  __proto__: playerFunctions
}

player2: {
  userName: 'sarah',
  score: 900,
  __proto__: playerFunctions
}
这意味着和都player1可以player2访问的属性playerFunctions,也就是说它们都可以运行setScore:
player1.setScore(1000);
player2.setScore(2000);
我们在这里实现了我们的目标,我们拥有附加数据和功能的对象,并且我们没有违反 DRY 原则。
但似乎只是为了创建链接对象而付出了很多努力:
- 我们需要创建对象。
- 我们需要创建一个不同的对象来实现我们的功能。
- 我们必须使用
Object.create将__proto__属性链接到功能对象。 - 我们需要用属性填充新对象。
- 我们需要返回新的对象。
如果其中一些任务可以为我们完成那会怎样?
运算符new——又称构造函数
在前面的例子中,我们看到为了在工厂函数中创建链接对象,我们需要执行一些“任务”。如果我们使用带有new函数调用的运算符,JavaScript 就可以为我们完成其中一些任务。
但在我们看到实际效果之前,让我们先确保我们对函数的含义有相同的理解。
函数到底是什么?
function double(num) {
    return num * 2;
}

double.someProp = 'Hi there!';

double(5); // 10
double.someProp // Hi there!

double.prototype // {}
我们都知道函数是什么,对吧?我们可以声明它,然后用括号调用它()。但看看上面的代码,我们还可以读取或创建它的属性,就像处理对象一样。所以我的结论是,JavaScript 中的函数不仅仅是函数,它们更像是一种“函数与对象的结合”。基本上每个函数都可以被调用,也可以像对象一样被处理。
原型属性
事实证明,所有函数(箭头函数除外)都具有.prototype属性。
是的,这里再次发出警告:
不是
__proto__或[[Prototype]],而是prototype。
现在让我们回到新的操作符。
使用new操作员调用
使用运算符后,我们的函数可能如下所示new:
⚠️ 如果你不是 100% 确定你理解了this关键词的工作原理,你可能需要阅读JavaScript - 深入了解“this”关键词
function Player(userName, score){
  this.userName = userName;
  this.score = score;
}

Player.prototype.setScore = function(newScore){
  this.score = newScore;
}

const player1 = new Player('sag1v', 700);
const player2 = new Player('sarah', 900);

console.log(player1)
console.log(player2)
输出如下:
Player {
  userName: "sag1v",
  score: 700,
  __proto__: Player.prototype
}

Player {
  userName: "sarah",
  score: 900,
  __proto__: Player.prototype
}
让我们看一下该代码(执行阶段)
我们正在Player使用运算符执行该函数new,请注意,我将函数名称从 改为createPlayer,Player这仅仅是因为这是开发人员之间的惯例。这是一种向函数使用者发出信号的方式,Player表明这是一个“构造函数”,应该使用new运算符来调用。
当我们使用该运算符调用函数时new,JavaScript 将为我们执行 4 件事:
- 它将创建一个新的对象。
- 它将把新对象分配给
this上下文。 - 在我们的例子中,它将把
__proto__新对象的属性链接到prototype函数的属性。Player.prototype - 它将返回这个新对象,除非您返回不同的对象。
如果我们编写由 JavaScript 完成的自动化步骤,它可能看起来像以下代码片段:
function Player(userName, score){
  this = {} // ⚠️ done by JavaScript
  this.__proto__ = Player.prototype // ⚠️ done by JavaScript

  this.userName = userName;
  this.score = score;

  return this // ⚠️ done by JavaScript
}
让我们看看步骤#3:
它会将
__proto__新对象的属性链接到prototype函数的属性......
这意味着我们可以添加任何方法,Player.prototype并且它们将可供我们新创建的对象使用。
这正是我们所做的:
Player.prototype.setScore = function(newScore){
  this.score = newScore;
}
这就是我们如何使用构造函数创建链接到其他对象的对象。
顺便说一句,如果我们不使用该new运算符,JavaScript 就不会为我们完成这些任务,我们最终只会在上下文中修改或创建一些属性this。记住这个选项,我们在进行子类化时会用到这个技巧。
有多种方法可以确保使用该运算符调用该函数new:
function Player(username, score){

  if(!(this instanceof Player)){
    throw new Error('Player must be called with new')
  }

  // ES2015 syntax
  if(!new.target){
    throw new Error('Player must be called with new')
  }
}
再次,要了解有关关键词的深入解释,this您可以阅读JavaScript - 深入了解“this”关键词。
班级
如果您不喜欢手动编写工厂函数,或者不喜欢构造函数语法,或者不喜欢手动检查函数是否由 new 运算符调用,JavaScript 也提供了一个class(自 ES2015 起)的继承机制。不过请记住,类主要是函数的语法糖,与其他语言中的传统类有很大不同,我们仍然使用“原型继承”。
引用MDN的一段话:
ECMAScript 2015 中引入的 JavaScript 类,主要是 JavaScript 现有基于原型的继承的语法糖。类语法并没有为 JavaScript 引入新的面向对象继承模型。
让我们将“构造函数”class逐步转换为:
声明一个类
我们使用class关键字并按照上一节中命名构造函数的方式命名我们的类。
class Player {

}
创建构造函数
我们将从上一节中获取构造函数的主体,并constructor用它为我们的类创建一个方法:
class Player {
  constructor(userName, score) {
    this.userName = userName;
    this.score = score;
  }
}
向类添加方法
我们想要附加的每个方法Player.prototype都可以简单地声明为类方法:
class Player {
  constructor(userName, score) {
    this.userName = userName;
    this.score = score;
  }

  setScore(newScore) {
    this.score = newScore;
  }
}
现在整个代码
class Player {
  constructor(userName, score) {
    this.userName = userName;
    this.score = score;
  }

  setScore(newScore) {
    this.score = newScore;
  }
}

const player1 = new Player('sag1v', 700);
const player2 = new Player('sarah', 900);

console.log(player1)
console.log(player2)
当我们运行代码时,我们得到与之前相同的输出:
Player {
  userName: "sag1v",
  score: 700,
  __proto__: Player.prototype
}

Player {
  userName: "sarah",
  score: 900,
  __proto__: Player.prototype
}
如你所见,class它的工作原理和行为与带有原型链的函数相同,只是语法不同。此外,它还内置了检查函数是否class通过运算符调用的功能new。
子类化——又称继承
如果我们想要一种特殊的用户Player,比如付费用户,可以解锁普通用户所没有的Player功能,比如更改用户名的能力。Player
那么让我们看看我们的目标是什么:
- 我们希望普通玩家拥有一个
userName、一个score和一种setScore方法。 - 我们还希望付费用户玩家能够拥有普通玩家拥有的所有东西+一种
setUserName方法,但显然我们不希望普通玩家拥有这种能力。
在深入研究之前,让我们先形象地看一下链接对象的链:
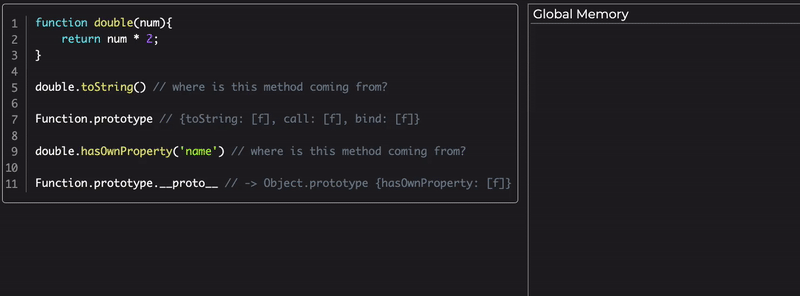
考虑下面的代码:
function double(num){
    return num * 2;
}

double.toString() // where is this method coming from?

Function.prototype // {toString: f, call: f, bind: f}

double.hasOwnProperty('name') // where is this method coming from?

Function.prototype.__proto__ // -> Object.prototype {hasOwnProperty: f}
我们知道,如果某个属性不直接存在于对象上,引擎会通过该属性在链接对象上查找该属性(如果存在)__proto__。但是,如果我们要查找的属性也不存在,会发生什么情况呢?正如我们之前所了解的,所有对象都有一个__proto__属性,因此引擎会通过该__proto__属性检查下一个链接对象。如果我们要查找的属性不存在呢?我想你明白了,引擎会继续沿着属性链向上查找,__proto__直到遇到死胡同,即空引用,这基本上就是Object.prototype.__proto__……
因此,如果我们逐步执行代码示例:
double.toString()
double没有toString方法✖️。- 经过
double.__proto__ double.__proto__指向的Function.prototype是包含该方法的对象toString。勾选✔️
double.hasOwnProperty('name')
double没有hasOwnProperty方法✖️。- 经过
double.__proto__ double.__proto__指向Function.prototype。Function.prototype没有hasOwnProperty方法✖️。- 通過
Function.prototype.__proto__。 Function.prototype.__proto__指向Object.prototype。Object.prototype是包含该方法的对象hasOwnProperty。勾选✔️
下面是一个小的动画 gif 来演示该过程:
现在回到创建付费用户实体的任务。我们将再次从头到尾,使用“OLOO”模式、“构造函数”模式以及类来实现此功能。这样,我们将看到每种模式和功能的权衡。
那么让我们深入研究子类吧。💪
OLOO - 子分类
这是使用 OLOO 和工厂功能模式实现的任务:
const playerFunctions = {
  setScore(newScore) {
    this.score = newScore;
  }
}

function createPlayer(userName, score) {
  const newPlayer = Object.create(playerFunctions);
  newPlayer.userName = userName;
  newPlayer.score = score;
  return newPlayer;
}

const paidPlayerFunctions = {
  setUserName(newName) {
    this.userName = newName;
  }
}

// link paidPlayerFunctions object to createPlayer object
Object.setPrototypeOf(paidPlayerFunctions, playerFunctions);

function createPaidPlayer(userName, score, balance) {
  const paidPlayer = createPlayer(name, score);
  // we need to change the pointer here
  Object.setPrototypeOf(paidPlayer, paidPlayerFunctions);
  paidPlayer.balance = balance;
  return paidPlayer
}

const player1 = createPlayer('sag1v', 700);
const paidPlayer = createPaidPlayer('sag1v', 700, 5);

console.log(player1)
console.log(paidPlayer)
这将输出:
player1 {
  userName: "sag1v",
  score: 700,
  __proto__: playerFunctions {
     setScore: ƒ
  }
}

paidPlayer {
  userName: "sarah",
  score: 900,
  balance: 5,
  __proto__: paidPlayerFunctions {
    setUserName: ƒ,
    __proto__: playerFunctions {
      setScore: ƒ
    }
  }
}
如您所见,我们的createPlayer功能实现没有改变,但是对于该createPaidPlayer功能,我们需要使用一些技巧。
我们createPaidPlayer使用createPlayer来创建初始的新对象,这样就无需重复创建新玩家的逻辑了。但不幸的是,它链接了__proto__错误的对象,所以我们需要使用Object.setPrototypeOf方法来解决这个问题。我们将目标对象(即新创建的对象,我们需要修复它的__proto__指针)传递给它,并将我们希望它指向的正确对象传递给它,例如paidPlayerFunctions。
但我们还没完,因为现在我们断开了与playerFunctions持有该方法的对象的链接。这就是为什么我们需要在和setScore之间进行链接,然后再用。这样我们就能确保我们的链接到,然后从 链接到。paidPlayerFunctionsplayerFunctionsObject.setPrototypeOfpaidPlayerpaidPlayerFunctionsplayerFunctions
对于 2 级链接来说,这是很多代码,想象一下 3 级或 4 级链接的麻烦。
构造函数 - 子类化
现在让我们用构造函数实现同样的事情。
function Player(userName, score) {
  this.userName = userName;
  this.score = score;
}

Player.prototype.setScore = function(newScore) {
  this.score = newScore;
}


function PaidPlayer(userName, score, balance) {
  this.balance = balance;
  /* we are calling "Player" without the "new" operator
  but we use the "call" method,
  which allows us to explicitly pass a ref for "this".
  Now the "Player" function will mutate "this"
  and will populate it with the relevant properties */
  Player.call(this, userName, score);
}

PaidPlayer.prototype.setUserName = function(newName) {
  this.userName = newName;
}

// link PaidPlayer.prototype object to Player.prototype object
Object.setPrototypeOf(PaidPlayer.prototype, Player.prototype);


const player1 = new Player('sag1v', 700);
const paidPlayer = new PaidPlayer('sarah', 900, 5);

console.log(player1)
console.log(paidPlayer)
我们应该得到与之前的实现类似的输出:
Player {
  userName: "sag1v",
  score: 700,
  __proto__: Player.prototype {
    setScore: ƒ
  }
}

PaidPlayer {
  userName: "sarah",
  score: 900,
  balance: 5,
  __proto__: PaidPlayer.prototype:{
    setUserName: ƒ,
    __proto__: Player.prototype {
      setScore: ƒ
    }
  }
}
这实际上与我们使用工厂函数模式得到的结果相同,但其中的一些操作由new操作员自动完成。它可能为我们节省了一些代码行,但也带来了一些其他挑战。
我们面临的第一个挑战是如何利用Player函数来获取创建初始 的逻辑Player。我们通过在不使用运算符的情况下调用它new(违背了我们的直觉!)并使用.call允许我们显式传递 引用的方法来实现this这一点。这样,该Player函数就不会像构造函数那样运行,因此它不会创建新对象并将其赋值给this
function PaidPlayer(userName, score, balance) {
  this.balance = balance;
  /* we are calling "Player" without the "new" operator
  but we use the "call" method,
  which allows us to explicitly pass a ref for "this".
  Now the "Player" function will mutate "this"
  and will populate it with the relevant properties */
  Player.call(this, userName, score);
}
我们在这里仅使用Player来改变我们传入的,this它基本上是上下文中新创建的对象PaidPlayer。
我们面临的另一个挑战是将 返回的实例链接到PaidPlayer的实例所具有的功能Player,我们使用 做到了这一点Object.setPrototypeOf,并将其链接PaidPlayer.prototype到Player.prototype。
// link PaidPlayer.prototype object to Player.prototype object
Object.setPrototypeOf(PaidPlayer.prototype, Player.prototype);
正如您所看到的,我们的引擎为我们做的事情越多,我们需要编写的代码就越少,但是随着抽象数量的增加,我们越来越难以跟踪引擎盖下发生的事情。
类别 - 子类别
通过类,我们可以获得更多的抽象,这意味着更少的代码:
class Player {
  constructor(userName, score) {
    this.userName = userName;
    this.score = score;
  }

  setScore(newScore) {
    this.score = newScore;
  }
}

class PaidPlayer extends Player {
  constructor(userName, score, balance) {
    super(userName, score);
    this.balance = balance;
  }

  setUserName(newName) {
    this.userName = newName;
  }
}


const player1 = new Player('sag1v', 700);
const paidPlayer = new PaidPlayer('sarah', 900, 5);

console.log(player1)
console.log(paidPlayer)
我们得到与构造函数相同的输出:
Player {
  userName: "sag1v",
  score: 700,
  __proto__: Player.prototype {
    setScore: ƒ
  }
}

PaidPlayer {
  userName: "sarah",
  score: 900,
  balance: 5,
  __proto__: PaidPlayer.prototype:{
    setUserName: ƒ,
    __proto__: Player.prototype {
      setScore: ƒ
    }
  }
}
所以如你所见,类不过是构造函数的语法糖而已。嗯,差不多是这样🤔
记住文档中的这一行:
ECMAScript 2015 中引入的 JavaScript 类主要是 JavaScript 现有的基于原型的继承的语法糖……
是的,主要是。
当我们使用extends关键词的时候,我们需要使用super函数,为什么?
记住“构造函数”部分中的这行(奇怪的):
Player.call(this, userName, score)
这super(userName, score)是一种模仿它的方法。
好吧,如果我们想在这里更准确一点,它实际上使用了 ES2015 引入的一个新功能:Reflect.construct。
引用文档:
静态 Reflect.construct() 方法的作用类似于 new 运算符,但本质上是一个函数。它相当于调用 new target(...args)。此外,它还提供了指定不同原型的选项。
所以我们不再需要“破解”构造函数了。基本上,底层super是用 实现的Reflect.construct。同样需要注意的是,当我们使用extend一个类时,在运行 之前,constructor我们不能在类体内部使用它,因为它尚未初始化。thissuper()this
class PaidPlayer extends Player {
  constructor(userName, score, balance) {
    // "this" is uninitialized yet...
    // super refers to Player in this case
    super(userName, score);
    // under the hood super is implemented with Reflect.construct
    // this = Reflect.construct(Player, [userName, score], PaidPlayer);
    this.balance = balance;
  }

  setUserName(newName) {
    this.userName = newName;
  }
}
总结
我们学习了连接对象的不同方式,包括附加数据和逻辑,以及将它们捆绑在一起。我们还了解了 JavaScript 中的“继承”是如何运作的,它通过__proto__属性将对象链接到其他对象,有时甚至包含多层级的链接。
我们一次又一次地看到它,我们得到的抽象越多,幕后发生的事情就越多,这使得我们更难跟踪代码中发生的事情。
每种模式都有其优点和缺点:
- 虽然
Object.create我们需要编写更多代码,但我们对对象的控制更加细粒度。不过,进行深层链接会变得繁琐。 - 使用构造函数,我们可以用 JavaScript 实现一些自动化任务,但语法可能看起来有点奇怪。我们还需要确保函数使用
new关键字调用,否则会遇到棘手的 bug。深层链接也不太好。 - 使用类,我们可以获得更清晰的语法和内置的检查,确保它是由
new运算符调用的。类在实现“继承”时最为出色,我们只需使用extends关键字和调用super()即可,而无需像其他模式那样费力费力。它的语法也更接近其他语言,看起来很容易学习。尽管这也是一个缺点,因为正如我们所见,它与其他语言中的类截然不同,但我们仍然使用旧的“原型继承”,并在其上添加了多层抽象。
希望这篇文章对您有所帮助,如果您有补充或任何建议或反馈,我很乐意听到,您可以发推文或直接给我发私信@ sag1v。🤓
欲了解更多文章,请访问debuggr.io
文章来源:https://dev.to/sag1v/javascript-the-prototype-chain-in-deep-2p58