使用 React、NodeJS 构建论坛
TL;DR
在本文中,您将学习如何构建一个论坛系统,让用户可以创建、回应和回复帖子。最后,我们还将使用 Novu 发送每个帖子回复的通知。如果您只想了解技术细节,可以跳过最后一步。
我知道,现在的论坛不像以前那样了,都是 Reddit、Facebook 社区(以及像 Devto 和 Mastodon 这样的小社区),但是!我小时候特别喜欢论坛,实际上我用PHPBB和vBulletin建过几个论坛,那时候 PHP 还挺流行的。怀旧的心情让我写下了这篇博文😎
一个小请求🤗
我正在尝试让 Novu 获得2 万颗星,您能帮我加星标吗?这能帮助我每周创作更多内容。
https://github.com/novuhq/novu
项目设置
在这里,我将指导您创建 Web 应用程序的项目环境。我们将使用 React.js 作为前端,使用 Node.js 作为后端服务器。
通过运行以下代码为 Web 应用程序创建项目文件夹:
mkdir forum-system
cd forum-system
mkdir client server
设置 Node.js 服务器
导航到服务器文件夹并创建一个package.json文件。
cd server & npm init -y
安装 Express、Nodemon 和 CORS 库。
npm install express cors nodemon
ExpressJS 是一个快速、简约的框架,它提供了在 Node.js 中构建 Web 应用程序的多种功能, CORS 是一个允许不同域之间通信的 Node.js 包, Nodemon 是一个在检测到文件更改后自动重启服务器的 Node.js 工具。
创建一个index.js文件——Web 服务器的入口点。
touch index.js
使用 Express.js 设置 Node.js 服务器。当您http://localhost:4000/api在浏览器中访问时,下面的代码片段会返回一个 JSON 对象。
//👇🏻index.js
const express = require("express");
const cors = require("cors");
const app = express();
const PORT = 4000;

app.use(express.urlencoded({ extended: true }));
app.use(express.json());
app.use(cors());

app.get("/api", (req, res) => {
    res.json({
        message: "Hello world",
    });
});

app.listen(PORT, () => {
    console.log(`Server listening on ${PORT}`);
});
通过将启动命令添加到package.json文件中的脚本列表中来配置 Nodemon。下面的代码片段使用 Nodemon 启动服务器。
//In server/package.json

"scripts": {
    "test": "echo \"Error: no test specified\" && exit 1",
    "start": "nodemon index.js"
  },
恭喜!您现在可以使用以下命令启动服务器。
npm start
设置 React 应用程序
通过终端导航到客户端文件夹并创建一个新的 React.js 项目。
cd client
npx create-react-app ./
安装 React Router - 一个 JavaScript 库,使我们能够在 React 应用程序中的页面之间导航。
npm install react-router-dom
删除 React 应用程序中的冗余文件(例如徽标和测试文件),并更新App.js文件以显示“Hello World”,如下所示。
function App() {
    return (
        <div>
            <p>Hello World!</p>
        </div>
    );
}
export default App;
将此处项目样式所需的 CSS 文件复制 到src/index.css文件中。
构建应用程序用户界面
在这里,我们将创建论坛系统的用户界面,以使用户能够创建、回复和回应各种主题。
client/src在包含Home.js、Login.js、Nav.js、Register.js和文件的文件夹中创建一个 components 文件夹Replies.js。
cd client/src
mkdir components
touch Home.js Login.js Nav.js Register.js Replies.js
- 从上面的代码片段来看:
- 和文件是Web
Login.js应用Register.js程序的身份验证页面。 - 该
Home.js文件代表身份验证后显示的仪表板页面。它允许用户创建帖子并做出反应。 - 该
Replies.js文件显示每个帖子的回复并允许用户回复帖子主题。 - 这
Nav.js是我们将配置 Novu 的导航栏。
- 和文件是Web
更新App.js文件以使用 React Router 呈现组件。
import React from "react";
import { BrowserRouter, Route, Routes } from "react-router-dom";
import Register from "./components/Register";
import Login from "./components/Login";
import Home from "./components/Home";
import Replies from "./components/Replies";

const App = () => {
    return (
        <div>
            <BrowserRouter>
                <Routes>
                    <Route path='/' element={<Login />} />
                    <Route path='/register' element={<Register />} />
                    <Route path='/dashboard' element={<Home />} />
                    <Route path='/:id/replies' element={<Replies />} />
                </Routes>
            </BrowserRouter>
        </div>
    );
};

export default App;
登录页面
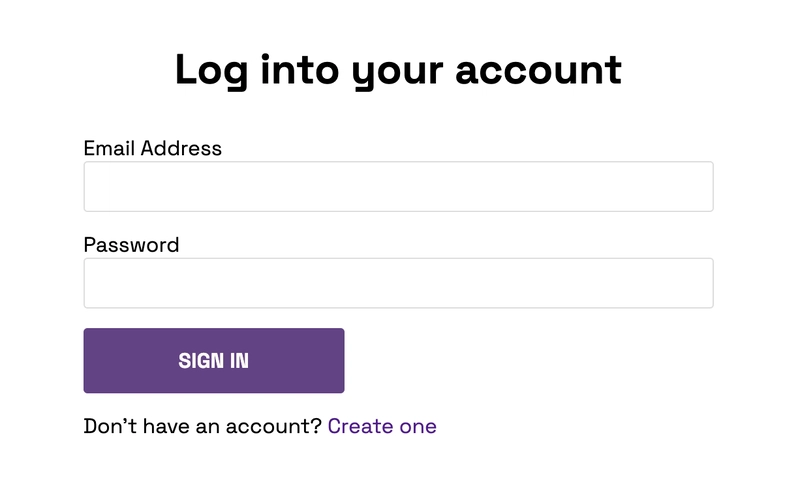
将以下代码复制到Login.js文件中以呈现接受用户电子邮件和密码的表单。
import React, { useState } from "react";
import { Link, useNavigate } from "react-router-dom";

const Login = () => {
    const [email, setEmail] = useState("");
    const [password, setPassword] = useState("");

    const handleSubmit = (e) => {
        e.preventDefault();
        console.log({ email, password });
        setEmail("");
        setPassword("");
    };

    return (
        <main className='login'>
            <h1 className='loginTitle'>Log into your account</h1>
            <form className='loginForm' onSubmit={handleSubmit}>
                <label htmlFor='email'>Email Address</label>
                <input
                    type='text'
                    name='email'
                    id='email'
                    required
                    value={email}
                    onChange={(e) => setEmail(e.target.value)}
                />
                <label htmlFor='password'>Password</label>
                <input
                    type='password'
                    name='password'
                    id='password'
                    required
                    value={password}
                    onChange={(e) => setPassword(e.target.value)}
                />
                <button className='loginBtn'>SIGN IN</button>
                <p>
                    Don't have an account? <Link to='/register'>Create one</Link>
                </p>
            </form>
        </main>
    );
};
export default Login;
注册页面
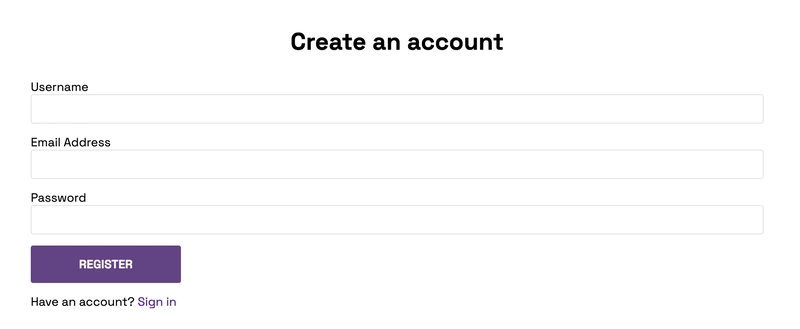
更新Register.js文件以显示注册表单,允许用户使用他们的电子邮件、用户名和密码创建帐户。
import React, { useState } from "react";
import { Link, useNavigate } from "react-router-dom";

const Register = () => {
    const [username, setUsername] = useState("");
    const [email, setEmail] = useState("");
    const [password, setPassword] = useState("");

    const handleSubmit = (e) => {
        e.preventDefault();
        console.log({ username, email, password });
        setEmail("");
        setUsername("");
        setPassword("");
    };
    return (
        <main className='register'>
            <h1 className='registerTitle'>Create an account</h1>
            <form className='registerForm' onSubmit={handleSubmit}>
                <label htmlFor='username'>Username</label>
                <input
                    type='text'
                    name='username'
                    id='username'
                    required
                    value={username}
                    onChange={(e) => setUsername(e.target.value)}
                />
                <label htmlFor='email'>Email Address</label>
                <input
                    type='text'
                    name='email'
                    id='email'
                    required
                    value={email}
                    onChange={(e) => setEmail(e.target.value)}
                />
                <label htmlFor='password'>Password</label>
                <input
                    type='password'
                    name='password'
                    id='password'
                    required
                    value={password}
                    onChange={(e) => setPassword(e.target.value)}
                />
                <button className='registerBtn'>REGISTER</button>
                <p>
                    Have an account? <Link to='/'>Sign in</Link>
                </p>
            </form>
        </main>
    );
};

export default Register;
Nav 组件
更新Nav.js文件以呈现导航栏,该导航栏显示应用程序的标题和退出按钮。在本文的后面,我将指导您在此组件中添加 Novu 的通知铃声。
import React from "react";

const Nav = () => {
    const signOut = () => {
        alert("User signed out!");
    };
    return (
        <nav className='navbar'>
            <h2>Threadify</h2>
            <div className='navbarRight'>
                <button onClick={signOut}>Sign out</button>
            </div>
        </nav>
    );
};

export default Nav;
主页
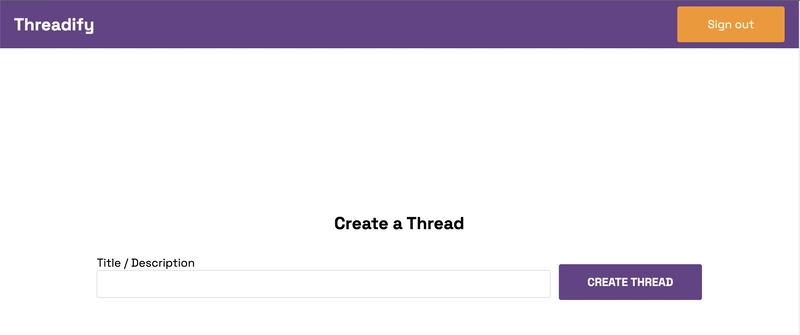
这是用户身份验证后的主页。用户可以在 Home 组件中创建帖子(主题)并进行回复。将以下代码复制到Home.js文件中。
import React, { useState } from "react";
import Nav from "./Nav";

const Home = () => {
    const [thread, setThread] = useState("");

    const handleSubmit = (e) => {
        e.preventDefault();
        console.log({ thread });
        setThread("");
    };
    return (
        <>
            <Nav />
            <main className='home'>
                <h2 className='homeTitle'>Create a Thread</h2>
                <form className='homeForm' onSubmit={handleSubmit}>
                    <div className='home__container'>
                        <label htmlFor='thread'>Title / Description</label>
                        <input
                            type='text'
                            name='thread'
                            required
                            value={thread}
                            onChange={(e) => setThread(e.target.value)}
                        />
                    </div>
                    <button className='homeBtn'>CREATE THREAD</button>
                </form>
            </main>
        </>
    );
};

export default Home;
上面的代码片段显示了导航栏和帖子的输入字段。我们将在接下来的部分中更新该组件。
回复页面
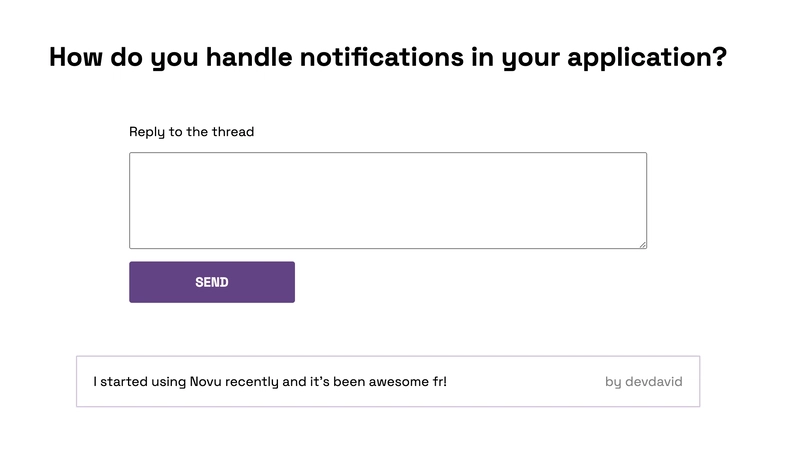
此页面是一个动态路由,允许用户回复帖子并查看评论。Replies.js使用以下代码片段更新该文件:
import React, { useState } from "react";

const Replies = () => {
    const [reply, setReply] = useState("");

    const handleSubmitReply = (e) => {
        e.preventDefault();
        console.log({ reply });
        setReply("");
    };

    return (
        <main className='replies'>
            <form className='modal__content' onSubmit={handleSubmitReply}>
                <label htmlFor='reply'>Reply to the thread</label>
                <textarea
                    rows={5}
                    value={reply}
                    onChange={(e) => setReply(e.target.value)}
                    type='text'
                    name='reply'
                    className='modalInput'
                />

                <button className='modalBtn'>SEND</button>
            </form>
        </main>
    );
};

export default Replies;
恭喜!您已经设计好了应用程序的用户界面。接下来,您将学习如何注册和登录用户。
使用 React 和 Node.js 进行用户身份验证
在这里,我将指导您验证用户身份以及如何仅允许授权用户访问 Web 应用程序中受保护的页面。
附言:在实际应用中,密码会被哈希处理并保存在安全的数据库中。为了简单起见,在本教程中,我将把所有凭据存储在一个数组中。
创建新用户
在服务器上添加一个 POST 路由,接受用户的凭证 - 电子邮件、用户名和密码。
//👇🏻 holds all the existing users
const users = [];
//👇🏻 generates a random string as ID
const generateID = () => Math.random().toString(36).substring(2, 10);

app.post("/api/register", async (req, res) => {
    const { email, password, username } = req.body;
    //👇🏻 holds the ID
    const id = generateID();
    //👇🏻 logs all the user's credentials to the console.
    console.log({ email, password, username, id });
});
在文件中创建一个signUp函数Register.js,将用户的凭据发送到服务器上的端点。
const signUp = () => {
    fetch("http://localhost:4000/api/register", {
        method: "POST",
        body: JSON.stringify({
            email,
            password,
            username,
        }),
        headers: {
            "Content-Type": "application/json",
        },
    })
        .then((res) => res.json())
        .then((data) => {
            console.log(data);
        })
        .catch((err) => console.error(err));
};
当用户提交表单时调用该函数,如下所示:
const handleSubmit = (e) => {
    e.preventDefault();
    //👇🏻 Triggers the function
    signUp();
    setEmail("");
    setUsername("");
    setPassword("");
};
更新/api/register路由以保存用户的凭据并向前端返回响应。
app.post("/api/register", async (req, res) => {
    const { email, password, username } = req.body;
    const id = generateID();
    //👇🏻 ensures there is no existing user with the same credentials
    const result = users.filter(
        (user) => user.email === email && user.password === password
    );
    //👇🏻 if true
    if (result.length === 0) {
        const newUser = { id, email, password, username };
        //👇🏻 adds the user to the database (array)
        users.push(newUser);
        //👇🏻 returns a success message
        return res.json({
            message: "Account created successfully!",
        });
    }
    //👇🏻 if there is an existing user
    res.json({
        error_message: "User already exists",
    });
});
上面的代码片段从 React.js 应用程序接受用户的凭据,并在将用户保存到数据库(数组)之前检查是否存在具有相同凭据的现有用户。
最后,通过更新函数来显示服务器的响应signUp,如下所示。
//👇🏻 React Router's useNavigate hook
const navigate = useNavigate();

const signUp = () => {
    fetch("http://localhost:4000/api/register", {
        method: "POST",
        body: JSON.stringify({
            email,
            password,
            username,
        }),
        headers: {
            "Content-Type": "application/json",
        },
    })
        .then((res) => res.json())
        .then((data) => {
            if (data.error_message) {
                alert(data.error_message);
            } else {
                alert("Account created successfully!");
                navigate("/");
            }
        })
        .catch((err) => console.error(err));
};
上面的代码片段显示来自 Node.js 服务器的成功或错误消息,并在成功创建帐户后将用户重定向到登录页面。
将用户登录到应用程序
在服务器上添加一个 POST 路由,该路由接受用户的电子邮件和密码,并在授予用户访问 Web 应用程序的权限之前对用户进行身份验证。
app.post("/api/login", (req, res) => {
    const { email, password } = req.body;
    //👇🏻 checks if the user exists
    let result = users.filter(
        (user) => user.email === email && user.password === password
    );
    //👇🏻 if the user doesn't exist
    if (result.length !== 1) {
        return res.json({
            error_message: "Incorrect credentials",
        });
    }
    //👇🏻 Returns the id if successfuly logged in
    res.json({
        message: "Login successfully",
        id: result[0].id,
    });
});
在文件中创建一个loginUser函数Login.js,将用户的电子邮件和密码发送到 Node.js 服务器。
//👇🏻 React Router's useNavigate hook
const navigate = useNavigate();

const loginUser = () => {
    fetch("http://localhost:4000/api/login", {
        method: "POST",
        body: JSON.stringify({
            email,
            password,
        }),
        headers: {
            "Content-Type": "application/json",
        },
    })
        .then((res) => res.json())
        .then((data) => {
            if (data.error_message) {
                alert(data.error_message);
            } else {
                alert(data.message);
                navigate("/dashboard");
                localStorage.setItem("_id", data.id);
            }
        })
        .catch((err) => console.error(err));
};
上面的代码片段将用户的凭据发送到 Node.js 服务器,并在前端显示响应。应用程序将经过身份验证的用户重定向到Home组件,并将其保存id到本地存储以便于识别。
更新文件signOut中的功能,以便在用户注销时从本地存储中Nav.js删除。id
const signOut = () => {
    localStorage.removeItem("_id");
    //👇🏻 redirects to the login page
    navigate("/");
};
在应用程序内创建和检索帖子主题
在这里,您将学习如何从 Node.js 服务器创建和检索帖子。
在文件中添加一个 POST 路由,index.js该路由接受来自 React.js 应用程序的帖子标题和用户的 ID。
app.post("/api/create/thread", async (req, res) => {
    const { thread, userId } = req.body;
    const threadId = generateID();

    console.log({ thread, userId, threadId });
});
接下来,将用户的 ID 和帖子标题发送到服务器。在此之前,我们需要确保Home.js路由是安全的。useEffect在 Home 组件中添加一个钩子,用于判断用户是否已通过身份验证。
import React, { useEffect, useState } from "react";
import { useNavigate } from "react-router-dom";

const Home = () => {
    const navigate = useNavigate();

    //👇🏻 The useEffect Hook
    useEffect(() => {
        const checkUser = () => {
            if (!localStorage.getItem("_id")) {
                navigate("/");
            } else {
                console.log("Authenticated");
            }
        };
        checkUser();
    }, [navigate]);

    return <>{/*--the UI elements*/}</>;
};
当用户登录应用程序时,我们会将其信息保存id到本地存储以便于识别。上面的代码片段会检查是否id存在;否则,用户将被重定向到登录页面。
在 Home 组件中添加一个函数,当提交表单时,将用户的 ID 和帖子标题发送到 Node.js 服务器。
const createThread = () => {
    fetch("http://localhost:4000/api/create/thread", {
        method: "POST",
        body: JSON.stringify({
            thread,
            userId: localStorage.getItem("_id"),
        }),
        headers: {
            "Content-Type": "application/json",
        },
    })
        .then((res) => res.json())
        .then((data) => {
            console.log(data);
        })
        .catch((err) => console.error(err));
};

//👇🏻 Triggered when the form is submitted
const handleSubmit = (e) => {
    e.preventDefault();
    //👇🏻 Calls the function
    createThread();
    setThread("");
};
保存帖子并将所有可用的帖子发送给客户端显示。
//👇🏻 holds all the posts created
const threadList = [];

app.post("/api/create/thread", async (req, res) => {
const { thread, userId } = req.body;
const threadId = generateID();

    //👇🏻 add post details to the array
    threadList.unshift({
        id: threadId,
        title: thread,
        userId,
        replies: [],
        likes: [],
    });

    //👇🏻 Returns a response containing the posts
    res.json({
        message: "Thread created successfully!",
        threads: threadList,
    });
});
上面的代码片段从前端接收用户的 ID 和帖子标题。然后,保存一个包含帖子详细信息的对象,并返回包含所有已保存帖子的响应。
显示帖子主题
创建一个状态来保存 Home 组件内的所有帖子。
const [threadList, setThreadList] = useState([]);
createThread按照如下所示更新函数:
const createThread = () => {
    fetch("http://localhost:4000/api/create/thread", {
        method: "POST",
        body: JSON.stringify({
            thread,
            userId: localStorage.getItem("_id"),
        }),
        headers: {
            "Content-Type": "application/json",
        },
    })
        .then((res) => res.json())
        .then((data) => {
            alert(data.message);
            setThreadList(data.threads);
        })
        .catch((err) => console.error(err));
};
该createThread函数检索应用程序中所有可用的帖子并将其保存到threadList状态中。
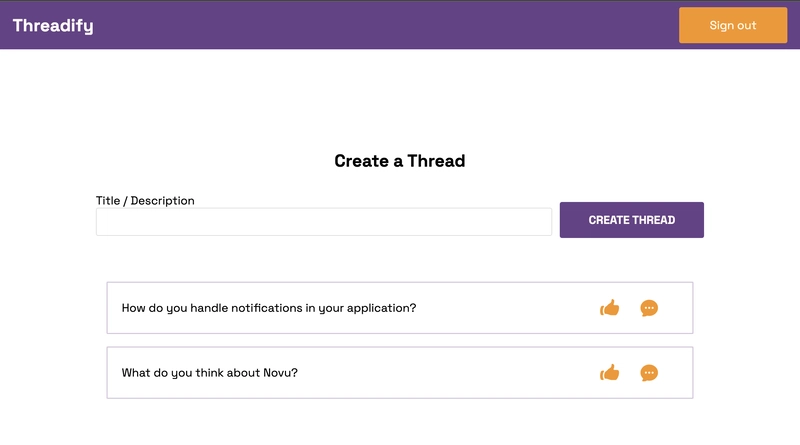
更新Home.js文件以显示可用的帖子,如下所示:
return (
    <>
        <Nav />
        <main className='home'>
            <h2 className='homeTitle'>Create a Thread</h2>
            <form className='homeForm' onSubmit={handleSubmit}>
                {/*--form UI elements--*/}
            </form>

            <div className='thread__container'>
                {threadList.map((thread) => (
                    <div className='thread__item' key={thread.id}>
                        <p>{thread.title}</p>
                        <div className='react__container'>
                            <Likes numberOfLikes={thread.likes.length} threadId={thread.id} />
                            <Comments
                                numberOfComments={thread.replies.length}
                                threadId={thread.id}
                                title={thread.title}
                            />
                        </div>
                    </div>
                ))}
            </div>
        </main>
    </>
);
- 从上面的代码片段来看:
- 所有帖子都显示在主页组件内。
- 我添加了两个新组件——“赞”和“评论”。它们都包含来自 Heroicons的 SVG 图标。
- 该
Likes组件接受帖子 ID 和帖子的点赞数 - 每个帖子的点赞数组的长度。 - 该
Comments组件接受数组的长度replies、帖子 ID 及其标题。
创建一个utils包含两个组件的文件夹。
cd client/src
mkdir utils
touch Likes.js Comments.js
将下面的代码复制到Likes.js文件中。
import React from "react";

const Likes = ({ numberOfLikes, threadId }) => {
    return (
        <div className='likes__container'>
            <svg
                xmlns='http://www.w3.org/2000/svg'
                viewBox='0 0 24 24'
                fill='currentColor'
                className='w-4 h-4 likesBtn'
            >
                <path d='M7.493 18.75c-.425 0-.82-.236-.975-.632A7.48 7.48 0 016 15.375c0-1.75.599-3.358 1.602-4.634.151-.192.373-.309.6-.397.473-.183.89-.514 1.212-.924a9.042 9.042 0 012.861-2.4c.723-.384 1.35-.956 1.653-1.715a4.498 4.498 0 00.322-1.672V3a.75.75 0 01.75-.75 2.25 2.25 0 012.25 2.25c0 1.152-.26 2.243-.723 3.218-.266.558.107 1.282.725 1.282h3.126c1.026 0 1.945.694 2.054 1.715.045.422.068.85.068 1.285a11.95 11.95 0 01-2.649 7.521c-.388.482-.987.729-1.605.729H14.23c-.483 0-.964-.078-1.423-.23l-3.114-1.04a4.501 4.501 0 00-1.423-.23h-.777zM2.331 10.977a11.969 11.969 0 00-.831 4.398 12 12 0 00.52 3.507c.26.85 1.084 1.368 1.973 1.368H4.9c.445 0 .72-.498.523-.898a8.963 8.963 0 01-.924-3.977c0-1.708.476-3.305 1.302-4.666.245-.403-.028-.959-.5-.959H4.25c-.832 0-1.612.453-1.918 1.227z' />
            </svg>
            <p style={{ color: "#434242" }}>
                {numberOfLikes === 0 ? "" : numberOfLikes}
            </p>
        </div>
    );
};

export default Likes;
上面的代码片段包含用于显示“赞”图标的 SVG 元素。该组件还会渲染帖子的点赞数量。
将下面的代码复制到Comments.js文件中。
import React from "react";
import { useNavigate } from "react-router-dom";

const Comments = ({ numberOfComments, threadId }) => {
    const navigate = useNavigate();

    const handleAddComment = () => {
        navigate(`/${threadId}/replies`);
    };

    return (
        <div className='likes__container'>
            <svg
                xmlns='http://www.w3.org/2000/svg'
                viewBox='0 0 24 24'
                fill='currentColor'
                className='w-6 h-6 likesBtn'
                onClick={handleAddComment}
            >
                <path
                    fillRule='evenodd'
                    d='M4.804 21.644A6.707 6.707 0 006 21.75a6.721 6.721 0 003.583-1.029c.774.182 1.584.279 2.417.279 5.322 0 9.75-3.97 9.75-9 0-5.03-4.428-9-9.75-9s-9.75 3.97-9.75 9c0 2.409 1.025 4.587 2.674 6.192.232.226.277.428.254.543a3.73 3.73 0 01-.814 1.686.75.75 0 00.44 1.223zM8.25 10.875a1.125 1.125 0 100 2.25 1.125 1.125 0 000-2.25zM10.875 12a1.125 1.125 0 112.25 0 1.125 1.125 0 01-2.25 0zm4.875-1.125a1.125 1.125 0 100 2.25 1.125 1.125 0 000-2.25z'
                    clipRule='evenodd'
                />
            </svg>
            <p style={{ color: "#434242" }}>
                {numberOfComments === 0 ? "" : numberOfComments}
            </p>
        </div>
    );
};

export default Comments;
该代码片段包含“评论”按钮的 SVG 元素以及帖子的评论数量。当用户点击评论图标时,会触发
该函数。它会将用户重定向到相应的组件,以便用户查看并添加每篇帖子的回复。handleAddCommentReplies
到目前为止,我们只能在创建新帖子时显示可用的帖子。接下来,让我们在组件挂载时检索它们。
在服务器上添加返回所有帖子的 GET 路由。
app.get("/api/all/threads", (req, res) => {
    res.json({
        threads: threadList,
    });
});
更新useEffectHome 组件内的钩子以从服务器获取所有帖子。
useEffect(() => {
    const checkUser = () => {
        if (!localStorage.getItem("_id")) {
            navigate("/");
        } else {
            fetch("http://localhost:4000/api/all/threads")
                .then((res) => res.json())
                .then((data) => setThreadList(data.threads))
                .catch((err) => console.error(err));
        }
    };
    checkUser();
}, [navigate]);
恭喜你完成了这一步!接下来,你将学习如何回应帖子。
如何回应和回复每条帖子
在本节中,您将学习如何回应和回复每条帖子。用户可以对每条帖子点赞或评论。
对每条帖子做出回应
Likes.js在文件中创建一个当用户点击“喜欢”图标时运行的函数。
const Likes = ({ numberOfLikes, threadId }) => {
    const handleLikeFunction = () => {
        alert("You just liked the post!");
    };

    return (
        <div className='likes__container'>
            <svg
                xmlns='http://www.w3.org/2000/svg'
                viewBox='0 0 24 24'
                fill='currentColor'
                className='w-4 h-4 likesBtn'
                onClick={handleLikeFunction}
            >
                {/*--other UI elements*/}
            </svg>
        </div>
    );
};
在服务器上创建一个 POST 路由来验证反应。
app.post("/api/thread/like", (req, res) => {
    //👇🏻 accepts the post id and the user id
    const { threadId, userId } = req.body;
    //👇🏻 gets the reacted post
    const result = threadList.filter((thread) => thread.id === threadId);
    //👇🏻 gets the likes property
    const threadLikes = result[0].likes;
    //👇🏻 authenticates the reaction
    const authenticateReaction = threadLikes.filter((user) => user === userId);
    //👇🏻 adds the users to the likes array
    if (authenticateReaction.length === 0) {
        threadLikes.push(userId);
        return res.json({
            message: "You've reacted to the post!",
        });
    }
    //👇🏻 Returns an error user has reacted to the post earlier
    res.json({
        error_message: "You can only react once!",
    });
});
- 从上面的代码片段来看:
- 该路由从 React.js 应用程序接受帖子 ID 和用户 ID,并搜索收到反应的帖子。
- 然后,在将用户添加到喜欢数组之前验证反应。
更新以便每当用户对帖子做出反应时handleLikeFunction向端点发送 POST 请求。api/thread/like
const handleLikeFunction = () => {
    fetch("http://localhost:4000/api/thread/like", {
        method: "POST",
        body: JSON.stringify({
            threadId,
            userId: localStorage.getItem("_id"),
        }),
        headers: {
            "Content-Type": "application/json",
        },
    })
        .then((res) => res.json())
        .then((data) => {
            if (data.error_message) {
                alert(data.error_message);
            } else {
                alert(data.message);
            }
        })
        .catch((err) => console.error(err));
};
显示每篇帖子的回复
在这里,我将指导您在 React 应用程序中显示每个帖子的回复。
在服务器上添加一个 POST 路由,该路由从前端接受帖子 ID,并返回标题和该帖子下的所有回复。
app.post("/api/thread/replies", (req, res) => {
    //👇🏻 The post ID
    const { id } = req.body;
    //👇🏻 searches for the post
    const result = threadList.filter((thread) => thread.id === id);
    //👇🏻 return the title and replies
    res.json({
        replies: result[0].replies,
        title: result[0].title,
    });
});
接下来,更新回复组件以向服务器上的端点发送请求api/thread/replies,并在页面加载时显示标题和回复。
import React, { useEffect, useState } from "react";
import { useParams, useNavigate } from "react-router-dom";

const Replies = () => {
    const [replyList, setReplyList] = useState([]);
    const [reply, setReply] = useState("");
    const [title, setTitle] = useState("");
    const navigate = useNavigate();
    const { id } = useParams();

    useEffect(() => {
        const fetchReplies = () => {
            fetch("http://localhost:4000/api/thread/replies", {
                method: "POST",
                body: JSON.stringify({
                    id,
                }),
                headers: {
                    "Content-Type": "application/json",
                },
            })
                .then((res) => res.json())
                .then((data) => {
                    setReplyList(data.replies);
                    setTitle(data.title);
                })
                .catch((err) => console.error(err));
        };
        fetchReplies();
    }, [id]);

    //👇🏻 This function when triggered when we add a new reply
    const handleSubmitReply = (e) => {
        e.preventDefault();
        console.log({ reply });
        setReply("");
    };
    return <main className='replies'>{/*--UI elements--*/}</main>;
};
- 从上面的代码片段来看:
- 该
useEffect钩子向服务器的端点发送请求并检索帖子标题及其回复。 - 和状态分别包含标题和答复
title。replyList - 该变量
id保存通过 React Router 中的动态路由从 URL 检索的帖子 ID。
- 该
按照以下方式显示每篇帖子的回复:
return (
    <main className='replies'>
        <h1 className='repliesTitle'>{title}</h1>

        <form className='modal__content' onSubmit={handleSubmitReply}>
            <label htmlFor='reply'>Reply to the thread</label>
            <textarea
                rows={5}
                value={reply}
                onChange={(e) => setReply(e.target.value)}
                type='text'
                name='reply'
                className='modalInput'
            />

            <button className='modalBtn'>SEND</button>
        </form>

        <div className='thread__container'>
            {replyList.map((reply) => (
                <div className='thread__item'>
                    <p>{reply.text}</p>
                    <div className='react__container'>
                        <p style={{ opacity: "0.5" }}>by {reply.name}</p>
                    </div>
                </div>
            ))}
        </div>
    </main>
);
上面的代码片段显示了回复组件的布局,其中显示了帖子标题、回复和用于回复帖子的表单字段。
创建帖子回复功能
在服务器上创建一个端点,允许用户添加新的回复,如下所示:
app.post("/api/create/reply", async (req, res) => {
    //👇🏻 accepts the post id, user id, and reply
    const { id, userId, reply } = req.body;
    //👇🏻 search for the exact post that was replied to
    const result = threadList.filter((thread) => thread.id === id);
    //👇🏻 search for the user via its id
    const user = users.filter((user) => user.id === userId);
    //👇🏻 saves the user name and reply
    result[0].replies.unshift({
        userId: user[0].id,
        name: user[0].username,
        text: reply,
    });

    res.json({
        message: "Response added successfully!",
    });
});
上面的代码片段从 React 应用程序接受帖子 ID、用户 ID 和回复,通过其 ID 搜索帖子,并将用户的 ID、用户名和回复添加到帖子回复中。
创建一个向端点发送请求的函数/api/create/reply。
const addReply = () => {
    fetch("http://localhost:4000/api/create/reply", {
        method: "POST",
        body: JSON.stringify({
            id,
            userId: localStorage.getItem("_id"),
            reply,
        }),
        headers: {
            "Content-Type": "application/json",
        },
    })
        .then((res) => res.json())
        .then((data) => {
            alert(data.message);
            navigate("/dashboard");
        })
        .catch((err) => console.error(err));
};

const handleSubmitReply = (e) => {
    e.preventDefault();
    //👇🏻 calls the function
    addReply();
    setReply("");
};
恭喜你完成了这么多!在接下来的部分中,你将学习如何使用 Novu 提供的 Topics API 向多个用户发送通知。
如何通过 Novu 中的 Topic API 发送通知
在本节中,我们将使用Novu Topic API同时向多个用户发送通知。为此,该 API 允许我们创建一个唯一的主题,为该主题分配订阅者,并一次性向订阅者发送批量通知。
设置您的 Novu 管理面板
导航到客户端文件夹并通过运行以下代码创建一个 Novu 项目。
cd client
npx novu init
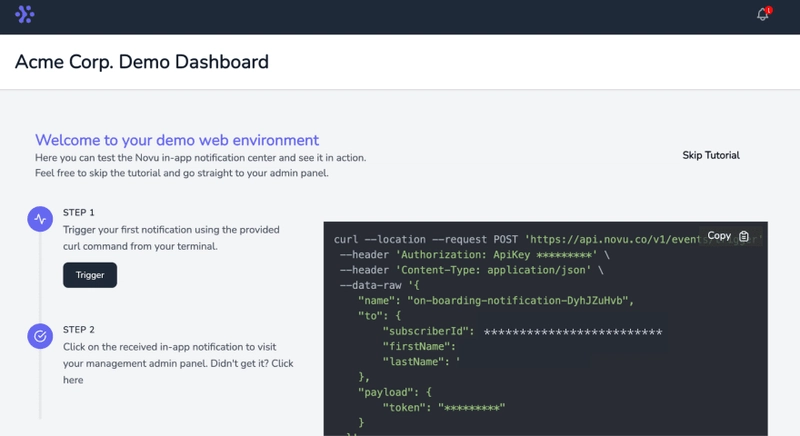
选择您的应用程序名称并登录 Novu。以下代码片段包含运行后应遵循的步骤npx novu init。
Now let's setup your account and send your first notification
? What is your application name? Forum App
? Now lets setup your environment. How would you like to proceed? Create a free cloud account (Recommended)
? Create your account with: Sign-in with GitHub
? I accept the Terms and Conditions (https://novu.co/terms) and have read the Privacy Policy (https://novu.co/privacy) Yes
✔ Created your account successfully.

  We've created a demo web page for you to see novu notifications in action.
  Visit: http://localhost:51422/demo to continue
访问演示页面,从页面复制您的订阅者 ID,然后单击“跳过教程”按钮。
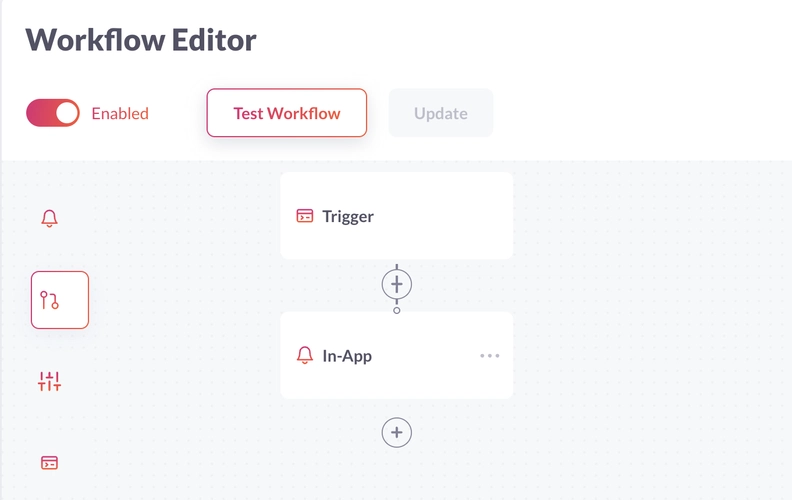
创建一个具有如下所示的工作流程的通知模板:
更新应用内通知模板,当有新回复时将此消息发送给帖子创建者。
Someone just dropped a reply to the thread!
在您的 React 项目中安装 Novu 通知包。
npm install @novu/notification-center
components/Nav.js根据其 文档更新文件以包含 Novu 通知铃。
import React from "react";
import {
    NovuProvider,
    PopoverNotificationCenter,
    NotificationBell,
} from "@novu/notification-center";
import { useNavigate } from "react-router-dom";

const Nav = () => {
    const navigate = useNavigate();

    const onNotificationClick = (notification) =>
        navigate(notification.cta.data.url);

    const signOut = () => {
        localStorage.removeItem("_id");
        navigate("/");
    };
    return (
        <nav className='navbar'>
            <h2>Threadify</h2>

            <div className='navbarRight'>
                <NovuProvider
                    subscriberId='<YOUR_SUBSCRIBER_ID>'
                    applicationIdentifier='<YOUR_APP_ID>'
                >
                    <PopoverNotificationCenter
                        onNotificationClick={onNotificationClick}
                        colorScheme='light'
                    >
                        {({ unseenCount }) => (
                            <NotificationBell unseenCount={unseenCount} />
                        )}
                    </PopoverNotificationCenter>
                </NovuProvider>

                <button onClick={signOut}>Sign out</button>
            </div>
        </nav>
    );
};
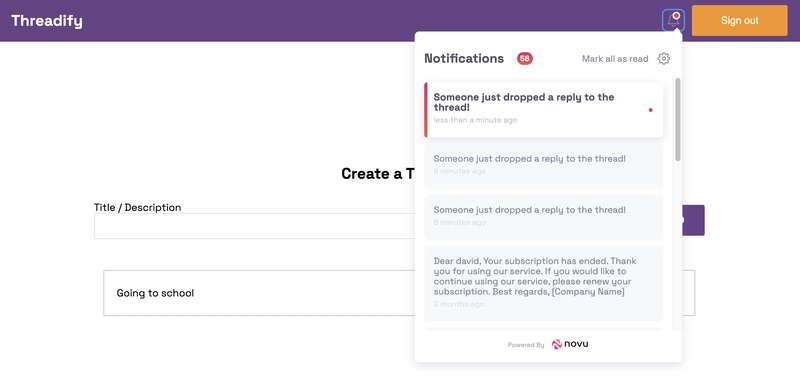
上面的代码片段将 Novu 的通知铃铛图标添加到 Nav 组件,使我们能够查看应用中的所有通知。请将“订阅者 ID”变量替换为您的 ID。
在 Novu 管理面板上选择“设置”,然后复制您的 App ID 和 API 密钥。确保将 App ID 添加到Nav.js文件中的变量中。
在服务器上配置 Novu
将 Novu SDK for Node.js 安装到服务器文件夹中。
npm install @novu/node
从软件包中导入 Novu,并使用您的 API 密钥创建实例。将 API 密钥变量替换为您之前复制的 API 密钥。
const { Novu } = require("@novu/node");
const novu = new Novu("<YOUR_API_KEY>");
通过 Novu Topic API 发送通知
首先,您需要在用户登录应用程序时将其添加为订阅者。因此,请更新/api/register路由以将用户添加为 Novu 订阅者。
app.post("/api/register", async (req, res) => {
    const { email, password, username } = req.body;
    const id = generateID();
    const result = users.filter(
        (user) => user.email === email && user.password === password
    );

    if (result.length === 0) {
        const newUser = { id, email, password, username };
        //👇🏻 add the user as a subscriber
        await novu.subscribers.identify(id, { email: email });

        users.push(newUser);
        return res.json({
            message: "Account created successfully!",
        });
    }
    res.json({
        error_message: "User already exists",
    });
});
上面的代码片段通过用户的电子邮件和 ID 创建了一个 Novu 订阅者。
接下来,将每个新帖子添加为 Novu 主题,并将用户添加为该主题的订阅者。
app.post("/api/create/thread", async (req, res) => {
    const { thread, userId } = req.body;
    let threadId = generateID();
    threadList.unshift({
        id: threadId,
        title: thread,
        userId,
        replies: [],
        likes: [],
    });
//👇🏻 creates a new topic from the post
    await novu.topics.create({
        key: threadId,
        name: thread,
    });
//👇🏻 add the user as a subscriber
    await novu.topics.addSubscribers(threadId, {
        subscribers: [userId],
        //replace with your subscriber ID to test run
        // subscribers: ["<YOUR_SUBSCRIBER_ID>"],
    });

    res.json({
        message: "Thread created successfully!",
        threads: threadList,
    });
});
最后,当线程上有新的回复时,向订阅者发送通知
app.post("/api/create/reply", async (req, res) => {
    const { id, userId, reply } = req.body;
    const result = threadList.filter((thread) => thread.id === id);
    const user = users.filter((user) => user.id === userId);
    result[0].replies.unshift({ name: user[0].username, text: reply });
//👇🏻 Triggers the function when there is a new reply
    await novu.trigger("topicnotification", {
        to: [{ type: "Topic", topicKey: id }],
    });

    res.json({
        message: "Response added successfully!",
    });
});
恭喜!🎉您已完成本教程的项目。
结论
到目前为止,您已经学习了如何验证用户身份、在 React 和 Node.js 应用程序之间进行通信以及如何使用 Novu Topic API 发送批量通知。
Novu 是一个开源通知基础架构,可让您从单个仪表板发送短信、聊天、推送和电子邮件通知。Topic API 只是 Novu 提供的众多精彩功能之一;欢迎点击 此处了解更多信息。
本教程的源代码可以在这里找到:
https://github.com/novuhq/blog/tree/main/forum-system-with-react-novu-node
感谢您的阅读!
文章来源:https://dev.to/novu/building-a-forum-with-react-nodejs-6pe 后端开发教程 - Java、Spring Boot 实战 - msg200.com

