使用 LangGraph、CopilotKit、Tavily 和 Next.js 构建 Perplexity 的克隆版 🪄
人工智能应用正在不断发展,不再仅仅局限于执行任务的自主代理。一种新的“人机协同”方法允许用户提供反馈、审查结果并决定人工智能的下一步行动。这些运行时代理被称为“协同代理”。
TL;DR
在本教程中,您将学习如何使用LangGraph、CopilotKit和Tavily构建 Perplexity 克隆。
开始建造吧!
什么是 Agentic Copilot?
Agentic copilots 是 CopilotKit 将 LangGraph 代理带入您的应用程序的方式。
CoAgents是 CopilotKit 构建代理体验的方法!
简而言之,它将通过执行多个搜索查询来处理用户请求,并将搜索状态和结果实时传输回客户端。
先决条件
要完全理解本教程,您需要对 React 或 Next.js 有基本的了解。
我们还将利用以下内容:
- Python——一种使用 LangGraph 构建 AI 代理的流行编程语言;确保它已安装在您的计算机上。
- LangGraph - 用于创建和部署 AI 代理的框架。它还有助于定义代理要执行的控制流和操作。
- OpenAI API 密钥- 使我们能够使用 GPT 模型执行各种任务;对于本教程,请确保您可以访问 GPT-4 模型。
- Tavily AI——一种搜索引擎,使人工智能代理能够在应用程序内进行研究并访问实时知识。
- CopilotKit - 一个开源副驾驶框架,用于构建自定义 AI 聊天机器人、应用内 AI 代理和文本区域。
- Shad Cn UI - 在应用程序内提供可重复使用的 UI 组件集合。
如何使用 LangGraph 和 CopilotKit 创建 AI 代理
在本节中,您将学习如何使用 LangGraph 和 CopilotKit 创建 AI 代理。
首先,克隆CopilotKit CoAgents 入门存储库。该ui目录包含 Next.js 应用程序的前端,而该agent目录包含该应用程序的 CoAgent。
在目录内,使用Poetryagent安装项目依赖项。
cd agent
poetry install
.env在代理文件夹中创建一个文件,并将您的OpenAI和Tavily AI API 密钥复制到该文件中:
OPENAI_API_KEY=
TAVILY_API_KEY=

将下面的代码片段复制到agent.py文件中:
"""
This is the main entry point for the AI.
It defines the workflow graph and the entry point for the agent.
"""
# pylint: disable=line-too-long, unused-import
from langgraph.graph import StateGraph, END
from langgraph.checkpoint.memory import MemorySaver

from ai_researcher.state import AgentState
from ai_researcher.steps import steps_node
from ai_researcher.search import search_node
from ai_researcher.summarize import summarize_node
from ai_researcher.extract import extract_node

def route(state):
    """Route to research nodes."""
    if not state.get("steps", None):
        return END

    current_step = next((step for step in state["steps"] if step["status"] == "pending"), None)

    if not current_step:
        return "summarize_node"

    if current_step["type"] == "search":
        return "search_node"

    raise ValueError(f"Unknown step type: {current_step['type']}")

# Define a new graph
workflow = StateGraph(AgentState)
workflow.add_node("steps_node", steps_node)
workflow.add_node("search_node", search_node)
workflow.add_node("summarize_node", summarize_node)
workflow.add_node("extract_node", extract_node)
# Chatbot
workflow.set_entry_point("steps_node")

workflow.add_conditional_edges(
    "steps_node",
    route,
    ["summarize_node", "search_node", END]
)

workflow.add_edge("search_node", "extract_node")

workflow.add_conditional_edges(
    "extract_node",
    route,
    ["summarize_node", "search_node"]
)

workflow.add_edge("summarize_node", END)

memory = MemorySaver()
graph = workflow.compile(checkpointer=memory)
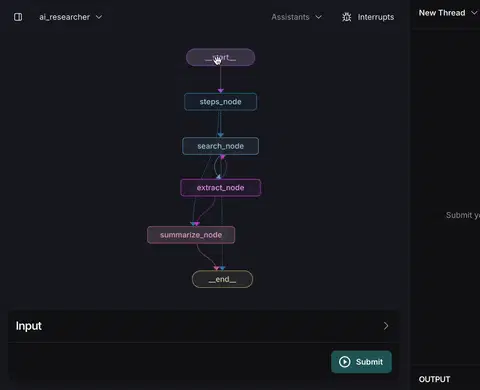
上面的代码片段定义了 LangGraph 代理的工作流程。它从 开始steps_node,搜索结果,汇总结果,并提取关键点。
接下来创建一个demo.py包含以下代码片段的文件:
"""Demo"""

import os
from dotenv import load_dotenv
load_dotenv()

from fastapi import FastAPI
import uvicorn
from copilotkit.integrations.fastapi import add_fastapi_endpoint
from copilotkit import CopilotKitSDK, LangGraphAgent
from ai_researcher.agent import graph

app = FastAPI()
sdk = CopilotKitSDK(
    agents=[
        LangGraphAgent(
            name="ai_researcher",
            description="Search agent.",
            graph=graph,
        )
    ],
)

add_fastapi_endpoint(app, sdk, "/copilotkit")

# add new route for health check
@app.get("/health")
def health():
    """Health check."""
    return {"status": "ok"}

def main():
    """Run the uvicorn server."""
    port = int(os.getenv("PORT", "8000"))
    uvicorn.run("ai_researcher.demo:app", host="0.0.0.0", port=port, reload=True)
上面的代码创建了一个 FastAPI 端点,它托管 LangGraph 代理并将其连接到 CopilotKit SDK。
您可以从GitHub 存储库复制用于创建 CoAgent 的剩余代码。在以下部分中,您将学习如何为 Perplexity 克隆版本构建用户界面,以及如何使用 CopilotKit 处理搜索请求。
使用 Next.js 构建应用程序界面
在本节中,我将引导您完成构建应用程序用户界面的过程。
首先,通过运行以下代码片段创建一个 Next.js Typescript 项目:
# 👉🏻 Navigate into the ui folder
npx create-next-app ./

通过运行以下代码片段将ShadCn UI库安装到新创建的项目中:
npx shadcn@latest init
components接下来,在 Next.js 项目的根目录创建一个文件夹,然后将此uiGitHub 存储库中的文件夹复制到该文件夹中。Shadcn 允许您通过命令行安装各种组件,从而轻松地将它们添加到应用程序中。
除了 Shadcn 组件之外,您还需要创建一些代表应用程序界面不同部分的组件。在components文件夹中运行以下代码片段,将这些组件添加到 Next.js 项目中:
touch ResearchWrapper.tsx ResultsView.tsx HomeView.tsx
touch AnswerMarkdown.tsx Progress.tsx SkeletonLoader.tsx
将下面的代码片段复制到app/page.tsx文件中:
"use client";

import { ResearchWrapper } from "@/components/ResearchWrapper";
import { ModelSelectorProvider, useModelSelectorContext } from "@/lib/model-selector-provider";
import { ResearchProvider } from "@/lib/research-provider";
import { CopilotKit } from "@copilotkit/react-core";
import "@copilotkit/react-ui/styles.css";

export default function ModelSelectorWrapper() {

  return (
      <CopilotKit runtimeUrl={useLgc ? "/api/copilotkit-lgc" : "/api/copilotkit"} agent="ai_researcher">
        <ResearchProvider>
          <ResearchWrapper />
        </ResearchProvider>
      </CopilotKit>
  );
}
上面的代码片段中,ResearchProvider有一个自定义的 React 上下文提供程序,它共享用户的搜索查询和结果,使应用程序内的所有组件都可以访问它们。该ResearchWrapper组件包含核心应用程序元素并管理 UI。
在 Next.js 项目的根目录创建一个lib包含research-provider.tsx文件的文件夹,并将以下代码复制到该文件中:
import { createContext, useContext, useState, ReactNode, useEffect } from "react";

type ResearchContextType = {
  researchQuery: string;
  setResearchQuery: (query: string) => void;
  researchInput: string;
  setResearchInput: (input: string) => void;
  isLoading: boolean;
  setIsLoading: (loading: boolean) => void;
  researchResult: ResearchResult | null;
  setResearchResult: (result: ResearchResult) => void;
};

type ResearchResult = {
  answer: string;
  sources: string[];
}

const ResearchContext = createContext<ResearchContextType | undefined>(undefined);

export const ResearchProvider = ({ children }: { children: ReactNode }) => {
  const [researchQuery, setResearchQuery] = useState<string>("");
  const [researchInput, setResearchInput] = useState<string>("");
  const [researchResult, setResearchResult] = useState<ResearchResult | null>(null);
  const [isLoading, setIsLoading] = useState<boolean>(false);

  useEffect(() => {
    if (!researchQuery) {
      setResearchResult(null);
      setResearchInput("");
    }
  }, [researchQuery, researchResult]);

  return (
    <ResearchContext.Provider
      value={{
        researchQuery,
        setResearchQuery,
        researchInput,
        setResearchInput,
        isLoading,
        setIsLoading,
        researchResult,
        setResearchResult,
      }}
    >
      {children}
    </ResearchContext.Provider>
  );
};

export const useResearchContext = () => {
  const context = useContext(ResearchContext);
  if (context === undefined) {
    throw new Error("useResearchContext must be used within a ResearchProvider");
  }
  return context;
};
声明并保存状态以ResearchContext确保它们在应用程序内的多个组件之间得到正确管理。
创建一个ResearchWrapper组件,如下所示:
import { HomeView } from "./HomeView";
import { ResultsView } from "./ResultsView";
import { AnimatePresence } from "framer-motion";
import { useResearchContext } from "@/lib/research-provider";

export function ResearchWrapper() {
  const { researchQuery, setResearchInput } = useResearchContext();

  return (
    <>
      <div className="flex flex-col items-center justify-center relative z-10">
        <div className="flex-1">
          {researchQuery ? (
            <AnimatePresence
              key="results"
              onExitComplete={() => {
                setResearchInput("");
              }}
              mode="wait"
            >
              <ResultsView key="results" />
            </AnimatePresence>
          ) : (
            <AnimatePresence key="home" mode="wait">
              <HomeView key="home" />
            </AnimatePresence>
          )}
        </div>
        <footer className="text-xs p-2">
          <a
            href="https://copilotkit.ai"
            target="_blank"
            rel="noopener noreferrer"
            className="text-slate-600 font-medium hover:underline"
          >
            Powered by CopilotKit 🪁
          </a>
        </footer>
      </div>
    </>
  );
}
该ResearchWrapper组件将HomeView组件渲染为默认视图,并ResultView在提供搜索查询时显示。该useResearchContext钩子使我们能够访问researchQuery状态并相应地更新视图。
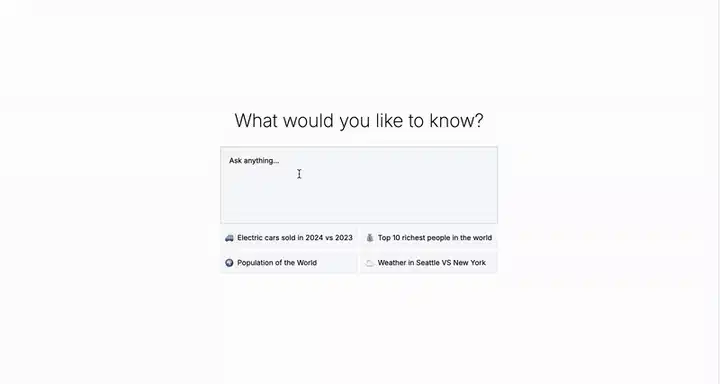
最后创建HomeView组件来渲染应用程序主页界面。
"use client";

import { useEffect, useState } from "react";
import { Textarea } from "./ui/textarea";
import { cn } from "@/lib/utils";
import { Button } from "./ui/button";
import { CornerDownLeftIcon } from "lucide-react";
import { useResearchContext } from "@/lib/research-provider";
import { motion } from "framer-motion";
import { useCoAgent } from "@copilotkit/react-core";
import { TextMessage, MessageRole } from "@copilotkit/runtime-client-gql";
import type { AgentState } from "../lib/types";
import { useModelSelectorContext } from "@/lib/model-selector-provider";

const MAX_INPUT_LENGTH = 250;

export function HomeView() {
  const { setResearchQuery, researchInput, setResearchInput } =
    useResearchContext();
  const { model } = useModelSelectorContext();
  const [isInputFocused, setIsInputFocused] = useState(false);
  const {
    run: runResearchAgent,
  } = useCoAgent<AgentState>({
    name: "ai_researcher",
    initialState: {
      model,
    },
  });

  const handleResearch = (query: string) => {
    setResearchQuery(query);
    runResearchAgent(() => {
      return new TextMessage({
        role: MessageRole.User,
        content: query,
      });
    });
  };

  const suggestions = [
    { label: "Electric cars sold in 2024 vs 2023", icon: "🚙" },
    { label: "Top 10 richest people in the world", icon: "💰" },
    { label: "Population of the World", icon: "🌍 " },
    { label: "Weather in Seattle VS New York", icon: "⛅️" },
  ];

  return (
    <motion.div
      initial={{ opacity: 0, y: -50 }}
      animate={{ opacity: 1, y: 0 }}
      exit={{ opacity: 0 }}
      transition={{ duration: 0.4 }}
      className="h-screen w-full flex flex-col gap-y-2 justify-center items-center p-4 lg:p-0"
    >
      <h1 className="text-4xl font-extralight mb-6">
        What would you like to know?
      </h1>

      <div
        className={cn(
          "w-full bg-slate-100/50 border shadow-sm rounded-md transition-all",
          {
            "ring-1 ring-slate-300": isInputFocused,
          }
        )}
      >
        <Textarea
          placeholder="Ask anything..."
          className="bg-transparent p-4 resize-none focus-visible:ring-0 focus-visible:ring-offset-0 border-0 w-full"
          onFocus={() => setIsInputFocused(true)}
          onBlur={() => setIsInputFocused(false)}
          value={researchInput}
          onChange={(e) => setResearchInput(e.target.value)}
          onKeyDown={(e) => {
            if (e.key === "Enter" && !e.shiftKey) {
              e.preventDefault();
              handleResearch(researchInput);
            }
          }}
          maxLength={MAX_INPUT_LENGTH}
        />
        <div className="text-xs p-4 flex items-center justify-between">
          <div
            className={cn("transition-all duration-300 mt-4 text-slate-500", {
              "opacity-0": !researchInput,
              "opacity-100": researchInput,
            })}
          >
            {researchInput.length} / {MAX_INPUT_LENGTH}
          </div>
          <Button
            size="sm"
            className={cn("rounded-full transition-all duration-300", {
              "opacity-0 pointer-events-none": !researchInput,
              "opacity-100": researchInput,
            })}
            onClick={() => handleResearch(researchInput)}
          >
            Research
            <CornerDownLeftIcon className="w-4 h-4 ml-2" />
          </Button>
        </div>
      </div>
      <div className="grid grid-cols-2 w-full gap-2 text-sm">
        {suggestions.map((suggestion) => (
          <div
            key={suggestion.label}
            onClick={() => handleResearch(suggestion.label)}
            className="p-2 bg-slate-100/50 rounded-md border col-span-2 lg:col-span-1 flex cursor-pointer items-center space-x-2 hover:bg-slate-100 transition-all duration-300"
          >
            <span className="text-base">{suggestion.icon}</span>
            <span className="flex-1">{suggestion.label}</span>
          </div>
        ))}
      </div>
    </motion.div>
  );
}

如何将 CoAgent 连接到 Next.js 应用程序
在本节中,您将学习如何将 CopilotKit CoAgent 连接到您的 Next.js 应用程序,以允许用户在应用程序内执行搜索操作。
安装以下 CopilotKit 软件包和OpenAI Node.js SDK。CopilotKit 软件包允许协同代理与 React 状态值交互并在应用程序内做出决策。
npm install @copilotkit/react-core @copilotkit/react-ui @copilotkit/runtime @copilotkit/runtime-client-gql openai
api在 Next.js 文件夹中创建一个文件夹app。在该api文件夹中,创建一个copilotkit包含文件的目录route.ts。这将创建一个 API 端点 ( /api/copilotkit),用于将前端应用程序连接到 CopilotKit CoAgent。
cd app
mkdir api && cd api
mkdir copilotkit && cd copilotkit
touch route.ts
将下面的代码片段复制到api/copilotkit/route.ts文件中:
import { NextRequest } from "next/server";
import {
  CopilotRuntime,
  OpenAIAdapter,
  copilotRuntimeNextJSAppRouterEndpoint,
} from "@copilotkit/runtime";
import OpenAI from "openai";

//👇🏻 initializes OpenAI as the adapter
const openai = new OpenAI();
const serviceAdapter = new OpenAIAdapter({ openai } as any);

//👇🏻 connects the CopilotKit runtime to the CoAgent
const runtime = new CopilotRuntime({
  remoteEndpoints: [
    {
      url: process.env.REMOTE_ACTION_URL || "http://localhost:8000/copilotkit",
    },
  ],
});

export const POST = async (req: NextRequest) => {
  const { handleRequest } = copilotRuntimeNextJSAppRouterEndpoint({
    runtime,
    serviceAdapter,
    endpoint: "/api/copilotkit",
  });

  return handleRequest(req);
};
上面的代码片段在 API 端点设置了 CopilotKit 运行时/api/copilotkit,允许 CopilotKit 通过 AI 协同代理处理用户请求。
最后,通过使用CopilotKit 组件app/page.tsx包装整个应用程序来更新,该组件为所有应用程序组件提供副驾驶上下文。
"use client";

import { ModelSelector } from "@/components/ModelSelector";
import { ResearchWrapper } from "@/components/ResearchWrapper";
import { ModelSelectorProvider, useModelSelectorContext } from "@/lib/model-selector-provider";
import { ResearchProvider } from "@/lib/research-provider";
import { CopilotKit } from "@copilotkit/react-core";
import "@copilotkit/react-ui/styles.css";

export default function ModelSelectorWrapper() {
  return (
      <main className="flex flex-col items-center justify-between">
        <ModelSelectorProvider>
            <Home/>
          <ModelSelector />
        </ModelSelectorProvider>
      </main>
  );
}

function Home() {
  const { useLgc } = useModelSelectorContext();

  return (
      <CopilotKit runtimeUrl={useLgc ? "/api/copilotkit-lgc" : "/api/copilotkit"} agent="ai_researcher">
        <ResearchProvider>
          <ResearchWrapper />
        </ResearchProvider>
      </CopilotKit>
  );
}
CopilotKit 组件包装了整个应用程序,并接受两个 props -runtimeUrl和agent。runtimeUrl是托管 AI 代理的后端 API 路由,agent是执行操作的代理的名称。
接受请求并将响应流式传输到前端
为了使 CopilotKit 能够访问和处理用户输入,它提供了useCoAgent钩子,允许从应用程序内的任何位置访问代理的状态。
例如,下面的代码片段演示了如何使用useCoAgent钩子。state变量允许访问代理的当前状态,setState用于修改状态,run函数使用代理执行指令。start和stop函数用于启动和停止代理的执行。
const { state, setState, run, start, stop } = useCoAgent({
    name: "search_agent",
});
HomeView当提供搜索查询时更新组件以执行代理。
//👇🏻 import useCoAgent hook from CopilotKit
import { useCoAgent } from "@copilotkit/react-core";

const { run: runResearchAgent } = useCoAgent({
    name: "search_agent",
});

const handleResearch = (query: string) => {
    setResearchQuery(query);
    runResearchAgent(query); //👉🏻 starts the agent execution
};
ResultsView接下来,您可以通过访问钩子中的状态变量将搜索结果流式传输到组件useCoAgent。将下面的代码片段复制到ResultsView组件中。
"use client";

import { useResearchContext } from "@/lib/research-provider";
import { motion } from "framer-motion";
import { BookOpenIcon, LoaderCircleIcon, SparkleIcon } from "lucide-react";
import { SkeletonLoader } from "./SkeletonLoader";
import { useCoAgent } from "@copilotkit/react-core";
import { Progress } from "./Progress";
import { AnswerMarkdown } from "./AnswerMarkdown";

export function ResultsView() {
    const { researchQuery } = useResearchContext();
    //👇🏻 agent state
    const { state: agentState } = useCoAgent({
        name: "search_agent",
    });

    console.log("AGENT_STATE", agentState);

    //👇🏻 keeps track of the current agent processing state
    const steps =
        agentState?.steps?.map((step: any) => {
            return {
                description: step.description || "",
                status: step.status || "pending",
                updates: step.updates || [],
            };
        }) || [];

    const isLoading = !agentState?.answer?.markdown;

    return (
        <motion.div
            initial={{ opacity: 0, y: -50 }}
            animate={{ opacity: 1, y: 0 }}
            exit={{ opacity: 0, y: -50 }}
            transition={{ duration: 0.5, ease: "easeOut" }}
        >
            <div className='max-w-[1000px] p-8 lg:p-4 flex flex-col gap-y-8 mt-4 lg:mt-6 text-sm lg:text-base'>
                <div className='space-y-4'>
                    <h1 className='text-3xl lg:text-4xl font-extralight'>
                        {researchQuery}
                    </h1>
                </div>

                <Progress steps={steps} />

                <div className='grid grid-cols-12 gap-8'>
                    <div className='col-span-12 lg:col-span-8 flex flex-col'>
                        <h2 className='flex items-center gap-x-2'>
                            {isLoading ? (
                                <LoaderCircleIcon className='animate-spin w-4 h-4 text-slate-500' />
                            ) : (
                                <SparkleIcon className='w-4 h-4 text-slate-500' />
                            )}
                            Answer
                        </h2>

                        <div className='text-slate-500 font-light'>
                            {isLoading ? (
                                <SkeletonLoader />
                            ) : (
                                <AnswerMarkdown markdown={agentState?.answer?.markdown} /> //👈🏼 displays search results
                            )}
                        </div>
                    </div>

                    {agentState?.answer?.references?.length && (
                        <div className='flex col-span-12 lg:col-span-4 flex-col gap-y-4 w-[200px]'>
                            <h2 className='flex items-center gap-x-2'>
                                <BookOpenIcon className='w-4 h-4 text-slate-500' />
                                References
                            </h2>
                            <ul className='text-slate-900 font-light text-sm flex flex-col gap-y-2'>
                                {agentState?.answer?.references?.map(
                                    (ref: any, idx: number) => (
                                        <li key={idx}>
                                            <a
                                                href={ref.url}
                                                target='_blank'
                                                rel='noopener noreferrer'
                                            >
                                                {idx + 1}. {ref.title}
                                            </a>
                                        </li>
                                    )
                                )}
                            </ul>
                        </div>
                    )}
                </div>
            </div>
        </motion.div>
    );
}
上面的代码片段从代理的状态中检索搜索结果,并使用useCoAgent钩子将其流式传输到前端。搜索结果以 Markdown 格式返回并传递到AnswerMarkdown组件,该组件负责在页面上渲染内容。
最后,将下面的代码片段复制到组件中。这将使用React Markdown 库AnswerMarkdown将 Markdown 内容渲染为格式化文本。
import Markdown from "react-markdown";

export function AnswerMarkdown({ markdown }: { markdown: string }) {
    return (
        <div className='markdown-wrapper'>
            <Markdown>{markdown}</Markdown>
        </div>
    );
}
恭喜!您已完成本教程的项目。您也可以在此处观看视频录像:
总结
LLM 智能与人类智能协同工作时最为有效,而CopilotKit CoAgents可让您在短短几分钟内将 AI 代理、副驾驶和各种类型的助手集成到您的软件应用程序中。
如果您需要构建 AI 产品或将 AI 代理集成到您的应用程序中,您应该考虑 CopilotKit。
本教程的源代码可在 GitHub 上找到:
https://github.com/CopilotKit/CopilotKit/tree/main/examples/coagents-ai-researcher
感谢您的阅读!
文章来源:https://dev.to/copilotkit/build-a-clone-of-perplexity-with-langgraph-copilotkit-tavily-nextjs-23j2