使用 Anthropic、Pinecone 和 CopilotKit 构建您自己的 RAG Copilot
TL;DR
在本教程中,我们将指导您使用Anthropic AI API、Pinecone API和CopilotKit 🪁为您的产品知识库逐步构建由 AI 驱动的 RAG Copilot 。
以下是我们将要介绍的内容:
- 使用 Next.js 构建简单的产品知识库
- 将 CopilotKit UI 组件与 CopilotKit 的 API 端点一起添加到您的应用程序客户端。
- 集成 Pinecone API 为您的知识库文章创建可搜索的索引。
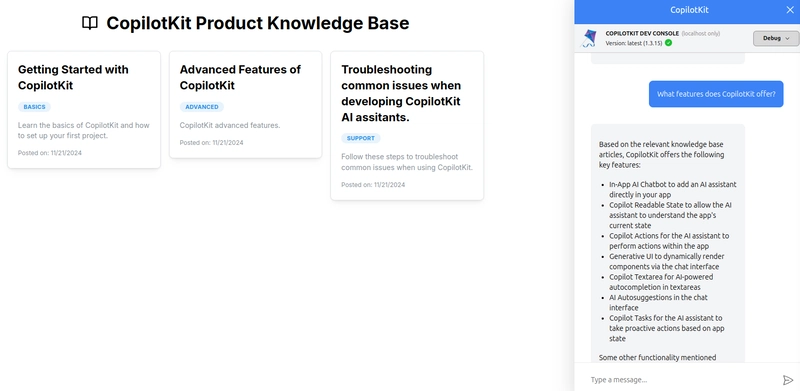
最终结果是使用 CopilotKit 实现功能齐全的 RAG 知识库应用程序:
CopilotKit 是什么
CopilotKit 是领先的开源框架,用于将可投入生产的 AI 驱动的副驾驶集成到您的应用程序中。它提供了功能丰富的 SDK,支持各种 AI 副驾驶用例,包括情境感知、副驾驶操作和生成式 UI。
这意味着您可以专注于定义副驾驶的角色,而不是陷入从头开始构建或处理复杂集成的技术问题。
先决条件
在我们开始之前,您需要准备以下几样东西:
- 熟悉使用 React.js构建 Web 应用。需要注意的是,你还需要掌握一些 TypeScript 知识,因为我们会在这个项目中用到它。
- 确保你的系统上安装了 Node.js >20。如果没有,你可以从Node.js 官方网站下载并安装 。
一旦你了解了这些,我们将设置我们将要工作的开发环境。
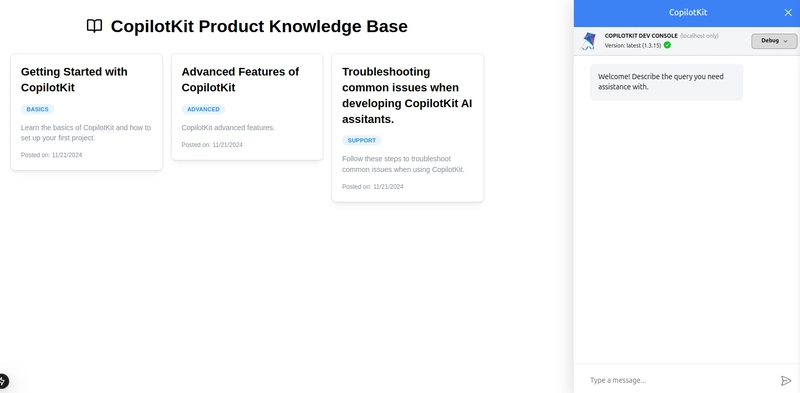
以下是我们将要构建的内容的快速预览:
设置项目
首先,运行以下命令为项目创建一个新目录,并搭建 Next.js 应用程序样板源文件和文件夹:
mkdir product-knowledge-base && cd product-knowledge-base
npx create-next-app product-knowledge-base
按照设置提示进行操作。您可以按如下所示进行选择(根据项目需求进行调整)。
创建项目后,导航到项目目录,并通过运行开发服务器验证一切正常:
cd product-knowledge-base
npm run dev
在此阶段,您的应用程序应该在本地运行http://localhost:3000。
接下来,让我们安装该项目所需的依赖项。这些包括:
- Mantine 用户界面。
- CopilotKit 包。
- 松果 SDK。
- 人类学 AI SDK。
- Axios。
运行以下命令来安装它们:
yarn add @anthropic-ai/sdk @mantine/core @mantine/hooks @copilotkit/react-core @copilotkit/react-ui @copilotkit/runtime lucide-react axios @pinecone-database/pinecone
现在,让我们设置项目的文件结构。以下是我们将要创建的主要文件和目录的概述:
src/app/ui/service/index.ts:处理后端的 API 调用以获取虚拟帖子。src/app/ui/components/KnowledgeBase.tsx:知识库的主要 UI 组件。src/app/lib/types/post.ts:src/app/lib/data/data.ts:知识库的虚拟帖子数据。src/app/api/copilotkit/route.ts:CopilotKit API 端点。src/app/api/posts/route.ts:虚拟帖子 API 端点。
您的项目结构如下所示:
product-knowledge-base/
├── src/
│   ├── app/
│   │   ├── ui/
│   │   │   ├── service/
│   │   │   │   └── index.ts
│   │   │   ├── components/
│   │   │   │   └── KnowledgeBase.tsx
│   │   ├── lib/
│   │   │   ├── types/
│   │   │   │   └── post.ts
│   │   │   ├── data/
│   │   │   │   └── data.ts
│   │   ├── api/
│   │   │   ├── copilotkit/
│   │   │   │   └── route.ts
│   │   │   ├── posts/
│   │   │   │   └── route.ts
通过此设置,您现在拥有了可用于本教程的开发环境。
构建知识库前端
首先,导入 CopilotKit 和 Mantine UI 提供程序,然后用它们封装您的整个应用,以便它们在全球范围内可用。以下是更新layout.tsx文件的方法:
import { MantineProvider } from "@mantine/core";

import "@mantine/core/styles.css";
import "@copilotkit/react-ui/styles.css";

import { CopilotKit } from "@copilotkit/react-core";

export default function RootLayout({
  children,
}: Readonly<{
  children: React.ReactNode;
}>) {
  return (
    <html lang="en">
      <body>
        <CopilotKit runtimeUrl="/api/copilotkit">
          <MantineProvider>{children}</MantineProvider>
        </CopilotKit>
      </body>
    </html>
  );
}
当使用这些提供程序包装应用程序时,请记住将 runtimeUrl="<endpoint-url>" prop 传递给 CopilotKit 提供程序。
设计知识库组件
在本节中,我们将介绍构建知识库组件所需的代码。首先定义 Post 接口。在 中添加以下代码src/app/lib/types/post.ts:
export interface Post {
  id: number;
  title: string;
  summary: string;
  content: string;
  category: string;
  createdAt: string;
}
接下来,导航到该 src/app/ui/service/index.ts 文件,并添加以下代码来处理从应用程序后端获取帖子的 API 请求:
import axios from 'axios';
import { Post } from '@/app/lib/types/post';

const API_BASE_URL = process.env.NEXT_PUBLIC_API_BASE_URL

export const fetchPosts = async (): Promise<Post[]> => {
  const response = await axios.get(`${API_BASE_URL}/api/posts`);
  return response.data;
};
让我们 .env 在项目的根目录中创建一个文件,并添加以下基本 URL。
NEXT_PUBLIC_API_BASE_URL='http://localhost:3000'
现在,让我们创建知识库 UI 组件。在组件内部src/app/ui/components/KnowledgeBase.tsx,首先添加以下导入:
"use client"

import { useState, useEffect } from "react";
import {
  Container,
  Title,
  Grid,
  Card,
  Text,
  Badge,
  Group,
  Stack,
  Box,
  Modal,
  List,
} from "@mantine/core";
import { BookOpen } from "lucide-react";
import { Post } from "@/app/lib/types/post";
import { fetchPosts } from "@/app/ui/service";
接下来,定义 KnowledgeBase 功能组件并初始化以下状态:
export function KnowledgeBase() {
  const [posts, setPosts] = useState<Post[]>([]);
  const [loading, setLoading] = useState(true);
  const [selectedPost, setSelectedPost] = useState<Post | null>(null);

  if (loading) {
    return <Text>Loading...</Text>;
  }

  return (
    <Container size="md" py="xl" ml="xl">
      <Stack gap="xl">
        <Group justify="center" align="center">
          <BookOpen size={32} />
          <Title order={1}>CopilotKit Product Knowledge Base</Title>
        </Group>
      </Stack>
    </Container>
  );
}
现在,让我们定义一个函数来从 API 中获取帖子列表:
useEffect(() => {
  const loadPosts = async () => {
    try {
      const data = await fetchPosts();
      setPosts(data);
    } catch (error) {
      console.error("Error loading posts:", error);
    } finally {
      setLoading(false);
    }
  };

  loadPosts();
}, []);
要显示从应用后端获取的帖子,请添加以下代码。我们将使用卡片以网格布局呈现帖子列表:
{/* Display posts */}
<Grid>
  {posts.map((post) => (
    <Grid.Col key={post.id} span={{ base: 12, sm: 6, md: 4 }}>
      <Card
        shadow="sm"
        padding="lg"
        radius="md"
        withBorder
        onClick={() => setSelectedPost(post)}
        style={{ cursor: "pointer" }}
      >
        <Stack gap="md">
          <Title order={3}>{post.title}</Title>
          <Badge color="blue" variant="light">
            {post.category}
          </Badge>
          <Text size="sm" c="dimmed">
            {post.summary}
          </Text>
          <Text size="xs" c="dimmed">
            Posted on: {new Date(post.createdAt).toLocaleDateString()}
          </Text>
        </Stack>
      </Card>
    </Grid.Col>
  ))}
</Grid>
为了显示单篇文章的内容,在本例中,我们将通过在点击文章卡片时在模态组件中显示虚拟内容来简化操作。为此,请添加以下代码:
{/* Modal for displaying selected post */}
{selectedPost && (
  <Modal
    opened={!!selectedPost}
    onClose={() => setSelectedPost(null)}
    title={selectedPost.title}
    centered
    size="xl"
  >
    <Stack gap="md">
      <List>
        {selectedPost.content
          .split("")
          .filter((item) => item.trim() !== "")
          .map((item, index) => (
            <List.Item key={index}>{item}</List.Item>
          ))}
      </List>
    </Stack>
  </Modal>
)}
接下来,定义以下函数,当用户点击帖子的卡片时更新所选的帖子状态。
  const handlePostClick = (post: Post) => {
    setSelectedPost(post);
  };
最后,要在浏览器中呈现此组件,请 src/app/page.tsx 使用以下代码将其导入文件中(确保删除所有样板 Next.js 代码):
import KnowledgeBase from "@/app/ui/components/KnowledgeBase";

export default function Home() {
  return (
    <div>
      <KnowledgeBase />
    </div>
  );
}
添加 CopilotKit UI 组件
下一步是将 CopilotKit UI 组件添加到知识库界面。CopilotKit 的 React SDK 提供了设计简洁且易于定制的 UI 组件。这些组件包括侧边栏、弹出窗口、文本区域和无头 UI 组件。在本例中,我们将使用 `CopilotSidebar`组件来渲染应用内聊天机器人界面。
要添加 CopilotKit 的 UI 侧边栏组件,请在您的中src/app/ui/components/KnowledgeBase.tsx添加以下导入:
import { CopilotSidebar } from "@copilotkit/react-ui";
导入后,在 JSX 返回语句中添加组件:
<Group justify="center" style={{ width: "100%" }}>
  <Box style={{ flex: 1, maxWidth: "350px" }}>
    <CopilotSidebar
      instructions="Help the user get the right knowledge base articles for their query"
      labels={{
        initial: "Welcome! Describe the query you need assistance with.",
      }}
      defaultOpen={true}
      clickOutsideToClose={false}
    />
  </Box>
</Group>
该组件接受各种 props,包括 instructions、 labels、 defaultOpen和 clickOutsideToClose。重要的是, instructions props 允许您提供额外的上下文,以帮助底层 Copilot AI LLM 更好地理解和响应用户查询。
使用 CopilotKit Hooks 实现 AI 操作
React CopilotKit SDK 还提供了一组实用的钩子,让您能够为应用的 AI Copilot 定义自定义操作。在本例中,我们将使用该 useCopilotAction 钩子定义预期操作,即根据用户查询检索知识库文章。
为此,首先 在组件文件useCopilotAction 中导入钩子, KnowledgeBase 如下所示:
import { useCopilotAction } from "@copilotkit/react-core";
导入后,您可以初始化钩子,并指定您希望副驾驶执行的操作。在本例中,我们将定义一个名为“FetchKnowledgebaseArticles”的操作,以根据提供的用户查询检索相关文章。让我们为其编写代码:
useCopilotAction({
  name: "FetchKnowledgebaseArticles",
  description: "Fetch relevant knowledge base articles based on a user query",
  parameters: [
    {
      name: "query",
      type: "string",
      description: "User query for the knowledge base",
      required: true,
    },
  ],
  render: "Getting relevant answers to your query...",
});
此操作设置包含几个重要元素。 name 属性为操作提供唯一标识符,而属性则 description 说明其用途以及何时使用。
此外,该 parameters 数组还定义了操作所需的输入,例如本例中的用户查询。最后,该 render 属性允许您指定在执行操作时显示的内容。在本例中,我们将显示一条简单的状态消息,以便让用户了解正在进行的流程。
集成应用程序的后端
为了完成整个应用程序的工作流程,让我们通过添加用于获取帖子的端点、集成 CopilotKit 功能和 Pinecone API 来构建后端,以便为知识库文章创建可搜索的索引。
为此,首先,转到包含虚拟帖子数据的GitHub 存储库src/app/lib/data/data.ts文件,将其复制并粘贴到本地文件中。
接下来,在src/app/api/posts/route.ts文件中添加以下代码来设置虚拟帖子 API 端点:
import { NextResponse } from 'next/server';
import { posts } from '@/app/lib/data/data';

export async function GET() {
  return NextResponse.json(posts);
}
此时,启动你的开发服务器并访问应用的 localhost URL。你应该会看到显示的帖子列表以及 CopilotKit 侧边栏组件。
回到本指南的主要目的,即为产品知识库集成 AI Copilot。通常,大多数产品知识库都包含各种内容——博客文章、常见问题解答、内部 SOP、API 文档等等。这比我们在本例中使用的三个虚拟帖子要多得多。
通常,这些知识库都集成了 Algolia Search API,方便用户快速搜索资源。现在,对于 AI Copilot,我们希望超越单纯的“搜索-展示”功能。本质上,我们希望利用 LLM 理解自然语言的能力,为知识库资源实现“类似对话”的搜索功能。
Copilot 不再只是简单地返回静态搜索结果,而是允许用户以更加友好的方式“讨论”资源、提出后续问题并获得答案。这无疑更加直观。
为了实现这一点,我们需要创建 LLM 可搜索的索引——本质上,就是 AI 可以查询以获取正确信息的数据源。为此,我们将使用 Pinecone 的矢量数据库 API 为虚拟数据创建可搜索的索引。
使用 Pinecone API SDK 创建可搜索索引
Pinecone是一项矢量数据库服务,旨在为应用程序提供快速、可扩展且准确的智能搜索功能。它允许您高效地存储和检索数据的矢量表示,使其成为语义搜索和推荐系统等任务的理想选择。
这意味着,您无需仅仅依赖 Anthropic AI LLM 为 Copilot 提供基于现有训练知识生成响应的支持,而是可以自定义 LLM 并使其更具情境化,从而使您的 Copilot 能够处理用户查询并根据应用数据生成响应。理想情况下,Pinecone 的用处就在于此——它允许您为数据创建向量数据库,以便使用大型语言模型轻松搜索。
本质上,在这个例子中,我们只是集成了 Pinecone 来为我们的知识库数据创建索引。这样,Copilot 可以首先搜索数据,并生成更相关、更情境化的响应,同时基于相同的知识库数据准确地回答后续问题。
以下是我们将要做的事情的简要概述:
- 设置 Pinecone。
- 为示例文章生成知识库内容嵌入。
- 索引和查询知识库数据。
在src/app/api/copilotkit/route.ts文件中,我们首先进行以下导入:
import { Pinecone } from '@pinecone-database/pinecone';
import {posts} from "@/app/lib/data/data";
接下来,为 Pinecone 和 Anthropic API 密钥定义环境变量:
 const ANTHROPIC_API_KEY = process.env.NEXT_PUBLIC_ANTHROPIC_API_KEY;
 const PINECONE_API_KEY = process.env.NEXT_PUBLIC_PINECONE_API_KEY;
添加检查以确保提供这些密钥是一种很好的做法,不用担心 - 我们稍后会介绍获取 Anthropic API 密钥的步骤。
if (!ANTHROPIC_API_KEY || !PINECONE_API_KEY) {
  console.error('Missing required API keys. ');
  process.exit(1);
}
现在,初始化 Pinecone SDK,并设置必要的配置:
const pinecone = new Pinecone({ apiKey: PINECONE_API_KEY });
const model = 'multilingual-e5-large';
const indexName = 'knowledge-base-data';
现在我们可以创建 Pinecone 索引了。索引本质上是一种结构化存储(数据的数值表示),它允许你基于向量相似性高效地搜索和检索数据。
理想情况下,对于生产环境的应用,您通常会通过 API 调用来动态检索帖子数据。但是,在本例中,我们将使用虚拟数据来模拟此过程。
为了为我们的知识库数据创建一个矢量数据库,我们需要为数据初始化一个 Pinecone 索引。
以下是实现此目的的函数:
// Function to create the Pinecone index
const initializePinecone = async () => {
  const maxRetries = 3;
  const retryDelay = 2000;

  for (let i = 0; i < maxRetries; i++) {
    try {
      const indexList = await pinecone.listIndexes();
      if (!indexList.indexes?.some(index => index.name === indexName)) {
        await pinecone.createIndex({
          name: indexName,
          dimension: 1024,
          metric: 'cosine',
          spec: {
            serverless: {
              cloud: 'aws',
              region: 'us-east-1',
            },
          },
        });
        await new Promise(resolve => setTimeout(resolve, 5000));
      }
      return pinecone.index(indexName);
    } catch (error) {
      if (i === maxRetries - 1) throw error;
      console.warn(`Retrying Pinecone initialization... (${i + 1}/${maxRetries})`);
      await new Promise(resolve => setTimeout(resolve, retryDelay));
    }
  }
  return null;
};
一旦设置完成,您就可以使用它来存储和检索您的知识库数据。
接下来,我们需要为你的知识库生成向量嵌入。这一步对于使你的应用程序能够使用向量嵌入高效地存储和搜索大量数据至关重要。
嵌入知识库内容其实就是将原始数据(通常是文本)转换为表示其语义的向量。Pinecone 随后将这些向量存储在索引中。
有了索引,您的应用程序可以执行相似性搜索等操作,从而允许它根据查询和存储内容之间的向量相似性快速检索最相关的数据。
为此,添加以下函数:
// Initialize Pinecone and prepare the index
(async () => {
    try {
      const index = await initializePinecone();
      if (index) {
        const embeddings = await pinecone.inference.embed(
          model,
          posts.map(d => d.content),
          { inputType: 'passage', truncate: 'END' }
        );

        const records = posts.map((d, i) => ({
          id: d.id.toString(),
          values: embeddings[i]?.values ?? [],
          metadata: { text: d.content },
        }));
        await index.namespace('knowledge-base-data-namespace').upsert(
          records.map(record => ({
            ...record,
            values: record.values || [],
          }))
        );
      }
    } catch (error) {
      console.error('Error initializing Pinecone:', error);
      process.exit(1);
    }
  })();
我们需要注意以下几点:
- 嵌入:这些是内容(例如文本或文章)的向量表示,用于捕捉数据的语义。在本例中,嵌入由 Pinecone 的模型multilingual-e5-large生成,该模型处理内容并将其转换为向量。请注意,您也可以使用其他模型,例如 OpenAI,它为此任务提供了嵌入 API。
- 命名空间:Pinecone 中的命名空间是索引的逻辑分区。它允许您组织索引中的数据,并在数据的特定段内执行操作。在本例中,命名空间设置为“knowledge-base-data-namespace”,它将知识库内容分组在一起。
- 记录:这些记录代表插入到 Pinecone 的数据。每条记录由一个 ID、值(嵌入)和元数据(例如文章文本)组成。Pinecone 使用值来执行相似性搜索,而元数据则为每条记录提供额外的上下文。
现在,为了使设置正常工作,您需要获取 Pinecone API 密钥。
如何获取 Pinecone API 密钥:
要获取 Pinecone AI API 密钥,请按照以下步骤操作:
- 前往 Pinecone 开发者控制台。
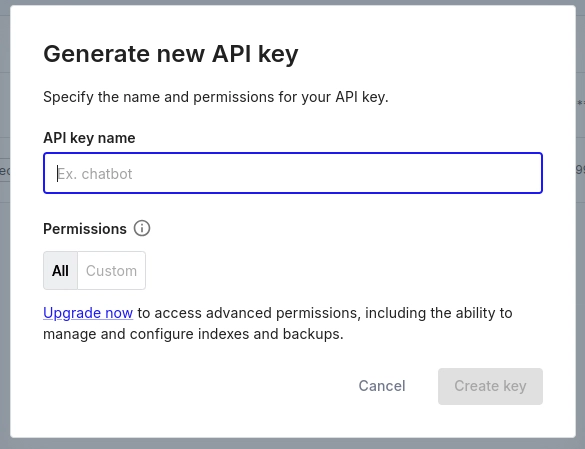
- 选择 “API 密钥” 选项卡,然后点击 “创建 API 密钥”。您可以使用默认密钥,也可以创建新密钥。
- 指定密钥的名称,然后单击 “创建密钥”。
完成这些步骤后,返回到您的 .env 文件并粘贴密钥:
NEXT_PUBLIC_PINECONE_API_KEY=your-api-key
集成 CopiloKit Node.js 端点
最后一步是添加 CopilotKit Node.js 端点来处理来自前端的请求。
在继续之前,您需要设置 Anthropic API 以向其服务发出请求。具体操作如下:
- 通过访问Anthropic AI 文档来创建 Anthropic 帐户 并设置账单。
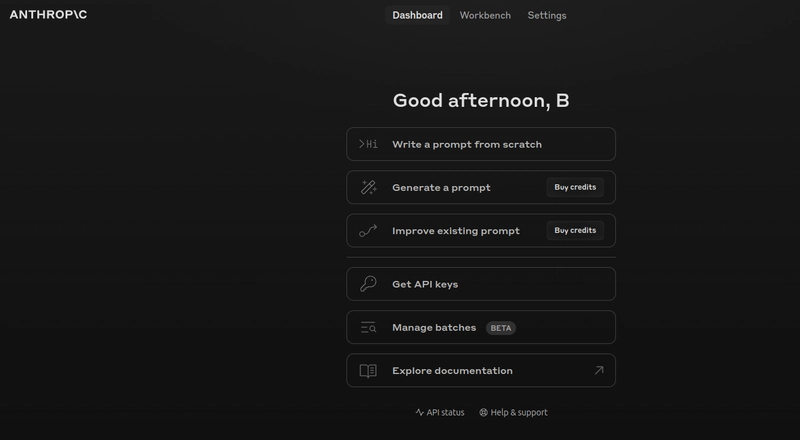
- 登录 Anthropic API 控制台后,生成您的 API 密钥。
- 获得 API 密钥后,将其添加到项目根目录中的 .env 文件中:
请务必设置计费和配额,以使您的应用能够发出 API 请求。
记住,我们在应用客户端添加了 CopilotKit API URL,以便它将请求转发到 CopilotKit 后端进行处理。为了实现这一点,我们需要定义 CopilotKit API 端点来管理和处理这些请求。首先,在src/app/api/copilotkit/route.ts文件中导入以下内容:
import { CopilotRuntime, AnthropicAdapter, copilotRuntimeNextJSAppRouterEndpoint } from "@copilotkit/runtime";

import Anthropic from "@anthropic-ai/sdk";
import { NextRequest } from 'next/server'
Copilot Runtime 是 CopilotKit 的后端引擎,允许应用与 LLM 交互。使用它,您可以为 Copilot 定义后端操作。您可以指定大量任务,包括执行内部数据库调用以及管理不同的流程和工作流。但是,对于这个特定示例,我们将定义一个操作,根据用户查询在 Pinecone 索引中查询相关文章。
为此,请添加以下代码:
const runtime = new CopilotRuntime({
  actions: () => [
    {
      name: 'FetchKnowledgebaseArticles',
      description: 'Fetch relevant knowledge base articles based on a user query',
      parameters: [
        {
          name: 'query',
          type: 'string',
          description: 'The User query for the knowledge base index search to perform',
          required: true,
        },
      ],
      handler: async ({ query }: { query: string }) => {
        try {
          const queryEmbedding = await pinecone.inference.embed(
            model,
            [query],
            { inputType: 'query' }
          );
          const queryResponse = await pinecone
            .index(indexName)
            .namespace('knowledge-base-data-namespace')
            .query({
              topK: 3,
              vector: queryEmbedding[0]?.values || [],
              includeValues: false,
              includeMetadata: true,
            });
          return { articles: queryResponse?.matches || [] };
        } catch (error) {
          console.error('Error fetching knowledge base articles:', error);
          throw new Error('Failed to fetch knowledge base articles.');
        }
      },    },
  ],
});
让我们分解一下这个操作处理器。理想情况下,这个处理器是整个集成的核心引擎。它接收从 Copilot 客户端传递的查询参数。
使用 Pinecone 的查询操作,查询被转换为向量表示,然后将其与 Pinecone 中存储的索引向量进行比较,以识别索引中最相关的前三篇文章。结果包括向量值和元数据,其中包含查询的实际匹配数据。
由于大多数产品知识库都包含大量文章,有些文章甚至涵盖类似的想法,而有些则完全不同。因此,返回多个与查询匹配的相关数据是可行的。(您可以topK根据预期用例调整返回匹配数据对象的数量)。
最后,继续,添加以下代码来定义 CopilotKit 端点,如下所示:
const anthropic = new Anthropic({ apiKey: ANTHROPIC_API_KEY });
const serviceAdapter = new AnthropicAdapter({ anthropic: anthropic as any });

export const POST = async (req: NextRequest) => {
  const { handleRequest } = copilotRuntimeNextJSAppRouterEndpoint({
    runtime,
    serviceAdapter,
    endpoint: '/api/copilotkit',
  });

    return handleRequest(req);


};
确保在前端指定了与 CopilotKit API 端点 (/api/copilotkit) 中相同的 URL。
要测试整个应用程序,请在终端中导航到主项目目录并运行以下命令:
npm run dev
然后,转到localhost:3000浏览器并在侧边栏输入字段中提出诸如“CopilotKit 提供哪些功能?”之类的问题。
最终结果是使用 CopilotKit 实现功能齐全的 RAG 知识库应用程序:
用户可以继续提出其他问题;如果您有大量文章,则无需筛选不同的页面,而是让 Copilot 检索用户需要的信息,这会使整个过程变得容易得多。
作为参考,或者如果您想在本文所介绍的内容的基础上进行构建,您可以从 GitHub 存储库克隆该项目的源代码。
概括
在本指南中,我们介绍了使用 CopilotKit、Anthropic AI API 和 Pinecone API 构建由 Anthropic 驱动的 Copilot 的步骤,用于产品知识库。
虽然我们已经探索了一些功能,但我们仅仅触及了 CopilotKit 无数用例的皮毛,这些用例涵盖了从构建交互式 AI 聊天机器人到构建代理解决方案的各种场景。实际上,CopilotKit 可让您在几分钟内为您的产品添加大量实用的 AI 功能。
如果您希望将 AI 驱动的 Copilots 集成到您现有的应用程序中,请考虑 安排演示,加入开发者的Discord 社区,并 开始使用文档 亲自尝试!
文章来源:https://dev.to/copilotkit/build-a-rag-copilot-on-your-own-knowledge-base-with-copilotkit-pinecone-anthropic-21m9 后端开发教程 - Java、Spring Boot 实战 - msg200.com
