💡构建一个由人工智能驱动的开源概念🤖
TL;DR
在本文中,我们将构建一个 Next.js 应用程序,该应用程序与 Notion API 集成以管理用户数据库,并使用CopilotKit与这些数据进行交互。
在本文结束时,您将了解如何:
- 设置服务器操作以获取用户的 Notion 数据库。
- 使用CopilotKit查询数据库实现聊天功能。
- 使用CopilotKit直接在聊天中编辑用户的 Notion 数据库。
以下是 CopilotKit 在您的 Notion 数据库中采取行动的预览:
此外,我们还将探索在 Next.js 项目的环境变量中实现类型安全的方法。👀
CopilotKit 是什么
CopilotKit 是领先的开源框架,用于将可投入生产的 AI 驱动的副驾驶集成到您的应用程序中。它提供了功能丰富的 SDK,支持各种 AI 副驾驶用例,包括情境感知、副驾驶操作和生成式 UI。
这意味着您可以专注于定义副驾驶的角色,而不是陷入从头开始构建或处理复杂集成的技术问题。
设置项目🛠️
首先,使用以下命令初始化 Next.js 项目:
ℹ️ 你可以使用任何你喜欢的包管理器。这里我使用 npm。
npx create-next-app@latest copilotkit-with-notion-api --typescript --tailwind --eslint --app --use-npm
导航到项目目录:
cd copilotkit-with-notion-api
安装依赖项
我们需要一些依赖项。运行此命令来安装项目所需的所有依赖项:
npm install @copilotkit/react-core @copilotkit/react-ui @copilotkit/runtime @notionhq/client @t3-oss/env-nextjs openai zod
为了获得更好的编码体验,请安装以下开发依赖项:
npm i --save-dev prettier-plugin-organize-imports prettier-plugin-package prettier-plugin-tailwindcss
配置 Prettier
现在 Prettier 已经安装完毕,让我们根据自己的喜好进行配置。.prettierrc在项目根目录中创建一个文件,内容如下:
// 👇 .prettierrc
{
    "arrowParens": "avoid",
    "printWidth": 80,
    "semi": false,
    "singleQuote": true,
    "jsxSingleQuote": true,
    "trailingComma": "all",
    "proseWrap": "always",
    "tabWidth": 2,
    "plugins": [
        "prettier-plugin-tailwindcss",
        "prettier-plugin-organize-imports",
        "prettier-plugin-package"
    ]
}
请随意调整这些规则以适合您的喜好。
设置Shadcn UI
对于可立即使用的 UI 组件集合,我们将使用shadcn/ui。运行以下命令使用默认设置初始化它:
npx shadcn@latest init -d
添加类型安全的环境变量
为了管理环境变量,我们将超越常规.env设置,使用 TypeScript 实现类型安全。这确保了应用程序在所有必需变量未正确定义的情况下无法运行。
为此,我们将使用该@t3-oss/env-nextjs库和模式验证库。zod
lib/env.ts使用以下代码创建一个新文件:
// 👇 lib/env.ts

import { createEnv } from '@t3-oss/env-nextjs'
import { z } from 'zod'

export const env = createEnv({
  /*
   * Serverside Environment variables, not available on the client.
   * Will throw if you access these variables on the client.
   */
  server: {
    NOTION_SECRET_API_KEY: z.string().min(1),
    NOTION_DB_ID: z.string().min(1),
    OPENAI_API_KEY: z.string().min(1),
  },
  /*
   * Environment variables available on the client (and server).
   *
   * 💡 You'll get type errors if these are not prefixed with NEXT_PUBLIC_.
   */
  client: {},
  /*
   * Due to how Next.js bundles environment variables on Edge and Client,
   * we need to manually destructure them to make sure all are included in bundle.
   *
   * 💡 You'll get type errors if not all variables from `server` & `client` are included here.
   */
  runtimeEnv: {
    NOTION_SECRET_API_KEY: process.env.NOTION_SECRET_API_KEY,
    NOTION_DB_ID: process.env.NOTION_DB_ID,
    OPENAI_API_KEY: process.env.OPENAI_API_KEY,
  },
})
此方法在运行时验证环境变量。如果任何必需的变量缺失或无效,应用程序将无法启动。
你可能已经猜到了,所有这些env变量都必须在文件中定义.env。这包括 Notion API 密钥,以及最重要的 OpenAI API 密钥。
现在,只需.env使用您的 OpenAI API 密钥填充文件:
OPENAI_API_KEY=<YOUR-OPENAI-API-KEY>
设置 Notion
要使用 Notion API,我们首先需要设置 Notion 集成。
创建新集成
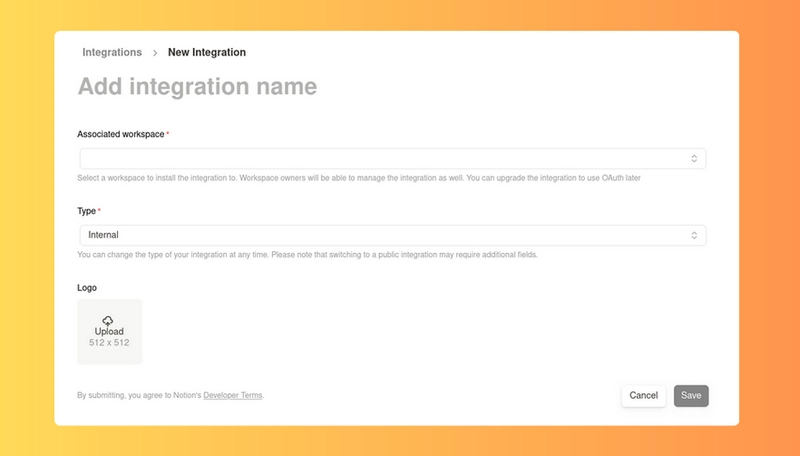
访问notion.so/my-integrations并创建一个新的集成。输入名称,选择工作区,并记下内部集成密钥。
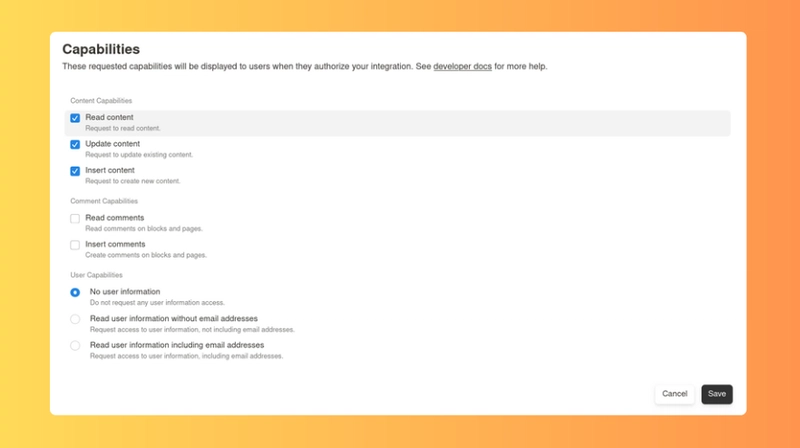
更新集成的功能以包括更新和插入权限。
将密钥添加到您的.env文件中,如下所示:
NOTION_SECRET_API_KEY=<YOUR-SECRET-HERE>
设置数据库
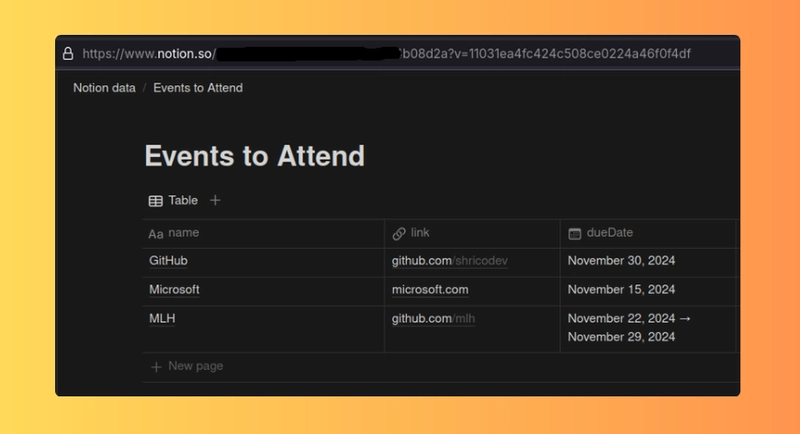
在 Notion 中,创建一个新的数据库或使用现有的数据库。本教程中的示例数据库包含三列:name、link和dueDate。
您可以自定义这些列以满足您的特定要求。
查找您的数据库 ID
要获取 Notion 数据库 ID,请检查数据库的 URL。该 ID 是 Notion 域名和?v=查询参数之间的字符串。
将此 ID 添加到您的.env文件中:
NOTION_DB_ID=<YOUR-DB-ID-HERE>
将集成分配给数据库
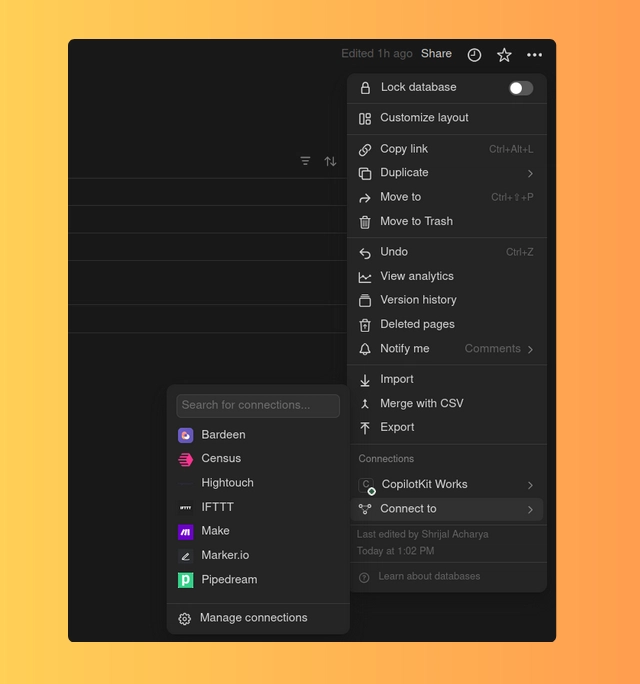
转到您的数据库,单击右上角的菜单按钮,然后分配您之前创建的集成。
完成此设置后,您的应用程序就可以使用 Notion API 访问和管理您的 Notion 数据库了。✨
设置CopilotKit 🤖
到目前为止一切顺利,现在,让我们集成CopilotKit——我们应用程序的灵魂,可以与 Notion 数据库进行交互。
定义常量
首先在目录中创建一个constants.ts文件lib/来集中存储与数据库结构和 API 端点相关的常量:
// 👇 lib/constants.ts

export const NOTION_DB_PROPERTY_LINK = 'link'
export const NOTION_DB_PROPERTY_NAME = 'name'
export const NOTION_DB_PROPERTY_DUE_DATE = 'dueDate'

export const COPILOTKIT_API_ENDPOINT = '/api/copilotkit'
更新数据库列名以匹配您的设置。常量定义CopilotKitCOPILOTKIT_API_ENDPOINT请求的端点。
创建 API 路由
接下来,在目录中创建一个route.ts文件/app/api/copilotkit:
// 👇 app/api/copilotkit/route.ts

import { COPILOTKIT_API_ENDPOINT } from '@/lib/constants'
import { env } from '@/lib/env'
import {
  CopilotRuntime,
  OpenAIAdapter,
  copilotRuntimeNextJSAppRouterEndpoint,
} from '@copilotkit/runtime'
import { NextRequest } from 'next/server'
import OpenAI from 'openai'

const openai = new OpenAI({ apiKey: env.OPENAI_API_KEY })
// Here, we are using GPT-3.5-turbo OpenAI model instead of the default `gpt-4o`
const serviceAdapter = new OpenAIAdapter({ openai, model: 'gpt-3.5-turbo' })
const runtime = new CopilotRuntime()

export const POST = async (req: NextRequest) => {
  const { handleRequest } = copilotRuntimeNextJSAppRouterEndpoint({
    runtime,
    serviceAdapter,
    endpoint: COPILOTKIT_API_ENDPOINT,
  })

  return handleRequest(req)
}
该文件设置了POST用于处理CopilotKit请求的路由。它使用 OpenAIGPT-3.5-turbo模型并定义了用于处理请求的运行时环境。
该POST函数监听请求,使用自定义运行时和服务适配器处理它们,然后通过CopilotKit端点发送回响应以处理 AI 生成的响应。
添加 CopilotKit 提供程序
要将CopilotKit集成到您的应用中,请将您的应用包装到CopilotKit提供程序中。此外,请包含预构建的 Copilot 弹出窗口,以实现即时 UI 功能。
更新layout.tsx如下:
// 👇 app/layout.tsx

import { COPILOTKIT_API_ENDPOINT } from '@/lib/constants'
import { CopilotKit } from '@copilotkit/react-core'
import { CopilotPopup } from '@copilotkit/react-ui'
import '@copilotkit/react-ui/styles.css'

// ...Rest of the code

export default function RootLayout({
  children,
}: Readonly<{
  children: React.ReactNode
}>) {
  return (
    <html lang='en'>
      <body
        className={`${geistSans.variable} ${geistMono.variable} antialiased`}
      >
        <CopilotKit runtimeUrl={COPILOTKIT_API_ENDPOINT}>
          <main>{children}</main>
          <CopilotPopup instructions='You are assisting the user as best as you can. Answer the best way possible given the user notion database information.' />
        </CopilotKit>
      </body>
    </html>
  )
}
首先,我们只需导入所需的模块和自定义样式,以使 Copilot 弹出窗口看起来美观。
我们用<CopilotKit />提供程序包装我们的应用程序并将其传递runtimeUrl给我们的COPILOTKIT_API_ENDPOINT常量,即/api/copilotkit端点。
现在,你应该已经在应用程序的右下角看到一个小的聊天弹出窗口了。它看起来也挺不错的。
这就是我们在应用程序中设置CopilotKit所需的全部内容。🥂现在,剩下的就是提供应用程序的上下文,以便它可以读取我们的数据并实时指导我们。
致力于实施👷♂️
现在,所有之前的工作都已完成,是时候实现应用程序的核心功能了。
我们将首先定义数据类型,然后逐步构建从 Notion 数据库获取和操作数据的功能。
定义类型
types/notion.ts在目录中创建一个文件types/来定义我们的 Notion 数据库数据的结构:
// 👇 types/notion.ts

import {
  NOTION_DB_PROPERTY_DUE_DATE,
  NOTION_DB_PROPERTY_LINK,
  NOTION_DB_PROPERTY_NAME,
} from '@/lib/constants'

export type TResponse = {
  success: boolean
  error: Error | null
}

export type TRow = {
  id: string
  properties: {
    [NOTION_DB_PROPERTY_NAME]: {
      id: string
      title: { text: { content: string } }[]
    }
    [NOTION_DB_PROPERTY_LINK]: { id: string; url: string }
    [NOTION_DB_PROPERTY_DUE_DATE]: {
      id: string
      type: 'date'
      date?: { start: string; end: string }
    }
  }
}

export type TRowDetails = {
  id: string
  [NOTION_DB_PROPERTY_NAME]: string
  [NOTION_DB_PROPERTY_LINK]: string
  [NOTION_DB_PROPERTY_DUE_DATE]: {
    start: string
    end: string
  }
}
首先,我们有一个TResponse类型,它将在服务器操作中用于定义函数的返回类型。然后,我们有一个TRow类型TRowDetails,它基本上保存了概念数据库中每一行数据的类型定义。
该TRow类型定义为与 Notion API 返回的数据匹配。该TRowDetails类型是我自定义的,用于仅保存我计划在 UI 中每行显示的数据。
💡 根据您的 Notion 数据库结构调整这些类型中的属性。
从 Notion 获取数据
创建lib/actions.ts定义与 Notion 数据库交互的服务器端操作:
// 👇 lib/actions.ts

'use server'

import { env } from '@/lib/env'
import { TResponse } from '@/types/notion'
import { Client } from '@notionhq/client'
import { QueryDatabaseResponse } from '@notionhq/client/build/src/api-endpoints'

const notion = new Client({
  auth: env.NOTION_SECRET_API_KEY,
})

export const fetchNotionDB = async (): Promise<
  QueryDatabaseResponse | TResponse
> => {
  try {
    const dbQuery = await notion.databases.query({
      database_id: env.NOTION_DB_ID,
    })

    return dbQuery
  } catch (error) {
    return {
      success: false,
      error: error as Error,
    } as TResponse
  }
}
该fetchNotionDB函数被标记为服务器操作('use server'),以确保它仅在服务器上运行,而不管在何处调用它。
首先,我们通过传递数据库 ID 来创建一个 Notion 客户端实例。然后在fetchNotionDB函数中,我们使用 Notion API 查询 Notion 数据库并返回响应。
显示数据
现在,让我们更新app/page.tsx文件以获取和呈现 Notion 数据库数据:
// 👇 app/page.tsx

import { NotionTable } from '@/components/notion-table'
import { fetchNotionDB } from '@/lib/actions'
import {
  NOTION_DB_PROPERTY_DUE_DATE,
  NOTION_DB_PROPERTY_LINK,
  NOTION_DB_PROPERTY_NAME,
} from '@/lib/constants'
import { isErrorResponse } from '@/lib/utils'
import { TRow } from '@/types/notion'

export default async function Home() {
  const response = await fetchNotionDB()

  if (isErrorResponse(response)) {
    return (
      <div className='mt-10 text-center text-rose-500'>
        Failed to fetch data. Please try again later.
      </div>
    )
  }

  const dbRows = response.results.map(row => ({
    id: row.id,
    // @ts-expect-error properties field definitely exists in each row.
    properties: row.properties || {},
  })) as TRow[]

  const formattedDBRows = dbRows.map(({ id, properties }) => {
    const name =
      properties?.[NOTION_DB_PROPERTY_NAME]?.title?.[0]?.text?.content || ''
    const link = properties?.[NOTION_DB_PROPERTY_LINK]?.url || ''
    const dueDate = properties?.[NOTION_DB_PROPERTY_DUE_DATE]?.date || {
      start: '',
      end: '',
    }

    return {
      id,
      [NOTION_DB_PROPERTY_NAME]: name,
      [NOTION_DB_PROPERTY_LINK]: link,
      [NOTION_DB_PROPERTY_DUE_DATE]: dueDate,
    }
  })

  return (
    <div className='mt-8 flex justify-center'>
      <div className='w-full max-w-4xl'>
        <NotionTable initialTableData={formattedDBRows} />
      </div>
    </div>
  )
}
这里,我们首先使用该函数获取用户的 Notion 数据库信息fetchNotionDB。然后,我们检查函数返回数据的类型,以确保其符合要求QueryDatabaseResponse。如果不是,则仅显示错误消息并返回。
💡 properties 赋值语句顶部的注释是为了抑制提示某行可能属于其他类型且可能没有 properties 字段的错误。然而,查询数据库总会为每一行返回一个 properties 字段。
接下来,我们获取 Notion 数据库的所有行并将它们转换为TRow[]。由于它包含一些与我们不太相关的数据,我们将其格式化为formattedDBRows变量TRowDetails[]。
最后,我们将获取的数据传递给<NotionTable />组件,该组件负责在 UI 中显示表格。
错误处理实用程序
请注意,我们尚未实现该isErrorResponse函数。请添加一个实用函数来判断响应是否为错误。更新lib/utils.ts如下:
// 👇 lib/utils.ts

import { TResponse } from '@/types/notion'
import { QueryDatabaseResponse } from '@notionhq/client/build/src/api-endpoints'

// ...Rest of the code

export function isErrorResponse(
  data: QueryDatabaseResponse | TResponse,
): data is TResponse {
  if (
    typeof data === 'object' &&
    data !== null &&
    'success' in data &&
    typeof (data as TResponse).success === 'boolean'
  ) {
    return (data as TResponse).success === false
  }
  return false
}
此函数检查数据是否为 类型TResponse,以及success字段是否设置为false。如果是,则返回False,否则返回True。
添加和配置 UI 组件
现在,我们需要做的就是实现<NotionTable />组件。在此之前,我们先添加一些需要用到的shadcn/ui组件。
安装所需的 UI 组件:
npx shadcn@latest add sonner table
Sonner通过将其提供程序添加到来启用Toast 通知app/layout.tsx:
// 👇 app/layout.tsx

import { Toaster } from '@/components/ui/sonner'

// ...Rest of the code

export default function RootLayout({
  children,
}: Readonly<{
  children: React.ReactNode
}>) {
  return (
    <html lang='en'>
      <body
        className={`${geistSans.variable} ${geistMono.variable} antialiased`}
      >
        {/* ...Rest of the code */}
          <main>{children}</main>
          <Toaster />
        {/* ...Rest of the code */}
      </body>
    </html>
  )
}
渲染概念数据库
创建NotionTable组件来渲染获取的数据。该组件还将负责大部分 AI 工作。
components/notion-table.tsx添加包含以下代码的文件:
// 👇 components/notion-table.tsx

'use client'

import {
  Table,
  TableBody,
  TableCaption,
  TableCell,
  TableHead,
  TableHeader,
  TableRow,
} from '@/components/ui/table'
import { updateNotionDBRowLink, updateNotionDBRowTitle } from '@/lib/actions'
import { TRowDetails } from '@/types/notion'
import { useCopilotAction, useCopilotReadable } from '@copilotkit/react-core'
import Link from 'next/link'
import { useState } from 'react'
import { toast } from 'sonner'

interface NotionTableProps {
  initialTableData: TRowDetails[]
}

export const NotionTable = ({ initialTableData }: NotionTableProps) => {
  const [tableData, setTableData] = useState<TRowDetails[]>(initialTableData)

  return (
    <Table className='rounded-sm shadow-sm'>
      <TableCaption className='py-4'>Notion Database</TableCaption>
      <TableHeader className='bg-zinc-100'>
        <TableRow>
          <TableHead>Name</TableHead>
          <TableHead>Link</TableHead>
          <TableHead className='text-right'>Due Date</TableHead>
        </TableRow>
      </TableHeader>
      {initialTableData.length === 0 ? (
        <p className='text-center text-zinc-500'>No data found.</p>
      ) : (
        <TableBody>
          {tableData.map((dbRow, i) => (
            <TableRow key={`${dbRow.name}-${dbRow.id}-${i}`}>
              <TableCell className='font-medium'>
                {dbRow.name ? (
                  <span>{dbRow.name}</span>
                ) : (
                  <span className='text-zinc-500'>Unnamed</span>
                )}
              </TableCell>
              <TableCell>
                {dbRow.link ? (
                  <Link
                    href={dbRow.link}
                    aria-label={`Link for ${dbRow.name || 'Unnamed'}`}
                    target='_blank'
                    className='underline underline-offset-4'
                  >
                    {dbRow.link}
                  </Link>
                ) : (
                  <span className='text-zinc-500'>No Link</span>
                )}
              </TableCell>
              <TableCell className='text-right'>
                {dbRow.dueDate.start ? (
                  <span>{dbRow.dueDate.start}</span>
                ) : (
                  <span className='text-zinc-500'>No Due Date</span>
                )}
                {dbRow.dueDate.end ? ` - ${dbRow.dueDate.end}` : null}
              </TableCell>
            </TableRow>
          ))}
        </TableBody>
      )}
    </Table>
  )
}
为了让 AI 能够理解我们的应用程序并与之交互,我们将利用CopilotKit中的一些钩子。
具体来说,我们将使用useCopilotReadable和useCopilotAction钩子为 AI 提供上下文和在我们的应用程序内执行操作的能力。
- 提供读取访问权限
useCopilotReadable
在 中notion-table.tsx添加useCopilotReadable钩子以使 AI 了解应用程序的状态:
  // ...Rest of the code

  useCopilotReadable({
    description:
      'All the rows in our notion database which holds the information for all the meetings I need to attend.',
    value: tableData,
  })

  // ...Rest of the code
通过添加此功能,CopilotKit可以实时了解状态tableData,从而使 AI 能够回答有关 Notion 数据库的查询。
- 启用写入访问权限
useCopilotAction
接下来,我们实现 AI 修改数据的功能。在useCopilotReadable同一文件的下方添加以下钩子,以允许更新行详细信息:
// 👇 components/notion-table.tsx

// ...Rest of the code

  useCopilotAction({
    name: 'updateRowName',
    description:
      'Update the title of the row (index starts from 0) in the notion database.',
    parameters: [
      {
        name: 'index',
        description: 'Index of the row to update.',
        required: true,
      },
      {
        name: 'newTitle',
        description: 'New title for the row.',
        required: true,
      },
    ],
    handler: async ({ index, newTitle }) => {
      const parsedIndex = parseInt(index, 10)
      if (isNaN(parsedIndex)) throw new Error('Invalid index')

      const { success } = await updateNotionDBRowTitle({
        tableRowId: tableData[parsedIndex].id,
        tableRowNewTitle: newTitle,
      })

      if (!success) return toast.error('Could not update the notion DB')

      toast.success('Successfully updated the notion DB')
      setTableData(prevData => {
        const updatedTableData = [...prevData]
        if (parsedIndex >= 0 && parsedIndex < updatedTableData.length) {
          updatedTableData[parsedIndex].name = newTitle
        }
        return updatedTableData
      })
    },
  })

  useCopilotAction({
    name: 'updateRowLink',
    description:
      'Update the link of the row (index starts from 0) in the notion database.',
    parameters: [
      {
        name: 'index',
        description: 'Index of the row to update.',
        required: true,
      },
      {
        name: 'newLink',
        description: 'New link to the row.',
        required: true,
      },
    ],
    handler: async ({ index, newLink }) => {
      const parsedIndex = parseInt(index, 10)
      if (isNaN(parsedIndex)) throw new Error('Invalid index')

      const { success } = await updateNotionDBRowLink({
        tableRowId: tableData[parsedIndex].id,
        tableRowNewLink: newLink,
      })

      if (!success) return toast.error('Could not update the notion DB')

      toast.success('Successfully updated the notion DB')
      setTableData(prevData => {
        const updatedTableData = [...prevData]
        if (parsedIndex >= 0 && parsedIndex < updatedTableData.length) {
          updatedTableData[parsedIndex].link = newLink
        }
        return updatedTableData
      })
    },
  })

// ...Rest of the code
每个useCopilotAction钩子包括:
name:动作的标识符。description:对该动作的清晰解释。parameters:执行该操作所需的输入。handler:执行操作的函数,修改数据库并相应地更新 UI。
实现数据库更新功能
我们还没有编写updateNotionDBRowTitle和updateNotionDBRowLink函数。在lib/actions.ts文件中,定义与 Notion API 交互的辅助函数:
// 👇 lib/actions.ts

'use server'

import {
  NOTION_DB_PROPERTY_LINK,
  NOTION_DB_PROPERTY_NAME,
} from '@/lib/constants'

// ...Rest of the code

export const updateNotionDBRowTitle = async ({
  tableRowId,
  tableRowNewTitle,
}: {
  tableRowId: string
  tableRowNewTitle: string
}): Promise<TResponse> => {
  try {
    await notion.pages.update({
      page_id: tableRowId,
      properties: {
        [NOTION_DB_PROPERTY_NAME]: {
          title: [{ text: { content: tableRowNewTitle } }],
        },
      },
    })
    return { success: true, error: null } as TResponse
  } catch (error) {
    return { success: false, error: error as Error } as TResponse
  }
}

export const updateNotionDBRowLink = async ({
  tableRowId,
  tableRowNewLink,
}: {
  tableRowId: string
  tableRowNewLink: string
}): Promise<TResponse> => {
  try {
    await notion.pages.update({
      page_id: tableRowId,
      properties: {
        [NOTION_DB_PROPERTY_LINK]: {
          url: tableRowNewLink,
        },
      },
    })
    return { success: true, error: null } as TResponse
  } catch (error) {
    return { success: false, error: error as Error } as TResponse
  }
}
这两个函数都使用Notion API来更新数据库中某一行(或“页面”)的特定字段,并返回成功或错误响应。
这就是我们今天在应用程序中要实现的全部内容。你还可以实现删除数据库中一行的功能。欢迎你浏览 Notion API 文档并自行实现。😎
结论
哇!现在,我们有了一个功能齐全的 AI 自动化应用程序,它可以从 Notion 数据库中获取用户数据,回答用户对数据的查询,甚至根据需要更改数据。🫨
如果您在编写代码时感到困惑,本文的完整记录源代码可在此处找到:Github Repo
关注 CopilotKit 以获取更多类似内容。
在下面的评论区分享你的想法!👇
非常感谢你的阅读!🎉 🫡
文章来源:https://dev.to/copilotkit/work-smarter-in-notion-add-a-copilot-with-copilotkit-50be 后端开发教程 - Java、Spring Boot 实战 - msg200.com


