如何让 AI 融入你的用户(Next.js、OpenAI、CopilotKit)
TL;DR
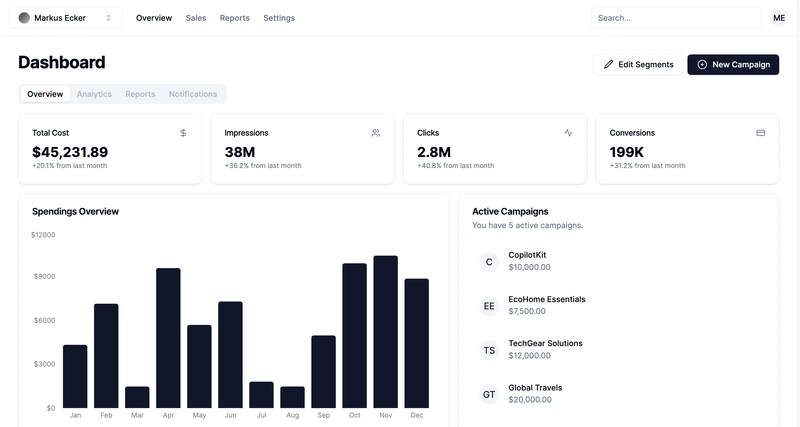
在本文中,您将学习如何构建一个由人工智能驱动的广告活动管理器应用程序,该应用程序允许您创建和分析广告活动,从而使您能够为您的业务做出正确的决策。
我们将介绍如何:
- 使用 Next.js 构建 Web 应用程序,
- 使用 CopilotKit 将 AI 助手集成到软件应用程序中,以及
- 创建针对特定行动的 AI 副驾驶员来处理应用程序内的各种任务。
- 建立一个活动管理器

CopilotKit:构建应用内 AI 副驾驶的框架
CopilotKit 是一个 开源的 AI 副驾驶平台。我们可以轻松地将强大的 AI 集成到你的 React 应用中。
建造:
- ChatBot:具有上下文感知能力的应用内聊天机器人,可以在应用内采取行动💬
- CopilotTextArea:具有上下文感知自动完成和插入功能的 AI 驱动文本字段📝
- 合作代理:可以与您的应用和用户交互的应用内 AI 代理🤖
先决条件
要完全理解本教程,您需要对 React 或 Next.js 有基本的了解。
我们还将利用以下内容:
- Radix UI—— 用于为应用程序创建可访问的 UI 组件。
- OpenAI API 密钥 - 使我们能够使用 GPT 模型执行各种任务。
- CopilotKit - 一个开源副驾驶框架,用于构建自定义 AI 聊天机器人、应用内 AI 代理和文本区域。
项目设置和包安装
首先,通过在终端中运行以下代码片段来创建 Next.js 应用程序:
npx create-next-app campaign-manager
选择您喜欢的配置设置。在本教程中,我们将使用 TypeScript 和 Next.js App Router。
接下来,将 Heroicons、 Radix UI及其原始组件安装到项目中。
npm install @heroicons/react @radix-ui/react-avatar @radix-ui/react-dialog @radix-ui/react-dropdown-menu @radix-ui/react-icons @radix-ui/react-label @radix-ui/react-popover @radix-ui/react-select @radix-ui/react-slot @radix-ui/react-tabs
另外,安装Recharts 库(用于创建交互式图表的 React 库)以及以下实用程序包:
npm install recharts class-variance-authority clsx cmdk date-fns lodash react-day-picker tailwind-merge tailwindcss-animate
最后,安装 CopilotKit 软件包。这些软件包使 AI 副驾驶能够从 React 状态中检索数据并在应用程序内做出决策。
npm install @copilotkit/react-ui @copilotkit/react-textarea @copilotkit/react-core @copilotkit/backend
恭喜!您现在可以构建应用程序了。
使用 Next.js 构建 Campaign Manager 应用
在本节中,我将引导您构建活动管理器应用程序的用户界面。
首先,让我们做一些初始设置。
在文件夹中创建一个components和文件夹。libsrc
cd src
mkdir components lib
在该lib文件夹中,我们将声明应用程序的静态类型和默认活动。因此,请在该文件夹中创建data.ts和types.ts文件lib。
cd lib
touch data.ts type.ts
将以下代码片段复制到type.ts文件中。该代码片段声明了广告系列属性及其数据类型。
export interface Campaign {
    id: string;
    objective?:
        | "brand-awareness"
        | "lead-generation"
        | "sales-conversion"
        | "website-traffic"
        | "engagement";
    title: string;
    keywords: string;
    url: string;
    headline: string;
    description: string;
    budget: number;
    bidStrategy?: "manual-cpc" | "cpa" | "cpm";
    bidAmount?: number;
    segment?: string;
}
为应用程序创建默认活动列表并将其复制到data.ts文件中。
import { Campaign } from "./types";

export let DEFAULT_CAMPAIGNS: Campaign[] = [
    {
        id: "1",
        title: "CopilotKit",
        url: "https://www.copilotkit.ai",
        headline: "Copilot Kit - The Open-Source Copilot Framework",
        description:
            "Build, deploy, and operate fully custom AI Copilots. In-app AI chatbots, AI agents, AI Textareas and more.",
        budget: 10000,
        keywords: "AI, chatbot, open-source, copilot, framework",
    },
    {
        id: "2",
        title: "EcoHome Essentials",
        url: "https://www.ecohomeessentials.com",
        headline: "Sustainable Living Made Easy",
        description:
            "Discover our eco-friendly products that make sustainable living effortless. Shop now for green alternatives!",
        budget: 7500,
        keywords: "eco-friendly, sustainable, green products, home essentials",
    },
    {
        id: "3",
        title: "TechGear Solutions",
        url: "https://www.techgearsolutions.com",
        headline: "Innovative Tech for the Modern World",
        description:
            "Find the latest gadgets and tech solutions. Upgrade your life with smart technology today!",
        budget: 12000,
        keywords: "tech, gadgets, innovative, modern, electronics",
    },
    {
        id: "4",
        title: "Global Travels",
        url: "https://www.globaltravels.com",
        headline: "Travel the World with Confidence",
        description:
            "Experience bespoke travel packages tailored to your dreams. Luxury, adventure, relaxation—your journey starts here.",
        budget: 20000,
        keywords: "travel, luxury, adventure, tours, global",
    },
    {
        id: "5",
        title: "FreshFit Meals",
        url: "https://www.freshfitmeals.com",
        headline: "Healthy Eating, Simplified",
        description:
            "Nutritious, delicious meals delivered to your door. Eating well has never been easier or tastier.",
        budget: 5000,
        keywords: "healthy, meals, nutrition, delivery, fit",
    },
];
由于我们使用 Radix UI 创建可以使用 TailwindCSS 轻松定制的基本 UI 组件,因此请在文件夹utils.ts中创建一个文件lib并将以下代码片段复制到该文件中。
//👉🏻 The lib folder now contains 3 files - data.ts, type.ts, util.ts
//👇🏻 Copy the code below into the "lib/util.ts" file.
import { type ClassValue, clsx } from "clsx";
import { twMerge } from "tailwind-merge";

export function cn(...inputs: ClassValue[]) {
    return twMerge(clsx(inputs));
}

export function randomId() {
    return Math.random().toString(36).substring(2, 15);
}
导航到该components文件夹并在其中创建另外三个文件夹。
cd components
mkdir app dashboard ui
该components/app文件夹将包含应用程序内要使用的各种组件,而仪表板文件夹包含一些元素的 UI 组件。
该ui文件夹包含使用 Radix UI 创建的多个 UI 元素。请将 项目存储库中的这些元素复制 到该文件夹中。
恭喜!该ui文件夹应该包含必要的 UI 元素。现在,我们可以用它们来创建应用程序所需的各种组件了。
创建应用程序 UI 组件
在这里,我将引导您创建应用程序的用户界面。
首先,找到该app/page.tsx文件并将以下代码片段粘贴到其中。该文件渲染components/app文件夹中声明的 App 组件。
"use client";
import { App } from "@/components/app/App";

export default function DashboardPage() {
    return <App />;
}
在文件夹中创建App.tsx、CampaignForm.tsx、MainNav.tsx和文件。UserNav.tsxcomponents/app
cd components/app
touch App.tsx CampaignForm.tsx MainNav.tsx UserNav.tsx
将下面的代码片段复制到App.tsx文件中。
"use client";
import { DEFAULT_CAMPAIGNS } from "@/lib/data";
import { Campaign } from "@/lib/types";
import { randomId } from "@/lib/utils";
import { Dashboard } from "../dashboard/Dashboard";
import { CampaignForm } from "./CampaignForm";
import { useState } from "react";
import _ from "lodash";

export function App() {
    //👇🏻 default segments
    const [segments, setSegments] = useState<string[]>([
        "Millennials/Female/Urban",
        "Parents/30s/Suburbs",
        "Seniors/Female/Rural",
        "Professionals/40s/Midwest",
        "Gamers/Male",
    ]);

    const [campaigns, setCampaigns] = useState<Campaign[]>(
        _.cloneDeep(DEFAULT_CAMPAIGNS)
    );

    //👇🏻 updates campaign list
    function saveCampaign(campaign: Campaign) {
        //👇🏻 newly created campaign
        if (campaign.id === "") {
            campaign.id = randomId();
            setCampaigns([campaign, ...campaigns]);
        } else {
            //👇🏻 existing campaign - search for the campaign and updates the campaign list
            const index = campaigns.findIndex((c) => c.id === campaign.id);
            if (index === -1) {
                setCampaigns([...campaigns, campaign]);
            } else {
                campaigns[index] = campaign;
                setCampaigns([...campaigns]);
            }
        }
    }

    const [currentCampaign, setCurrentCampaign] = useState<Campaign | undefined>(
        undefined
    );

    return (
        <div className='relative'>
            <CampaignForm
                segments={segments}
                currentCampaign={currentCampaign}
                setCurrentCampaign={setCurrentCampaign}
                saveCampaign={(campaign) => {
                    if (campaign) {
                        saveCampaign(campaign);
                    }
                    setCurrentCampaign(undefined);
                }}
            />
            <Dashboard
                campaigns={campaigns}
                setCurrentCampaign={setCurrentCampaign}
                segments={segments}
                setSegments={setSegments}
            />
        </div>
    );
}
- 从上面的代码片段来看,
- 我为该活动创建了一个默认细分列表,并对已定义的活动列表进行了深度复制。
- 该
saveCampaign函数接受一个活动作为参数。如果该活动没有 ID,则表示它是新创建的,因此会将其添加到活动列表中。否则,它会找到该活动并更新其属性。 Dashboard和组件CampaignForm接受片段和活动作为道具。
Dashboard组件在仪表板上显示各种 UI 元素,而CampaignForm 组件则使用户能够在应用程序中创建和保存新的活动。
您还可以使用GitHub 存储库中的代码片段更新仪表板和应用程序组件。
恭喜!您应该已经拥有一个可以运行的 Web 应用程序,用户可以查看和创建新的营销活动。
在接下来的部分中,您将学习如何将 CopilotKit 添加到应用程序中,以根据每个活动的目标和预算进行分析和做出决策。

使用 CopilotKit 通过 AI 分析广告活动
在这里,您将学习如何将 AI 添加到应用程序中,以帮助您分析您的活动并做出最佳决策。
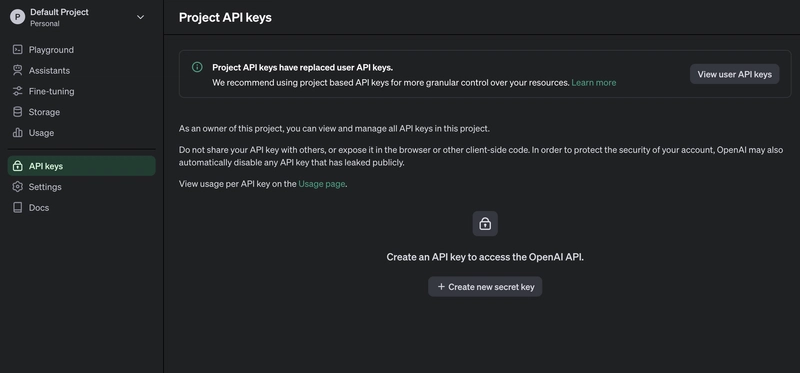
在我们继续之前,请访问OpenAI 开发者平台并创建一个新的密钥。
创建一个.env.local文件并将您新创建的密钥复制到该文件中。
OPENAI_API_KEY=<YOUR_OPENAI_SECRET_KEY>
OPENAI_MODEL=gpt-4-1106-preview
接下来,您需要为 CopilotKit 创建一个 API 端点。在 Next.js 应用文件夹中,创建一个api/copilotkit包含route.ts文件的文件夹。
cd app
mkdir api && cd api
mkdir copilotkit && cd copilotkit
touch route.ts
将以下代码片段复制到route.ts文件中。CopilotKit后端接受用户请求并使用 OpenAI 模型做出决策。
import { CopilotBackend, OpenAIAdapter } from "@copilotkit/backend";

export const runtime = "edge";

export async function POST(req: Request): Promise<Response> {
    const copilotKit = new CopilotBackend({});
    const openaiModel = process.env["OPENAI_MODEL"];

    return copilotKit.response(req, new OpenAIAdapter({ model: openaiModel }));
}
要将您的应用程序连接到此 API 端点,app/page.tsx请按如下所示更新文件:
"use client";
import { App } from "@/components/app/App";
import { CopilotKit } from "@copilotkit/react-core";
import { CopilotSidebar } from "@copilotkit/react-ui";

export default function DashboardPage() {
    return (
        <CopilotKit url='/api/copilotkit/'>
            <CopilotSidebar
                instructions='Help the user create and manage ad campaigns.'
                defaultOpen={true}
                labels={{
                    title: "Campaign Manager Copilot",
                    initial:
                        "Hello there! I can help you manage your ad campaigns. What campaign would you like to work on?",
                }}
                clickOutsideToClose={false}
            >
                <App />
            </CopilotSidebar>
        </CopilotKit>
    );
}
该CopilotKit组件包装了整个应用程序,并接受一个url包含指向 API 端点链接的 prop。该CopilotSidebar组件向应用程序添加了一个聊天机器人侧边栏面板,使我们能够向 CopilotKit 提供各种指令。

如何让AI副驾驶执行各种操作
CopilotKit 提供了两个钩子,使我们能够处理用户的请求并插入应用程序状态:useCopilotAction和useMakeCopilotReadable。
该useCopilotAction钩子允许您定义由 CopilotKit 执行的操作。它接受包含以下参数的对象:
- name——动作的名称。
- 描述——动作的描述。
- 参数——包含所需参数列表的数组。
- render - 默认的自定义函数或字符串。
- 处理程序——由操作触发的可执行函数。
useCopilotAction({
    name: "sayHello",
    description: "Say hello to someone.",
    parameters: [
        {
            name: "name",
            type: "string",
            description: "name of the person to say greet",
        },
    ],
    render: "Process greeting message...",
    handler: async ({ name }) => {
        alert(`Hello, ${name}!`);
    },
});
该useMakeCopilotReadable钩子向 CopilotKit 提供应用程序状态。
import { useMakeCopilotReadable } from "@copilotkit/react-core";

const appState = ...;
useMakeCopilotReadable(JSON.stringify(appState));
CopilotKit 还允许您为用户的提示提供上下文,使其能够做出充分而准确的决策。
将guidance.ts和 添加script.ts到lib项目内的文件夹中,并将此指导和脚本建议复制到文件中以使 CopilotKit 做出决策。
在 App 组件内,将当前日期、脚本建议和指导传递到 CopilotKit。
import { GUIDELINE } from "@/lib/guideline";
import { SCRIPT_SUGGESTION } from "@/lib/script";
import {
    useCopilotAction,
    useMakeCopilotReadable,
} from "@copilotkit/react-core";

export function App() {
    //-- 👉🏻 ...other component functions

    //👇🏻 Ground the Copilot with domain-specific knowledge for this use-case: marketing campaigns.
    useMakeCopilotReadable(GUIDELINE);
    useMakeCopilotReadable(SCRIPT_SUGGESTION);

    //👇🏻 Provide the Copilot with the current date.
    useMakeCopilotReadable("Today's date is " + new Date().toDateString());

    return (
        <div className='relative'>
            <CampaignForm
                segments={segments}
                currentCampaign={currentCampaign}
                setCurrentCampaign={setCurrentCampaign}
                saveCampaign={(campaign) => {
                    if (campaign) {
                        saveCampaign(campaign);
                    }
                    setCurrentCampaign(undefined);
                }}
            />
            <Dashboard
                campaigns={campaigns}
                setCurrentCampaign={setCurrentCampaign}
                segments={segments}
                setSegments={setSegments}
            />
        </div>
    );
}
在组件内创建一个 CopilotKit 操作,App当用户提供此类指令时,该操作会创建一个新的活动或编辑现有的活动。
useCopilotAction({
    name: "updateCurrentCampaign",
    description:
        "Edit an existing campaign or create a new one. To update only a part of a campaign, provide the id of the campaign to edit and the new values only.",
    parameters: [
        {
            name: "id",
            description:
                "The id of the campaign to edit. If empty, a new campaign will be created",
            type: "string",
        },
        {
            name: "title",
            description: "The title of the campaign",
            type: "string",
            required: false,
        },
        {
            name: "keywords",
            description: "Search keywords for the campaign",
            type: "string",
            required: false,
        },
        {
            name: "url",
            description:
                "The URL to link the ad to. Most of the time, the user will provide this value, leave it empty unless asked by the user.",
            type: "string",
            required: false,
        },
        {
            name: "headline",
            description:
                "The headline displayed in the ad. This should be a 5-10 words",
            type: "string",
            required: false,
        },
        {
            name: "description",
            description:
                "The description displayed in the ad. This should be a short text",
            type: "string",
            required: false,
        },

        {
            name: "budget",
            description: "The budget of the campaign",
            type: "number",
            required: false,
        },
        {
            name: "objective",
            description: "The objective of the campaign",
            type: "string",
            enum: [
                "brand-awareness",
                "lead-generation",
                "sales-conversion",
                "website-traffic",
                "engagement",
            ],
        },

        {
            name: "bidStrategy",
            description: "The bid strategy of the campaign",
            type: "string",
            enum: ["manual-cpc", "cpa", "cpm"],
            required: false,
        },
        {
            name: "bidAmount",
            description: "The bid amount of the campaign",
            type: "number",
            required: false,
        },
        {
            name: "segment",
            description: "The segment of the campaign",
            type: "string",
            required: false,
            enum: segments,
        },
    ],
    handler: (campaign) => {
        const newValue = _.assign(
            _.cloneDeep(currentCampaign),
            _.omitBy(campaign, _.isUndefined)
        ) as Campaign;

        setCurrentCampaign(newValue);
    },
    render: (props) => {
        if (props.status === "complete") {
            return "Campaign updated successfully";
        } else {
            return "Updating campaign";
        }
    },
});
添加另一个模拟 API 调用的操作,以允许 CopilotKit 从以前创建的活动中检索历史数据。
// Provide this component's Copilot with the ability to retrieve historical cost data for certain keywords.
// Will be called automatically when needed by the Copilot.
useCopilotAction({
    name: "retrieveHistoricalData",
    description: "Retrieve historical data for certain keywords",
    parameters: [
        {
            name: "keywords",
            description: "The keywords to retrieve data for",
            type: "string",
        },
        {
            name: "type",
            description: "The type of data to retrieve for the keywords.",
            type: "string",
            enum: ["CPM", "CPA", "CPC"],
        },
    ],
    handler: async ({ type }) => {
        // fake an API call that retrieves historical data for cost for certain keywords based on campaign type (CPM, CPA, CPC)
        await new Promise((resolve) => setTimeout(resolve, 2000));

        function getRandomValue(min: number, max: number) {
            return (Math.random() * (max - min) + min).toFixed(2);
        }

        if (type == "CPM") {
            return getRandomValue(0.5, 10);
        } else if (type == "CPA") {
            return getRandomValue(5, 100);
        } else if (type == "CPC") {
            return getRandomValue(0.2, 2);
        }
    },
    render: (props) => {
        // Custom in-chat component rendering. Different components can be rendered based on the status of the action.
        let label = "Retrieving historical data ...";
        if (props.args.type) {
            label = `Retrieving ${props.args.type} for keywords ...`;
        }
        if (props.status === "complete") {
            label = `Done retrieving ${props.args.type} for keywords.`;
        }

        const done = props.status === "complete";
        return (
            <div className=''>
                <div className=' w-full relative max-w-xs'>
                    <div className='absolute inset-0 h-full w-full bg-gradient-to-r from-blue-500 to-teal-500 transform scale-[0.80] bg-red-500 rounded-full blur-3xl' />
                    <div className='relative shadow-xl bg-gray-900 border border-gray-800  px-4 py-8 h-full overflow-hidden rounded-2xl flex flex-col justify-end items-start'>
                        <h1 className='font-bold text-sm text-white mb-4 relative z-50'>
                            {label}
                        </h1>
                        <p className='font-normal text-base text-teal-200 mb-2 relative z-50 whitespace-pre'>
                            {props.args.type &&
                                `Historical ${props.args.type}: ${props.result || "..."}`}
                        </p>
                    </div>
                </div>
            </div>
        );
    },
});

恭喜!您已完成本教程的项目。
结论
CopilotKit 是一款功能强大的工具,可让您在几分钟内将 AI Copilot 添加到您的产品中。无论您对 AI 聊天机器人和助手感兴趣,还是对复杂任务的自动化感兴趣,CopilotKit 都能让您轻松实现。
如果您需要构建 AI 产品或将 AI 工具集成到您的软件应用程序中,您应该考虑 CopilotKit。
您可以在 GitHub 上找到本教程的源代码:
https://github.com/CopilotKit/campaign-manager-demo
感谢您的阅读!
文章来源:https://dev.to/copilotkit/build-an-ai-powered-campaign-manager-nextjs-openai-copilotkit-59ii 后端开发教程 - Java、Spring Boot 实战 - msg200.com


