如何使用 Socket.io 和 React.js 构建实时拍卖系统
这篇文章是关于什么的?
就像实际拍卖一样,如果您出价购买一件商品,其他竞标者也会出价。拍卖采用“快速”决策出价,如果您出价不够快,其他人就会中标或超过您。
使用网上竞标,我们必须遵循同样的原则。一旦有新的投标,我们必须立即向投标人提供信息。

有两种方法可以从服务器获取有关新出价的实时信息:
-
使用长轮询 HTTP 请求,基本上每 5 - 10 秒发送一次 HTTP 请求来获取有关新出价的信息。
-
当新的出价到达时,使用开放套接字(Websockets)直接从服务器获取信息。
在本文中,我将讨论 Websockets,特别是 Node.js 库 - Socket.io
Novu——第一个开源通知架构
简单介绍一下我们。Novu 是第一个开源通知基础设施。我们主要负责管理所有产品通知。这些通知可以是应用内通知(类似 Facebook 的铃声图标)、电子邮件、短信等等。
寻找新的贡献者
欢迎帮助我们构建最佳的开源通知基础设施,获得社区的认可,并成为社区英雄:
https://novu.co/contributors
那么 Socket.io 到底是什么鬼?
Socket.io 是一个 JavaScript 库,它使我们能够在 Web 浏览器和 Node.js 服务器之间建立实时双向通信。它是一个高性能库,能够在最短的时间内处理大量数据。
通常,要从服务器获取信息,您需要发送 HTTP 请求。使用 WebSockets,服务器会在有新信息时自动通知您,而无需您主动询问。
在本文中,我们将利用 Socket.io 提供的实时通信功能创建一个竞价系统,允许用户将物品放到拍卖平台上并进行竞价。Socket.io 还会在物品上架拍卖时以及用户出价后通知用户。
如何将 Socket.io 添加到 React 和 Node.js 应用程序
在本节中,我们将为我们的竞价系统搭建项目环境。您还将学习如何将 Socket.io 添加到 React 和 Node.js 应用程序中,以及如何通过 Socket.io 连接两个开发服务器以实现实时通信。
创建包含两个名为客户端和服务器的子文件夹的项目文件夹。
mkdir bidding-system
cd bidding-system
mkdir client server
通过终端导航到客户端文件夹并创建一个新的 React.js 项目。
cd client
npx create-react-app ./
安装 Socket.io 客户端 API 和 React Router。React Router 是一个 JavaScript 库,它使我们能够在 React 应用程序中的页面之间导航。
npm install socket.io-client react-router-dom
从 React 应用中删除多余的文件(例如徽标和测试文件),并更新App.js文件以显示如下所示的 Hello World。
function App() {
  return (
    <div>
      <p>Hello World!</p>
    </div>
  );
}
接下来,导航到服务器文件夹并创建一个package.json文件。
cd server
npm init -y
安装 Express.js、CORS、Nodemon 和 Socket.io 服务器 API。
Express.js是一个快速、简约的框架,它提供了多种用于在 Node.js 中构建 Web 应用程序的功能。CORS 是一个 Node.js包,允许不同域之间进行通信。
Nodemon是一个 Node.js 工具,它在检测到文件更改后会自动重启服务器,而 Socket.io允许我们在服务器上配置实时连接。
npm install express cors nodemon socket.io
创建一个 index.js 文件 - Web 服务器的入口点。
touch index.js
使用 Express.js 设置一个简单的 Node.js 服务器。下面的代码片段会在浏览器中访问时返回一个 JSON 对象http://localhost:4000/api。
//index.js
const express = require('express');
const app = express();
const PORT = 4000;

app.get('/api', (req, res) => {
  res.json({
    message: 'Hello world',
  });
});

app.listen(PORT, () => {
  console.log(`Server listening on ${PORT}`);
});
导入 HTTP 和 CORS 库以允许客户端和服务器域之间进行数据传输。
const express = require('express');
const app = express();
const PORT = 4000;

//New imports
const http = require('http').Server(app);
const cors = require('cors');

app.use(cors());

app.get('/api', (req, res) => {
  res.json({
    message: 'Hello world',
  });
});

http.listen(PORT, () => {
  console.log(`Server listening on ${PORT}`);
});
接下来,将 Socket.io 添加到项目中,以创建实时连接。在app.get()代码块之前,复制以下代码。
//New imports
.....
const socketIO = require('socket.io')(http, {
    cors: {
        origin: "http://localhost:3000"
    }
});

//Add this before the app.get() block
socketIO.on('connection', (socket) => {
    console.log(`⚡: ${socket.id} user just connected!`);
    socket.on('disconnect', () => {
      console.log('🔥: A user disconnected');
    });
});
从上面的代码片段中,该socket.io("connection")函数与 React 应用程序建立连接,然后为每个套接字创建一个唯一的 ID,并在用户访问网页时将该 ID 记录到控制台。
当您刷新或关闭网页时,套接字会触发断开事件,表明用户已与套接字断开连接。
接下来,通过将启动命令添加到文件中的脚本列表中来配置 Nodemon package.json。下面的代码片段使用 Nodemon 启动服务器。
//In server/package.json

"scripts": {
    "test": "echo \"Error: no test specified\" && exit 1",
    "start": "nodemon index.js"
  },
您现在可以使用以下命令通过 Nodemon 运行服务器。
npm start
打开客户端文件夹中的 App.js 文件并将 React 应用程序连接到 Socket.io 服务器。
import socketIO from 'socket.io-client';
const socket = socketIO.connect('http://localhost:4000');

function App() {
  return (
    <div>
      <p>Hello World!</p>
    </div>
  );
}
启动 React.js 服务器。
npm start
检查服务器运行的终端;React.js 客户端的 ID 出现在终端中。
恭喜🥂,React 应用程序已成功通过 Socket.io 连接到服务器。
💡 在本文的剩余部分,我将引导您创建竞价系统的流程,在本系列的下一篇文章中,我将指导您在客户端和服务器之间发送消息并将其保存在 JSON 文件中。
💡 JSON 文件将作为应用程序的数据库。虽然这不是一种安全的数据保存方式,但这只是一个演示,因此如果需要,您可以随意使用您选择的任何数据库。
招标系统工作流程
在我们开始构建每个组件之前,我将引导您了解应用程序的工作流程。
它的工作原理如下:
- 主页:用户只需提供用户名,应用程序会保存此用户名,以便在整个应用程序中进行身份识别。为了简化本教程,我们不会使用任何身份验证库。
- 产品页面:用户可以查看所有待拍卖的产品,点击每个产品进行竞价,并且有一个行动号召将用户重定向到可以添加待拍卖物品的页面。
- 添加产品页面:此页面允许用户添加拍卖品的名称和价格,然后将他们重定向到产品页面以查看最近添加的商品。
- 出价页面:用户可以对从“产品”页面中选择的商品进行出价。此页面接受包含所选商品名称和价格的 URL 参数;然后显示一个表单输入框,允许用户对商品进行出价。
- Nav 组件:所有页面顶部都有 Nav 组件,并在其中显示通知。当用户设置出价或添加新产品时,Nav 组件会通知其他所有用户。
无需多言,创建一个包含所有页面的组件文件夹。确保每个页面都呈现一个 HTML 元素。
cd src
mkdir components
cd components
touch Home.js Products.js AddProduct.js BidProduct.js Nav.js
接下来,将 components 文件夹中的所有文件导入到 App.js 文件中,并使用 React Router v6为每个页面创建一个路由。
//Pages import
import Home from './components/Home';
import AddProduct from './components/AddProduct';
import BidProduct from './components/BidProduct';
import Products from './components/Products';
import Nav from './components/Nav';
import socketIO from 'socket.io-client';
import { Route, Routes, BrowserRouter as Router } from 'react-router-dom';

const socket = socketIO.connect('http://localhost:4000');

function App() {
  return (
    <Router>
      <div>
        {/* Nav is available at the top of all the pages as a navigation bar */}
        <Nav socket={socket} />
        <Routes>
          <Route path="/" element={<Home />} />
          <Route path="/products" element={<Products />} />
          <Route
            path="/products/add"
            element={<AddProduct socket={socket} />}
          />
          {/* Uses dynamic routing */}
          <Route
            path="/products/bid/:name/:price"
            element={<BidProduct socket={socket} />}
          />
        </Routes>
      </div>
    </Router>
  );
}

export default App;
代码片段声明了每个页面的路由,并将 Socket.io 库传递到必要的组件中。
导航到src/index.css并复制下面的代码。它包含设计此项目所需的所有 CSS。
/* --------General Stylesheet for the project ------*/
@import url('https://fonts.googleapis.com/css2?family=Poppins:wght@100;200;300;400;500;600;700;800;900&display=swap');
* {
  margin: 0;
  padding: 0;
  box-sizing: border-box;
  font-family: 'Poppins', sans-serif;
}
body {
  margin: 0;
}

/* --------Stylesheet for the Navigation component ------*/
.navbar {
  width: 100%;
  height: 10vh;
  background-color: #f0ebe3;
  display: flex;
  align-items: center;
  justify-content: space-between;
  padding: 20px;
  margin-bottom: 30px;
}
.navbar .header {
  width: 70%;
}

/* --------Stylesheet for the Home component ------*/
.home__form {
  width: 100%;
  height: 80vh;
  padding: 20px;
  display: flex;
  align-items: center;
  justify-content: center;
  flex-direction: column;
}
.home__input,
.addProduct__form input,
.bidProduct__form input {
  width: 70%;
  padding: 10px;
  border-radius: 5px;
  margin: 15px 0;
  outline: none;
  border: 1px solid #576f72;
}
.home__cta {
  width: 200px;
  padding: 10px;
  font-size: 16px;
  outline: none;
  border: none;
  cursor: pointer;
  color: #fff;
  background-color: rgb(67, 143, 67);
}

/* --------Stylesheet for the Products component ------*/
.editIcon {
  height: 20px;
  cursor: pointer;
}
table {
  width: 95%;
  border: 1px solid #576f72;
  margin: 0 auto;
  border-collapse: collapse;
}
tr,
td,
th {
  border: 1px solid #576f72;
  text-align: center;
  padding: 5px;
}
.table__container {
  display: flex;
  align-items: center;
  flex-direction: column;
}
.products__cta {
  width: 70%;
  background-color: rgb(67, 143, 67);
  padding: 15px;
  color: #fff;
  margin-bottom: 35px;
  border-radius: 5px;
  text-decoration: none;
  text-align: center;
}

/* --------Stylesheet for the AddProducts & BidProducts component ------*/
.addproduct__container,
.bidproduct__container {
  width: 100%;
  display: flex;
  flex-direction: column;
  align-items: center;
}
.addproduct__container h2,
.bidproduct__container h2 {
  margin-bottom: 30px;
}
.addProduct__form,
.bidProduct__form {
  display: flex;
  flex-direction: column;
  width: 80%;
  margin: 0 auto;
}
.addProduct__cta,
.bidProduct__cta {
  width: 200px;
  padding: 10px;
  font-size: 16px;
  outline: none;
  border: none;
  color: #fff;
  background-color: rgb(67, 143, 67);
  cursor: pointer;
}
.bidProduct__name {
  margin-bottom: 20px;
}
恭喜💃🏻,我们可以开始编写项目的每个部分的代码了。
创建应用程序的主页
在本节中,我们将创建竞价系统的主页。该页面将接受用户的用户名,然后将其保存到本地存储,以便在整个应用程序中进行识别。
更新Home.js文件以呈现接受至少六个字母作为用户名的表单字段。
import React, { useState } from 'react';

const Home = () => {
  const [userName, setUserName] = useState('');

  return (
    <div>
      <form className="home__form" onSubmit={handleSubmit}>
        <label htmlFor="username">Enter your username</label>
        <input
          type="text"
          name="username"
          className="home__input"
          value={userName}
          onChange={(e) => setUserName(e.target.value)}
          required
          minLength={6}
        />
        <button className="home__cta">SIGN IN</button>
      </form>
    </div>
  );
};

export default Home;
创建handleSubmit将用户名存储在本地存储中的函数,然后在提交表单后将用户重定向到产品页面。
从下面的代码片段可以看出,该useNavigate钩子使我们能够在页面之间重定向用户。
import React, { useState } from 'react';
import { useNavigate } from 'react-router-dom';

const Home = () => {
  const [userName, setUserName] = useState('');
  const navigate = useNavigate();

  const handleSubmit = (e) => {
    e.preventDefault();
    localStorage.setItem('userName', userName);
    navigate('/products');
  };

  return <div>.....</div>;
};

export default Home;
创建产品页面
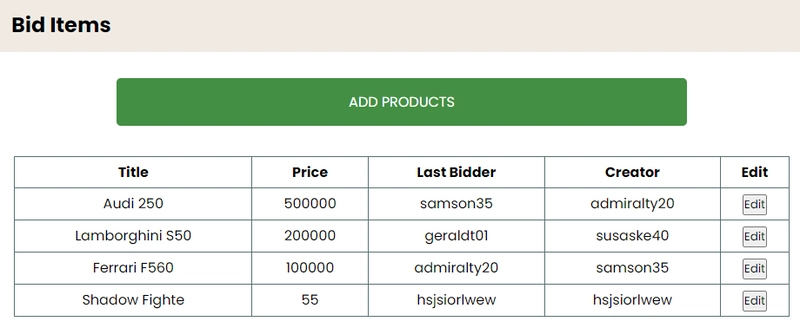
在本节中,我将指导您创建一个简单的布局,用于显示每件商品及其相关信息。商品详情包括名称、价格、所有者和最后竞标者。
对于这种数据结构来说,每行都包含每件商品的表格布局是最简单的。
那就让我们开始编写代码吧!💪
更新Products.js以显示包含两种产品的表格,其中有四列,包含名称、价格、最后竞标者和创建者。
import React from 'react';
const Products = () => {
  return (
    <div>
      <div className="table__container">
        <table>
          <thead>
            <tr>
              <th>Name</th>
              <th>Price</th>
              <th>Last Bidder</th>
              <th>Creator</th>
            </tr>
          </thead>
          {/* Data for display, we will later get it from the server */}
          <tbody>
            <tr>
              <td>Tesla Model S</td>
              <td>$30,000</td>
              <td>@david_show</td>
              <td>@elon_musk</td>
            </tr>

            <tr>
              <td>Ferrari 2021</td>
              <td>$50,000</td>
              <td>@bryan_scofield</td>
              <td>@david_asaolu</td>
            </tr>
          </tbody>
        </table>
      </div>
    </div>
  );
};

export default Products;
我们已经能够向用户显示可供拍卖的商品。接下来,我们需要允许用户添加商品并对每件商品进行竞价。一个简单的方法是创建一个指向“添加商品”页面的超链接,以及一个用于竞价的编辑按钮。
更新Products页面以包含编辑按钮和添加产品的行动号召。
import React from 'react';
import { Link } from 'react-router-dom';

const Products = () => {
  return (
    <div>
      <div className="table__container">
        <Link to="/products/add" className="products__cta">
          ADD PRODUCTS
        </Link>

        <table>
          <thead>
            <tr>
              <th>Name</th>
              <th>Price</th>
              <th>Last Bidder</th>
              <th>Creator</th>
              <th>Edit</th>
            </tr>
          </thead>
          {/* Data for display, we will later get it from the server */}
          <tbody>
            <tr>
              <td>Tesla Model S</td>
              <td>$30,000</td>
              <td>@david_show</td>
              <td>@elon_musk</td>
              <td>
                <button>Edit</button>
              </td>
            </tr>

            <tr>
              <td>Ferrari 2021</td>
              <td>$50,000</td>
              <td>@bryan_scofield</td>
              <td>@david_asaolu</td>
              <td>
                <button>Edit</button>
              </td>
            </tr>
          </tbody>
        </table>
      </div>
    </div>
  );
};

export default Products;
创建添加产品页面
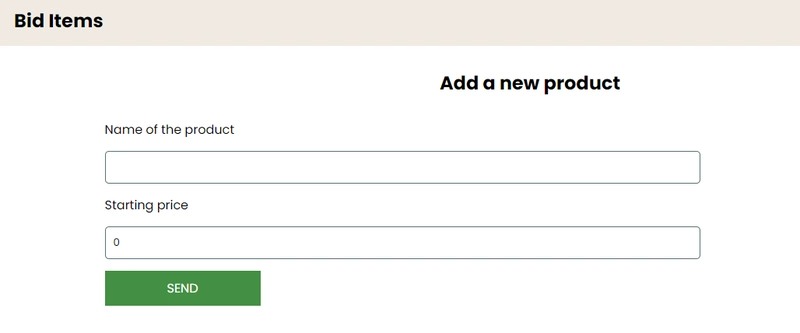
在本节中,我们将创建AddProduct一个包含表单的页面,该表单具有两个输入字段,分别用于输入拍卖产品的名称和价格,以及一个提交按钮。
import React, { useState } from 'react';
import { useNavigate } from 'react-router-dom';

const AddProduct = () => {
  const [name, setName] = useState('');
  const [price, setPrice] = useState(0);
  const navigate = useNavigate();

  const handleSubmit = (e) => {
    e.preventDefault();
    console.log({ name, price, owner: localStorage.getItem('userName') });
    navigate('/products');
  };

  return (
    <div>
      <div className="addproduct__container">
        <h2>Add a new product</h2>
        <form className="addProduct__form" onSubmit={handleSubmit}>
          <label htmlFor="name">Name of the product</label>
          <input
            type="text"
            name="name"
            value={name}
            onChange={(e) => setName(e.target.value)}
            required
          />

          <label htmlFor="price">Starting price</label>
          <input
            type="number"
            name="price"
            value={price}
            onChange={(e) => setPrice(e.target.value)}
            required
          />

          <button className="addProduct__cta">SEND</button>
        </form>
      </div>
    </div>
  );
};

export default AddProduct;
从上面的代码可以看出,handleSubmit按钮会从表单收集用户的输入,并将其记录到控制台,然后重定向到“产品”页面。保存到本地存储的用户名也会作为产品所有者附加到该产品上。
创建出价页面
出价页面与该AddProduct页面非常相似。它包含一个表单,其中包含一个用于输入所选产品出价的输入字段和一个行动号召。用户出价后,它会将用户重定向到产品页面。
import React, { useState } from 'react';
import { useNavigate } from 'react-router-dom';

const BidProduct = () => {
  const [userInput, setUserInput] = useState(0);
  const navigate = useNavigate();

  const handleSubmit = (e) => {
    e.preventDefault();
    navigate('/products');
  };

  return (
    <div>
      <div className="bidproduct__container">
        <h2>Place a Bid</h2>
        <form className="bidProduct__form" onSubmit={handleSubmit}>
          <h3 className="bidProduct__name">Product Name</h3>

          <label htmlFor="amount">Bidding Amount</label>
          <input
            type="number"
            name="amount"
            value={userInput}
            onChange={(e) => setUserInput(e.target.value)}
            required
          />

          <button className="bidProduct__cta">SEND</button>
        </form>
      </div>
    </div>
  );
};

export default BidProduct;
创建导航组件
Nav 组件位于每个页面的顶部(根据 App.js 文件)。它代表应用的通知中心——用户可以在此查看来自 Socket.io 的通知。
更新Nav.js文件以呈现<nav>如下所示的元素。 h2 元素代表徽标,通知容器位于屏幕右侧。
import React from 'react';

const Nav = () => {
  return (
    <nav className="navbar">
      <div className="header">
        <h2>Bid Items</h2>
      </div>

      <div>
        <p style={{ color: 'red' }}>My notifications are here</p>
      </div>
    </nav>
  );
};

export default Nav;
恭喜,我们已经完成了本系列的第一部分。在本系列的下一篇文章中,我将指导您如何在 React 应用和 Node.js 服务器之间发送消息。
您可以在此处找到完整的源代码:
https://github.com/novuhq/blog/tree/main/bidding%20system%20using%20socketIO
请务必关注我,以便在我发布该系列的下一部分时收到通知!
https://dev.to/nevodavid
感谢您的阅读!🥂
文章来源:https://dev.to/novu/how-to-build-a-real-time-auction-system-with-socketio-and-reactjs-3ble 后端开发教程 - Java、Spring Boot 实战 - msg200.com


