使用 ChatGPT、React 和 NodeJS 掌握通知
标题
标题
标题
标题
标题
TLDR;
在本教程中,您将学习如何使用 React 和 NodeJS 构建一个 Web 应用程序,该应用程序允许您将 ChatGPT 生成的通知发送给您的用户。
简介
我一生中开发过很多产品,
所有这些产品都需要以某种形式向用户发送通知。
它可能是一封“欢迎电子邮件”,或者通知用户他们还没有支付上一张发票😅
但有一件事是肯定的。我是个程序员,不是文案。
那么,我该如何为我的通知设计出合适的信息呢?

一年多以前,我就在使用 GPT+3,效果不错,但它还不能用于自动化生产。
但 ChatGPT 改变了游戏规则。
什么是 ChatGPT?
ChatGPT是由OpenAI 训练的 AI 语言模型 ,用于生成文本并以类似人类的对话方式与用户交互。值得一提的是,ChatGPT 是免费且开放给公众使用的。
用户只需几秒钟即可提交请求并获得历史、科学、数学和时事等广泛主题的信息或问题的答案。
ChatGPT 还可以执行其他任务,例如校对、释义和翻译。它还可以帮助编写、调试和解释代码片段。ChatGPT 的广泛功能正是其流行的原因。
主要问题是它还不能通过 API 来使用。
但这并不能阻止我们😈
Novu——第一个开源通知基础设施
简单介绍一下我们。Novu 是第一个开源通知基础设施。我们主要负责管理所有产品通知。这些通知可以是应用内通知(类似 Facebook 的铃铛图标 - Websockets)、电子邮件、短信等等。

如果你能给我们一颗星,我会非常高兴!也请在评论区告诉我❤️
https://github.com/novuhq/novu
ChatGPT 的限制
正如我之前提到的,ChatGPT 目前尚未提供公共 API。
因此,要使用它,我们必须自行摸索。
这意味着我们将执行完整的浏览器自动化操作,登录 OpenAI 网站,解决他们的验证码(您可以使用2captcha),然后发送带有 OpenAI Cookie 的 API 请求。
幸运的是,有人已经在这里建造了一个可以实现所有这些功能的公共图书馆。
仅供参考,这不是一个 API,如果您尝试发出许多请求,您将遇到严格的限制,当然,您将无法将其用于实时请求。
如果您想使用它,请使用队列并进行后台处理。如果您想了解如何操作,请在评论中留言,我会另写一篇文章来介绍它。
项目设置
在这里,我将指导您创建 Web 应用程序的项目环境。我们将使用 React.js 作为前端,使用 Node.js 作为后端服务器。
通过运行以下代码为 Web 应用程序创建项目文件夹:
mkdir react-chatgpt
cd react-chatgpt
mkdir client server
设置 Node.js 服务器
导航到服务器文件夹并创建一个package.json文件。
cd server & npm init -y
安装 Express、Nodemon 和 CORS 库。
npm install express cors nodemon
ExpressJS是一个快速、简约的框架,它提供了在 Node.js 中构建 Web 应用程序的多种功能, CORS是一个允许不同域之间通信的 Node.js 包, Nodemon是一个在检测到文件更改后自动重启服务器的 Node.js 工具。
创建一个index.js文件——Web 服务器的入口点。
touch index.js
使用 Express.js 设置 Node.js 服务器。当您http://localhost:4000/api在浏览器中访问时,下面的代码片段会返回一个 JSON 对象。
//👇🏻index.js
const express = require("express");
const cors = require("cors");
const app = express();
const PORT = 4000;

app.use(express.urlencoded({ extended: true }));
app.use(express.json());
app.use(cors());

app.get("/api", (req, res) => {
    res.json({
        message: "Hello world",
    });
});

app.listen(PORT, () => {
    console.log(`Server listening on ${PORT}`);
});
安装 ChatGPT API 库 和 Puppeteer。ChatGPT API 使用 Puppeteer 作为可选的对等依赖项,以自动绕过 Cloudflare 保护。
npm install chatgpt puppeteer
要在 中使用 ChatGPT API server/index.js,您需要配置文件以使用require和import关键字来导入库。
因此,更新server/package.json以包含类型关键字。
{ "type": "module" }
在文件顶部添加下面的代码片段server/index.js。
import { createRequire } from "module";
const require = createRequire(import.meta.url);
//...other code statements
完成最后两个步骤后,您现在就可以在index.js文件中使用 ChatGPT。
通过将启动命令添加到package.json文件中的脚本列表中来配置 Nodemon。下面的代码片段使用 Nodemon 启动服务器。
//In server/package.json

"scripts": {
    "test": "echo \"Error: no test specified\" && exit 1",
    "start": "nodemon index.js"
  },
恭喜!您现在可以使用以下命令启动服务器。
npm start
设置 React 应用程序
通过终端导航到客户端文件夹并创建一个新的 React.js 项目。
cd client
npx create-react-app ./
安装 React Router - 一个 JavaScript 库,使我们能够在 React 应用程序中的页面之间导航。
npm install react-router-dom
从 React 应用程序中删除冗余文件,例如徽标和测试文件,并更新App.js文件以显示“Hello World”,如下所示。
function App() {
    return (
        <div>
            <p>Hello World!</p>
        </div>
    );
}
export default App;
导航到src/index.css文件并复制以下代码。它包含设计此项目所需的所有 CSS。
@import url("https://fonts.googleapis.com/css2?family=Space+Grotesk:wght@300;400;500;600;700&display=swap");
* {
    box-sizing: border-box;
    margin: 0;
    padding: 0;
    font-family: "Space Grotesk", sans-serif;
}
body {
    margin: 0;
    padding: 0;
}
textarea,
select {
    padding: 10px 15px;
    margin-bottom: 15px;
    border: 1px solid #ddd;
    border-radius: 5px;
}
.notification__form {
    width: 80%;
    display: flex;
    align-items: left;
    justify-content: center;
    flex-direction: column;
}
.homeContainer h3,
textarea {
    margin-bottom: 20px;
}
.notification__form button {
    width: 200px;
    padding: 15px 10px;
    cursor: pointer;
    outline: none;
    border: none;
    background-color: #82aae3;
    border-radius: 5px;
    margin-bottom: 15px;
}
.navbar {
    width: 100%;
    height: 10vh;
    padding: 20px;
    background-color: #82aae3;
    display: flex;
    align-items: center;
    justify-content: space-between;
}
.homeContainer {
    width: 100%;
    min-height: 100vh;
    display: flex;
    align-items: center;
    justify-content: center;
    flex-direction: column;
}
更新App.js文件以呈现 Home 组件,如下所示:
import React from "react";
import { BrowserRouter, Route, Routes } from "react-router-dom";
import Home from "./components/Home";

const App = () => {
    return (
        <BrowserRouter>
            <Routes>
                <Route path='/' element={<Home />} />
            </Routes>
        </BrowserRouter>
    );
};

export default App;
从上面的代码片段中,我导入了 Home 组件。创建一个包含该Home.js文件的 components 文件夹,如下所示:
cd client
mkdir components
cd components
touch Home.js
将下面的代码片段复制到Home.js文件中:
import React, { useState } from "react";
const Home = () => {
const [message, setMessage] = useState("");
const [subscriber, setSubscriber] = useState("");
const handleSubmit = (e) => {
e.preventDefault();
console.log({ message, subscriber });
setMessage("");
setSubscriber("");
};
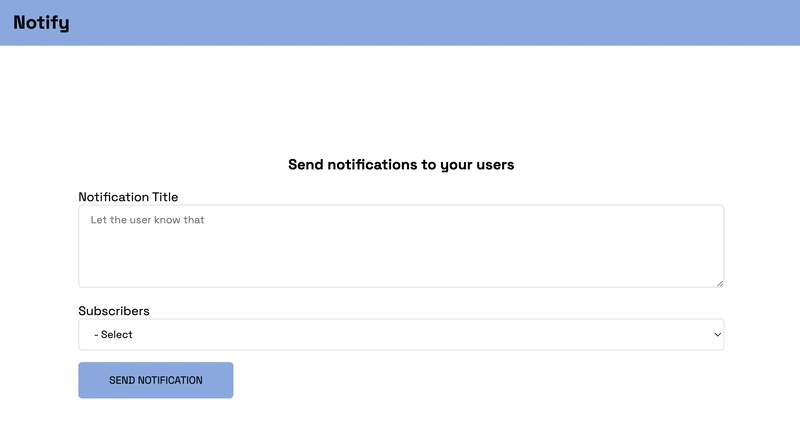
return (
<div className='home'>
<nav className='navbar'>
<h2>Notify</h2>
</nav>
<main className='homeContainer'>
<h3>Send notifications to your users</h3>
<form
className='notification__form'
onSubmit={handleSubmit}
method='POST'
>
<label htmlFor='title'>Notification Title</label>
<textarea
rows={5}
name='title'
required
value={message}
onChange={(e) => setMessage(e.target.value)}
placeholder='Let the user know that'
/>
<label htmlFor='subscriber'>Subscribers</label>
<select
value={subscriber}
name='subscriber'
onChange={(e) => setSubscriber(e.target.value)}
>
<option value='Select'>Select</option>
</select>
<button>SEND NOTIFICATION</button>
</form>
</main>
</div>
);
};
export default Home;
如何将 Novu 添加到 React 和 Node.js 应用程序
我们将使用 Novu 发送应用内通知,但如果您想构建自己的应用内通知,请跳过此步骤。
将 Novu 添加到 React 应用程序
通过在客户端文件夹中运行以下代码来创建 Novu 项目。
cd client
npx novu init
在创建 Novu 项目之前,您需要使用 Github 登录。下面的代码片段包含运行后应遵循的步骤npx novu init。
Now let's setup your account and send your first notification
❓ What is your application name? Devto Clone
❓ Now lets setup your environment. How would you like to proceed?
   > Create a free cloud account (Recommended)
❓ Create your account with:
   > Sign-in with GitHub
❓ I accept the Terms and Condidtions (https://novu.co/terms) and have read the Privacy Policy (https://novu.co/privacy)
    > Yes
✔️ Create your account successfully.

We've created a demo web page for you to see novu notifications in action.
Visit: http://localhost:57807/demo to continue
访问演示网页http://localhost:52685/demo,复制您的订阅者 ID,然后点击“跳过教程”按钮。我们将在本教程的后续部分使用它。

在您的 React 项目中安装 Novu Notification 包作为依赖项。
npm install @novu/notification-center
更新components/Home.js文件以包含 Novu 及其 文档中所需的元素。
import {
    NovuProvider,
    PopoverNotificationCenter,
    NotificationBell,
} from "@novu/notification-center";
import { useNavigate } from "react-router-dom";

const Home = () => {
    const navigate = useNavigate();

    const onNotificationClick = (notification) => {
        navigate(notification.cta.data.url);
    };
    //...other statements

    return (
        <div className='home'>
            <nav className='navbar'>
                <h2>Notify</h2>
                <NovuProvider
                    subscriberId={"<YOUR_SUBSCRIBER_ID>"}
                    applicationIdentifier={"<YOUR_APP_ID>"}
                >
                    <PopoverNotificationCenter onNotificationClick={onNotificationClick}>
                        {({ unseenCount }) => (
                            <NotificationBell unseenCount={unseenCount} colorScheme='light' />
                        )}
                    </PopoverNotificationCenter>
                </NovuProvider>
            </nav>
            <main className='homeContainer'>...</main>
        </div>
    );
};
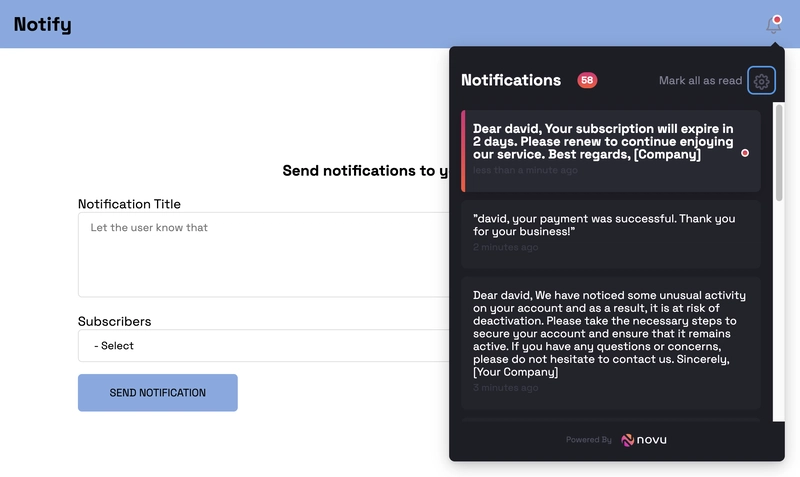
上面的代码片段将 Novu 的通知铃铛图标添加到导航栏,使我们能够查看所有应用通知。

该NovuProvider组件需要您先前复制的订户 ID以及Novu 管理平台http://localhost:52685/demoAPI 密钥下的设置部分中提供的应用程序 ID 。
接下来,让我们为应用程序创建通知工作流程和模板。
在浏览器中打开Novu Manage 平台并创建通知模板。
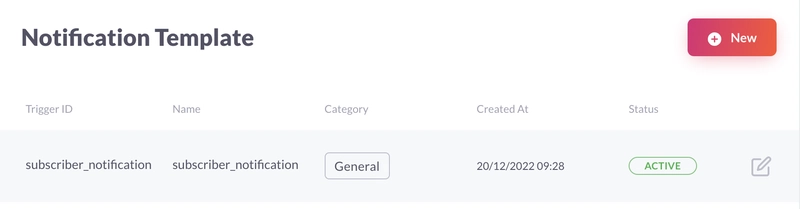
选择模板,点击工作流编辑器,确保工作流如下:
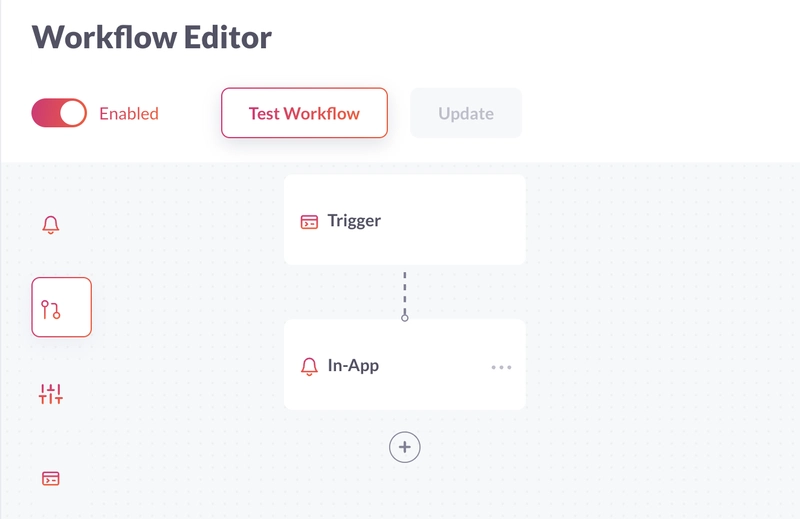
点击该In-App步骤并编辑模板以包含消息变量,如下所示。该消息变量将包含 ChatGPT 生成的通知。
{{message}}
单击“更新”按钮保存模板。
将 Novu 添加到 Node.js 应用程序
导航到服务器文件夹并安装适用于 Node.js 的 Novu SDK。
cd server
npm install @novu/node
从包中导入 Novu 并使用您的 API 密钥创建实例。
//server/index.js

const { Novu } = require("@novu/node");
const novu = new Novu("<YOUR_API_KEY>");
恭喜!您已成功将 Novu 添加到您的 Web 应用程序中。在接下来的部分中,您将学习如何通过 Novu 向用户发送 AI 生成的通知。
如何通过 Novu 向您的用户发送 ChatGPT 通知
在本节中,我将指导您如何从 ChatGPT 生成针对不同用例的通知,并将其发送给您的 Novu 订阅者。
该应用程序允许您指定所需的通知类型,并选择接收消息的订阅者。
我们在 中创建了一个表单字段Home.js。接下来,让我们获取订阅者列表并在组件中显示它们。
获取并显示您的 Novu 订阅者
在文件中添加一条index.js从 Novu 获取订阅者列表的路由。
app.get("/subscribers", async (req, res) => {
    try {
        const { data } = await novu.subscribers.list(0);
        const resultData = data.data;
        //👇🏻 Returns subscibers with an id, and first and last names
        const subscribers = resultData.filter(
            (d) => d.firstName && d.lastName && d.subscriberId
        );
        res.json(subscribers);
    } catch (err) {
        console.error(err);
    }
});
创建一个函数,向端点发送请求/subscribers并在 React 应用程序的页面加载时显示订阅者。
//👇🏻 State representing the list of subscribers
const [subscribers, setSubscribers] = useState([
    { firstName: "", lastName: "", subscriberId: "Select", _id: "null" },
]);

//👇🏻 Fetch the list of subscribers on page load
useEffect(() => {
    async function fetchSubscribers() {
        try {
            const request = await fetch("http://localhost:4000/subscribers");
            const response = await request.json();
            setSubscribers([...subscribers, ...response]);
        } catch (err) {
            console.error(err);
        }
    }
    fetchSubscribers();
}, []);
更新 Home 组件内的 select 标签以呈现订阅者列表,如下所示:
<select
    value={subscriber}
    name='subscriber'
    onChange={(e) => setSubscriber(e.target.value)}
>
    {subscribers.map((s) => (
        <option
            key={s._id}
            value={`${s.firstName} ${s.lastName} - ${s.subscriberId}`}
        >{`${s.firstName} ${s.lastName} - ${s.subscriberId}`}</option>
    ))}
</select>
从 ChatGPT 生成通知
index.js创建一个接受来自用户的通知标题和订阅者的路线。
app.post("/notify", (req, res) => {
    //👇🏻 Destructure the message and subscriber from the object
    const { message, subscriber } = req.body;
    //👇🏻 Separates the first name and the subscriber ID
    const subscriberDetails = subscriber.split(" ");
    const firstName = subscriberDetails[0];
    const subscriberId = subscriberDetails[3];
    //👇🏻 Added some specifications to the message to enable the AI generate a concise notification.
    const fullMessage = `I have a notification system and I want to send the user a notification about "${message}" can you write me one?
please use double curly brackets for variables.
make it short, and use only one variable for the user name.
Please just write 1 notification without any intro.`;

    //👇🏻 Log the required variables to the console
    console.log({ firstName, subscriberId, fullMessage });
});
接下来,我们将表单详细信息提交到/notify服务器上的路由。创建一个函数,在表单提交时向端点发出 POST 请求。
//👇🏻 Makes the POST request
async function sendNotification() {
    try {
        const request = await fetch("http://localhost:4000/notify", {
            method: "POST",
            body: JSON.stringify({
                message,
                subscriber,
            }),
            headers: {
                Accept: "application/json",
                "Content-Type": "application/json",
            },
        });
        const data = await request.json();
        console.log(data);
    } catch (err) {
        console.error(err);
    }
}

//👇🏻 Runs when a user submits the form
const handleSubmit = (e) => {
    e.preventDefault();
    //👇🏻 Calls the function
    sendNotification();
    setMessage("");
    setSubscriber("");
};
更新/notify路由以将必要的变量传递到另一个函数。
app.post("/notify", (req, res) => {
    const { message, subscriber } = req.body;
    const subscriberDetails = subscriber.split(" ");
    const firstName = subscriberDetails[0];
    const subscriberId = subscriberDetails[3];
    const fullMessage = `I have a notification system and I want to send the user a notification about "${message}" can you write me one?
please use double curly brackets for variables.
make it short, and use only one variable for the user name.
Please just write 1 notification without any intro.`;
    console.log({ firstName, subscriberId, fullMessage });

    //👇🏻 Pass the variables as a parameter into the function
    chatgptFunction(fullMessage, subscriberId, firstName, res);
});
chatgptFunction按照如下所示创建:
//👇🏻 Holds the AI-generated notification
let chatgptResult = "";

async function chatgptFunction(message, subscriberId, firstName, res) {
    // use puppeteer to bypass cloudflare (headful because of captchas)
    const api = new ChatGPTAPIBrowser({
        email: "<YOUR_CHATGPT_EMAIL>",
        password: "<YOUR_CHATGPT_PASSWORD>",
    });
    //👇🏻 Open up the login screen on the browser
    await api.initSession();
    const result = await api.sendMessage(message);
    chatgptResult = result.response;
    //👇🏻 Replace the user variable with the user's first name
    const notificationString = chatgptResult.replace("{{user}}", firstName);

    console.log(notificationString, subscriberId);
}
最后,让我们通过 ID 将通知发送给订阅者。创建另一个函数,用于接受notificationString并subscriberId发送通知。
async function chatgptFunction(message, subscriberId, firstName, res) {
    // use puppeteer to bypass cloudflare (headful because of captchas)
    const api = new ChatGPTAPIBrowser({
        email: "<YOUR_CHATGPT_EMAIL>",
        password: "<YOUR_CHATGPT_PASSWORD>",
    });
    await api.initSession();
    const result = await api.sendMessage(message);
    chatgptResult = result.response;
    const notificationString = chatgptResult.replace("{{user}}", firstName);

    //👇🏻 Pass the necessary variables as parameters
    sendNotification(notificationString, subscriberId, res);
}

//👇🏻 Sends the notification via Novu
async function sendNotification(data, subscriberId, res) {
    try {
        let result = await novu.trigger("<NOTIFICATION_TEMPLATE_ID>", {
            to: {
                subscriberId: subscriberId,
            },
            payload: {
                message: data,
            },
        });
        return res.json({ message: result });
    } catch (err) {
        return res.json({ error_message: err });
    }
}
恭喜!🎉您已完成本教程的项目。
结论
到目前为止,我们已经介绍了
- ChatGPT 是什么
- 如何在 Node.js 应用程序中与其通信,以及
- 如何在 React 和 Node.js 应用程序中通过 Novu 向用户发送 ChatGPT 生成的通知。
本教程将引导您了解使用 Novu 和 ChatGPT 构建的应用程序示例。ChatGPT 可被视为终极个人助理,在各个领域都非常有用,能够帮助我们更智能、更高效地工作。
本教程的源代码可在此处获取:https://github.com/novuhq/blog/tree/main/sending-chatgpt-notifications-with-novu
感谢您的阅读!
帮帮我!
如果您觉得这篇文章帮助您更好地理解了 WebSocket!请给我们一个 Star,我会非常高兴!也请在评论区告诉我❤️
https://github.com/novuhq/novu