🪄✨使用 React、Hanko 和 Novu 构建具有点赞功能的博客🔥
TL;DR🔥
TL;DR🔥
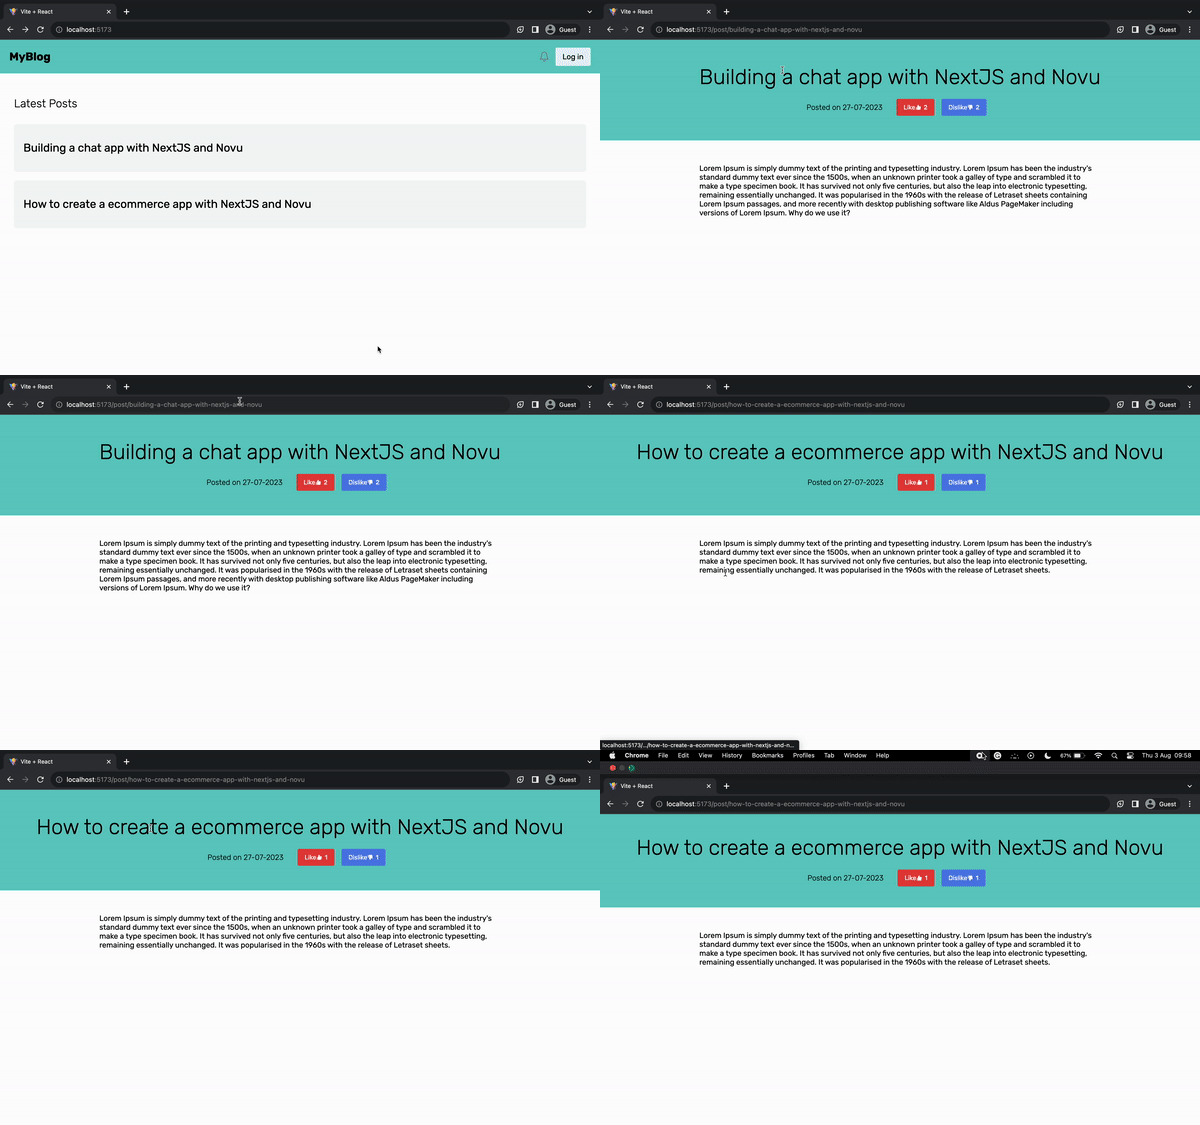
在本教程中,您将学习如何构建一个博客平台,让您可以创建和回复帖子。
- 我们将与 Hanko 建立登录和注册
- 构建整个博客:
- 创建帖子
- 对帖子做出反应
- 使用 Novu 为每个反应添加应用内通知。
Novu:开源通知基础设施🚀
简单介绍一下我们。Novu 是一个开源通知基础设施。我们主要负责管理所有产品通知。通知可以是应用内通知(类似于开发者社区的Websockets中的铃铛图标)、电子邮件、短信等等。
让我们开始设置吧🆙
现在,我将引导您创建应用程序的项目设置。我们将使用 React.js 作为前端,使用 Node.js 作为后端服务器。
如下所示为 Web 应用程序创建一个文件夹。
mkdir simple-blog
cd simple-blog
mkdir client server
设置 Node.js 服务器
导航到服务器文件夹并创建一个package.json文件。
cd server & npm init -y
安装 Express、Nodemon 和 CORS 库。
npm install express cors nodemon
ExpressJS 是一个快速、简约的框架,它提供了在 Node.js 中构建 Web 应用程序的多种功能, CORS 是一个允许不同域之间通信的 Node.js 包, Nodemon 是一个在检测到文件更改后自动重启服务器的 Node.js 工具。
创建一个index.js文件——Web 服务器的入口点。
touch index.js
使用 Express.js 设置 Node.js 服务器。当您http://localhost:4000/api在浏览器中访问时,下面的代码片段会返回一个 JSON 对象。
//👇🏻index.js
const express = require("express");
const cors = require("cors");
const app = express();
const PORT = 4000;

app.use(express.urlencoded({ extended: true }));
app.use(express.json());
app.use(cors());

app.get("/api", (req, res) => {
    res.json({
        message: "Hello world",
    });
});

app.listen(PORT, () => {
    console.log(`Server listening on ${PORT}`);
});
通过将启动命令添加到package.json文件中的脚本列表中来配置 Nodemon。下面的代码片段使用 Nodemon 启动服务器。
//In server/package.json

"scripts": {
    "test": "echo \"Error: no test specified\" && exit 1",
    "start": "nodemon index.js"
  },
恭喜!🎉您现在可以使用以下命令启动服务器。
npm start
设置 React 应用程序
通过终端导航到客户端文件夹并使用 Vite创建一个新的 React.js 项目。
npm create vite@latest
安装 React Icons 和 React Router - 一个 JavaScript 库,使我们能够在 React 应用程序中的页面之间导航。
npm install react-router-dom react-icons
删除 React 应用程序中的冗余文件(例如徽标和测试文件),并更新App.jsx文件以显示“Hello World”,如下所示。
function App() {
    return (
        <div>
            <p>Hello World!</p>
        </div>
    );
}
export default App;
将此处项目样式所需的 CSS 文件复制 到src/index.css文件中。
构建应用程序用户界面🛠️
在这里,我们将为博客应用程序创建用户界面,以使用户能够查看、创建和回应帖子。
client/src在包含Home.jsx、Login.jsx、Details.jsx和 的文件夹中创建一个 components 文件夹NewPost.jsx。
cd client/src
mkdir components
touch Home.jsx Details.jsx Login.jsx NewPost.jsx
- 从上面的代码片段
- 该
Home.jsx组件显示所有可用的帖子。 - 该
Detail.jsx组件显示每篇帖子的详细信息,例如其内容、发布日期以及对该帖子的反应数量。 - 该
NewPost.jsx组件使用户能够创建新帖子。 - 该
Login.jsx组件通过 Hanko 将用户登录到应用程序中。
- 该
更新App.jsx文件以使用 React Router 呈现组件。
import React from "react";
import { BrowserRouter as Router, Route, Routes } from "react-router-dom";
import Home from "./components/Home";
import Details from "./components/Details";
import Login from "./components/Login";
import NewPost from "./components/NewPost";

const App = () => {
    return (
        <Router>
            <Routes>
                <Route path='/' element={<Home />} />
                <Route path='/login' element={<Login />} />
                <Route path='/post/:slug' element={<Details />} />
                <Route path='/post/new' element={<NewPost />} />
            </Routes>
        </Router>
    );
};

export default App;
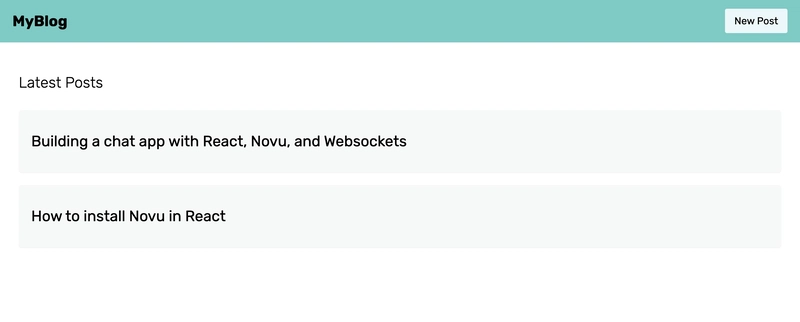
主页
主页显示应用程序内创建的所有帖子。将以下代码复制到Home.jsx文件中。
import React from "react";
import { Link } from "react-router-dom";

const Home = () => {
    return (
        <div>
            <nav className='navbar'>
                <Link to='/' className='logo'>
                    <h2>MyBlog</h2>
                </Link>
                <div style={{ display: "flex", alignItems: "center" }}>
                    <Link to='/post/new' className='newPostBtn'>
                        New Post
                    </Link>
                </div>
            </nav>
            <main className='main'>
                <h2 className='heading'>Latest Posts</h2>
                <div className='posts_container'>
                    <Link to={`/post/details`} className='post'>
                        <h2 className='post_title'>
                            Building a chat app with React, Novu, and Websockets
                        </h2>
                    </Link>

                    <Link to={`/post/details`} className='post'>
                        <h2 className='post_title'>How to install Novu in React</h2>
                    </Link>
                </div>
            </main>
        </div>
    );
};

export default Home;
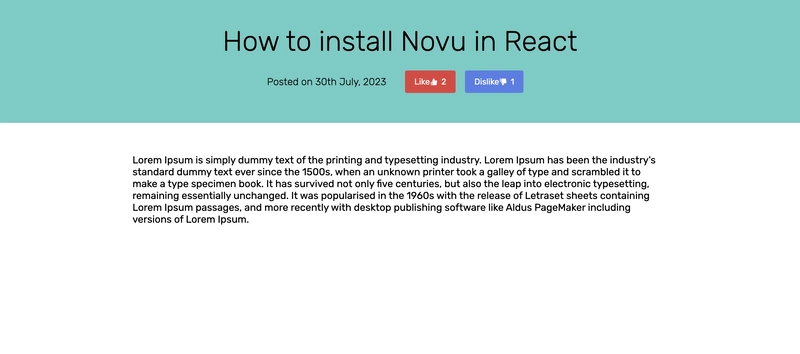
帖子详情页面
用户从组件点击时,此页面会显示帖子详情Home.jsx。将以下代码复制到Details.jsx文件中。
import React from "react";
import { AiTwotoneLike, AiTwotoneDislike } from "react-icons/ai";

const Details = () => {
    return (
        <div>
            <header className='details_header'>
                <h1 className='details_heading'>How to install Novu in React</h1>
                <div className='post_details'>
                    <div>
                        <p className='details_date'>Posted on 30th July, 2023</p>
                    </div>
                    <div className='reactions-group'>
                        <button className='reactBtn'>
                            Like <AiTwotoneLike /> <span style={{ marginLeft: 5 }}>2</span>
                        </button>
                        <button className='reactBtn unlikeBtn'>
                            Dislike <AiTwotoneDislike />
                            <span style={{ marginLeft: 5 }}>1</span>
                        </button>
                    </div>
                </div>
            </header>
            <main className='details_body'>
                Lorem Ipsum is simply dummy text of the printing and typesetting
                industry. Lorem Ipsum has been the industry's standard dummy text ever
                since the 1500s, when an unknown printer took a galley of type and
                scrambled it to make a type specimen book. It has survived not only five
                centuries, but also the leap into electronic typesetting, remaining
                essentially unchanged. It was popularised in the 1960s with the release
                of Letraset sheets containing Lorem Ipsum passages, and more recently
                with desktop publishing software like Aldus PageMaker including versions
                of Lorem Ipsum.
            </main>
        </div>
    );
};

export default Details;
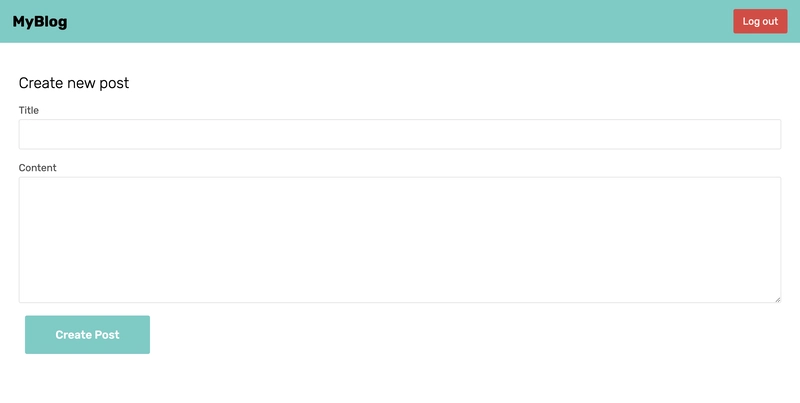
新帖子页面
此页面显示一个表单字段,用于填写博客文章的标题和内容。请将以下代码片段复制到NewPost.jsx文件中。
import React, { useState } from "react";
import { Link, useNavigate } from "react-router-dom";

const NewPost = () => {
    const navigate = useNavigate();
    const [title, setTitle] = useState("");
    const [content, setContent] = useState("");

    const handleSubmit = (e) => {
        e.preventDefault();
        console.log({ title, content });
        setContent("");
        setTitle("");
    };
    return (
        <div>
            <nav className='navbar'>
                <Link to='/' className='logo'>
                    <h2>MyBlog</h2>
                </Link>

                <div>
                    <button className='newPostBtn logOut'>Log out</button>
                </div>
            </nav>
            <main className='main'>
                <h2 className='heading'>Create new post</h2>
                <form className='newPost_form' onSubmit={handleSubmit}>
                    <label htmlFor='title' className='label'>
                        Title
                    </label>
                    <input
                        type='text'
                        className='newPost_title'
                        id='title'
                        name='title'
                        value={title}
                        required
                        onChange={(e) => setTitle(e.target.value)}
                    />
                    <label htmlFor='content' className='label'>
                        Content
                    </label>
                    <textarea
                        rows={10}
                        className='newPost_content'
                        value={content}
                        required
                        onChange={(e) => setContent(e.target.value)}
                    />
                    <button className='newPostBtn submitBtn' type='submit'>
                        Create Post
                    </button>
                </form>
            </main>
        </div>
    );
};

export default NewPost;
密码钥匙代表着未来吗?🔑
Hanko 是一个开源、易于集成的身份验证解决方案,可让您向软件应用程序添加各种形式的身份验证,例如电子邮件和密码、无密码、密码密钥和 OAuth。
它是一个一体化的身份验证解决方案,可让您在几分钟内在您的 Web 应用程序中设置身份验证。它还提供可自定义的 Web 组件,您可以将其添加到您的 Web 应用程序中,以便快速轻松地处理身份验证。
在接下来的部分中,您将学习如何将 Hanko 添加到博客应用程序中。
使用 Hanko 轻松向 React 应用添加身份验证
在这里,你将学习如何使用 Hanko 为你的 React 应用程序添加身份验证。在开始之前,请运行下面的代码片段来安装 Hanko 包。
npm install @teamhanko/hanko-elements
建立 Hanko 项目
访问 主页 并创建一个帐户。
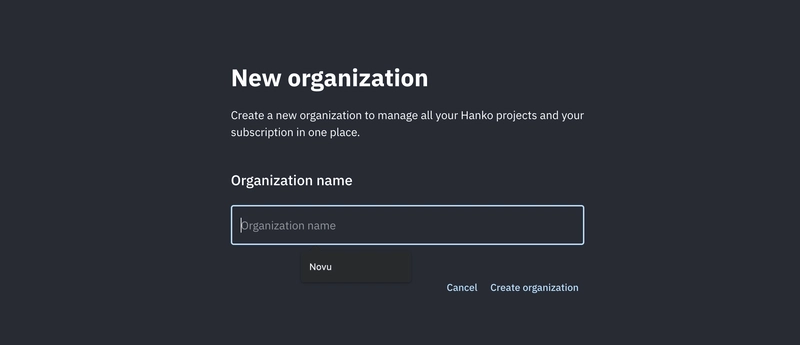
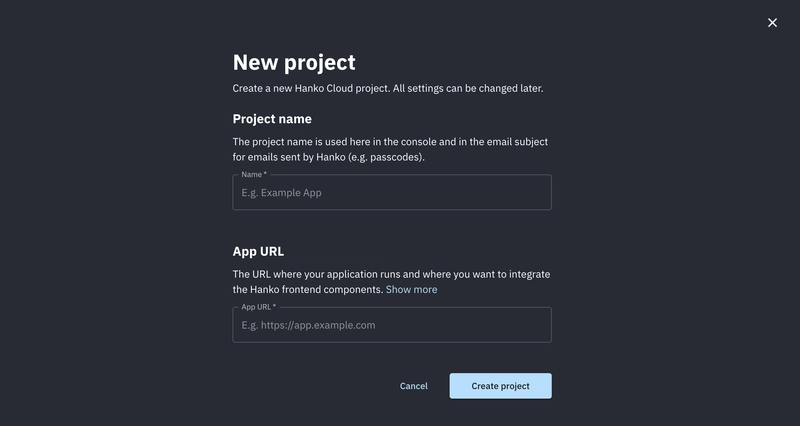
创建一个新组织来管理您的 Hanko 项目。
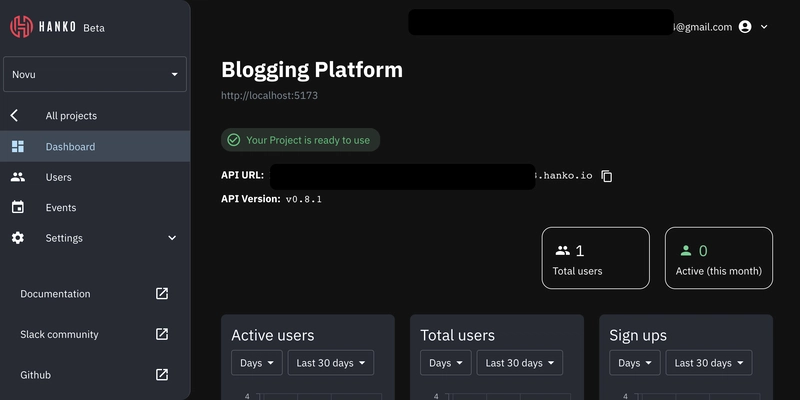
然后,创建一个新的 Hanko 项目并将您的开发服务器添加为 API URL。
最后,将您的 API URL 保存在计算机上的某个位置;它将用于设置身份验证。
将 Hanko 添加到 React 应用
将下面的代码复制到Login.jsx文件中。
import React, { useEffect, useCallback, useMemo } from "react";
import { useNavigate } from "react-router-dom";
import { register, Hanko } from "@teamhanko/hanko-elements";
const hankoApi = "<YOUR_HANKO_API_URL>";

const Login = () => {
    const navigate = useNavigate();
    const hanko = useMemo(() => new Hanko(hankoApi), []);

    useEffect(() => {
        register(hankoApi).catch((error) => {
            console.log(error);
        });
    }, []);

    return (
        <div className='login_container'>
            <hanko-auth />
        </div>
    );
};

export default Login;
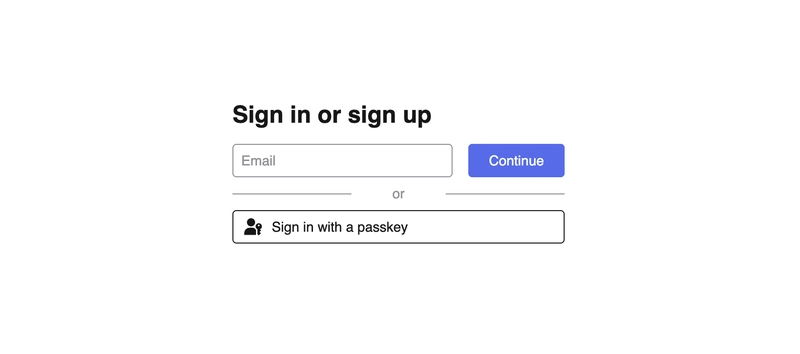
该代码片段显示 Hanko 身份验证组件并允许用户直接通过 Hanko 注册或登录。
在组件内添加下面的代码片段Login.jsx。
//👇🏻 generates random string as ID
const generateUserID = () => Math.random().toString(36).substring(2, 10);

//👇🏻 executes after a user logs in
const redirectAfterLogin = useCallback(() => {
    localStorage.setItem("loggedIn", "true");
    if (!localStorage.getItem("u_id")) {
        localStorage.setItem("u_id", generateUserID());
    }
    navigate("/");
}, [navigate]);

//👇🏻 triggered after a successful sign in
useEffect(
    () =>
        hanko.onAuthFlowCompleted(() => {
            redirectAfterLogin();
        }),
    [hanko, redirectAfterLogin]
);
从上面的代码片段中可以看出,当用户登录应用程序时,该u_id值被设置为本地存储,以便在用户请求 Node.js 服务器时识别每个用户。
💡PS:由于这是一个小型应用程序,因此我使用了本地存储。如果您在生产环境中使用 Hanko,则可能需要 查看后端指南。
恭喜!🎉 您已成功将 Hanko 添加到 React 应用程序中。在接下来的部分中,我们将向博客应用程序添加所有必要的功能。
与 Node.js 服务器通信
在本节中,您将学习如何通过在应用程序内检索和创建帖子来与 Node.js 服务器通信。
在我们开始之前,请在 React 应用程序中创建一个utils包含文件的文件夹。util.js
cd client
mkdir utils
cd utils
touch util.js
显示博客文章
index.js在服务器上的文件中创建一个帖子数组。
let posts = [
    {
        u_id: "a123",
        post_id: "1",
        title: "Building a chat app with NextJS and Novu",
        slug: "building-a-chat-app-with-nextjs-and-novu",
        content:
            "Lorem Ipsum is simply dummy text of the printing and typesetting industry. Lorem Ipsum has been the industry's standard dummy text ever since the 1500s, when an unknown printer took a galley of type and scrambled it to make a type specimen book. It has survived not only five centuries, but also the leap into electronic typesetting, remaining essentially unchanged.",
        published_date: "27-07-2023",
        likes: [{ u_id: "12345" }, { u_id: "ancsd" }],
        dislikes: [{ user_id: "12345" }, { u_id: "12345" }],
    },
    {
        u_id: "b123",
        post_id: "2",
        title: "How to create an ecommerce app with NextJS and Novu ",
        slug: "how-to-create-an-ecommerce-app-with-nextjs-and-novu",
        content:
            "Lorem Ipsum is simply dummy text of the printing and typesetting industry. Lorem Ipsum has been the industry's standard dummy text ever since the 1500s, when an unknown printer took a galley of type and scrambled it to make a type specimen book. It has survived not only five centuries, but also the leap into electronic typesetting, remaining essentially unchanged. It was popularised in the 1960s with the release of Letraset sheets.",
        published_date: "27-07-2023",
        likes: [{ u_id: "12345" }],
        dislikes: [{ user_id: "12345" }],
    },
];
添加另一个以 JSON 格式返回帖子的端点。
app.get("/posts", (req, res) => {
    res.json({
        posts,
    });
});
接下来,在文件中创建一个函数utils/util.js,从 React 应用程序向端点发送请求。
export const fetchAllPosts = (setLoading, setPosts) => {
    fetch("http://localhost:4000/posts")
        .then((res) => res.json())
        .then((data) => {
            setLoading(false);
            setPosts(data.posts);
        })
        .catch((err) => console.error(err));
};
最后,在Home组件挂载的时候执行该函数。
import React, { useCallback, useEffect, useState } from "react";
import { Link } from "react-router-dom";
import { fetchAllPosts } from "../utils/util";

const Home = () => {
    const [loggedIn, setLoggedIn] = useState(false);
    const [posts, setPosts] = useState([]);
    const [loading, setLoading] = useState(true);

    const fetchPosts = useCallback(() => {
        fetchAllPosts(setLoading, setPosts);
    }, []);

    useEffect(() => {
        if (localStorage.getItem("loggedIn")) {
            setLoggedIn(true);
        }
        fetchPosts();
    }, [fetchPosts]);

    if (loading) return <p>Loading...</p>;

    return (
        <div>
            <nav className='navbar'>
                <Link to='/' className='logo'>
                    <h2>MyBlog</h2>
                </Link>
                <div style={{ display: "flex", alignItems: "center" }}>
                    {loggedIn ? (
                        <Link to='/post/new' className='newPostBtn'>
                            New Post
                        </Link>
                    ) : (
                        <Link to='/login' className='newPostBtn'>
                            Log in
                        </Link>
                    )}
                </div>
            </nav>
            <main className='main'>
                <h2 className='heading'>Latest Posts</h2>
                <div className='posts_container'>
                    {posts?.map((post) => (
                        <Link to={`/post/${post.slug}`} className='post' key={post.post_id}>
                            <h2 className='post_title'>{post.title}</h2>
                        </Link>
                    ))}
                </div>
            </main>
        </div>
    );
};

export default Home;
上面的代码片段在页面挂载时从服务器获取所有帖子,并在 React 应用中显示它们。它还会检查用户是否经过身份验证才能显示Login或New Post按钮。
检索帖子的详细信息
这里,你需要在主页点击某篇文章时获取其详细信息。为此,你需要通过 slug 属性过滤文章数组。
创建另一个 POST 路由,posts通过帖子的 slug 过滤数组并返回整个帖子对象。
app.post("/post/details", (req, res) => {
    const { slug } = req.body;
    const result = posts.filter((post) => post.slug === slug);
    res.json({ post: result[0] });
});
在文件中添加一个函数utils/util.js,向端点发送请求post/details并返回帖子对象。
export const fetchPostContent = (slug, setLoading, setPost) => {
    fetch("http://localhost:4000/post/details", {
        method: "POST",
        body: JSON.stringify({ slug: slug }),
        headers: {
            Accept: "application/json",
            "Content-Type": "application/json",
        },
    })
        .then((res) => res.json(res))
        .then((data) => {
            setLoading(false);
            setPost(data.post);
        })
        .catch((err) => console.error(err));
};
将函数导入到Details.jsx组件中。
import { useParams } from "react-router-dom";
import { fetchPostContent } from "../utils/util";

const Details = () => {
    const { slug } = useParams();
    const [post, setPost] = useState({});
    const [loading, setLoading] = useState(true);

    const fetchPostDetails = useCallback(() => {
        fetchPostContent(slug, setLoading, setPost)
    }, [slug]);

    useEffect(() => {
        fetchPostDetails();
    }, [fetchPostDetails]);

    if (loading) return <p>Loading...</p>;

    return (
        <div>....</div>
    )
更新 UI 元素以相应地显示帖子详细信息。
return (
    <div>
        <header className='details_header'>
            <h1 className='details_heading'>{post.title}</h1>
            <div className='post_details'>
                <div>
                    <p className='details_date'>Posted on {post.published_date}</p>
                </div>
                <div className='reactions-group'>
                    <button
                        className='reactBtn'
                        onClick={() => reactToPost(slug, "like")}
                    >
                        Like <AiTwotoneLike />{" "}
                        <span style={{ marginLeft: 5 }}>{post.likes.length}</span>
                    </button>
                    <button
                        className='reactBtn unlikeBtn'
                        onClick={() => reactToPost(slug, "dislike")}
                    >
                        Dislike <AiTwotoneDislike />
                        <span style={{ marginLeft: 5 }}>{post.dislikes.length}</span>
                    </button>
                </div>
            </div>
        </header>
        <main className='details_body'>{post.content}</main>
    </div>
);
对博客文章做出回应
首先,您需要在 Node.js 服务器上创建一个端点,当用户单击用户界面上的按钮时,该端点会更新帖子的喜欢和不喜欢的数量属性。
app.post("/post/react", async (req, res) => {
    const { slug, type, u_id } = req.body;

    //👇🏻 like post functionality
    for (let i = 0; i < posts.length; i++) {
        if (posts[i].slug === slug && type === "like") {
            //👇🏻 validates the post reaction
            const validateLike = posts[i].likes.filter(
                (likes) => likes.u_id === u_id
            );
            if (validateLike.length === 0) {
                posts[i].likes.push({ u_id });
                res.json({ message: "You've just liked a post" });
            }
        }

        //👇🏻 dislike post functionality
        if (posts[i].slug === slug && type === "dislike") {
            //👇🏻 validates the post reaction
            const validateDislike = posts[i].dislikes.filter(
                (dislikes) => dislikes.u_id === u_id
            );
            if (validateDislike.length === 0) {
                posts[i].dislikes.push({ u_id });
                const sendNotifcation = await notify("liked", u_id);
                res.json({ message: "You've just disliked a post" });
            }
        }
    }
});
上面的代码片段处理了用户对帖子的反应。它posts通过帖子的 slug 过滤数组,并验证帖子的反应,以确保用户尚未对该帖子做出反应,然后再相应地更新属性。
在文件中创建一个函数,utils/util.js当用户单击“喜欢”和“不喜欢”按钮时,向端点发送请求。
export const postReaction = (slug, type) => {
    fetch("http://localhost:4000/post/react", {
        method: "POST",
        body: JSON.stringify({ slug, type, u_id: localStorage.getItem("u_id") }),
        headers: {
            Accept: "application/json",
            "Content-Type": "application/json",
        },
    })
        .then((res) => res.json(res))
        .then((data) => alert(data.message))
        .catch((err) => console.error(err));
};
当用户点击按钮时执行该功能。
import { postReaction } from "../utils/util";

const Details = () => {
    //👇🏻 calls the function
    const reactToPost = (slug, type) => {
        postReaction(slug, type);
    };

    return (
        <div>
            <header className='details_header'>
                <h1 className='details_heading'>{post.title}</h1>
                <div className='post_details'>
                    <div>
                        <p className='details_date'>Posted on {post.published_date}</p>
                    </div>
                    <div className='reactions-group'>
                        {/*-- like button*/}
                        <button
                            className='reactBtn'
                            onClick={() => reactToPost(slug, "like")}
                        >
                            Like <AiTwotoneLike />{" "}
                            <span style={{ marginLeft: 5 }}>{post.likes.length}</span>
                        </button>
                        {/*-- Dislike button*/}
                        <button
                            className='reactBtn unlikeBtn'
                            onClick={() => reactToPost(slug, "dislike")}
                        >
                            Dislike <AiTwotoneDislike />
                            <span style={{ marginLeft: 5 }}>{post.dislikes.length}</span>
                        </button>
                    </div>
                </div>
            </header>
            <main className='details_body'>{post.content}</main>
        </div>
    );
};
export default Details;
创建新帖子
创建一个将新帖子添加到posts数组的端点。
//👇🏻 creates post slug
const createSlug = (text, id) => {
    let slug = text
        .trim()
        .toLowerCase()
        .replace(/[^\w\s-]/g, "");
    slug = slug.replace(/\s+/g, "-");
    return slug + "-" + id;
};

//👇🏻 generates a random string as ID
const generateID = () => Math.random().toString(36).substring(2, 10);

app.post("/post/add", (req, res) => {
    const { u_id, title, content, date } = req.body;
    const postObject = {
        u_id,
        post_id: generateID(),
        title,
        slug: createSlug(title, generateID()),
        content,
        published_date: date,
        likes: [],
        dislikes: [],
    };
    posts.unshift(postObject);
    res.json({ message: "Post added successfully!✅" });
});
上面的代码片段创建了一个新的帖子对象,并将新创建的帖子添加到posts数组中。
添加一个向文件内的端点发送请求的函数utils/util.js。
export const addNewPost = (u_id, title, content, date, navigate) => {
    fetch("http://localhost:4000/post/add", {
        method: "POST",
        body: JSON.stringify({ u_id, title, content, date }),
        headers: {
            Accept: "application/json",
            "Content-Type": "application/json",
        },
    })
        .then((res) => res.json(res))
        .then((data) => {
            alert(data.message);
            navigate("/");
        })
        .catch((err) => {
            console.error(err);
            alert("Encountered an error ❌");
        });
};
当用户在NewPost.jsx文件内提交表单时执行该功能。
//👇🏻 formates the date to a readable string
const formatDate = () => {
    const date = new Date();
    const day = String(date.getDate()).padStart(2, "0");
    const month = String(date.getMonth() + 1).padStart(2, "0");
    const year = date.getFullYear();
    return `${day}-${month}-${year}`;
};

//👇🏻 executes on form submit
const handleSubmit = (e) => {
    e.preventDefault();
    //👇🏻 adds the new post
    addNewPost(
        localStorage.getItem("u_id"),
        title,
        content,
        formatDate(),
        navigate
    );
    setContent("");
    setTitle("");
};
使用 Novu 发送应用内通知 📳
这里,我们需要在有人回复帖子时通知帖子作者。为此,我们将使用Novu - 一个开源通知基础架构,它允许您从单个仪表板发送应用内通知、短信通知、聊天通知、推送通知和电子邮件通知。
创建 Novu 项目
导航到客户端文件夹并通过运行以下代码创建一个 Novu 项目。
cd client
npx novu init
选择您的应用程序名称并登录 Novu 仪表板。以下代码片段包含运行后应遵循的步骤npx novu init。
Now let's setup your account and send your first notification
? What is your application name? Forum App
? Now lets setup your environment. How would you like to proceed? Create a free cloud account (Recommended)
? Create your account with: Sign-in with GitHub
? I accept the Terms and Conditions (https://novu.co/terms) and have read the Privacy Policy (https://novu.co/privacy) Yes
✔ Created your account successfully.
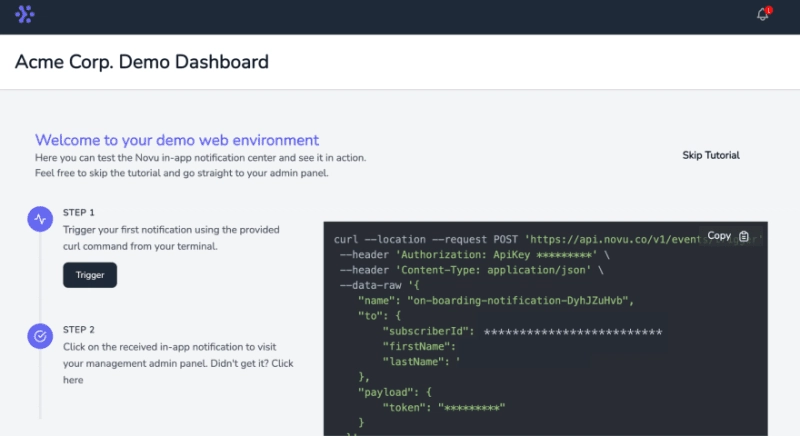
访问演示页面,从页面复制您的订阅者 ID,然后单击“跳过教程”按钮。
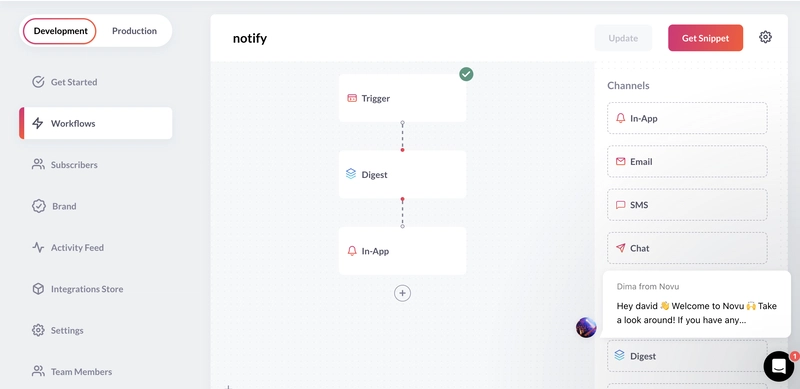
创建一个具有如下所示的工作流程的通知模板:
Novu Digest 允许您控制在应用中发送通知的方式。它可以收集多个触发事件,安排它们的时间,或将它们作为单条消息发送。
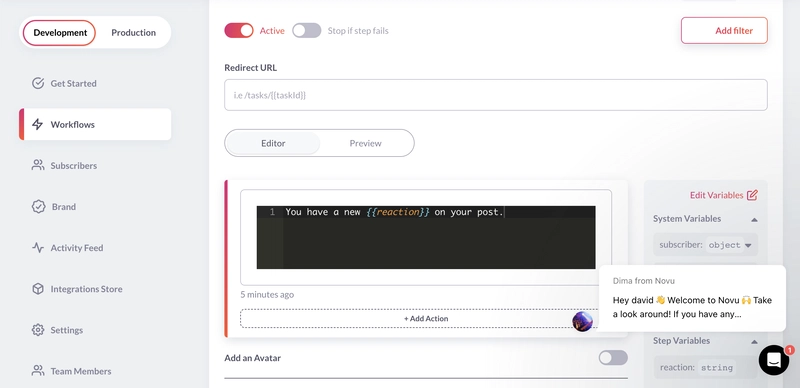
更新应用内通知步骤,当有人对其帖子做出反应时将此消息发送给帖子作者。
You have a new {{reaction}} on your post.
向 React 应用添加 Novu 通知铃
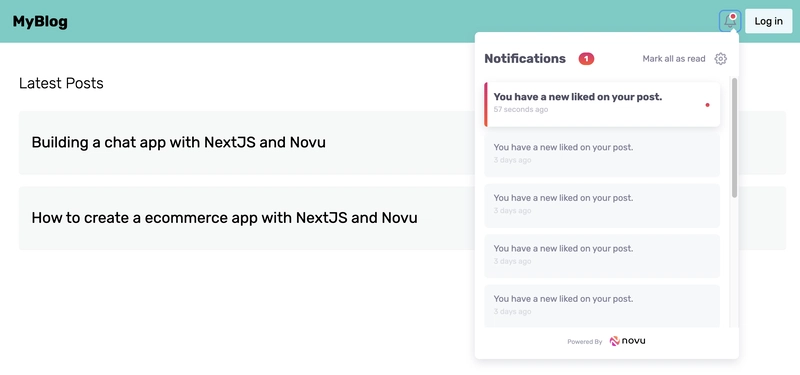
Novu 应用内通知使用通知铃声向用户发送提醒。本文将教您如何将其添加到您的 React 应用程序中。
安装 Novu 通知包。
npm install @novu/notification-center
Novu.jsx在组件文件夹中创建一个文件并将以下内容复制到该文件中。
import React from "react";
import {
    NovuProvider,
    PopoverNotificationCenter,
    NotificationBell,
} from "@novu/notification-center";
import { useNavigate } from "react-router-dom";

function Novu() {
    const navigate = useNavigate();
    const onNotificationClick = (notification) =>
        navigate(notification.cta.data.url);

    return (
        <>
            <NovuProvider
                subscriberId='<YOUR_SUBSCRIBER_ID>'
                applicationIdentifier='<YOUR_APP_ID>'
            >
                <PopoverNotificationCenter
                    onNotificationClick={onNotificationClick}
                    colorScheme='light'
                >
                    {({ unseenCount }) => <NotificationBell unseenCount={unseenCount} />}
                </PopoverNotificationCenter>
            </NovuProvider>
        </>
    );
}

export default Novu;
上面的代码片段使我们能够将 Novu 的通知铃声图标添加到应用程序中。这样,您就可以查看应用程序内的所有通知。
在 Novu 管理面板上选择“设置”,复制您的应用程序 ID,并将订阅者的 ID 占位符替换为您的 ID。
将Novu.jsx组件导入到组件中Home.jsx。
const Home = () => {
    return (
        <div>
            <nav className='navbar'>
                <Link to='/' className='logo'>
                    <h2>MyBlog</h2>
                </Link>
                <div style={{ display: "flex", alignItems: "center" }}>
                    {/*---👇🏻 Novu component👇🏻---*/}
                    <Novu />
                    {loggedIn ? (
                        <Link to='/post/new' className='newPostBtn'>
                            New Post
                        </Link>
                    ) : (
                        <Link to='/login' className='newPostBtn'>
                            Log in
                        </Link>
                    )}
                </div>
            </nav>
            {/*--- other components ---*/}
        </div>
    );
};
在 Node.js 服务器上配置 Novu
将 Novu SDK for Node.js 安装到服务器文件夹中。
npm install @novu/node
从包中导入 Novu 并使用您的 API 密钥创建实例。
const { Novu } = require("@novu/node");
const novu = new Novu("<YOUR_API_KEY>");
在文件中创建一个函数index.js,通过 Novu 向帖子作者发送通知。
const notify = async (reaction, userID) => {
    await novu.subscribers.identify(userID, {
        firstName: "inAppSubscriber",
    });
    const response = await novu.trigger("notify", {
        to: {
            subscriberId: "<YOUR_SUBSCRIBER_ID>",
        },
        payload: {
            reaction,
        },
    });
    return response.data.data;
};
当用户对帖子做出反应时执行该功能。
app.post("/post/react", async (req, res) => {
    const { slug, type, u_id } = req.body;

    for (let i = 0; i < posts.length; i++) {
        if (posts[i].slug === slug && type === "like") {
            const validateLike = posts[i].likes.filter(
                (likes) => likes.u_id === u_id
            );
            if (validateLike.length === 0) {
                posts[i].likes.push({ u_id });
                //👇🏻 Triggers Novu
                const sendNotifcation = await notify("like", u_id);
                if (sendNotifcation.acknowledged) {
                    res.json({ message: "You've just liked a post" });
                }
            }
        }
        if (posts[i].slug === slug && type === "dislike") {
            const validateDislike = posts[i].dislikes.filter(
                (dislikes) => dislikes.u_id === u_id
            );
            if (validateDislike.length === 0) {
                posts[i].dislikes.push({ u_id });
                //👇🏻 Triggers Novu
                const sendNotifcation = await notify("dislike", u_id);
                if (sendNotifcation.acknowledged) {
                    res.json({ message: "You've just disliked a post" });
                }
            }
        }
    }
});
恭喜!您已完成申请。
结论
到目前为止,您已经学习了如何使用 Hanko 验证用户身份、在 React 和 Node.js 应用之间进行通信以及如何使用 Novu Digest 发送应用内通知。
Novu让您能够在应用程序中创建丰富的通知系统,从而为用户提供卓越的用户体验。您也可以尝试 Hanko ,它简洁易用,易于集成。
本教程的源代码可以在这里找到:
https://github.com/novuhq/blog/tree/main/hanko-auth-blog-with-novu。
感谢您的阅读!
文章来源:https://dev.to/novu/building-a-blog-with-a-liking-feature-using-react-hanko-and-novu-1m81
 后端开发教程 - Java、Spring Boot 实战 - msg200.com


