ASP .NET Core 中的身份验证
本文介绍了 ASP .NET Core 中的身份验证。它尝试解释这些概念及其关联,并展示一些代码,以便您可以将身份验证添加到您自己的 .NET 应用程序中。
验证用户身份意味着确定用户的真实身份。我们这样做是为了确保用户的身份与其声明相符。一旦我们确认信任他们,我们就可以让他们登录到我们的应用,并向他们展示只有登录用户才能访问的资源。
主要场景
以下是我们要解决的主要场景:
- 验证用户。
- 当未经身份验证的用户尝试访问受限资源时做出响应。
处理程序,处理身份验证流程的服务
要执行身份验证流程,您需要一个处理程序。您可以拥有多个处理程序,但每个处理程序必须实现IAuthenticationService相应的接口。处理程序由身份验证中间件使用。已注册的身份验证处理程序及其配置选项称为“方案”。
一个计划
要使用某个方案,您需要在此处注册它Startup.ConfigureServices,如下所示:
void ConfigureServices()
{
  // register your scheme
}
您需要做的是先调用,AddAuthentication()然后调用特定的方案,如下例所示:
void ConfigureServices()
{
  services.AddAuthentication(JwtBearerDefaults.AuthenticationScheme)
    .AddJwtBearer(JwtBearerDefaults.AuthenticationScheme, options =>   Configuration.Bind("JwtSettings", options))
    .AddCookie(CookieAuthenticationDefaults.AuthenticationScheme, options => Configuration.Bind("CookieSettings", options));
}
这里我们调用了AddAuthentication(),然后又调用了AddJwtBearer()和这两个方案AddCookie()。通过调用这些方案,你可以注册它们以及它们的配置设置。
如果您使用 ASP .NET Identity,则并不总是需要明确调用
AddAuthentication(),该调用会在内部为您完成。
设置中间件
为了理解为什么我们要执行此步骤,我们首先来讨论一下请求管道。想象一下以下场景:
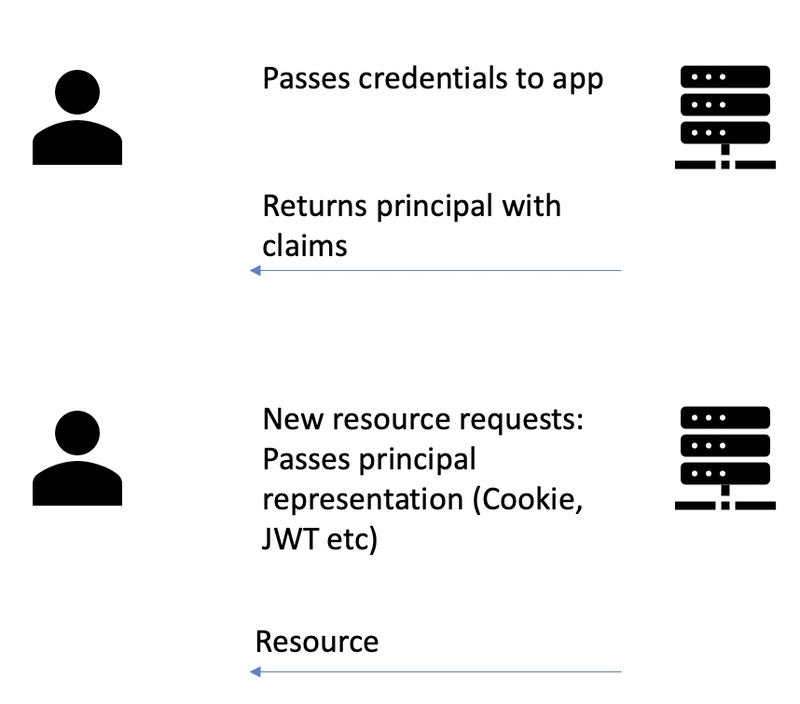
调用客户端向系统上的资源发出请求。为了实现这一点,他们需要登录到系统。要登录,用户需要提供凭证(通常是用户名和密码),以证明他们的身份。我们称之为身份验证。但是,我们需要编写代码来确保请求被拦截,并有机会验证用户身份。这就是为什么我们现在需要与中间件交互,并将其配置为使用我们之前在 ASP.NET 中注册的处理程序/方案。
现在我们转到类中Configure()的另一个方法Startup并像这样调用UseAuthentication():
void Configure()
{
  UseAuthentication();
}
UseAuthentication()您需要在正确的时间调用,以便任何依赖于该授权的程序都可以使用它。以下是一些指导原则:
- 之后
UseRouting(),以便路由信息可用于身份验证决策。- 之前
UseEndpoints(),以便用户在访问端点之前进行身份验证。
验证用户
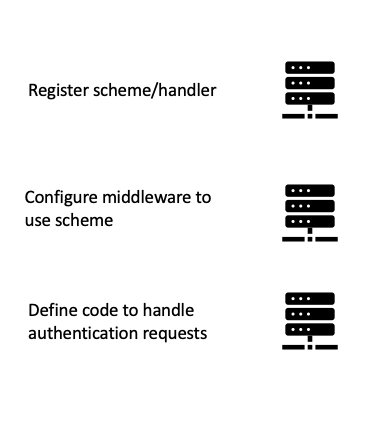
好的,到目前为止您已经看到了三部分中的两部分:
- 注册方案/处理程序
- 指示管道使用它
- 验证用户身份<-待解释
让我们讨论一下如何验证用户身份。我们将借用一个示例项目中的代码来实现这一点,该示例项目实现了Cookie 身份验证。
注册方案/处理程序
首先,让我们检查 1)在Startup.csConfigureServices()中的方法中方案的注册:
public void ConfigureServices(IServiceCollection services)
    {
        services.AddMvc();

        services.AddAuthentication(CookieScheme) // Sets the default scheme to cookies
            .AddCookie(CookieScheme, options =>
            {
                options.AccessDeniedPath = "/account/denied";
                options.LoginPath = "/account/login";
            });

        // Example of how to customize a particular instance of cookie options and
        // is able to also use other services.
        services.AddSingleton<IConfigureOptions<CookieAuthenticationOptions>, ConfigureMyCookie>();
    }
AddCookie()注意注册方案和配置的调用AccessDeniedPath。LoginPath通过指定这些配置值,我们知道如果用户是以下哪种情况,应该将他们发送到哪条路由:
- 无法提供凭证
/account/denied - 提供凭证并登录的地方
/account/login
配置中间件
我们已经注册了该方案并准备使用它。下一步是通过调用 明确地告诉我们的应用程序使用它UseAuthentication()。
public void Configure(IApplicationBuilder app, IWebHostEnvironment env)
{
    if (env.IsDevelopment())
    {
        app.UseDeveloperExceptionPage();
    }
    else
    {
        app.UseExceptionHandler("/Home/Error");
    }

    app.UseStaticFiles();

    app.UseRouting();

    app.UseAuthentication();
    app.UseAuthorization();

    app.UseEndpoints(endpoints =>
    {
        endpoints.MapDefaultControllerRoute();
    });
}
请注意对的调用app.UseAuthentication()以及它在对的调用之后的UseRouting()方式,因此我们有路由信息,并且在对的调用之前UseEndpoints(),因此后者可以利用身份验证功能。
进行实际身份验证
当我们注册该方案时,我们告诉它在哪里进行登录,也就是/account/login我们需要编写一个控制器类和方法。因此,创建一个AccountController.cs包含以下内容的控制器类:
using System.Collections.Generic;
using System.Security.Claims;
using System.Threading.Tasks;
using Microsoft.AspNetCore.Authentication;
using Microsoft.AspNetCore.Mvc;

namespace AuthSamples.Cookies.Controllers;

public class AccountController : Controller
{
}
我们需要在这个类中填充以下内容:
- 呈现登录表单的方法
- 处理用户发送的登录凭证并进行验证的方法
- 一种处理注销的方法
渲染登录表单
这里我们的控制器代码变得简单,如下所示:
[HttpGet]
public IActionResult Login(string returnUrl = null)
{
    ViewData["ReturnUrl"] = returnUrl;
    return View();
}
由于我们有一个渲染Login.cshtml 的模板,所以它变得简单:
<h2>Login</h2>

<div class="row">
    <div class="col-md-8">
        <section>
            <form asp-controller="Account" asp-action="Login" asp-route-returnurl="@ViewData["ReturnUrl"]" method="post" class="form-horizontal" role="form">
                <div class="form-group">
                    <label class="col-md-2 control-label">User</label>
                    <div class="col-md-10">
                        <input type="text" name="username" />
                    </div>
                </div>

                <div class="form-group">
                    <label class="col-md-2 control-label">Password</label>
                    <div class="col-md-10">
                        <input type="password" name="password" />
                    </div>
                </div>

                <div class="form-group">
                    <div class="col-md-offset-2 col-md-10">
                        <button type="submit" class="btn btn-default">Log in</button>
                    </div>
                </div>
            </form>
        </section>
    </div>
</div>
上述模板由用户名字段、密码字段和提交按钮组成。
处理登录请求
想象一下,现在用户在上述表单中输入他们的凭证,那么我们需要控制器代码来处理:
private bool ValidateLogin(string userName, string password)
{
    // For this sample, all logins are successful.
    return true;
}

[HttpPost]
public async Task<IActionResult> Login(string userName, string password, string returnUrl = null)
{
    ViewData["ReturnUrl"] = returnUrl;

    // Normally Identity handles sign in, but you can do it directly
    if (ValidateLogin(userName, password))
    {
        var claims = new List<Claim>
            {
                new Claim("user", userName),
                new Claim("role", "Member")
            };

        await HttpContext.SignInAsync(new ClaimsPrincipal(new ClaimsIdentity(claims, "Cookies", "user", "role")));

        if (Url.IsLocalUrl(returnUrl))
        {
            return Redirect(returnUrl);
        }
        else
        {
            return Redirect("/");
        }
    }

    return View();
}
Login()当用户点击登录按钮时,通过 POST 请求调用该方法。我们提供了并username调用password(ValidateLogin()这里通常需要调用数据库来验证用户,确保用户存在、密码正确等)。- 然后我们登录用户,如果
ValidateLogin()响应为真。 - 当我们调用 时,登录就会发生
HttpContext.SignInAsync()。该方法需要ClaimsPrincipal创建一个实例。该对象需要一个对象作为实例。从高层次上讲,我们声明用户是谁,然后可以在授权ClaimsIdentity过程中确定用户可以访问系统的哪些部分。
处理注销请求
用户可能想要注销,为了处理这个问题,您可以向您的AccountController类添加另一个方法,如下所示:
public async Task<IActionResult> Logout()
{
    await HttpContext.SignOutAsync();
    return Redirect("/");
}
调用HttpContext.SignOutAsync()将确保应用程序忘记有关您和您的登录会话的所有信息。
这里发生的事情是:
正确路由用户
此时您可能想知道,系统如何知道如何将用户发送到此登录表单,例如,如何检查谁已登录或未登录?
这时我们来看一下HomeController.cs文件。它使用一个特性类,Authorize当用户未通过身份验证时,强制用户进入登录页面。具体实现如下:
- 用户尝试前往路线
/Home/MyClaims
   [Authorize]
   public IActionResult MyClaims()
   {
      return View();
   }
- 如果用户已登录,则会显示
MyClaims函数所代表的视图。如果用户未登录,则会转到account/login。
概括
希望您现在已经对如何在 ASP .NET 应用程序中对用户进行身份验证和登录有了一个很好的了解。在下一部分中,我们将讨论如何授权用户,即确定哪些用户可以访问哪些资源。
文章来源:https://dev.to/dotnet/authentication-in-asp-net-core-59k8 后端开发教程 - Java、Spring Boot 实战 - msg200.com

