学习 Deno:聊天应用
原文:https ://aralroca.com/blog/learn-deno-chat-app
Node.js 最初由Ryan Dahl于 2009 年用 C++编写。Ryan 于 2012 年离开了 Node.js,因为他觉得自己的目标已经基本实现。
现在,他的目标变了。在意识到 Node.js 中存在一些无法修复的设计错误后,他决定创建另一个基于 V8 构建的 JavaScript(也包括 TypeScript)运行时:Deno(Rust 语言)。Deno 1.0.0 最终将于 2020 年 5 月 13 日发布。

我们将了解 Deno 的工作原理及其与 Node 的区别,并实现一个简单的聊天应用程序。
我们将介绍以下内容:
安装 Deno
安装 Deno 的方法有很多种:使用 curl、iwr、Homebrew、Chocolatey…… 请参阅此处的安装方法。Deno 是一个单一的二进制可执行文件,它没有外部依赖项。
就我而言,我将使用 Homebrew:
➜  ~ brew install deno
➜  ~ deno --version
deno 1.0.0-rc1
v8 8.2.308
typescript 3.8.3
正如我们所见,这里没有npm。Npm 最初在 Node 生态系统中至关重要……它是一个集中式(甚至是私有控制的)模块存储库。现在 Deno 改变了这种情况。稍后我们将看到如何在没有package.json和node_moduleseither 的情况下安装软件包。
要升级到最新版本我们需要这样做deno upgrade。
我建议执行deno help以查看所有可能的用法:
USAGE:
    deno [OPTIONS] [SUBCOMMAND]

OPTIONS:
    -h, --help                     Prints help information
    -L, --log-level <log-level>    Set log level [possible values: debug, info]
    -q, --quiet                    Suppress diagnostic output
    -V, --version                  Prints version information

SUBCOMMANDS:
    bundle         Bundle module and dependencies into single file
    cache          Cache the dependencies
    completions    Generate shell completions
    doc            Show documentation for a module
    eval           Eval script
    fmt            Format source files
    help           Prints this message or the help of the given subcommand(s)
    info           Show info about cache or info related to source file
    install        Install script as an executable
    repl           Read Eval Print Loop
    run            Run a program given a filename or url to the module
    test           Run tests
    types          Print runtime TypeScript declarations
    upgrade        Upgrade deno executable to newest version

ENVIRONMENT VARIABLES:
    DENO_DIR             Set deno's base directory (defaults to $HOME/.deno)
    DENO_INSTALL_ROOT    Set deno install's output directory
                         (defaults to $HOME/.deno/bin)
    NO_COLOR             Set to disable color
    HTTP_PROXY           Proxy address for HTTP requests
                         (module downloads, fetch)
    HTTPS_PROXY          Same but for HTTPS
如果您正在使用 Visual Studio Code,我建议安装此插件以方便使用 Deno:
简单的“Hello World”
对于 Deno 中的简单“Hello world”,我们只需要创建一个文件.js或.ts,然后使用执行它deno run [file]。
对于.ts,它将编译+执行;对于.js,文件将直接执行:
// example.ts file
console.log('Hello from Deno 🖐')
在 shell 中:
➜  deno run example.ts
Compile file:///Users/aralroca/example.ts
Hello from Deno 🖐
该tsconfig.json文件是可选的,因为 Deno 中有一些 TypeScript 默认设置。要应用,tsconfig.json我们应该使用deno run -c tsconfig.json [file]。
顺便说一句,Deno 尽可能地使用 Web 标准。可以使用window……fetch我们Worker的代码应该与 Deno 和浏览器兼容。
提供 index.html
Deno 有自己的标准库https://deno.land/std/,因此我们可以直接从URL导入来使用其模块。其目标之一是仅交付单个可执行文件,并尽量减少链接。这样,只需将 URL 导入到项目中,或者deno run https://...在使用 CLI 的情况下直接执行即可。
为了创建一个 http 服务器并提供服务,index.html我们将使用这个模块:https://deno.land/std/http/。
我们将创建两个文件:server.ts和index.html。
索引.html
<!DOCTYPE html>
<html lang="en">
  <head>
    <meta name="viewport" content="width=device-width, initial-scale=1" />
    <meta charset="utf-8" />
    <title>Example using Deno</title>
  </head>
  <body>index.html served correctly</body>
</html>
服务器.ts
import { listenAndServe } from "https://deno.land/std/http/server.ts";

listenAndServe({ port: 3000 }, async (req) => {
  if (req.method === "GET" && req.url === "/") {
    req.respond({
      status: 200,
      headers: new Headers({
        "content-type": "text/html",
      }),
      body: await Deno.open("./index.html"),
    });
  }
});

console.log("Server running on localhost:3000");
我们可以默认使用 ESmodules 代替 Common.js,这样文件扩展名就始终位于末尾。此外,它还支持最新的功能async-await。
而且,我们再也不用担心格式化了。不用像 Prettier 那样使用工具,直接用deno fmt命令就可以格式化文件。
第一次deno run server.ts运行时,我们会看到与“Hello World”示例的两个不同之处:
-
它从模块下载所有依赖项
http。它不应该使用yarn或npm install,而应该在运行项目之前安装所有需要的依赖项。由于缓存了缓存,因此只会在第一次安装时执行。要清除缓存,可以使用该--reload命令。 -
它会抛出一个错误
Uncaught PermissionDenied: network access to "127.0.0.1:3000", run again with the --allow-net flag。Deno 默认是安全的。这意味着我们无法访问网络或读取文件(index.html)。这是相对于 Node 的重大改进之一。在 Node 中,任何 CLI 库都可以在未经我们同意的情况下执行许多操作。例如,使用 Deno,可以仅允许在一个文件夹中进行读取访问:deno --allow-read=/etc。要查看所有权限标志,请运行deno run -h。
现在我们已准备好为您服务index.html:
➜ deno run --allow-net --allow-read server.ts
Compile file:///Users/aralroca/server.ts
Server running on localhost:3000

使用 WebSockets
WebSockets、UUID 以及 Node 中的其他基本功能并非核心组件。这意味着我们需要使用第三方库才能使用它们。然而,您可以使用 Deno 标准库来使用 WebSockets、UUID 以及许多其他功能。换句话说,您无需担心维护问题,因为 Deno 会持续维护。
为了继续实现我们的简单聊天应用程序,让我们创建一个新文件chat.ts:
import {
  WebSocket,
  isWebSocketCloseEvent,
} from "https://deno.land/std/ws/mod.ts";
import { v4 } from "https://deno.land/std/uuid/mod.ts";

const users = new Map<string, WebSocket>();

function broadcast(message: string, senderId?: string): void {
  if(!message) return
  for (const user of users.values()) {
    user.send(senderId ? `[${senderId}]: ${message}` : message);
  }
}

export async function chat(ws: WebSocket): Promise<void> {
  const userId = v4.generate();

  // Register user connection
  users.set(userId, ws);
  broadcast(`> User with the id ${userId} is connected`);

  // Wait for new messages
  for await (const event of ws) {
    const message = typeof event === 'string' ? event : ''

    broadcast(message, userId);

    // Unregister user conection
    if (!message && isWebSocketCloseEvent(event)) {
      users.delete(userId);
      broadcast(`> User with the id ${userId} is disconnected`);
      break;
    }
  }
}
现在,注册一个端点/ws来公开聊天server.ts:
import { listenAndServe } from "https://deno.land/std/http/server.ts";
import { acceptWebSocket, acceptable } from "https://deno.land/std/ws/mod.ts";
import { chat } from "./chat.ts";

listenAndServe({ port: 3000 }, async (req) => {
  if (req.method === "GET" && req.url === "/") {
    req.respond({
      status: 200,
      headers: new Headers({
        "content-type": "text/html",
      }),
      body: await Deno.open("./index.html"),
    });
  }

  // WebSockets Chat
  if (req.method === "GET" && req.url === "/ws") {
    if (acceptable(req)) {
      acceptWebSocket({
        conn: req.conn,
        bufReader: req.r,
        bufWriter: req.w,
        headers: req.headers,
      }).then(chat);
    }
  }
});

console.log("Server running on localhost:3000");
为了实现我们的客户端部分,我们将选择 Preact,以便能够直接使用模块,而不需要 npm、babel 和 webpack,正如我们在上一篇文章中看到的那样。
<!DOCTYPE html>
<html lang="en">
  <head>
    <meta charset="UTF-8" />
    <title>Chat using Deno</title>
  </head>
  <body>
    <div id="app" />
    <script type="module">
      import { html, render, useEffect, useState } from 'https://unpkg.com/htm/preact/standalone.module.js'

      let ws

      function Chat() {
        // Messages
        const [messages, setMessages] = useState([])
        const onReceiveMessage = ({ data }) => setMessages(m => ([...m, data]))
        const onSendMessage = e => {
          const msg = e.target[0].value

          e.preventDefault()
          ws.send(msg)
          e.target[0].value = ''
        }

        // Websocket connection + events
        useEffect(() => {
          if (ws) ws.close()
          ws = new WebSocket(`ws://${window.location.host}/ws`)
          ws.addEventListener("message", onReceiveMessage)

          return () => {
            ws.removeEventListener("message", onReceiveMessage)
          }
        }, [])

        return html`
          ${messages.map(message => html`
              <div>${message}</div>
          `)}

          <form onSubmit=${onSendMessage}>
           <input type="text" />
           <button>Send</button>
          </form>
        `
      }

      render(html`<${Chat} />`, document.getElementById('app'))
    </script>
  </body>
</html>
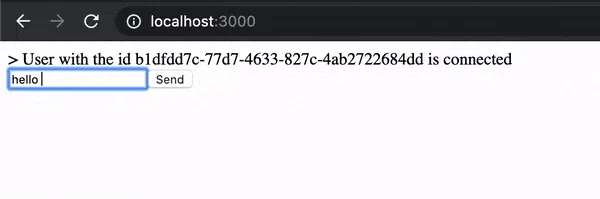
结果:

这是一个非常丑陋的聊天,没有样式,但功能齐全,因为我们的目标是了解 Deno 是如何工作的。
第三方和 deps.ts 约定
我们可以像使用 Deno 标准库一样使用第三方库,通过直接导入模块的 URL。
- STD,Deno 核心库:https://deno.land/std/
- X、Deno 第三方库:https://deno.land/x/
然而, https://deno.land/x/的生态系统还很小。不过,有个好消息要告诉你,我们可以使用https://www.pika.dev上的软件包。借助 Parcel 或 Minibundle 等工具,我们可以将 Node 库编译成模块,以便在 Deno 项目中复用。
我们将使用camel-case包将每个聊天消息转换为 camelCase!

让我们在文件中添加这个导入chat.ts:
import { camelCase } from 'https://cdn.pika.dev/camel-case@^4.1.1';
// ...before code
const message = camelCase(typeof event === 'string' ? event : '')
// ... before code
就是这样。再次运行server.ts将会下载camel-case软件包。现在你可以看到它已经运行了:
但是,如果我想camelCase在多个文件中使用这个辅助函数,那么在每个文件中都添加完整的导入会很麻烦。URL 指示了我们必须使用哪个版本的包。这意味着如果我们想要升级依赖项,就需要搜索并替换所有导入。这可能会给我们带来麻烦,但不用担心,Deno 有一个针对依赖项的约定可以解决这个问题。创建一个deps.ts文件来导出所有项目依赖项。
// deps.ts file
export { camelCase } from 'https://cdn.pika.dev/camel-case@^4.1.1';
和
// chat.ts file
import { camelCase } from './deps.ts';
// ...
const message = camelCase(typeof event === 'string' ? event : '')
// ...
测试
我们将构建一个无用camelize.ts实用程序,以驼峰命名格式返回文本,并添加一个额外的字符,每个大写字母包含一个 🐪。为什么?看看如何使用 Deno 进行测试。
/**
 * Return the text in camelCase + how many 🐪
 *
 * @example "this is an example" -> "thisIsAnExample 🐪🐪🐪"
 * @param text
 * @returns {string}
 */
export function camelize(text: string) {
  // @todo
}
顺便说一下,我们可以使用以下方式可视化文件的 JSdocs deno doc [file]:
➜  deno doc camelize.ts
function camelize(text: string)
  Return the text in camelCase + how many 🐪
让我们创建一个文件test.ts。测试运行器内置于 Deno 核心中Deno.test(),我们可以使用 STD https://deno.land/std/testing/asserts.ts来使用断言。
import { assertStrictEq } from "https://deno.land/std/testing/asserts.ts";
import { camelize } from "./camelize.ts";

Deno.test("camelize works", async () => {
  assertStrictEq(camelize("this is an example"), "thisIsAnExample 🐪🐪🐪");
});
要运行所有测试,我们只需要执行deno test。
➜  deno test
Compile file:///Users/aralroca/test.ts
running 1 tests
test camelize works ... FAILED (0ms)

failures:

camelize works
AssertionError: actual: undefined expected: thisIsAnExample 🐪🐪🐪
    at assertStrictEq (asserts.ts:224:11)
    at test.ts:5:3
    at asyncOpSanitizer ($deno$/testing.ts:36:11)
    at Object.resourceSanitizer [as fn] ($deno$/testing.ts:70:11)
    at TestApi.[Symbol.asyncIterator] ($deno$/testing.ts:264:22)
    at TestApi.next (<anonymous>)
    at Object.runTests ($deno$/testing.ts:346:20)

failures:

        camelize works

test result: FAILED. 0 passed; 1 failed; 0 ignored; 0 measured; 0 filtered out (0ms)
当然,它会失败,因为我们还没有实现我们的实用程序,但是,我们仍然可以看到错误是如何在 shell 中显示的。
实施该camelize实用程序后:
import { camelCase } from "./deps.ts";

/**
 * Return the text in camelCase + how many 🐪
 *
 * @example "this is an example" -> "thisIsAnExample 🐪🐪🐪"
 * @param text
 * @returns {string}
 */
export function camelize(text: string) {
  const camelCaseText = camelCase(text);
  const matches = camelCaseText.match(/[A-Z]/g) || [];
  const camels = Array.from({ length: matches.length })
    .map(() => "🐪")
    .join("");

  return `${camelCaseText} ${camels}`;
}
现在所有测试都通过了:
➜  deno test
Compile file:///Users/aralroca/camelize.ts
running 1 tests
test camelize works ... ok (3ms)

test result: ok. 1 passed; 0 failed; 0 ignored; 0 measured; 0 filtered out (3ms)
如果您想使用观察者不每次都执行所有测试,您可以使用基于 nodemon 的https://deno.land/x/denon/,然后运行denon test。
现在我们准备使用我们的助手了chat.ts。

调试
为了使用 Deno 进行调试:
- 在代码中的某处添加一行
debugger;代码。 - 使用标志运行
--inspect-brk。deno run --inspect-brk ...或deno test --inspect-brk ...调试测试。 - 在 Chrome 上打开
chrome://inspect页面。 - 在远程目标部分按“检查”。
- 按下“恢复脚本执行”按钮,代码将在断点处暂停。

结论
我们通过用 TypeScript 创建一个简单的聊天应用来了解 Deno 的工作原理。我们没有使用 npm、package.json、node_modules、webpack、babel、jest、prettier……因为我们不需要它们,所以 Deno 简化了这个过程。
我们探索了开始 Deno 项目的重要事项:权限、deno 命令、如何使用 deno 内部结构、如何使用第三方依赖项、提供文件、websockets、格式化文件、测试、调试等。
我希望本文能够帮助您在 2020 年 5 月 13 日发布 Deno 1.0.0 时开始在您的项目中使用它。
本文代码
我把代码上传到我的 GitHub 上:
参考
- https://deno.land/
- https://github.com/denoland/deno/tree/master/docs
- https://blog.logrocket.com/deno-1-0-what-you-need-to-know/
- https://twitter.com/flaviocopes/status/1259068673966383105
- https://www.youtube.com/watch?v=M3BM9TB-8yA
- https://github.com/denoland/deno
- https://en.wikipedia.org/wiki/Ryan_Dahl