学习基本的 Web 组件
尽管 Web 组件近来势头不振,但它们仍有许多优势。其中之一就是可以编写与框架无关的组件,考虑到框架在 JS 领域频繁失去人气,这无疑是一大优势。
许多组织的项目前端使用不同的框架,通过将按钮、模态框等基本组件编写为 Web 组件,我们可以显著提高代码的可重用性。Web 组件并非旨在取代 React、Vue 和 Angular 等框架,而是与框架协同使用。
使用 Web Components 还可以将样式封装到组件中(使用 shadow DOM),这在大型项目中非常有用,因为我们需要小心避免样式覆盖(例如通过重复的类名)。此功能由 styled-components 等库提供,但很高兴看到它原生支持。
在本教程中,我们将创建两个组件:用户卡片和模态框。使用 Rick & Morty API,网页将加载数据,然后将 Web 组件插入 DOM。用户向下滚动时,也会重复相同的操作。
创建用户卡
卡片将显示有关角色的两个详细信息,即其图像和名称,以及我们将用来打开模式的按钮。
要创建 Web 组件,我们首先需要用标记创建一个模板。
<template>
    <style>
        /** Styles to be added **/
    </style>
    <!-- Mark up describing the component will go here -->
</template>
定义模板后,我们需要创建一个继承自HTMLElement或HTMLUListElement等的类HTMLParagraphElement。如果使用前者,组件将是一个独立的自定义元素,继承所需的最少属性。如果使用后者,组件将是一个自定义的内置元素,继承额外的属性。
继承自的 Web 组件HTMLUListElement将具有左边距和上边距,就像大多数列表一样。
<!-- Autonomous custom element -->
<user-card>
</user-card>

<!-- customized in-built element -->
<div is='user-card'>
</div>
需要注意的是,自定义元素的使用方式取决于自定义元素继承自哪个类(请参阅上面的代码块)。在本文中,我们将定义要继承自的元素HTMLElement。
class UserCard extends HTMLElement {

  constructor() {
    super();
  }

}
以上是声明自定义元素类所需的最少代码,为了使其可用于 DOM,我们需要在 CustomElementRegistry 中定义它,如下所示。
window.customElements.define("user-card", UserCard);
就这样,我们现在可以开始使用了<user-card>。但是目前类中还没有定义任何内容,我们先来定义一下模板(我们之前讨论过)。然后定义构造函数来执行以下操作:
- 当自定义元素添加到 DOM 时,创建一个影子 DOM,它将成为自定义组件的子项。
- 将从模板创建的节点附加到影子 DOM 中。
/** Defining the template **/
const template = document.createElement("template");
template.innerHTML = `
  <link rel="stylesheet" href="userCard/styles.css">
  <div class="user-card">
    <img />
    <div class="container">
      <h3></h3>
      <div class="info">
      </div>
      <button id="open-modal">Show Info</button>
    </div>
  </div>
`;
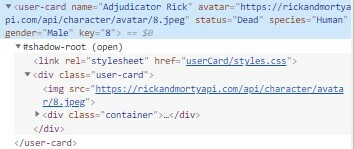
上面定义的标记将帮助我们创建如下所示的卡片 -
/** Defining the constructor **/
  constructor() {
    super();
    this.attachShadow({ mode: "open" });
    this.shadowRoot.appendChild(template.content.cloneNode(true));
  }
在构造函数中,我们使用attachShadow将影子 DOM 附加到当前节点,然后向使用访问的影子 DOMshadowRoot添加一个子项,它是我们之前定义的模板的克隆。
到目前为止,Web 组件应该如下所示
const template = document.createElement("template");
template.innerHTML = `
  <link rel="stylesheet" href="userCard/styles.css">
  <div class="user-card">
    <img />
    <div class="container">
      <h3></h3>
      <div class="info">
      </div>
      <button id="open-modal">Show Info</button>
    </div>
  </div>
`;

class UserCard extends HTMLElement {

  constructor() {
    super();
    this.attachShadow({ mode: "open" });
    this.shadowRoot.appendChild(template.content.cloneNode(true));
  }

}

window.customElements.define("user-card", UserCard);
下一步是定义生命周期,如果你对 React 有一些了解,这应该很熟悉。为了简洁起见,我们将只关注两种方法
- 已连接回调()
- 属性改变回调()
连接回调()
当自定义元素挂载到 DOM 上时,会调用此方法,这时我们应该定义事件监听器、网络调用来获取数据、间隔和超时。
为了清理自定义元素卸载时的间隔、超时,我们必须使用disconnectedCallback()。
属性改变回调()
当自定义元素的任何属性发生更改(或属性被赋值)时,都会调用此方法。仅当 getter 中定义的属性observedAttributes()值发生更改时,才会调用此方法。
对于用户卡组件,这些方法将按如下方式实现 -
  static get observedAttributes() {
/** Even though we have other attributes, only defining key here
 as to reduce the number of times attributeChangedCallback is called **/
    return ["key"];
  }
  connectedCallback() {
/** Attaching an event-listener to the button so that the
openModal() methods gets invoked in click, openModal will be
defined later **/
    this.shadowRoot
      .querySelector("#open-modal")
      .addEventListener("click", () => this.openModal());
  }

  attributeChangedCallback(name, oldValue, newValue) {
/** Updating the DOM whenever the key attribute is updated,
 helps in avoiding unwanted DOM updates **/
    if (name === "key") {
      this.shadowRoot.querySelector("h3").innerText = this.getAttribute("name");
      this.shadowRoot.querySelector("img").src = this.getAttribute("avatar");
    }
  }
创建模态框
创建模态组件与创建用户卡组件类似。
模态框的代码 -
const modalTemplate = document.createElement('template');
modalTemplate.innerHTML = `
  <link rel="stylesheet" href="modal/styles.css">
  <div class="modal">
  <div class='modal-content'>
  <button id='close' class='close'>Close</button>
  <img></img>
  <h3></h3>
  <p></p>
  </div>
  </div>
`;

class Modal extends HTMLElement {

  static get observedAttributes() {
    return ['key'];
  }

  constructor() {
    super();
    this.showInfo = false;
    this.attachShadow({ mode: 'open' });
    this.shadowRoot.appendChild(modalTemplate.content.cloneNode(true));
  }

  connectedCallback() {
    this.shadowRoot.querySelector('#close').addEventListener('click', () => {this.remove()});
  }

  attributeChangedCallback(name, oldValue, newValue) {
    if(name==='key'){
      this.shadowRoot.querySelector('h3').innerText = this.getAttribute('name');
      this.shadowRoot.querySelector('img').src = this.getAttribute('avatar');
      this.shadowRoot.querySelector('p').innerHTML = `
      Gender: ${this.getAttribute('gender')}
      <br/>
      Status: ${this.getAttribute('status')}
      <br/>
      Species: ${this.getAttribute('species')}
      `}
  }

}

window.customElements.define('user-modal', Modal);
要调用模式,我们需要openModel在用户卡组件中定义。openModal将创建user-modal节点并将收到的所有属性分配user-card给模式,然后将其附加到 DOM。
  openModal() {
    const userModal = document.createElement("user-modal");
    userModal.setAttribute("name", this.getAttribute("name"));
    userModal.setAttribute("avatar", this.getAttribute("avatar"));
    userModal.setAttribute("status", this.getAttribute("status"));
    userModal.setAttribute("species", this.getAttribute("species"));
    userModal.setAttribute("gender", this.getAttribute("gender"));
    userModal.setAttribute("key", this.getAttribute("key"));
    document
      .getElementsByTagName("body")[0]
      .insertAdjacentElement("afterend", userModal);
  }
将所有部分连接在一起
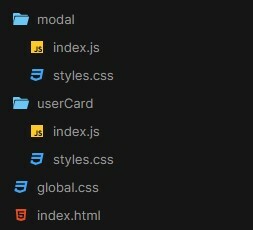
这些组件被放置在以下文件夹结构中
在这两个组件中index.html,都导入了从 Rick and Morty API 获取角色数据的脚本。
一旦获取数据,就会为每个字符user-card创建一个节点,分配属性,然后将其插入到 DOM 中,如下所示 -
await fetch(`https://rickandmortyapi.com/api/character?page=${page}`)
        .then((_) => _.json())
        .then((_) => {
          _.results.forEach((user, index) => {
            max = _.info.pages;
            const nodeToBeInserted = document.createElement("user-card");
            nodeToBeInserted.setAttribute("name", user.name);
            nodeToBeInserted.setAttribute("avatar", user.image);
            nodeToBeInserted.setAttribute("status", user.status);
            nodeToBeInserted.setAttribute("species", user.species);
            nodeToBeInserted.setAttribute("gender", user.gender);
            nodeToBeInserted.setAttribute("key", user.id);
            document
              .getElementById("details")
              .insertAdjacentElement("beforeend", nodeToBeInserted);
          });
        });
      page++;
    };
当用户到达页面末尾时,事件监听器会获取更多数据。
  window.addEventListener(
      "scroll",
      () => {
        const {
          scrollTop,
          scrollHeight,
          clientHeight
        } = document.documentElement;
        if (scrollTop + clientHeight >= scrollHeight - 5 && max >= page) {
          loadData();
        }
      },{ passive: true });
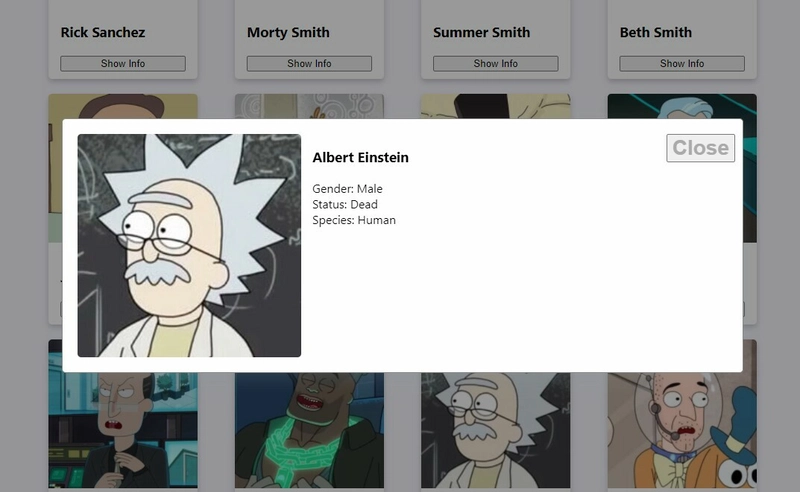
就是这样!最终结果如下:
结论
我希望本文能让您对 Web 组件有一个很好的了解。
如果您有兴趣了解更多信息,请查看MDN 上的 Web 组件
编辑- 正如下面尖锐的评论,创建 Web 组件可以变得更简单 -
文章来源:https://dev.to/98lenvi/learn-basic-web-components-66e 后端开发教程 - Java、Spring Boot 实战 - msg200.com


几乎每个人都会因为文档不正确而犯同样的错误:
可以写成:
append注意和的使用appendChild。在大多数示例中,appendChilds 返回值从未使用过。append可以添加多个文本节点或元素。并且全局 template.innerHTML 也不是必需的:
文档还说你“在构造函数中首先使用 super()”
这也是不正确的。
您可以在之前 使用任何 JavaScript ;只是在调用之前
super()不能使用thissuper()