我如何利用生成式 UI 提升我的前端游戏水平🧑💻🌠
TL;DR
在本教程中,您将了解什么是生成式 UI 以及如何使用它在您的应用程序中提供动态用户体验。
您还将学习如何构建交互式销售仪表板,以便使用 AI 副驾驶添加、更新和删除数据。
本实用指南将带您了解前端和 AI 应用开发的最新动态。您的用户一定会感激您磨练这些技能。
CopilotKit:构建应用内 AI 副驾驶的框架
CopilotKit 是一个 开源的 AI 副驾驶平台。我们可以轻松地将强大的 AI 集成到你的 React 应用中。
建造:
- ChatBot:具有上下文感知能力的应用内聊天机器人,可以在应用内采取行动💬
- CopilotTextArea:具有上下文感知自动完成和插入功能的 AI 驱动文本字段📝
- 合作代理:可以与您的应用和用户交互的应用内 AI 代理🤖
什么是生成式 UI?
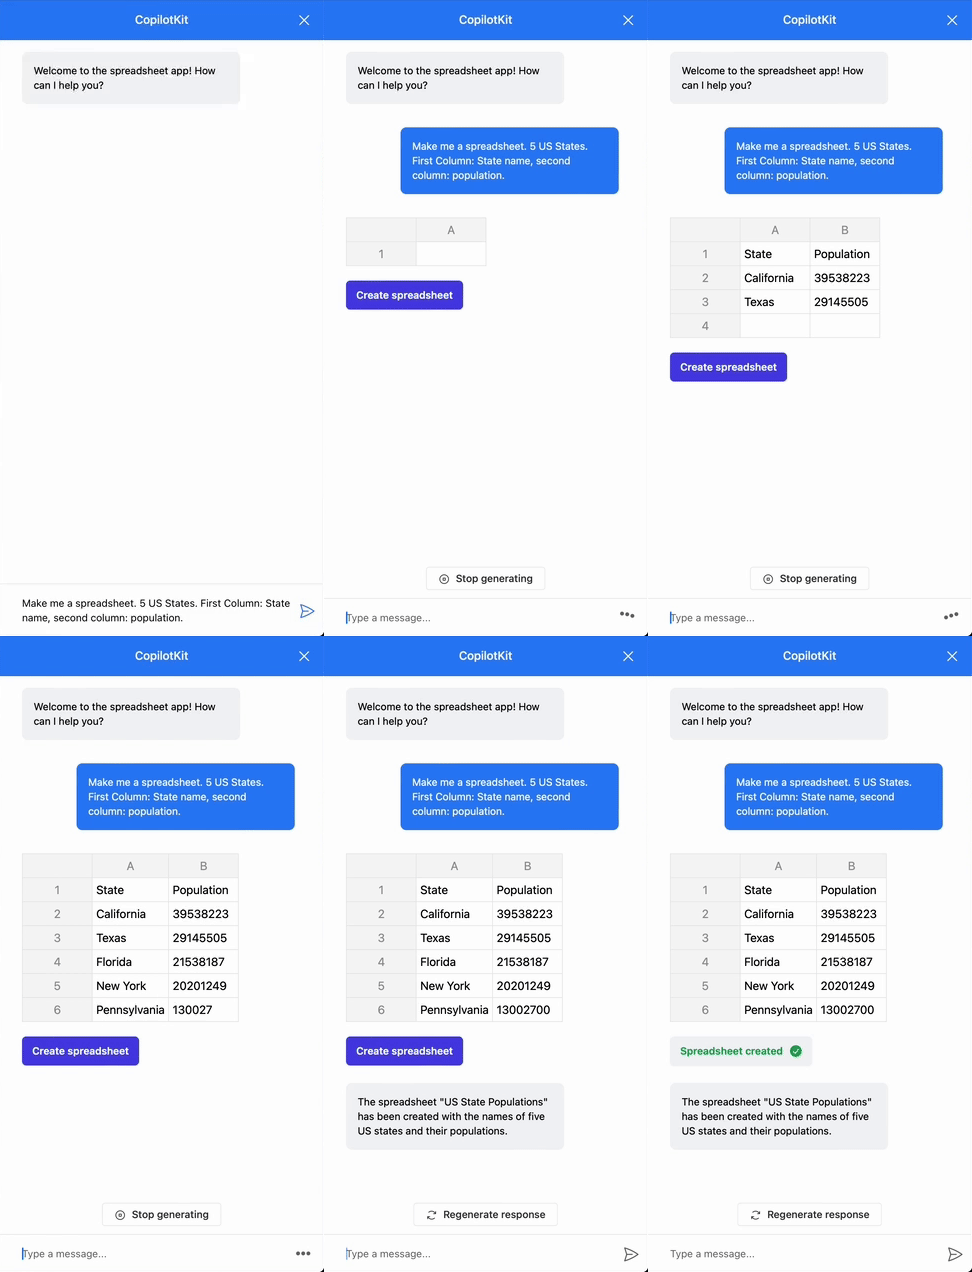
生成式 UI 是指根据用户输入动态生成并实时更新的 UI 组件。嵌入 AI 的软件应用程序会监听用户的提示,并根据给定的指令生成 UI。CopilotKit利用此功能,使用户能够在 Copilot 聊天窗口中渲染 React 组件。
先决条件
要完全理解本教程,您需要对 React 或 Next.js 有基本的了解。
我们还将使用以下工具:
-
CopilotKit - 一个开源副驾驶框架,用于构建自定义 AI 聊天机器人、应用内 AI 代理和文本区域。
-
OpenAI API 密钥- 提供一个 API 密钥,使我们能够使用 ChatGPT 模型执行各种任务。
-
Shadcn/ui——可定制和可重复使用的 UI 组件的集合。
-
Recharts——专为 React 应用程序构建的图表库
项目设置和包安装
首先,通过在终端中运行以下代码片段来创建 Next.js 应用程序:
npx create-next-app generative-ui-with-copilotkit
安装 CopilotKit 软件包。这些软件包使 AI 副驾驶能够从 React 状态中检索数据并在应用程序内做出决策。
npm install @copilotkit/react-ui @copilotkit/react-core @copilotkit/backend recharts
shadcn/ui通过运行以下代码片段在 Next.js 项目中进行设置:
npx shadcn-ui@latest init
components.json通过回答以下安装问题来配置文件:
Which style would you like to use? › Default
Which color would you like to use as base color? › Slate
Do you want to use CSS variables for colors? › > yes
恭喜!现在,您的 Next.js 项目中应该有一个components.json文件,其中概述了 Shadcn UI 的配置以及components将包含各种 UI 组件的文件夹。
最后,将应用程序中使用的以下 ShadCn 组件:Card、Chart、Checkbox和Table组件添加到应用程序。
npx shadcn-ui@latest add card
npx shadcn-ui@latest add chart
npx shadcn-ui@latest add checkbox
npx shadcn-ui@latest add table
使用 Next.js 构建销售仪表板
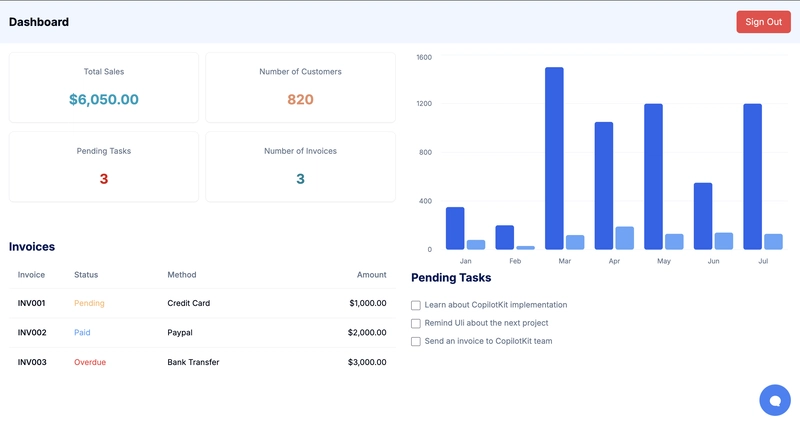
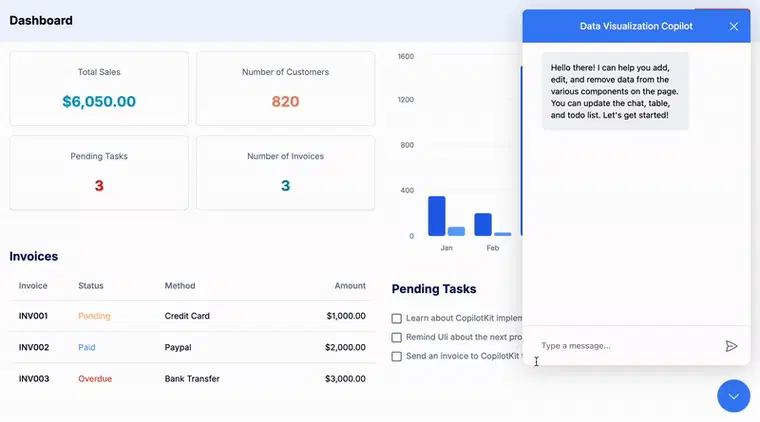
在本节中,您将学习如何使用 ShadCn UI 组件创建可视化数据的销售仪表板。
首先,types.d.ts在 Next.js 项目的根目录创建一个文件,并将以下代码片段复制到该文件中:
interface Todo {
    id: number;
    text: string;
    completed: boolean;
}
interface Invoice {
    id: number;
    status: "Paid" | "Pending" | "Overdue";
    amount: number;
    method: "Credit Card" | "Paypal" | "Bank Transfer";
}
interface Chart {
    month: string;
    sales: number;
    customers: number;
}
上面的代码片段定义了应用程序中使用的各种变量的数据结构。
在 Next.js 应用程序文件夹中添加一个components文件夹并创建 App、Card、Chart、Checkbox、Nav 和 Table 组件。
cd app
mkdir components && cd components
touch App.tsx Card.tsx Chart.tsx Checkbox.tsx Nav.tsx Table.tsx
更新App.tsx组件以包含必要的 React 状态和功能:
import { useState } from "react";
import ChartComponent from "@/app/components/Chart";
import CardComponent from "@/app/components/Card";
import TableComponent from "@/app/components/Table";
import CheckboxComponent from "@/app/components/Checkbox";
import NavComponent from "@/app/components/Nav";

export default function App() {
    //👇🏻 a todo list
    const [todoList, setTodoList] = useState<Todo[]>([
        {
            id: 1,
            text: "Learn about CopilotKit implementation",
            completed: false,
        },
        {
            id: 2,
            text: "Remind Uli about the next project",
            completed: false,
        },
        {
            id: 3,
            text: "Send an invoice to CopilotKit team",
            completed: false,
        },
    ]);

    //👇🏻 an invoice list
    const [invoiceList, setInvoiceList] = useState<Invoice[]>([
        {
            id: 1,
            status: "Pending",
            amount: 1000,
            method: "Credit Card",
        },
        {
            id: 2,
            status: "Paid",
            amount: 2000,
            method: "Paypal",
        },
        {
            id: 3,
            status: "Overdue",
            amount: 3000,
            method: "Bank Transfer",
        },
    ]);

  //👇🏻 the chart data
    const [chartData, setChartData] = useState<Chart[]>([
        { month: "January", sales: 350, customers: 80 },
        { month: "February", sales: 200, customers: 30 },
        { month: "March", sales: 1500, customers: 120 },
        { month: "April", sales: 1050, customers: 190 },
        { month: "May", sales: 1200, customers: 130 },
        { month: "June", sales: 550, customers: 140 },
        { month: "July", sales: 1200, customers: 130 },
    ]);

    //👇🏻 calculates the total sales and number of customers
    const calculateTotal = (key: keyof Chart): number => {
        if (key === "sales")
            return chartData.reduce((acc, item) => acc + item.sales, 0);
        return chartData.reduce((acc, item) => acc + item.customers, 0);
    };

    return (/**-- 👉🏻 UI components 👈🏼 ---*/)
}
从 App 组件渲染以下 UI 组件,每个组件用于显示发票、待办任务和销售数据。
export default function App() {
    //👉🏻 the states and functions

    return (
        <main>
            <NavComponent />
            <div className='w-full flex items-center justify-between p-4 md:flex-row space-x-4'>
                <div className='lg:w-1/2 h-[300px] lg:mb-0 mb-4 w-full'>
                    <CardComponent
                        invoiceLength={invoiceList.length}
                        todoLength={todoList.length}
                        totalCustomers={calculateTotal("customers")}
                        totalSales={calculateTotal("sales")}
                    />
                </div>
                <div className='lg:w-1/2  h-[300px] w-full lg:mb-0 mb-4 '>
                    <ChartComponent chartData={chartData} />
                </div>
            </div>
            <div className='w-full flex flex-row items-center justify-between lg:space-x-4 p-4'>
                <div className='lg:w-1/2 w-full h-full lg:mb-0 mb-8'>
                    <TableComponent invoiceList={invoiceList} />
                </div>
                <div className='lg:w-1/2 w-full h-full lg:mb-0 mb-4'>
                    <CheckboxComponent todoList={todoList} setTodoList={setTodoList} />
                </div>
            </div>
        </main>
    );
}
最后,您可以从GitHub 存储库复制各种仪表板组件。
如何将 CopilotKit 添加到 Next.js 应用程序
在本节中,您将学习如何将 CopilotKit 添加到应用程序中,以使用户能够使用 AI 副驾驶自动添加、删除和更新数据。
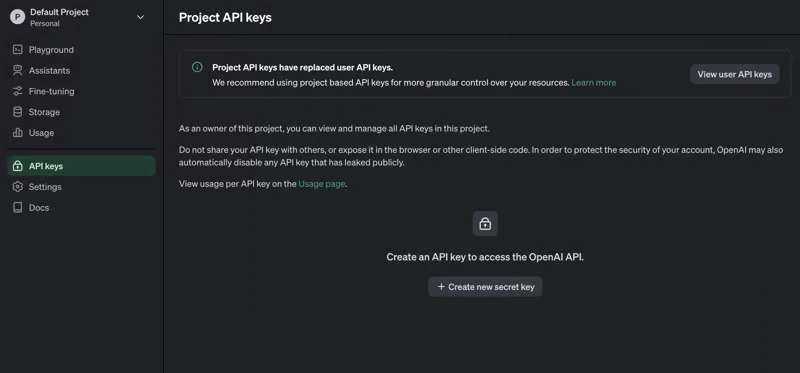
在我们继续之前,请访问OpenAI 开发者平台并创建一个新的密钥。
创建一个.env.local文件并将您新创建的密钥复制到该文件中。
OPENAI_API_KEY=<YOUR_OPENAI_SECRET_KEY>
OPENAI_MODEL=gpt-4-1106-preview
接下来,您需要为 CopilotKit 创建一个 API 端点。在 Next.js 应用文件夹中,创建一个api/copilotkit包含route.ts文件的文件夹。
cd app
mkdir api && cd api
mkdir copilotkit && cd copilotkit
touch route.ts
将以下代码片段复制到route.ts文件中。CopilotKit后端接受用户请求并使用 OpenAI 模型做出决策。
import { CopilotRuntime, OpenAIAdapter } from "@copilotkit/backend";

export const runtime = "edge";

export async function POST(req: Request): Promise<Response> {
    const copilotKit = new CopilotRuntime({});
    const openaiModel = process.env["OPENAI_MODEL"];
    return copilotKit.response(req, new OpenAIAdapter({ model: openaiModel }));
}
要将应用程序连接到后端 API 路由,请将下面的代码片段复制到app/page.tsx文件中。
"use client"
import { CopilotKit } from "@copilotkit/react-core";
import { CopilotPopup } from "@copilotkit/react-ui";
import "@copilotkit/react-ui/styles.css";
import "@copilotkit/react-textarea/styles.css";
import App from "./components/App";

export default function Home() {
    return (
        <CopilotKit runtimeUrl='/api/copilotkit/'>
            <App />
            <CopilotPopup
                instructions='Help the user update and manipulate data on the chart, table, todo, and card components.'
                defaultOpen={true}
                labels={{
                    title: "Data Visualization Copilot",
                    initial:
                        "Hello there! I can help you add, edit, and remove data from the various components on the page. You can update the chat, table, and todo list. Let's get started!",
                }}
                clickOutsideToClose={false}
            ></CopilotPopup>
        </CopilotKit>
    );
}
CopilotKit 组件封装了整个应用程序,并接受一个runtimeUrl包含指向 API 端点链接的 prop。该CopilotKitPopup组件为应用程序添加了一个聊天机器人侧边栏面板,使我们能够使用 AI Copilot 提供各种指令并执行各种操作。
利用生成式 UI 和 CopilotKit 实现交互式操作
CopilotKit 提供了两个钩子,使我们能够处理用户的请求并插入应用程序状态:useCopilotAction和useCopilotReadable。
该useCopilotAction钩子允许您定义由 CopilotKit 执行的操作。它接受包含以下参数的对象:
- name——动作的名称。
- 描述——动作的描述。
- 参数——包含所需参数列表的数组。
- render - 返回 UI 组件的字符串或函数。
- 处理程序——由操作触发的可执行函数。
useCopilotAction({
    name: "sayHello",
    description: "Say hello to someone.",
    parameters: [
        {
            name: "name",
            type: "string",
            description: "name of the person to say greet",
        },
    ],
    render: "Process greeting message...",
    handler: async ({ name }) => {
        alert(`Hello, ${name}!`);
    },
});
该render属性允许我们根据用户输入和操作的当前状态动态显示 React 组件,从而方便将生成式 UI 与 CopilotKit 结合使用。您很快就会学习如何实现此功能。
该useCopilotReadable钩子向 CopilotKit 提供应用程序状态。
import { useCopilotReadable } from "@copilotkit/react-core";

const myAppState = "...";
useCopilotReadable({
  description: "The current state of the app",
  value: myAppState
});
现在,让我们将应用程序状态插入 CopilotKit。
在组件内App.tsx,将chartData、invoiceList和todoList状态传递到 CopilotKit。
   //👇🏻 pass Chart data to CopilotKit
    useCopilotReadable({
        description:
            "The chart data is a list of sales and customers data for each month. You can update the data for each month. It contains the month, sales, and customers data.",
        value: chartData,
    });

 //👇🏻 pass invoice data to CopilotKit
    useCopilotReadable({
        description: "The invoice list is a list of invoices that need to be paid. You can add, edit, and remove invoices from the list and also update the status of the invoice. An invoice status can either be Paid, Pending, or Overdue. The acceptable payment methods are Credit Card, Paypal, and Bank Transfer.",
        value: invoiceList,
    });

 //👇🏻 pass todolist data to CopilotKit
    useCopilotReadable({
        description: "The todo list is a list of tasks that need to be completed. You can add, edit, and remove tasks from the list.",
        value: todoList,
    });
使用 CopilotKit 自动执行各种操作
我们需要允许用户在应用程序中创建、更新和删除数据。因此,让我们使用useCopilotAction钩子创建执行以下操作的操作:
- 更新图表数据,
- 创建新发票,
- 删除发票,
- 更新待办事项状态,
- 创建新的待办事项,
- 删除待办事项。
chartData添加更新文件的操作App.tsx:
   //👇🏻 action to update chartData
    useCopilotAction({
        name: "updateChartData",
        description: "Update the chart data for the a particular month.",
        parameters: [
            {
                name: "month",
                type: "string",
                description: "The month to update the data for.",
                required: true,
            },
            {
                name: "sales",
                type: "number",
                description: "The sales data for the month.",
                required: true,
            },
            {
                name: "customers",
                type: "number",
                description: "The customers data for the month.",
                required: true,
            },
        ],
        render: ({ status, args }) => {
            const { month, sales, customers } = args;
            if (month === undefined || sales === undefined || customers === undefined) return "";
            if (typeof month !== "string" || typeof sales !== "number" || typeof customers !== "number") return "";

            const updateChart = () => {
                setChartData((prev)  => {
                    return prev.map((item) => {
                        if (item.month === month) {
                            return { month, sales, customers };
                        }
                        return item;
                    });
                });
            };
            return (
                <div className="w-full p-2">
                    <p className="text-sm text-blue-400 mb-2">Status: {status}</p>
                    <ChartComponent chartData={[{month, sales, customers}]} />
                    <button className="px-4 py-2 bg-blue-400 text-white shadow rounded-md" onClick={updateChart}>Update</button>
                </div>
            )
        },
        handler: async () => {
            // Do nothing
        },
    });
- 从上面的代码片段来看,
- 该动作接受一个描述 React 状态属性的参数数组
chartData。 - 该
render属性显示用户提示的结果以及允许用户将数据添加到页面的按钮。
- 该动作接受一个描述 React 状态属性的参数数组
接下来,创建从应用程序创建和删除发票的操作。
//👇🏻 action to add new invoice
    useCopilotAction({
        name: "addNewInvoice",
        description: "Add new invoices to the invoice list",
            parameters: [
                {
                    name: "status",
                    type: "string",
                    description: "The status of the invoice.",
                    required: true,
                },
                {
                    name: "amount",
                    type: "number",
                    description: "The amount of the invoice.",
                    required: true,
                },
                {
                    name: "method",
                    type: "string",
                    description: "The payment method of the invoice.",
                    required: true,
                },
        ],
        render: ({ status: fetchStatus, args }) => {
            const { amount, method, status } = args;
            if (method !== "Credit Card" && method !== "Paypal" && method !== "Bank Transfer") return "";
            if (status !== "Paid" && status !== "Pending" && status !== "Overdue") return "";
            if (amount === undefined) return "";

            const addInvoice = () => {
                 setInvoiceList((prev ) => {
                    return [...prev, { id: prev.length + 1, status, amount, method }];
                });
            };
            return (
                <div className="w-full p-2">
                    <p className="text-sm text-blue-400 mb-2">Status: {fetchStatus}</p>
                    {status && amount !== undefined && method && <TableComponent invoiceList={[{ id: invoiceList.length + 1, status, amount, method }]} />}
                    <button className="px-4 py-2 bg-blue-400 text-white shadow rounded-md" onClick={addInvoice}>Add to Page</button>
                </div>
            )
         },
        handler: async ({ status, amount, method }) => {
            //Do nothing
    })

    //👇🏻 action to delete invoices
    useCopilotAction({
        name: "deleteInvoice",
        description: "Remove invoices to the invoice list",
            parameters: [
                {
                    name: "id",
                    type: "number",
                    description: "The id of the invoice to remove.",
                    required: true,
                },
        ],
        render: ({ status, args }) => {
            const { id } = args;
            if (id === undefined) return "";
            const getInvoice = invoiceList.find((item) => item.id === id);
            if (!getInvoice) return ""

            const deleteInvoice = () => {
                setInvoiceList((prev) => {
                    return prev.filter((item) => item.id !== id);
                });
            }

            return (
                <div className="w-full p-2">
                    <p className="text-sm text-blue-400 mb-2">Status: {status}</p>
                    <TableComponent invoiceList={[getInvoice]} />
                    <button className="px-4 py-2 bg-blue-400 text-white shadow rounded-md" onClick={deleteInvoice}>Delete</button>
                </div>

            )
        },
        handler: async ({) => {
            // Do nothing
        }
    })
addNewInvoice和操作deleteInvoice在执行用户的请求后呈现 React 组件(生成式 UI),允许用户通过单击按钮将结果添加到页面。
最后,添加创建、更新和删除待办事项的操作。
 //👇🏻 action to update todo status
    useCopilotAction({
        name: "toggleTodo",
        description: "Toggle the completion status of a todo item.",
        parameters: [
            {
                name: "id",
                type: "number",
                description: "The id of the todo item to toggle.",
                required: true,
            },
        ],
        render: ({ status, args }) => {
            const { id } = args;
            if (id === undefined) return "";
            const getTodo = todoList.find((item) => item.id === id);
            if (!getTodo) return "";

            const toggleTodo = () => {
                setTodoList(
                    todoList.map((todo) => {
                        if (todo.id === id) {
                            return { ...todo, completed: !todo.completed };
                        }
                        return todo;
                    })
                );
            };
            return (
                <div className="w-full p-2">
                    <p className="text-sm text-blue-400 mb-2">Status: {status}</p>
                    <CheckboxComponent todoList={[getTodo]} setTodoList={setTodoList} />
                    <button className="px-4 py-2 bg-blue-400 text-white shadow rounded-md" onClick={toggleTodo}>Toggle Todo</button>
                </div>
            )

        },
        handler: async () => {
            // Do nothing
        },
    })

    //👇🏻 action to add new todo
    useCopilotAction({
        name: "addNewTodo",
        description: "Add new todo to the todo list",
        parameters: [
            {
                name: "text",
                type: "string",
                description: "The text of the todo item.",
                required: true,
            },
        ],
        render: ({ status, args }) => {
            const { text } = args;
            if (text === undefined) return "";

            const addTodo = () => {
                setTodoList((prev) => {
                    return [...prev, { id: prev.length + 1, text, completed: false }];
                });
            };
            return (
                <div className="w-full p-2">
                    <p className="text-sm text-blue-400 mb-2">Status: {status}</p>
                    <CheckboxComponent todoList={[...todoList, { id: todoList.length + 1, text, completed: false }]} setTodoList={setTodoList} />
                    <button className="px-4 py-2 bg-blue-400 text-white shadow rounded-md" onClick={addTodo}>Add to Page</button>
                </div>
            )

        },
        handler: async () => {
            // Do nothing
        },
    });

    //👇🏻 action to delete todo
    useCopilotAction({
        name: "deleteTodo",
        description: "Remove todo from the todo list",
        parameters: [
            {
                name: "id",
                type: "number",
                description: "The id of the todo item to remove.",
                required: true,
            },
        ],
        render: ({ status, args }) => {
            const { id } = args;
            if (id === undefined) return "";
            const getTodo = todoList.find((item) => item.id === id);
            if (!getTodo) return "";

            const deleteTodo = () => {
                setTodoList((prev) => {
                    return prev.filter((item) => item.id !== id);
                });
            };
            return (
                <div className="w-full p-2">
                    <p className="text-sm text-blue-400 mb-2">Status: {status}</p>
                    <CheckboxComponent todoList={[getTodo]} setTodoList={setTodoList} />
                    <button className="px-4 py-2 bg-red-500 text-white shadow rounded-md" onClick={deleteTodo}>Delete</button>
                </div>
            )
        },
        handler: async ({ id }) => {
            // Do nothing
        },
    });
该toggleTodo操作用于切换待办事项的状态。该addNewTodo操作用于创建新的待办事项,该deleteTodo操作还用于通过待办事项的 ID 删除待办事项。
恭喜!您已完成本教程的项目。
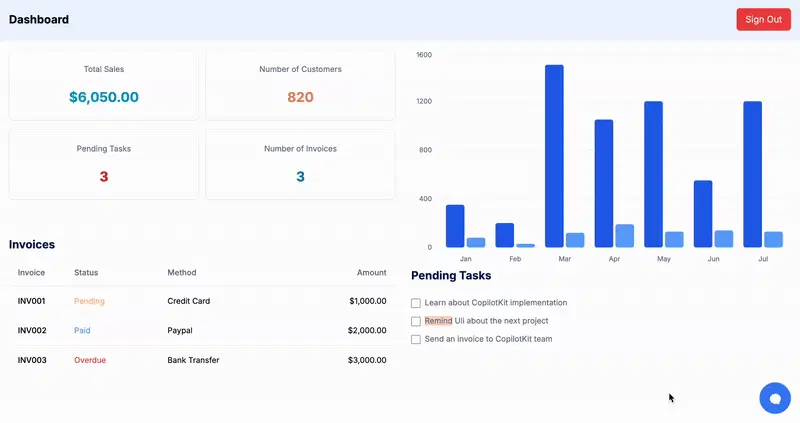
以下是该应用程序的简要演示:
结论
CopilotKit 是一款功能强大的工具,可让您在几分钟内将 AI Copilot 添加到您的产品中。无论您对 AI 聊天机器人和助手感兴趣,还是对复杂任务的自动化感兴趣,CopilotKit 都能让您轻松实现。
如果您需要构建 AI 产品或将 AI 工具集成到您的软件应用程序中,您应该考虑 CopilotKit。
您可以在 GitHub 上找到本教程的源代码:
https://github.com/dha-stix/interactive-sales-dashboard-with-copilokit
感谢您的阅读!
文章来源:https://dev.to/copilotkit/how-i-upped-my-frontend-game-with-generative-ui-4fhc 后端开发教程 - Java、Spring Boot 实战 - msg200.com


