使用 Flutter 构建食谱应用
使用 Flutter 构建食谱应用
让我们用 Flutter 制作一个食谱应用程序,基本上学习如何用 Flutter 构建完整的应用程序,还要学习如何在 Flutter 应用程序中使用 API,这是一个可以添加到 cv 中的很好的 Flutter 项目。
如果您喜欢通过视频学习,那么您可以观看视频
📕 本系列涵盖的内容:
- 使用 Flutter 从 API 获取数据
- Flutter 应用中如何使用 useState
- 如何在 Flutter 小部件中传递数据
- 在 Flutter 应用中使用自定义字体
- 如何显示网格视图等等。先决条件:
如果尚未安装Flutter,请安装。
源代码:

使用 Flutter 构建食谱应用
完整免费课程:https://youtu.be/VTR5HpRfS0A
在今天的课程中,我们将学习#flutter的基础知识,并创建一个真实的应用程序。我们将学习如何仅使用Flutter构建一个食谱应用程序。
📕 本视频涵盖的内容:
• 使用 Flutter 从 API 获取数据
• 如何在 Flutter 中 useState
• 如何在 Flutter 中通过 Widget 传递数据
• 如何显示网格视图
如果你是 Flutter 的初学者,我强烈建议你继续学习,因为你将学习如何将所有小部分组合在一起,以理解如何从 API 获取数据、如何更新状态等内容。
那么让我们开始编码吧。
步骤 1:创建一个 Flutter 项目,
我将使用 Android Studio 来完成,您可以使用终端/cmd 或 VS 代码,不会有任何区别。
步骤 2:代码清理
我们将首先删除 main.dart 中的所有注释,并删除 MyHomePage() 状态小部件
步骤 3:安装所需的包
http // 以使用 api。webview_flutter
// 用于移动应用中的 webview。url_launcher
// 用于网站在新选项卡中打开食谱 url。
要安装,只需将其添加到 cupertino_icons 下方的 pubspec.yaml 文件中,然后对于 vs 代码 CTRL + S(保存),Android Studio 单击右上角的“获取包”。
步骤 4:在 views 文件夹中创建 home.dart
并将其添加到 main.dart,如下所示。
import 'package:flutter/material.dart';
import 'package:recipe_app/views/home.dart';

void main() {
  runApp(MyApp());
}

class MyApp extends StatelessWidget {
  // This widget is the root of your application.
  @override
  Widget build(BuildContext context) {
    return MaterialApp(
      title: 'Flutter Recipe',
      debugShowCheckedModeBanner: false,
      home: Home(),
    );
  }
}
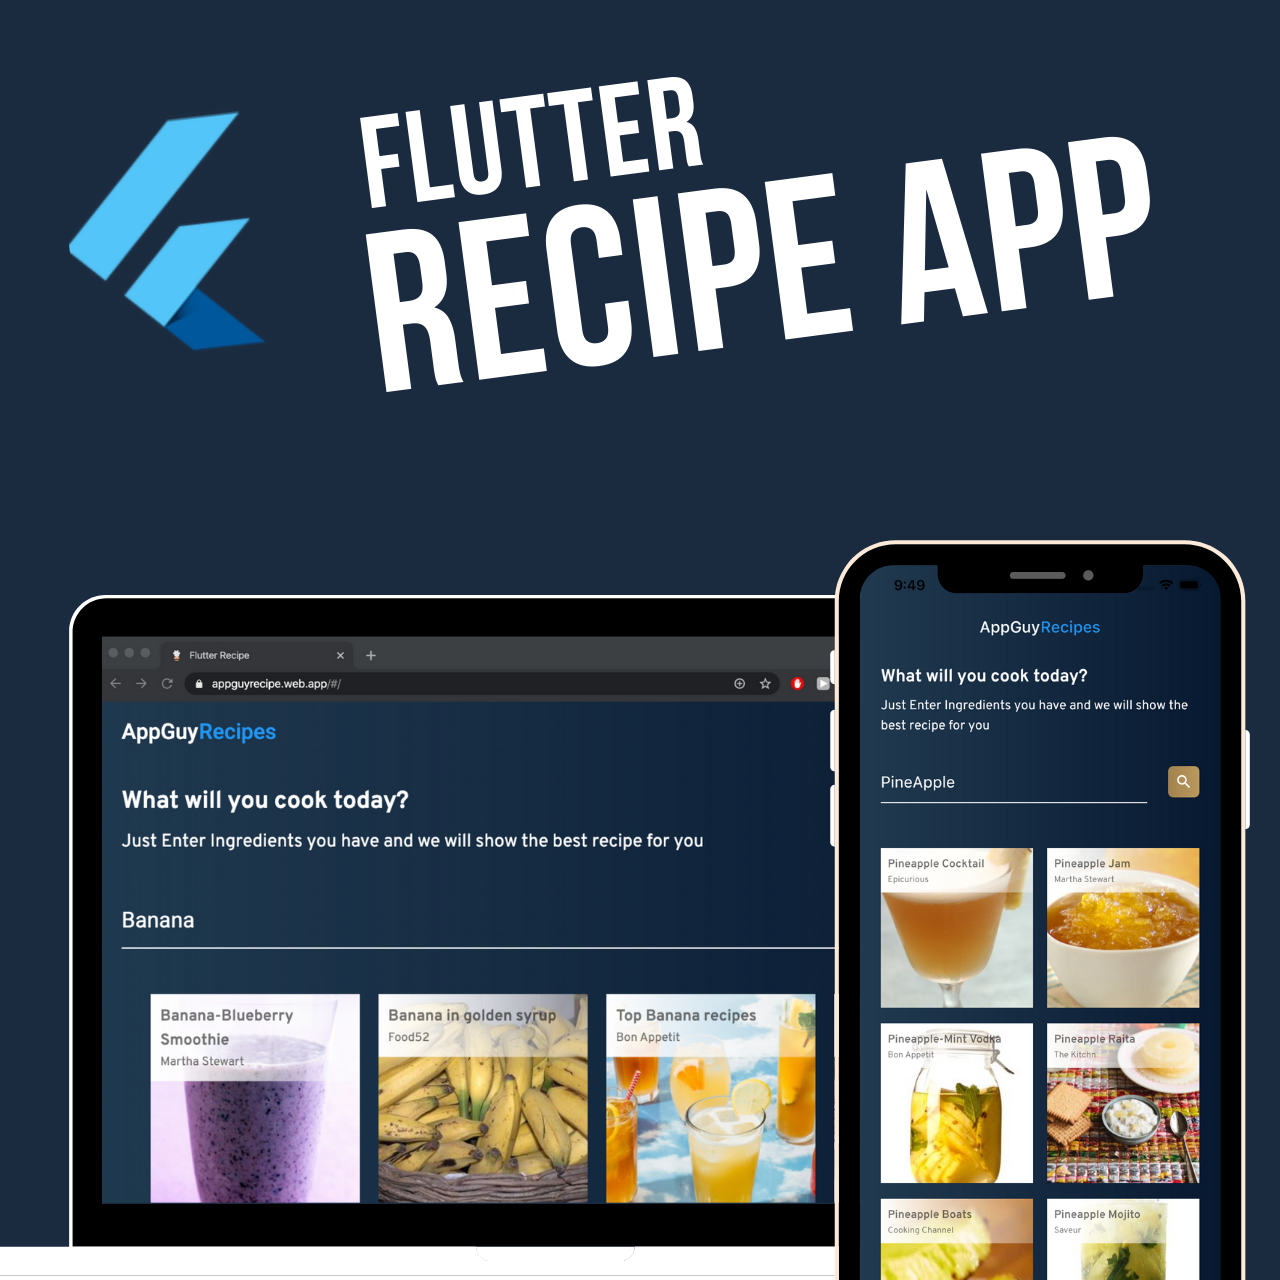
步骤5:现在让我们为应用程序创建用户界面。
作为初学者,为了了解所有小部件(Flutter 中的所有内容,包括图像、文本、容器……),请查看 Flutter 官方小部件目录:https://flutter.dev/docs/development/ui/widgets
让我们讨论最重要的事情,我建议观看视频以更好地理解。
什么是 Scaffold?
它是一个包装器,提供预构建的小部件,如应用栏、浮动操作按钮、抽屉等等,因此我们不必从头开始创建它们。
什么是 Stack?
我们使用堆栈将一个小部件放在另一个小部件上方,把它想象成一个三明治,但我们有一些小部件而不是图钉,它可以是图像上方的文本,可能是自定义图像/背景上方的完整应用程序等等
什么是 Column?
列用于以垂直方式将小部件一个接一个地排列。
Row 是什么?
行用于以水平方式一个接一个地排列小部件。
什么是 Sizedbox?
Sizedbox 用于在我们的应用程序中创建空间,可以是图像和文本之间、文本和文本之间的空间,也可以是任何小部件之间的空间。
如何使用渐变色背景?
对于渐变色,如果容器具有线性渐变属性,我们使用盒子装饰属性。
此外,我们还使用了 Textedit Controller 来跟踪用户在字段中的输入内容。我还使用了自定义字体 Overpass(我非常喜欢这个),所以下一步也要添加它。
以上就是我们在 home.dart 文件中构建的内容。(我是否遗漏了什么?请在评论中告诉我)
import 'dart:convert';
import 'dart:io';
import 'package:flutter/foundation.dart';
import 'package:flutter/material.dart';
import 'package:http/http.dart' as http;
import 'package:recipe_app/models/recipe_model.dart';
import 'package:recipe_app/views/recipe_view.dart';
import 'package:url_launcher/url_launcher.dart';
class Home extends StatefulWidget {
@override
_HomeState createState() => _HomeState();
}
class _HomeState extends State<Home> {
List<RecipeModel> recipies = new List();
String ingridients;
bool _loading = false;
String query = "";
TextEditingController textEditingController = new TextEditingController();
@override
void initState() {
super.initState();
}
@override
Widget build(BuildContext context) {
return Scaffold(
body: Stack(
children: <Widget>[
Container(
height: MediaQuery.of(context).size.height,
width: MediaQuery.of(context).size.width,
decoration: BoxDecoration(
gradient: LinearGradient(
colors: [
const Color(0xff213A50),
const Color(0xff071930)
],
begin: FractionalOffset.topRight,
end: FractionalOffset.bottomLeft)),
),
SingleChildScrollView(
child: Container(
padding: EdgeInsets.symmetric(vertical: !kIsWeb ? Platform.isIOS? 60: 30 : 30, horizontal: 24),
child: Column(
crossAxisAlignment: CrossAxisAlignment.start,
children: <Widget>[
Row(
mainAxisAlignment: kIsWeb
? MainAxisAlignment.start
: MainAxisAlignment.center,
children: <Widget>[
Text(
"AppGuy",
style: TextStyle(
fontSize: 18,
color: Colors.white,
fontFamily: 'Overpass'),
),
Text(
"Recipes",
style: TextStyle(
fontSize: 18,
color: Colors.blue,
fontFamily: 'Overpass'),
)
],
),
SizedBox(
height: 60,
),
Text(
"What will you cook today?",
style: TextStyle(
fontSize: 20,
color: Colors.white,
fontWeight: FontWeight.w400,
fontFamily: 'Overpass'),
),
Text(
"Just Enter Ingredients you have and we will show the best recipe for you",
style: TextStyle(
fontSize: 15,
color: Colors.white,
fontWeight: FontWeight.w300,
fontFamily: 'OverpassRegular'),
),
SizedBox(
height: 40,
),
Container(
child: Row(
children: <Widget>[
Expanded(
child: TextField(
controller: textEditingController,
style: TextStyle(
fontSize: 16,
color: Colors.white,
fontFamily: 'Overpass'),
decoration: InputDecoration(
hintText: "Enter Ingridients",
hintStyle: TextStyle(
fontSize: 16,
color: Colors.white.withOpacity(0.5),
fontFamily: 'Overpass'),
enabledBorder: UnderlineInputBorder(
borderSide: BorderSide(color: Colors.white),
),
focusedBorder: UnderlineInputBorder(
borderSide: BorderSide(color: Colors.white),
),
),
),
),
SizedBox(
width: 16,
),
InkWell(
onTap: () async {
if (textEditingController.text.isNotEmpty) {
setState(() {
_loading = true;
});
recipies = new List();
String url =
"https://api.edamam.com/search?q=${textEditingController.text}&app_id=0f21d949&app_key=8bcdd93683d********5cb95e64ab26";
var response = await http.get(url);
print(" $response this is response");
Map<String, dynamic> jsonData =
jsonDecode(response.body);
print("this is json Data $jsonData");
jsonData["hits"].forEach((element) {
print(element.toString());
RecipeModel recipeModel = new RecipeModel();
recipeModel =
RecipeModel.fromMap(element['recipe']);
recipies.add(recipeModel);
print(recipeModel.url);
});
setState(() {
_loading = false;
});
print("doing it");
} else {
print("not doing it");
}
},
child: Container(
decoration: BoxDecoration(
borderRadius: BorderRadius.circular(8),
gradient: LinearGradient(
colors: [
const Color(0xffA2834D),
const Color(0xffBC9A5F)
],
begin: FractionalOffset.topRight,
end: FractionalOffset.bottomLeft)),
padding: EdgeInsets.all(8),
child: Row(
mainAxisSize: MainAxisSize.min,
children: <Widget>[
Icon(
Icons.search,
size: 18,
color: Colors.white
),
],
),
)),
],
),
),
SizedBox(
height: 30,
),
Container(
child: GridView(
gridDelegate: SliverGridDelegateWithMaxCrossAxisExtent(
mainAxisSpacing: 10.0, maxCrossAxisExtent: 200.0),
shrinkWrap: true,
scrollDirection: Axis.vertical,
physics: ClampingScrollPhysics(),
children: List.generate(recipies.length, (index) {
return GridTile(
child: RecipieTile(
title: recipies[index].label,
imgUrl: recipies[index].image,
desc: recipies[index].source,
url: recipies[index].url,
));
})),
),
],
),
),
)
],
),
);
}
}
class RecipieTile extends StatefulWidget {
final String title, desc, imgUrl, url;
RecipieTile({this.title, this.desc, this.imgUrl, this.url});
@override
_RecipieTileState createState() => _RecipieTileState();
}
class _RecipieTileState extends State<RecipieTile> {
_launchURL(String url) async {
print(url);
if (await canLaunch(url)) {
await launch(url);
} else {
throw 'Could not launch $url';
}
}
@override
Widget build(BuildContext context) {
return Wrap(
children: <Widget>[
GestureDetector(
onTap: () {
if (kIsWeb) {
_launchURL(widget.url);
} else {
print(widget.url + " this is what we are going to see");
Navigator.push(
context,
MaterialPageRoute(
builder: (context) => RecipeView(
postUrl: widget.url,
)));
}
},
child: Container(
margin: EdgeInsets.all(8),
child: Stack(
children: <Widget>[
Image.network(
widget.imgUrl,
height: 200,
width: 200,
fit: BoxFit.cover,
),
Container(
width: 200,
alignment: Alignment.bottomLeft,
decoration: BoxDecoration(
gradient: LinearGradient(
colors: [Colors.white30, Colors.white],
begin: FractionalOffset.centerRight,
end: FractionalOffset.centerLeft)),
child: Padding(
padding: const EdgeInsets.all(8.0),
child: Column(
crossAxisAlignment: CrossAxisAlignment.start,
children: <Widget>[
Text(
widget.title,
style: TextStyle(
fontSize: 13,
color: Colors.black54,
fontFamily: 'Overpass'),
),
Text(
widget.desc,
style: TextStyle(
fontSize: 10,
color: Colors.black54,
fontFamily: 'OverpassRegular'),
)
],
),
),
)
],
),
),
),
],
);
}
}
class GradientCard extends StatelessWidget {
final Color topColor;
final Color bottomColor;
final String topColorCode;
final String bottomColorCode;
GradientCard(
{this.topColor,
this.bottomColor,
this.topColorCode,
this.bottomColorCode});
@override
Widget build(BuildContext context) {
return Padding(
padding: const EdgeInsets.all(8.0),
child: Wrap(
children: <Widget>[
Container(
child: Stack(
children: <Widget>[
Container(
height: 160,
width: 180,
decoration: BoxDecoration(
gradient: LinearGradient(
colors: [topColor, bottomColor],
begin: FractionalOffset.topLeft,
end: FractionalOffset.bottomRight)),
),
Container(
width: 180,
alignment: Alignment.bottomLeft,
decoration: BoxDecoration(
gradient: LinearGradient(
colors: [Colors.white30, Colors.white],
begin: FractionalOffset.centerRight,
end: FractionalOffset.centerLeft)),
child: Padding(
padding: const EdgeInsets.all(8.0),
child: Column(
children: <Widget>[
Text(
topColorCode,
style: TextStyle(fontSize: 16, color: Colors.black54),
),
Text(
bottomColorCode,
style: TextStyle(fontSize: 16, color: bottomColor),
)
],
),
),
)
],
),
),
],
),
);
}
}
步骤 6:将自定义字体添加到 Flutter 应用:
首先从我的 github repo 下载字体 .otf 文件:这里,然后添加到 assets/fonts 文件夹
然后在 pubspec.yaml 文件中像这样提及它们。请在此处查看完整的 pubspec.yaml 文件
 fonts:
    - family: Overpass
      fonts:
       - asset: assets/fonts/overpass_bold.otf
    - family: OverpassRegular
      fonts:
        - asset: assets/fonts/overpass_regular.otf
步骤 7:在 Flutter 应用程序中使用 Api,
现在我们将添加 Edamam Api 以使用其食谱数据库,并在应用程序中请求时显示
首次注册:https://developer.edamam.com/edamam-recipe-api
点击“仪表盘”>“应用程序”>“查看”>“复制应用程序密钥”。
步骤 8:调用 API 并获取应用中的搜索数据。因此,当应用用户提交内容并点击“搜索”时,我们将在 onTap 上运行此代码:
代码已添加到顶部 home.dart 文件中,因此现在运行应该可以正常工作。只需确保更新 Api 密钥即可。
步骤9:在应用中添加Web视图。
显示Web视图非常简单,额外的代码只是应用栏。此外,我还遇到了一个问题,Web视图中只能显示https网站,所以我创建了一个自定义函数,将http网站重定向到https网站。代码如下:在Views中创建一个新文件recipe_view.dart。
import 'dart:async';
import 'dart:io';

import 'package:flutter/foundation.dart';
import 'package:flutter/material.dart';
import 'package:webview_flutter/webview_flutter.dart';

class RecipeView extends StatefulWidget {
  final String postUrl;
  RecipeView({@required this.postUrl});

  @override
  _RecipeViewState createState() => _RecipeViewState();
}

class _RecipeViewState extends State<RecipeView> {

  final Completer<WebViewController> _controller =
      Completer<WebViewController>();

  String finalUrl ;

  @override
  void initState() {
    // TODO: implement initState
    super.initState();
    finalUrl = widget.postUrl;
    if(widget.postUrl.contains('http://')){
      finalUrl = widget.postUrl.replaceAll("http://","https://");
      print(finalUrl + "this is final url");
    }

  }

  @override
  Widget build(BuildContext context) {
    return Scaffold(
      body: Container(
        child: Column(
          children: <Widget>[
            Container(
              padding: EdgeInsets.only(top: Platform.isIOS? 60: 30, right: 24,left: 24,bottom: 16),
              width: MediaQuery.of(context).size.width,
              decoration: BoxDecoration(
                  gradient: LinearGradient(
                      colors: [
                        const Color(0xff213A50),
                        const Color(0xff071930)
                      ],
                      begin: FractionalOffset.topRight,
                      end: FractionalOffset.bottomLeft)),
              child:  Row(
                mainAxisAlignment: kIsWeb
                    ? MainAxisAlignment.start
                    : MainAxisAlignment.center,
                children: <Widget>[
                  Text(
                    "AppGuy",
                    style: TextStyle(
                        fontSize: 18,
                        color: Colors.white,
                        fontFamily: 'Overpass'),
                  ),
                  Text(
                    "Recipes",
                    style: TextStyle(
                        fontSize: 18,
                        color: Colors.blue,
                        fontFamily: 'Overpass'),
                  )
                ],
              ),
            ),
            Container(
              height: MediaQuery.of(context).size.height - (Platform.isIOS ? 104 : 30),
              width: MediaQuery.of(context).size.width,
              child: WebView(
                onPageFinished: (val){
                  print(val);
                },
                javascriptMode: JavascriptMode.unrestricted,
                initialUrl: finalUrl,
                onWebViewCreated: (WebViewController webViewController){
                  setState(() {
                    _controller.complete(webViewController);
                  });
                },
              ),
            ),
          ],
        ),
      )
    );
  }
查看 rawrecipe_app.dart,托管于 GitHub,❤
运行应用测试是否正常运行,有什么问题吗?谷歌一下😅(对我来说没问题),……哦,还是没解决,请在下方评论,FlutterNerd 社区的所有人都很乐意提供帮助。
第十步:在 Web 上运行 Flutter 应用。
首先,请确保您处于 Beta 频道,以便逐步运行 Flutter Web 应用 > 此处 <
然后只需运行选择 chrome voila 的应用程序即可🥳它就可以工作了,就是这么简单,无需设置。
如果您遇到问题,我强烈建议您观看视频,这样更好,而且我尝试以直观的方式解释每个步骤。
🎓 您可能喜欢的更多教程
1. 使用 Firebase 构建功能齐全的 Flutter 聊天应用程序
在本课程中,您将学习如何构建一个功能齐全的聊天应用程序,该应用程序具有一对一实时聊天搜索用户功能,例如 Insta DM。
👉 https://flutternerd.com/build-a-fully-functioning-flutter-chat-app-with-firebase-part-1-4/
2.使用 Flutter 构建壁纸应用程序
在此您将学习如何使用 Flutter 构建壁纸应用程序这是一个可以添加到作品集的很棒的项目
https://flutternerd.com/build-a-wallpaper-app-with-flutter/
3.使用 NewsApi Org 构建 Flutter 新闻应用程序
在这个项目中,我们将使用 NewsAPI.org 并使用它构建一个新闻应用程序
https://flutternerd.com/news-app-with-newsapi-org-flutter/
文章来源:https://dev.to/theindianappguy/build-a-recipe-app-with-flutter-4iko