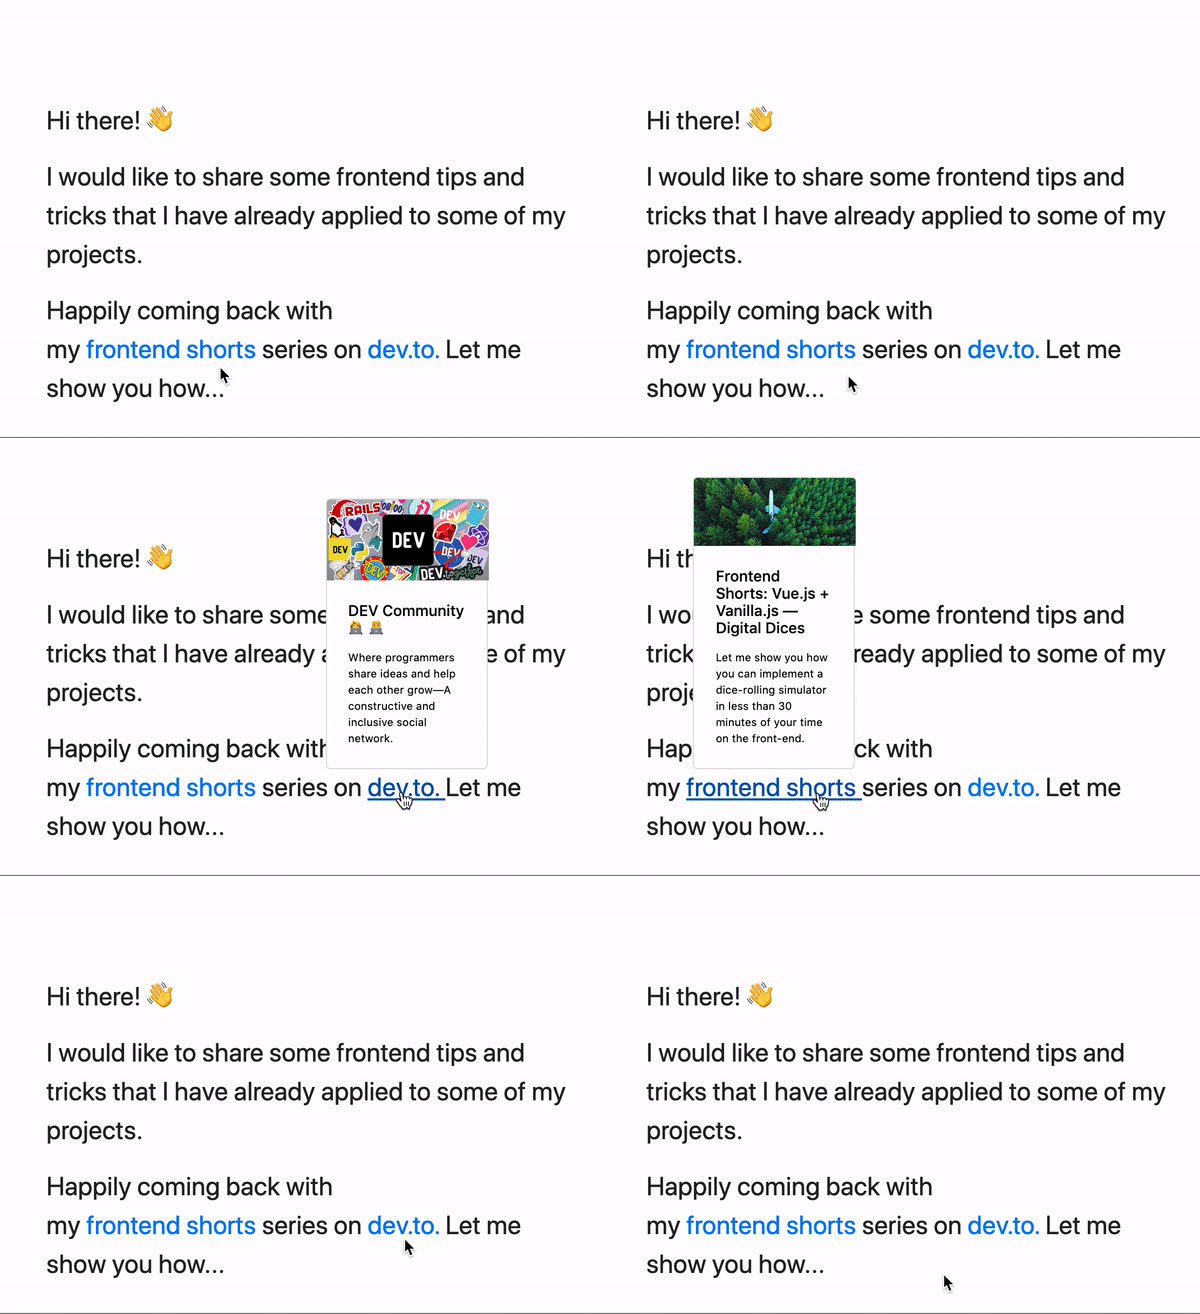
前端短文:如何使用 React、Vue 和 Vanilla JavaScript 创建链接内容预览器
我不仅喜欢写博客,也喜欢读博客!传统上,当博主陈述一些基于科学的事实或引用其他文章时,他们必须添加来源链接。
读者面临的问题是,现在是否值得停止阅读帖子并转而阅读资料?
因为除了帖子之外,我们可能还会有多达 10 个指向不同来源的链接。那么,我们可以跳过哪些链接呢?
这就是为什么如今链接内容预览器已成为博客甚至聊天的必备功能。您已经在 Facebook、LinkedIn、Twitter、WhatsApp 等平台上以各种不同的形式看到了它们。
链接内容预览器的主要好处是,读者在点击链接之前可以对稍后要阅读的内容有一些预期。
通常,链接内容预览器包含域名(URL)、标题、文本和图片。您还可以通过为其内容提供更多数据来创建包含更多信息的预览器。
在这篇文章中,我将向您展示如何使用 React、Vue 和 Vanilla JavaScript 快速为您的博客开发链接内容预览器功能。
从简单到复杂的概念,让我们从 Vanilla JavaScript 实现开始:
第一部分:使用 VanillaJS 链接内容预览器
第一步是向中添加简单的文本内容index.html:
<!--index.html-->

<html lang="en">
<head>
    <meta charset="UTF-8">
    <title>Link Content Previewer</title>
</head>
<body>

<div class="wrapper">
    <p>Hi there! 👋</p>
    <p>I would like to share some frontend tips and tricks that
        I have already applied to some of my projects.</p>
    <p>Happily coming back with <br/> my
        <a href="https://dev.to/ilonacodes/frontend-shorts-vue-js-vanilla-js-digital-dices-og"
             class="link-with-preview"
        >
            frontend shorts
        </a>
        series on
        <a href="https://dev.to"
         class="link-with-preview"
        >
            dev.to.
        </a>
        Let me show you how...
    </p>
</div>

</body>
</html>
接下来,需要有一个card元素来包含和预览来自引用源的信息:
<!--index.html-->
...
<div class="card">
    <img src="" class="card-img-top">
    <div class="card-body">
        <h5 class="card-title"></h5>
        <p class="card-text"></p>
    </div>
</div>
到目前为止,您已经看到我使用Bootstrap 4自定义 CSS 类来设置卡片样式。它们也应该导入到<head />:
<!--index.html-->
...
<link rel="stylesheet" href="https://stackpath.bootstrapcdn.com/bootstrap/4.4.1/css/bootstrap.min.css">
<link rel="stylesheet" href="index.css">
...
由于Boostrap 4功能性,元素定位和一些基本样式会自动从库中应用。因此index.css文件不大,您可以在下面找到链接内容预览器功能所需的所有样式:
/*index.css*/

body {
    font-size: 24px;
}

.wrapper {
    width: 500px;
    top: 50%;
    left: 50%;
    transform: translate(-50%, -50%);
    position: absolute;
}

.card {
    width: 150px;
    display: none;
    font-size: 10px;
    color: black;

    position: absolute;
    z-index: 100;

    bottom: 30px;
    left: 50%;
    transform: translateX(-50%);
}

.link-with-preview {
    position: relative;
}

.card img {
    width: 150px;
}

.card-title {
    font-size: 14px;
}
body要使链接内容预览器正常工作,我们必须编写 JavaScript。希望您没有忘记将脚本添加到in的末尾index.html:
<!--index.html-->
...
<script src="index.js"></script>
并准备开始使用 JavaScript 编码:
const card = document.querySelector(".card");

const hideLinkPreview = () => {
    return card.style.display = 'none';
};

const showLinkPreview = event => {
    const image = event.currentTarget.getAttribute("data-image");
    card.querySelector('img').setAttribute("src", image);

    const title = event.currentTarget.getAttribute("data-title");
    card.querySelector('h5').textContent = title;

    const text = event.currentTarget.getAttribute("data-text");
    card.querySelector('p').textContent = text;

    event.currentTarget.appendChild(card);

    return card.style.display = 'inline-block';
};

document.querySelectorAll(".link-with-preview").forEach(el => {
    el.addEventListener("mouseover", showLinkPreview);
    el.addEventListener("mouseleave", hideLinkPreview)
});
-
声明
card并实现两个函数hideLinkPreview(event)和,参数showLinkPreview(event)为event。在我们的例子中,它是链接的onmouseover和onmouse leave事件<a />。 -
hideLinkPreview(event)操作简单。它只是在鼠标离开时隐藏内容预览(一张卡片)。 -
对于,从链接中获取、和 等
showLinkPreview(event)属性非常重要,将它们设置为实例以在鼠标悬停事件上显示和预览所引用资源的内容。data-imagedata-titledata-text<a />card -
event.currentTarget.appendChild(card);帮助我们将card内容附加到链接预览器内部,并将卡片正确定位/置于链接上方的中心。 -
将所有需要的数据传递到浏览器中,以便在悬停时
index.html预览非空内容:card
<!--index.html-->
<html lang="en">
<head>
<meta charset="UTF-8">
<title>Link Content Previewer</title>
<link rel="stylesheet" href="https://stackpath.bootstrapcdn.com/bootstrap/4.4.1/css/bootstrap.min.css">
<link rel="stylesheet" href="index.css">
</head>
<body>
<div class="wrapper">
<p>Hi there! 👋</p>
<p>I would like to share some frontend tips and tricks that
I have already applied to some of my projects.</p>
<p>Happily coming back with <br/> my
<a href="https://dev.to/ilonacodes/frontend-shorts-vue-js-vanilla-js-digital-dices-og"
onmouseover="showLinkPreview()"
onmouseleave="hideLinkPreview()"
class="link-with-preview"
data-image="https://dev-to-uploads.s3.amazonaws.com/i/3zp478dfafzy1mgfaevn.jpg"
data-title="Frontend Shorts: Vue.js + Vanilla.js — Digital Dices"
data-text="Let me show you how you can implement a dice-rolling simulator in less than 30 minutes of your time on the front-end."
>frontend shorts</a>
series on
<a href="https://dev.to"
onmouseover="showLinkPreview()"
onmouseleave="hideLinkPreview()"
class="link-with-preview"
data-image="https://thepracticaldev.s3.amazonaws.com/i/6hqmcjaxbgbon8ydw93z.png"
data-title="DEV Community 👩💻👨💻"
data-text="Where programmers share ideas and help each other grow—A constructive and inclusive social network."
>
dev.to.
</a>
Let me show you how...
</p>
</div>
<div class="card">
<img src="" class="card-img-top">
<div class="card-body">
<h5 class="card-title"></h5>
<p class="card-text"></p>
</div>
</div>
<script src="index.js"></script>
</body>
</html>
您可以找到VanillaJS 实现的完整源代码:
第二部分:使用 Vue.js 链接内容预览器
正如您目前猜测的那样,index.html它index.css看起来也index.html与index.cssVanillaJS 实现类似:
<div id="app">
<div class="wrapper">
<p>Hi there! 👋</p>
<p>I would like to share some frontend tips and tricks that
I have already applied to some of my projects.</p>
<p>Happily coming back with <br/> my
<link-previewer
href="https://dev.to/ilonacodes/frontend-shorts-vue-js-vanilla-js-digital-dices-og"
text="frontend shorts"
preview-img="https://dev-to-uploads.s3.amazonaws.com/i/3zp478dfafzy1mgfaevn.jpg"
preview-title="Frontend Shorts: Vue.js + Vanilla.js — Digital Dices"
preview-text="Let me show you how you can implement a dice-rolling simulator in less than 30 minutes of your time on the front-end."
></link-previewer>
series on
<link-previewer
href="https://dev.to"
text="dev.to."
preview-img="https://thepracticaldev.s3.amazonaws.com/i/6hqmcjaxbgbon8ydw93z.png"
preview-title="DEV Community 👩💻👨💻"
preview-text="Where programmers share ideas and help each other grow—A constructive and inclusive social network."
></link-previewer>
Let me show you how...
</p>
</div>
</div>
要使用 Vue.js 框架,您需要添加 Vue.js 脚本:
<script src="https://cdn.jsdelivr.net/npm/vue@2.6.11"></script>
根据index.html,我们仍然缺少link-previewer具有相应 props 的组件:, , 和href。text让previewTitle我们在下面使用 Vue.js 创建组件:previewImgpreviewTextlink-previewerindex.html
...
<script>
    Vue.component('link-previewer', {
        props: ['href', 'text', 'previewTitle', 'previewImg', 'previewText'],

        data() {
            return {
                shown: false
            };
        },

        methods: {
            show() {
                this.shown = true;
            },

            hide() {
                this.shown = false;
            }
        },

        // this enables proper syntax highlighting and auto-completion in the IDE for the HTML code snippet below:
        //language=HTML
        template: `
            <a v-bind:href="href"
               v-on:mouseover="show"
               v-on:mouseleave="hide"
               class="link-with-preview"
            >
                {{ text }}
                <div class="card"
                     v-bind:class="{'card-show': shown}">
                    <img v-bind:src="previewImg" alt=""
                         class="card-img-top">
                    <div class="card-body">
                        <h5 class="card-title">{{ previewTitle }}</h5>
                        <div class="card-text">
                            {{ previewText }}
                        </div>
                    </div>
                </div>
            </a>
        `
    });

    const app = new Vue({
        el: '#app'
    });
</script>
-
改变“link-previewer”组件状态的唯一数据
shown: false是data() -
show()这取决于和hide()方法的调用 -
在 Vue.js 实现的情况下,
card组件及其引用的 props 将被构建为template。 -
数据借助速记从 传递到
link-previewer,事件通过 传递。cardv-bindv-on
使用 Vue.js 的完整解决方案,您可以在这里看到:Vue.js — index.html。
第三部分:使用 React.js 链接内容预览器
该组件的 HTML 结构与 VanillaJS 实现App.js几乎相同:index.html
// App.js

import React from "react";
import "./styles.css";
import { LinkPreviewer } from "./LinkPreviewer";

export default function App() {
  return (
    <div className="App">
      <div>
        <p>Hi there! 👋</p>
        <p>
          I would like to share some frontend tips and tricks that I have
          already applied to some of my projects.
        </p>
        <p>
          Happily coming back with <br /> my
          <LinkPreviewer
            href="https://dev.to/ilonacodes/frontend-shorts-vue-js-vanilla-js-digital-dices-og"
            image="https://thepracticaldev.s3.amazonaws.com/i/6hqmcjaxbgbon8ydw93z.png"
            title="Frontend Shorts: Vue.js + Vanilla.js — Digital Dices"
            text="Let me show you how you can implement a dice-rolling simulator in less than 30 minutes of your time on the front-end."
          >
            frontend shorts
          </LinkPreviewer>
          series on
          <LinkPreviewer
            href="https://dev.to"
            image="https://thepracticaldev.s3.amazonaws.com/i/6hqmcjaxbgbon8ydw93z.png"
            title="DEV Community"
            text="Where programmers share ideas and help each other grow—A constructive and inclusive social network."
          >
            dev.to
          </LinkPreviewer>
        </p>
      </div>
    </div>
  );
}
区别仅在于我们需要创建LinkPreviewer组件并使用它来呈现链接内容预览的正确数据:
// LinkPreviewer

import React, { useState } from "react";
import "./styles.css";

export const LinkPreviewer = props => {
  const [isShown, setIsShown] = useState(false);

  return (
    <a
      href={props.href}
      className="link-with-preview"
      onMouseEnter={() => setIsShown(true)}
      onMouseLeave={() => setIsShown(false)}
    >
      <span> {props.children} </span>
      {isShown && (
        <Card image={props.image} title={props.title} text={props.text} />
      )}
    </a>
  );
};

const Card = props => {
  return (
    <div className="card">
      <img src={props.image} className="card-img-top" alt="" />
      <div className="card-body">
        <h5 className="card-title">{props.title}</h5>
        <p className="card-text">{props.text}</p>
      </div>
    </div>
  );
};
-
将
LinkPreviewer返回<a/>所需的属性、事件和样式类,以便在浏览器中正确呈现内容预览功能。 -
当为真时,组件
Card会在预览中呈现引用源的图像、标题和文本等内容isShown。 -
得益于 React hook,
const [isShown, setIsShown] = useState(false);可以轻松处理两个事件onMouseEnter以及悬停onMouseLeave时LinkPreviewer隐藏和显示链接内容预览器。
index.cssCSS 类与VanillaJS 方法相同。
带有React 实现的代码片段在这里。
💬 结论
如您所见,创建链接内容预览器功能非常简单,并且与您要使用的 JavaScript 框架或库无关。因为任何实现都不会有太大差异。方法保持不变。
如果您是开发人员或技术娴熟的人,并且拥有自己的博客,那么您无需依赖第三方库来实现此类功能。您可以自行开发。
感谢您的阅读!
我希望您发现这个前端简短有用且实用,并能帮助我在互联网上传播它,例如通过 Twitter。
编写出最好的代码,
Ilona Codes。
照片由 Matteo Catanese 在 Unsplash 上拍摄
链接:https://dev.to/ilonacodes/frontend-shorts-how-to-create-link-content-previewer-with-react-vue-and-vanilla-javascript-1pm1 后端开发教程 - Java、Spring Boot 实战 - msg200.com
