⏱ 10 分钟教程:使用 Amplify Functions 部署 Apollo GraphQL 服务器
封面图片由Joel Filipe提供
要查看此应用程序的最终代码,请查看此处的repo 。
在我之前的教程中,我展示了如何使用 Amplify 无服务器函数来部署运行 Express 服务器的 REST API。如果我们想采用类似的方法,但部署在 Amplify 函数中运行的 GraphQL API,该怎么办?
在本 10 分钟教程中,您将学习如何使用Amplify 函数、Apollo和 React部署全栈无服务器 GraphQL 应用程序。
我们将使用apollo-server-lambda包使这变得更加容易,只需要几行代码即可将典型的 Lambda 处理程序转换为 GraphQL 服务器。
如果您有兴趣使用 AWS AppSync(Amplify 提供的托管 GraphQL 服务)部署无服务器 GraphQL API,请查看本教程
入门
首先安装并配置最新版本的 Amplify CLI。
要观看如何配置 CLI 的视频演示,请单击此处。
$ npm install -g @aws-amplify/cli

$ amplify configure
现在,创建一个新的 React 项目来保存前端代码并安装必要的依赖项:
$ npx create-react-app fs-apollo

$ cd fs-apollo

$ npm install apollo-boost @apollo/react-hooks graphql
接下来,初始化一个新的 Amplify 项目:
$ amplify init

# Chooose your environment name and default text editor
# You can answer the defaults for the rest of the questions and then choose the profile you created when you ran amplify configure
创建 GraphQL API
现在,我们可以创建 API 了。为此,我们可以使用 Amplifyadd命令。使用该api类别,CLI 将创建一个无服务器函数以及一个可用于 GraphQL 服务器的 http 端点。
$ amplify add api

? Please select from one of the below mentioned services: REST
? Provide a friendly name for your resource to be used as a label for this category in the project: apolloapi
? Provide a path (e.g., /items): /graphql
? Choose a Lambda source: Create a new Lambda function
? Provide a friendly name for your resource to be used as a label for this category in the project: apolloserver
? Provide the AWS Lambda function name: apolloserver
? Choose the function runtime that you want to use: NodeJS
? Choose the function template that you want to use: Hello World
? Do you want to access other resources created in this project from your Lambda function? N
? Do you want to edit the local lambda function now? N
? Restrict API access: N
? Do you want to add another path? N
CLI 为我们创建了一些东西:
- API 端点
- Lambda 函数
- 处理函数的一些样板代码
接下来,我们将进入功能目录并安装 Apollo 服务器的依赖项:
$ cd amplify/backend/function/apolloserver/src

$ npm install apollo-server-lambda graphql

$ cd ../../../../../
现在,让我们打开该函数的代码。
打开amplify/backend/function/apolloserver/src/index.js。在这里,您将看到主函数处理程序:
exports.handler = async (event) => {
    // TODO implement
    const response = {
        statusCode: 200,
        body: JSON.stringify('Hello from Lambda!'),
    };
    return response;
};
这是我们将用 Apollo 服务器替换的代码。使用以下代码更新函数:
const { ApolloServer, gql } = require('apollo-server-lambda')

/* Construct a schema, using GraphQL schema language */
const typeDefs = gql`
  type Query { hello: String }
`

/* Provide resolver functions for your schema fields */
const resolvers = {
  Query: {
    hello: () => 'Hello from Apollo!!',
  },
}

const server = new ApolloServer({
    typeDefs,
    resolvers,
    context: ({ event, context }) => ({
      headers: event.headers,
      functionName: context.functionName,
      event,
      context,
    }),
  })

exports.handler = server.createHandler({
  cors: {
    origin: '*',
    credentials: true,
  },
})
在typedefs定义中,你可以定义应用程序所需的 GraphQL 模式。在本例中,我们只有一个查询,返回字符串“Hello from Apollo!!”。
现在,我们可以部署函数和 GraphQL API:
$ amplify push
客户端
现在后端已经部署完毕,让我们更新客户端以便与服务器进行交互。为此,打开src/App.js并使用以下内容进行更新:
import React from 'react'
import logo from './logo.svg'
import './App.css'

import ApolloClient, { gql } from 'apollo-boost'
import { ApolloProvider, useQuery} from '@apollo/react-hooks';
import config from './aws-exports'

/*
* The endpoint is created by the Amplify CLI and stored in the aws-exports.js file
*/
const { endpoint } = config.aws_cloud_logic_custom[0]

/* Define the query */
const query = gql`{ hello }`;

function App() {
  /* Use useQuery hook to call GraphQL API */
  const { loading, error, data } = useQuery(query);
  if (loading) return <p>Loading...</p>;
  if (error) {
    console.log('error: ', error)
    return <p>Error :(</p>;
  }

  return (
    <div className="App">
      <header className="App-header">
        <img src={logo} className="App-logo" alt="logo" />
        <h1>{data.hello}</h1>
      </header>
    </div>
  );
}

/* Create client using the GraphQL endpoint  */
const client = new ApolloClient({
  uri: endpoint + '/graphql'
});

const AppWithProvider = () => (
  <ApolloProvider client={client}>
    <App />
  </ApolloProvider>
);

export default AppWithProvider
要测试它,请运行以下start命令:
$ npm start
更新服务器
要更新服务器,请进行您想要更新的任何更改,然后运行以下push命令:
$ amplify push
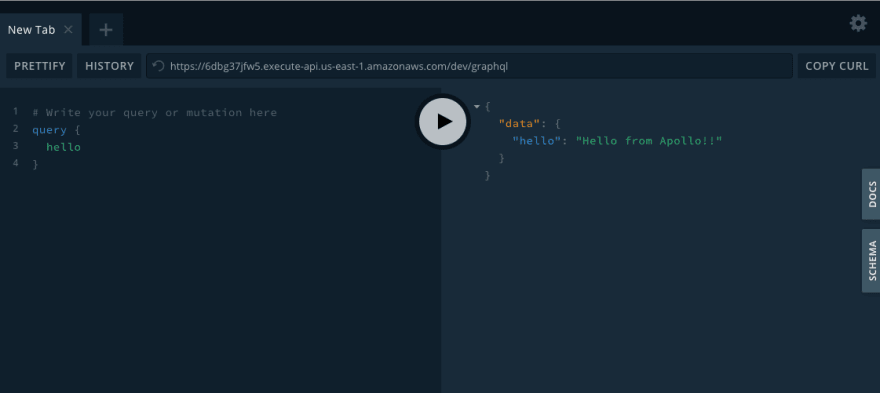
GraphQL 游乐场
服务器启动并运行后,你还可以通过在浏览器中导航到 GraphQL 端点 /graphql 来使用 GraphQL 游乐场。URL 在文件中可用aws-exports.js,如下所示:
https://6dbg37jfw5.execute-api.us-east-1.amazonaws.com/dev/graphql
视频演示
我还制作了本教程的分步视频演示。