使用 React 和 Chakra UI 的 NoCodeAPI Google Sheet 教程
我们将使用 React、Chakra UI 和 NoCodeAPI 构建一个简单的网站“Fungram”,用于从 Google 表格中获取数据。本教程的目标是帮助您熟悉 NoCodeAPI 及其工作原理。
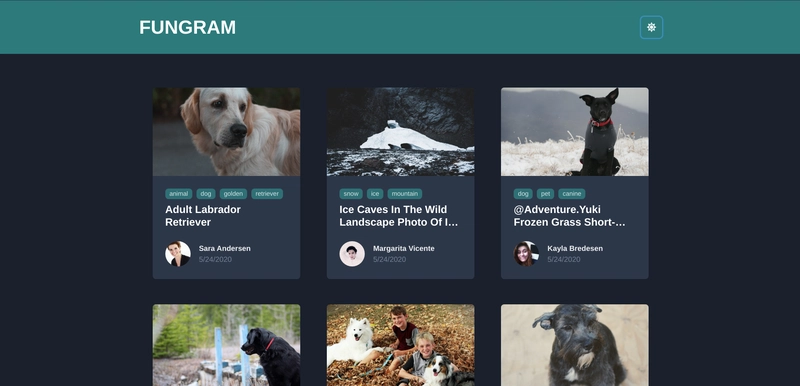
最终的项目将看起来像这样(黑暗模式):
查看该项目的实时链接 - fungram.netlify.app
源代码可在github.com/fabcodingzest/fungram获取
我们将使用的技术栈-
-
React 是一个 JavaScript 库,用于使用可重复使用的组件构建更快的用户界面。
-
Chakra UI 是一个简单、模块化且可访问的组件库,可以帮助我们设计网站风格。
-
NoCodeAPI 可以轻松设置 Google Sheet、Airtable、Twitter 等 API。
入门
让我们开始设置项目目录。
创建 React 项目
我们将使用 create-react-app 模板作为 Chakra UI。
# using npm
npx create-react-app fungram --template @chakra-ui

# or using yarn
yarn create react-app fungram --template @chakra-ui

# Enter the project directory
cd fungram

# Use the following command to open the project in vs-code
code .
我们将对文件进行一些更改并删除不需要的文件(如果您愿意,可以跳过此步骤并直接转到此部分)。
src从目录中删除以下内容
├── App.test.js
├── Logo.js
├── logo.svg
├── reportWebVitals.js
├── serviceWorker.js
├── setupTests.js
└── test-utils.js
这将显示一些错误,我们需要删除已删除文件的导入,所以让我们这样做。
1)删除 App.js 返回函数内的所有内容,使其看起来像这样:
import React from 'react';

function App() {
  return (
    <div>
      Hello
    </div>
  );
}

export default App;
2)转到index.js,它看起来像这样:
import { ChakraProvider, ColorModeScript, theme } from '@chakra-ui/react';
import React, { StrictMode } from 'react';
import ReactDOM from 'react-dom';
import App from './App';

ReactDOM.render(
  <StrictMode>
    <ChakraProvider theme={theme}>
      <ColorModeScript />
      <App />
    </ChakraProvider>
  </StrictMode>,
  document.getElementById('root')
);
我们在这里做了什么?
由于我们从 App.js 中删除了 ChakraProvider,因此我们将其添加到 index.js 中(您也可以在 App.js 中使用它,我只是更喜欢将它单独放在索引文件中)。
3)启动开发服务器:
yarn start
# or
npm run start
现在我们已经完成了项目设置,让我们去 NoCodeAPI 来获取我们的端点。
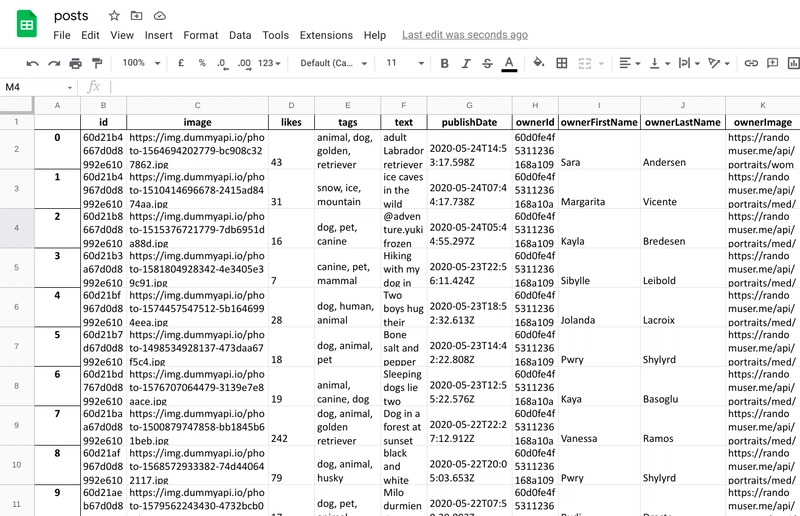
在我们继续之前,我只想表明我在 Google 表格中存储了一些帖子数据,我们将在项目中使用这些数据,如下所示:
注:我使用本教程将从DummyAPI获取的 JSON 数据转换为 Google 表格。(我知道我可以使用NoCodeAPI 导入功能直接导入数据,但由于数据是嵌套的,如果没有 Dummy API 标头就无法工作,所以我不得不先完成这个步骤,然后手动将 .xlsx 文件导入 Google 表格 xD。每天都能学到新东西。)
使用 NoCodeAPI
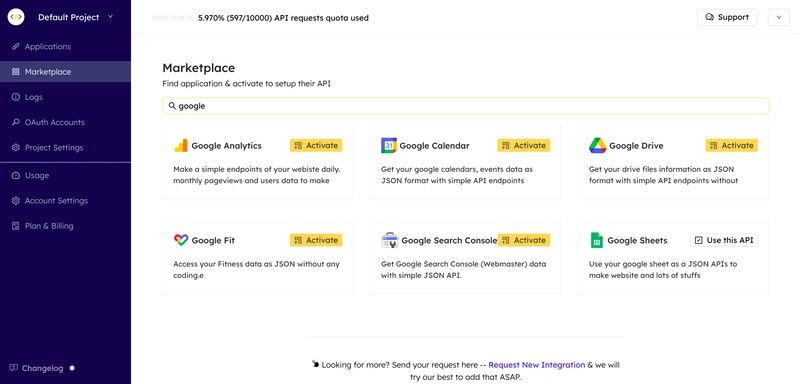
首先,你当然需要注册。登录后,前往 Marketplace 搜索 Google Sheet,或者向下滚动一点,你应该就能看到一个(如图所示):
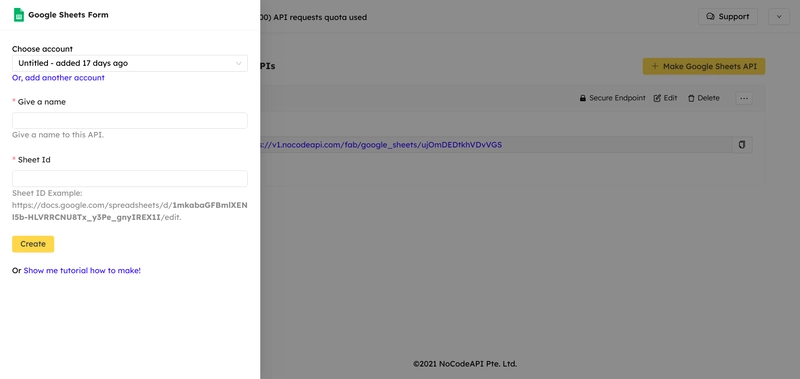
您将在那里看到激活按钮(因为我已经在使用该 API,所以它显示“为我使用此 API”),点击它。它会将您重定向到一个页面,在该页面上您应该能够看到一个黄色的 Make Google Sheets API 按钮,点击它,您将看到以下抽屉:
为 API 输入您想要的名称并输入工作表 ID(请参考示例),点击“创建”,然后就好了!我们的 Google Sheet API 已准备就绪,可供使用。您将看到类似以下内容:
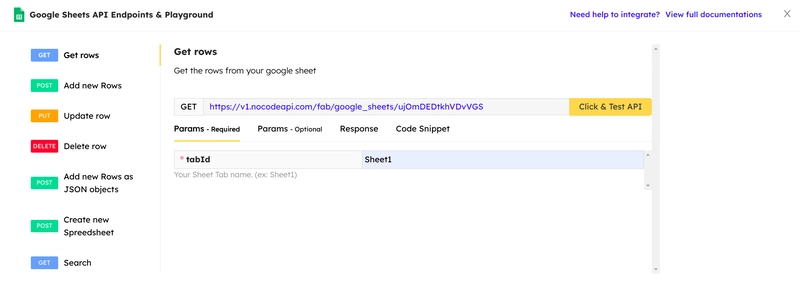
单击使用此 API 并根据需要使用端点,只需确保输入 tabId(例如,我的情况为 Sheet1),因为它是必需参数:
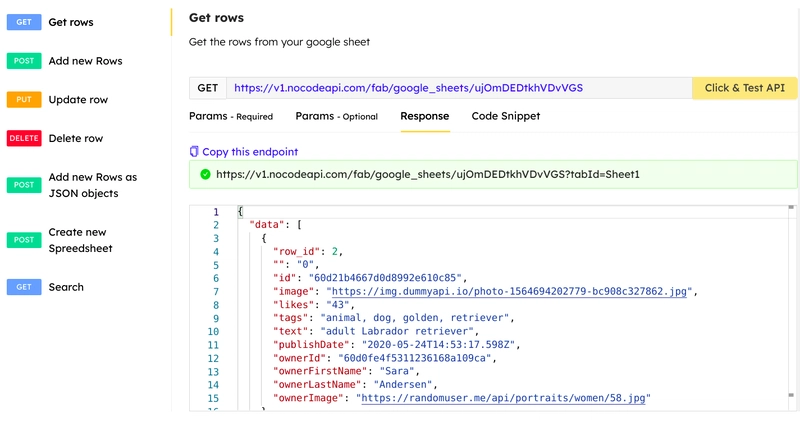
测试 API,您应该能够看到如下结果:
哈利路亚!我们的 API 现在可以正常工作了,我们只需要在 React App 中使用 API 端点即可。出发啦!
回到我们的 React 项目
首先,我们将借助Axios来设置我们的 API 。
1)要安装 Axios,请在终端中运行以下命令:
# using Yarn
yarn add axios

# or using npm
npm install axios
2)创建一个api文件夹,包含api.js并添加以下代码:
import axios from 'axios';

export default axios.create({
  baseURL: "Your api endpoint from NoCodeAPI",
  params: {
    tabId: 'Sheet1', // passing the required parameter in the axios instance of api
  },
});
我们不能公开提供 API 字符串,因此我们将其作为环境变量存储在.env文件中,所以让我们快速创建一个环境变量并使用前缀添加我们的 API 端点REACT_APP_(这就是create-react-app工作原理,你必须有这个),我将按照以下步骤进行。
REACT_APP_API=your_nocodeapi_endpoint
现在我们已经完成了,让我们改变baseURLin api.js,它看起来会像这样:
import axios from 'axios';

export default axios.create({
  baseURL: process.env.REACT_APP_API,
  params: {
    tabId: 'Sheet1',
  },
});
好极了!现在我们可以开始处理组件了。
让我们回来并从 api 中获取一些数据App.js,我们将使用 useEffect 钩子,但在此之前,让我们使用 useState 钩子向组件添加一些状态(不要忘记导入它)。
const [posts, setPosts] = useState([]);
const [loading, setLoading] = useState(true);
const [error, setError] = useState('');
这些状态是不言自明的,所以让我们转到 useEffect 函数,它看起来像这样:
import api from './api/api'; // importing the api

useEffect(() => {
    const fetchData = async () => {
      setLoading(true);
      try {
        const res = await api.get('/');
        setPosts(res.data.data);
      } catch (error) {
        setError(error.message);
      }
      setLoading(false);
    };
    fetchData();
  }, []);
我们在这里做了什么?
- 我们创建了一个异步函数,其中我们首先设置我们的加载状态,
true因为我们的数据尚未被获取。 - 在
try块中,我们正在等待来自 api 的响应并将其保存在res变量中。 - 获取数据后,我们使用 useState 钩子提供的 setPosts 函数。
- 如果我们发现任何错误,我们会将错误状态设置为错误消息。
- 该过程结束后,我们将加载状态设置回 false。
- 最后,我们调用钩子内的函数,该函数将在 App 组件渲染时运行。
我们将在目录components中创建一个文件夹src。记住我们有一个ColorModeSwitch.js文件,也将其移动到 components 文件夹中。
现在,让我们编写我们的 App 组件。
// Adding these in case of data is loading or there is some error
// The components used are simply Chakra UI components (import them)
if (loading)
return (
<Flex alignItems={'center'} justifyContent={'center'} minH={'100vh'}>
<Spinner size="xl" thickness="4px" />
</Flex>
);
if (error) return (
<Flex alignItems={'center'} justifyContent={'center'} minH={'100vh'}>
{error}
</Flex>
);
// when we get the data
return (
<div>
<Box bg={'teal.600'}>
<Container as={'header'} maxW={'container.xl'} py={6}>
<Flex
w={'full'}
alignItems={'center'}
justifyContent={'space-between'}
>
<Text
color={'white'}
fontSize={'4xl'}
fontWeight={'600'}
textTransform={'uppercase'}
>
fungram
</Text>
<ColorModeSwitcher justifySelf="flex-end" />
</Flex>
</Container>
</Box>
<Container as="main" maxW="container.xl" my={10}>
<Grid
templateColumns={{
base: 'repeat(1, 1fr)',
md: 'repeat(2, 1fr)',
lg: 'repeat(3, 1fr)',
}}
>
{posts.map(post => (
<PostCard key={post.id} data={post} />
))}
</Grid>
</Container>
<Box bg={'teal.600'}>
<Container as={'footer'} maxW={'container.xl'} align={'center'} py={6}>
<Text fontSize={'sm'}>
© 2021 Made by{' '}
<Link fontWeight={'600'} href="http://github.com/fabcodingzest">
Fab
</Link>
</Text>
<Text fontSize={'sm'}>
Checkout the code at{' '}
<Link
fontWeight={'600'}
href="http://github.com/fabcodingzest"
>
GitHub
</Link>
</Text>
</Container>
</Box>
</div>
);
再说一遍,我们在这里做了什么?
- Chakra UI 组件用于设置页眉、页脚和主要元素的样式(不要忘记导入它们)。
- 我们
ColorModeSwitch在标题中使用了该组件。 - 主要部分是通过包含我们的数据数组的帖子状态进行映射。
<Postcard />我们为数组中的每个项目渲染组件,并将数据作为dataprop 以及 key prop 传递。
现在,我们还没有创建 PostCard 组件,所以让我们在里面创建它,src/components/它看起来像这样:
import {
  Image,
  Box,
  Tag,
  Center,
  Heading,
  Text,
  Stack,
  Avatar,
  useColorModeValue,
  HStack,
} from '@chakra-ui/react';

const PostCard = ({ data }) => {
  const {
    image,
    tags,
    text,
    publishDate,
    ownerFirstName,
    ownerLastName,
    ownerImage,
  } = data;
  const date = new Date(publishDate).toLocaleDateString();
  const tagsArr = tags.split(', ');
  return (
    <Center py={6}>
      <Box
        maxW={'350px'}
        w={'full'}
        bg={useColorModeValue('white', 'gray.700')}
        boxShadow={useColorModeValue('2xl', 'sm')}
        rounded={'md'}
        p={6}
        overflow={'hidden'}
      >
        <Box
          h={'210px'}
          bg={'gray.100'}
          mt={-6}
          mx={-6}
          mb={6}
          pos={'relative'}
        >
          <Image
            src={image}
            objectFit={'cover'}
            h={'full'}
            w={'full'}
            alt={text}
          />
        </Box>
        <Stack>
          <HStack spacing={2}>
            {tagsArr.map(item => (
              <Tag size={'sm'} key={item} variant="solid" colorScheme="teal">
                {item}
              </Tag>
            ))}
          </HStack>
          <Heading
            color={useColorModeValue('gray.700', 'white')}
            fontSize={'xl'}
            fontFamily={'body'}
            textTransform="capitalize"
            noOfLines={2}
          >
            {text}
          </Heading>
        </Stack>
        <Stack mt={6} direction={'row'} spacing={4} align={'center'}>
          <Avatar src={ownerImage} alt={'Author'} />
          <Stack direction={'column'} spacing={0} fontSize={'sm'}>
            <Text fontWeight={600}>
              {ownerFirstName} {ownerLastName}
            </Text>
            <Text color={'gray.500'}>{date}</Text>
          </Stack>
        </Stack>
      </Box>
    </Center>
  );
};

export default PostCard;
我们在这里做了什么?
- 我们首先对收到的数据支柱进行解构。
- 将其转换
publishDate为本地日期字符串。 - 拆分标签字符串并获取标签数组(这是因为我在 Google 表格中存储标签的方式)。
- 其余我们仅使用 Chakra UI 来实现样式。
哈利路亚!项目已经完成了,但你还可以用 NoCodeAPI 做更多事情,所以请务必尝试一下市场上其他类型的请求或产品。祝一切顺利!
概括
- 我们学习了如何使用 Chakra UI 模板创建 React 项目。
- 我们学习了如何使用 NoCodeAPI 设置 Google Sheet API。
- 我们学习了如何获取数据、处理加载和错误状态。
 后端开发教程 - Java、Spring Boot 实战 - msg200.com
