使用 AWS Amplify 构建全栈应用程序:初学者指南
2024 年 6 月 27 日:这篇博文使用 Amplify Gen 1,如果您要启动新的 Amplify 应用程序,我建议您尝试Gen 2!
几周前,我加入了AWS Amplify团队,担任高级开发者倡导者。我非常高兴能够参与开发一款产品,让前端和移动开发者更容易地体验 AWS 的强大功能。我想为初学者介绍如何使用 AWS Amplify 构建全栈应用程序。
首先,在开始之前,请确保您熟悉 HTML、CSS、Git 和 Github、API 以及没有框架的 JavaScript(Vanilla JavaScript)。
我们将构建什么
在本教程中,我们将构建一个 Gif 显示应用程序,用户可以在其中查看 gif、添加新 gif、编辑现有 gif 以及删除它们。

设置
我们将设置文件、安装必要的软件并配置 Babel。如果您想直接查看代码,这里有一个已完成这些步骤的分支,您只需安装软件、下载文件,然后$ npm install在下载的文件夹中运行即可。
注意:以 开头的命令$是在命令行中运行的,但是$复制命令时请省略 !
- 请按照此文档和视频安装 Amplify CLI。注意:您需要一个 AWS 账户并安装 Node!
- 通过在终端中运行此命令来安装 Parcel
$ npm install -g parcel-bundler - 通过运行以下命令创建项目所需的文件:
- 创建一个名为 giphlify 的目录:
$ mkdir giphlify - 进入该目录:
$ cd giphlify - 创建 src 目录:
$ mkdir src - 在该目录中创建一个 JS 文件:
$ touch src/script.js - 创建
css文件夹:$ mkdir css - 创建 HTML 和 CSS 文件:
$ touch index.html css/style.css - 创建 Babel 配置文件:
$ touch .babelrc
- 创建一个名为 giphlify 的目录:
- 初始化您的项目:
- 设置一个 npm 项目(--y 将接受默认配置!):
$ npm init --y - 初始化一个git项目:
$ git init - 安装AWS Amplify:
$ npm i aws-amplify - 安装Babel:
$ npm i --save-dev babel-core - 在本地安装 Parcel(这是为了我们部署应用程序时使用):
$ npm i --save-dev parcel-bundler
- 设置一个 npm 项目(--y 将接受默认配置!):
- 设置你的 Babel 配置:在你的
.babelrc文件中,复制并粘贴以下内容
{
  "presets": [
    ["env", {
      "targets": {
        "browsers": ["last 2 Chrome versions"]
      }
    }]
  ]
}
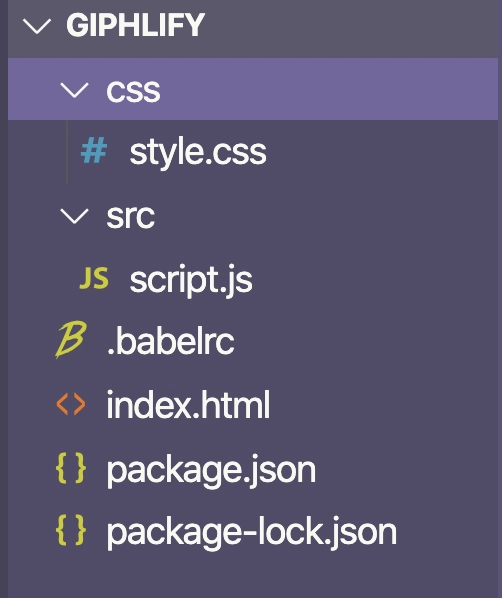
您的文件树应该看起来像这样!
这将允许我们使用我们需要的所有 AWS Amplify 和 Parcel 功能。
package.json在步骤中创建的文件中npm init,更新scripts对象以包含另外两个项目,即启动和构建:
 "scripts": {
    "test": "echo \"Error: no test specified\" && exit 1",
+ "start": "parcel index.html",
+ "build": "parcel build index.html "
  },
注意:如果您复制并粘贴,请删除每行开头的加号😊
😅 好的,现在你的应用程序设置好了!感觉好像很多,但我们也做了很多安装工作。下次创建 AWS Amplify 应用时,可以跳过前几个步骤。而且,使用 Parcel 比很多替代方案都简单得多,而且它还能提供很多实用的功能!
⏱此时您的代码应该是这样的!
添加 API
我们接下来需要做的是初始化 AWS Amplify。
我们首先运行命令$ amplify init。然后会询问你一些关于项目的问题:
? Enter a name for the project (giphlify)按回车键接受推荐的 giphliphy!? Enter a name for the environment由于我们处于开发模式,请按回车键接受推荐的开发。? Choose your default editor:选择您的文本编辑器,我的是,Visual Studio Code所以我会使用向上和向下箭头键来选择它,然后按回车键继续。? Choose the type of app that you're building使用向上和向下箭头键导航到javascript,然后按回车键(它可能已经被选中)。? What javascript framework are you using选择none? Source Directory Path:按 Enter 键选择默认值,src? Distribution Directory Path:按 Enter 键选择默认值,dist? Build Command:按 Enter 键选择默认值,npm run-script build? Start Command:按 Enter 键选择默认值,npm run-script start? Do you want to use an AWS profile?按y“是”? Please choose the profile you want to use选择您的 AWS 配置文件
现在您有一个 AWS Amplify 项目🎉
我们还想在项目中添加一个 API,以便将数据存储到数据库中并加以利用。API 使我们能够与数据进行交互和操作。四个常见的操作是创建、读取、更新和删除,通常称为 CRUD 操作。我们将把这四个操作集成到我们的应用程序中!
您可以通过运行以下命令来初始化 API $ amplify add api。与我们初始化 AWS Amplify 时类似,它会询问几个问题,以便为您构建最佳的 API!以下是如何针对我们的 Giphlify 应用回答这些问题:
? Please select from one of the below mentioned services:选择 GraphQL。? Provide API name:使用默认提供的 giphlify。? Choose the default authorization type for the API选择 API 密钥。? Enter a description for the API key:您只需在此处按 Enter 键即可。? After how many days from now the API key should expire (1-365):输入 365(如果您想要一个接近的到期日期,可以输入更短的日期)? Do you want to configure advanced settings for the GraphQL API选择“不,我已经完成了。”? Do you have an annotated GraphQL schema?输入“n”表示否? Choose a schema template:选择“带有字段的单个对象(例如,带有 ID、名称、描述的“Todo”)”? Do you want to edit the schema now? (y/N)输入y以打开您的文本编辑器!
最后一条命令应该会在文本编辑器中打开该文件/amplify/backend/api/giphlify/schema.graphql。该文件中应该已经包含一些代码,如果你要构建一个待办事项列表应用,那么它就是待办事项的架构!我们将删除现有的架构并添加一个新的。
type Gif @model {
  id: ID!
  altText: String!
  url: String!
}
GraphQL 是一种“API 查询语言”。它使我们能够从 API 中准确获取所需的数据,并根据需要进行修改。在此代码片段中,我们创建了一个数据类型,即 Gif。 指示@modelAWS Amplify 将此数据添加到我们的数据库中。然后,括号内的三行是我们希望每个 Gif 都具有的字段。id将自动添加,并且每个 Gif 都是唯一的;altText将为使用屏幕阅读器和搜索引擎的用户描述图像; 将url是指向图像的链接。每个字段在 之后也有其数据类型:。id是一种ID类型,另外两个是String。!表示该字段对于每个图像都是必需的。
配置和初始化我们的 API 为您生成了一堆文件,其中大多数我们不需要担心——我们将来会使用一些!
最后,我们运行以下命令:
$ amplify push --y
这将修改我们的 API 并进行部署!这样,我们的应用后端就完成了。现在该讨论前端了!
代码设置
打开你的文本编辑器,打开你的项目,对我来说,这个命令是$ code .。我们将从创建 开始index.html。打开该文件,并添加样板 HTML 代码。同时,链接你的 JavaScript 和 CSS 文件。
<!DOCTYPE html>
<html lang="en">
<head>
  <title>Document</title>
  <link rel="stylesheet" href="./css/style.css">
</head>
<body>
  <h1>Giphlify</h1>
  <script src="./src/script.js"></script>
</body>
</html>
继续$ npm run start在终端中运行该命令。这将使用 Parcel 热加载您的代码,允许您使用模块,并运行 Babel。在我们编写更多代码时,请保持此服务器运行,它会持续为您更新!如果您需要退出服务器,请运行ctrl + c将其关闭。此外,Parcel 会在名为 的文件夹中创建文件,dist/这些文件已存在于您的 中.gitignore。这些是 Parcel 创建并实际托管的文件的打包版本。
在您选择的浏览器中导航localhost:1234至查看您的应用程序!
现在,转到你的src/script.js文件。在这里,我们将添加:
import Amplify from '@aws-amplify/api'
import awsConfig from './aws-exports'

Amplify.configure(awsConfig)
这将使用文件中的配置信息src/aws-exports.js为我们的前端应用程序配置 AWS Amplify!
注意:如果您之前没见过这个import语法,请查看此资源。Parcel 也在这里帮助我们!
另外,.cache/在 .gitignore 文件的末尾添加以下内容。这些是 Parcel 创建的、我们不想存储在仓库中的文件。
⏱此时您的代码应该是这样的!
创建表单
现在,我们需要实现的第一个功能是创建一个用于添加新 GIF 动图的表单。首先,我们需要添加一些 HTML 代码,创建一个包含两个字段的表单,一个用于填写 GIF 动图的 URL,另一个用于填写其 altText。我们还将为每个表单字段添加一个提交按钮和标签。
<!DOCTYPE html>
<html lang="en">
<head>
  <title>Document</title>
  <link rel="stylesheet" href="./css/style.css">
</head>
<body>
  <h1>Giphlify</h1>
+ <form id="create-form">
+ <h2>Create a New Gif</h2>
+ <label for="altText">Alt Text</label>
+ <input type="text" name="altText" id="altText">
+ <label for="url">URL</label>
+ <input type="text" name="url" id="url">
+ <input type="submit" value="Create">
+ </form>
  <script src="./src/script.js"></script>
</body>
</html>
现在我们将编写 JavaScript 代码以使我们的表单正常工作。
首先,修改第一行的导入,以便从 AWS Amplify 导入 API 和 graphqlOperation:
import Amplify, { API, graphqlOperation } from '@aws-amplify/api'
当我们将 API 推送到 AWS Amplify 时,它还会生成一些可以在代码中使用的 GraphQL 查询。查看 中的文件/src/graphql。您将看到查询(允许我们选择要在应用程序上显示的数据)、突变(允许我们更改数据)以及订阅(允许我们“监听”应用程序中的更改)。现在,导入突变createGif!
import Amplify, { API, graphqlOperation } from '@aws-amplify/api'
import awsConfig from './aws-exports'

+ import { createGif } from './graphql/mutations'
现在,我们将添加一个事件来监听create-form提交的内容。我们将抓取用户的表单输入并将其放入一个对象中。然后,我们将使用AWS Amplify 的 API 功能,根据用户提供的数据运行我们的createGif变异操作。查看下面带注释的代码!
// create an async function: https://developer.mozilla.org/en-US/docs/Web/JavaScript/Reference/Statements/async_function
const createNewGif = async e => {
  e.preventDefault() // don't refresh the page after form submit

  const gif = {
    // grab the value of the `altText` field
    altText: document.getElementById('altText').value,
    // grab the value of the `url` field
    url: document.getElementById('url').value
  }

  try {
    // Make the API request: provide the createGif operation, provide the user's gif data
    const newGif = await API.graphql(graphqlOperation(createGif, { input: gif }))
    // Print the data to the console once it comes back
    console.log(newGif)
    // Reset the form (make the fields blank again)
    document.getElementById('create-form').reset()
  } catch (err) {
    // If the request fails, print the error message to the console
    console.error(err)
  }
}

// run our createNewGif function when the form is submitted
document.getElementById('create-form').addEventListener('submit', createNewGif)
尝试在表单中输入以下数据:
altText: excited black lab jumping up and down
url: https://media.giphy.com/media/eLpO6JFWmTximd6608/giphy.gif
注意:要获取更多动图,您可以前往Giphy并选择任意动图链接。请确保获取带有.gif扩展名的 URL,以便我们的img标签能够正常工作。此外,互联网上的任何图片也应该可以正常使用!
⏱此时您的代码应如下所示。
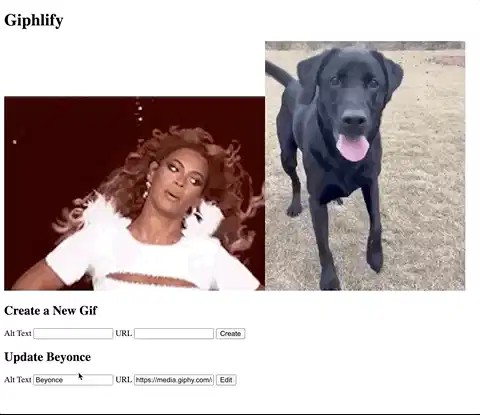
界面应该是这样的:

当您单击时,控制台中应该出现什么create:

太棒了,现在我们可以创建 gif 动图了!现在就把它们全部显示在页面上吧!
显示所有 Gif
首先,让我们添加一个包含所有 gif 的 HTML 元素:
...
<body>
  <h1>Giphlify</h1>
+ <div class="container"></div>
  <form>
...
让我们导入 GraphQL 查询来列出所有的 gif:
import Amplify, { API, graphqlOperation } from '@aws-amplify/api'
import awsConfig from './aws-exports'

import { createGif } from './graphql/mutations'
+ import { listGifs } from './graphql/queries'
我们还将添加一个在页面加载时运行的函数,该函数获取所有 gif 并显示它们:
const getGifs = async () => {
  // select the container element
  const container = document.querySelector('.container')
  // reset its current contents
  container.innerHTML = ''
  // make a request to get all our gifs
  const gifs = await API.graphql(graphqlOperation(listGifs))
  // loop through our gifs and
  gifs.data.listGifs.items.map(gif => {
    // create a new image element
    const img = document.createElement('img')
    // add the src attribute to the img
    img.setAttribute('src', gif.url)
    // add the alt attribute to the img
    img.setAttribute('alt', gif.altText)
    // add the image to the container
    document.querySelector('.container').appendChild(img)
  })
}

// run this function on page load
getGifs()
一旦我们创建一个新的 gif,我们也要重新获取所有的 gif:
const createNewGif = async e => {
  ...
  try {
    const newGif = await API.graphql(graphqlOperation(createGif, { input: gif }))
+ getGifs()
    document.getElementById('create-form').reset()
  }
  ...
}
您的应用程序现在应该看起来像这样,并且当您添加新的 gif 时应该更新!

⏱此时您的代码应如下所示。
编辑 Gif
现在我们已经完成了两个 CRUD 操作:create和read!现在我们需要添加编辑和删除。我将创建第二个表单,用于编辑 GIF。当我点击任何 GIF 时,它会将点击的 GIF 填充到编辑表单中。
让我们在创建表单后添加一个编辑表单:
<h2 id="edit-title">Update </h2>
<form id="edit-form">
  <label for="altText">Alt Text</label>
  <input type="text" name="altText" id="edit-altText">
  <label for="url">URL</label>
  <input type="text" name="url" id="edit-url">
  <input type="submit" value="Edit">
</form>
让我们为每个图片添加一个事件监听器,这样当我们点击其中一张图片时,编辑表单就会自动填充该动图的信息。我们还将添加一个全局变量来存储当前正在编辑的动图。
+ let currentGifId = ''
...
const getGifs = async () => {
  ...
  gifs.data.listGifs.items.map(gif => {
    const img = document.createElement('img')
    img.setAttribute('src', gif.url)
    img.setAttribute('alt', gif.altText)
+ img.addEventListener('click', () => {
+ currentGifId = gif.id
+ document.getElementById('edit-altText').value = gif.altText
+ document.getElementById('edit-url').value = gif.url
+ document.getElementById('edit-title').innerText = `Update ${gif.altText}`
+ })
    document.querySelector('.container').appendChild(img)
  })
  ...
让我们导入updateGif突变:
import Amplify, { API, graphqlOperation } from '@aws-amplify/api'
import awsConfig from './aws-exports'

+ import { createGif, updateGif } from './graphql/mutations'
当用户提交编辑表单时,我们需要使用用户提交的数据运行此变异:
const editGif = async e => {
  e.preventDefault()

  try {
    return await API.graphql(graphqlOperation(updateGif, {
      input: {
        id: currentGifId,
        altText: document.getElementById('edit-altText').value,
        url: document.getElementById('edit-url').value
      }
    }))
  } catch (err) {
    console.error(err)
  }
  getGifs()
}

document.getElementById('edit-form').addEventListener('submit', editGif)
请注意,这次我们需要包含id我们想要编辑的 gif,以便我们的 API 编辑正确的 Gif!
⏱此时您的代码应如下所示。
以下是该功能工作原理的 gif:
删除 Gif
最后,我们需要添加删除动图的功能。我们将创建一个删除按钮,用于删除当前存储在 id 中的动图currentGifId。用户只需点击某个动图,然后点击删除按钮即可将其删除。
...
<h2 id="edit-title">Update </h2>
+ <button id="delete-button">Delete</button>
<form id="edit-form">
...
让我们导入删除突变:
import Amplify, { API, graphqlOperation } from '@aws-amplify/api'
import awsConfig from './aws-exports'

+ import { createGif, deleteGif, updateGif } from './graphql/mutations'
现在,我们将添加一个事件监听器,以便当用户单击删除按钮时,gif 就会被删除!
const removeGif = async () => {
  await API.graphql(graphqlOperation(deleteGif, {
    input: { id: currentGifId }
  }))
  getGifs()
}

document.getElementById('delete-button').addEventListener('click', removeGif)
现在我们有了一个全栈 CRUD 应用程序🎉🎉🎉
⏱此时您的代码应如下所示。
造型
好吧,这个应用功能齐全,但不算最漂亮。您可以随意设计它;不过,这是我完成样式后的应用。我还为该应用添加了表单的模态窗口,并稍微重构了 JavaScript 代码,使其更加模块化,更易读。
部署站点
最后,我们需要添加托管来部署我们的前端。
首先,我们需要通过以下方式将本教程代码推送到GitHub :
- 通过单击页面右上角的加号按钮来创建一个新的存储库。
- 选择存储库名称并单击
create repository - 然后,复制命令
…or push an existing repository from the command line并在终端中运行它们。 - 在您的终端中运行
git add . && git commit -m "tutorial complete" && git push以发送您的最新更改。
然后,您可以运行命令:$ amplify add hosting。选择Continuous deployment (Git-based deployments)第一个问题,然后在弹出时前往 Amplify 控制台。
- 在“从现有代码”菜单中选择 GitHub,然后单击“继续”
- 输入您刚刚创建的 GitHub 存储库的名称(它应该会自动填充!)然后单击下一步。
- 构建设置将自动填充,但您需要单击
edit并将baseDirectory以下artifacts内容更改为dist:
...
artifacts:
  baseDirectory: dist
- 点击
save and deploy
这可能需要几分钟的时间,但之后您的应用程序就可以启动并供任何人访问了。
在您 AWS 账户生效后的前 12 个月内,我们用于 API 的 Amplify 和 Appsync 均提供免费套餐,很可能足以涵盖您的托管费用。之后,您可以在此处查看更多关于 API 托管的信息,以及此处更多关于静态网站托管的信息!
结论
在本教程中,我们使用 JavaScript、HTML、CSS 和 AWS Amplify 构建了一个全栈 CRUD 应用。我们能够使用 AWS Amplify 生成的 GraphQL 查询和变更来与数据交互。我们还将前端部署到了 AWS Amplify Hosting。接下来的步骤可能是添加用户身份验证,或者允许用户上传图片,而不仅仅是发布链接。如果您对本教程有任何疑问,请发推文给我!
文章来源:https://dev.to/aws/build-your-first-fullstack-application-on-aws-4gh5