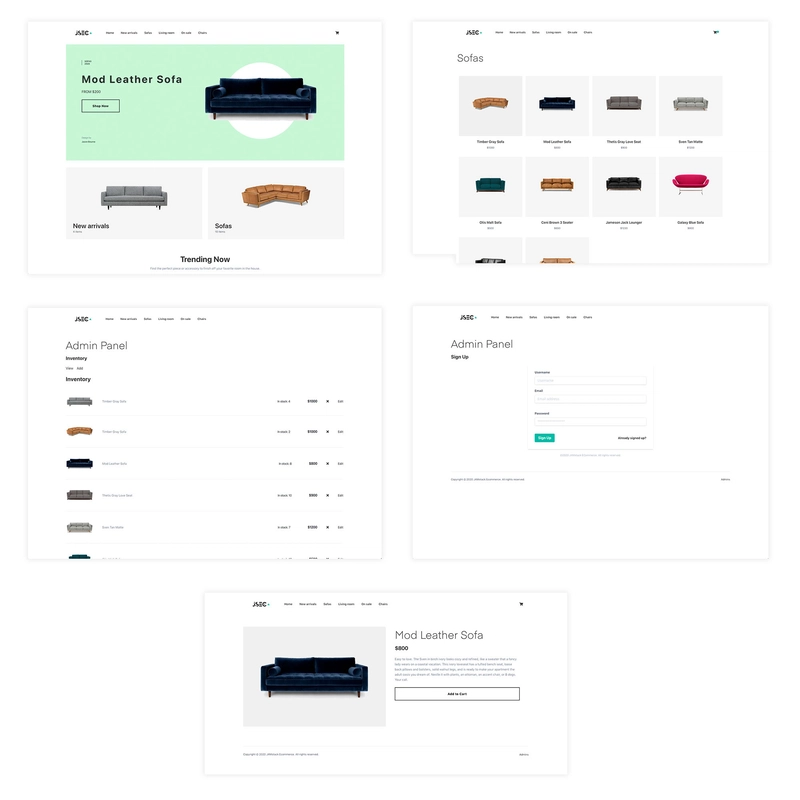
使用 Gatsby 和 AWS Amplify 构建无服务器 JAMstack 电子商务商店
在本文中,您将学习如何使用Gatsby、AWS Amplify和JAMstack ECommerce构建全栈无服务器 JAMstack 电子商务商店。
虽然这篇文章重点关注构建电子商务应用程序的具体用例,但我将展示的服务和功能是大多数实际生产应用程序的构建块,所以我希望你会发现它很有用。
奠定基础
对于这个网站,我选择使用Gatsby,以便获得静态网站的优势,包括更好的性能、更好的 SEO 以及更经济/更轻松的可扩展性。Next.js(React)和 Nuxt(Vue)也是同样出色的选择,但我最终选择了 Gatsby,因为我之前使用过它,并且目前它拥有强大的开发者社区和丰富的文档。
我们将要构建的应用程序具有以下功能:
- 能够通过 API 查询库存
- 在构建时,根据库存类别创建导航
- 在构建时,为每个库存项目创建页面,为每个导航项目创建类别页面以及相应的视图
- 购物车/结账
- 用于创建/更新库存的管理面板
- 在构建时从公共文件夹下载图像与动态获取
基于这些功能,我们可以假设该应用程序从 API / 服务的角度具有以下要求:
- 身份验证(注册、登录)
- 动态组授权(只有管理员用户可以查看和更新库存)
- 具有创建、更新和删除操作的 API
- 用于查询 API 的公共 API 访问权限
- 私有 API 访问权限,以便只有管理员用户可以创建/更新/删除库存
- 图片/资产托管
为了在前端和后端构建这些功能,我们将使用 Amplify 框架:
- 用于创建和配置 AWS 服务的Amplify CLI
- 用于与服务交互的Amplify Client库
- Amplify Console用于托管和查看已部署的应用程序和功能。
让我们开始建造吧!
要遵循本教程,您需要拥有一个 AWS 账户(在此注册)
入门
首先,克隆Gatsby JAMstack ECommerce 启动项目,它将作为我们将要构建的应用程序的基础:
$ git clone https://github.com/jamstack-cms/jamstack-ecommerce.git
接下来,进入目录并使用npm或yarn安装依赖项:
$ cd jamstack-ecommerce

$ npm install

# or

$ yarn
接下来,启动项目来了解应用程序的外观:
$ gatsby develop
当应用程序加载时,您应该能够转到http://localhost:8000/并看到如下内容:
太好了,我们现在可以开始运行了!
你可能想知道库存信息是从哪里来的。首先,库存信息是硬编码在位于provider/inventory.js的 inventory 文件中的。
但这并不理想,因为在本地保持所有更新很难扩展。因此,我们建议将库存设置为动态的,并能够使用某种内容管理系统通过管理面板添加和更新库存。
为此,我们需要设置一个 API。首先,创建 Amplify 项目,以便我们可以将库存提供商迁移到真正的后端提供商。
安装 Amplify 并初始化 Amplify 项目
在使用 Amplify 之前,您首先需要拥有或创建一个 AWS 账户。
接下来,从命令行全局安装 Amplify CLI:
$ npm install -g @aws-amplify/cli
如果安装了 CLI,您应该能够运行 ampify 命令并查看一些输出和帮助选项。
$ amplify
现在 CLI 已成功安装,我们现在需要配置 CLI。为此,请运行 configure 命令:
$ amplify configure
这将引导您完成在本地创建和配置 AWS 用户凭证的步骤。如需这些配置步骤的指导演练,请观看此视频。
创建 Amplify 项目
配置 CLI 后,您可以创建一个新的 Amplify 项目:
$ amplify init

? Enter a name for the project: jamstack-ecommerce
? Enter a name for the environment dev
? Choose your default editor: <your_preferred_editor>
? Choose the type of app that youre building: javascript
? What javascript framework are you using: react
? Source Directory Path: src
? Distribution Directory Path: public
? Build Command: gatsby build
? Start Command: npm run start
- 当提示输入 AWS 配置文件时,请选择您在配置步骤中创建的配置文件。
初始化完成后,您现在应该看到在项目目录中为您创建了 2 个工件:
- src/aws-exports.js - 此文件将保存 CLI 创建的服务的资源信息的键值对。
- amplify目录——这将保存我们为将要使用的 AWS 服务管理的 GraphQL 模式和无服务器功能等编写的后端代码。
现在我们已经设置了基础项目,让我们继续安装 AWS Amplify 客户端库:
$ npm install aws-amplify

# or

$ yarn add aws-amplify
创建后端服务
现在我们已准备就绪,可以开始创建要集成到应用程序中的服务了。首先,我们先来了解一下身份验证。
验证
此应用程序的身份验证设置需要完成以下事项:
- 允许用户注册和登录
- 根据预先确定的管理员列表检测管理员用户,并在他们注册后将其放入管理员组中。
我们可以通过结合使用Amazon Cognito(托管身份验证服务)和AWS Lambda(功能即服务)来实现这一点。
我们将创建一个身份验证服务,当有人注册(确认后)时,该服务将调用(触发)一个 Lambda 函数。在该函数中,我们可以根据用户的电子邮件地址确定是否允许其拥有管理员访问权限。
要创建服务,我们将使用 Amplify add命令:
$ amplify add auth

? Do you want to use the default authentication and security configuration? Default configuration
? How do you want users to be able to sign in? Username
? Do you want to configure advanced settings? Yes
? What attributes are required for signing up? Email (keep defaults)
? Do you want to enable any of the following capabilities? Add User to Group
? Enter the name of the group to which users will be added. Admin
? Do you want to edit your add-to-group function now? Y
现在,让我们编辑确认后 Lambda 触发器的代码。在amplify/backend/function/function_name/src/add-to-group.js中,使用以下代码:
// amplify/backend/function/function_name/src/add-to-group.js
const aws = require('aws-sdk');

exports.handler = async (event, context, callback) => {
  const cognitoidentityserviceprovider = new aws.CognitoIdentityServiceProvider({ apiVersion: '2016-04-18' });

  // Here, update the array to include the Admin emails you would like to use
  let adminEmails = ["dabit3@gmail.com"], isAdmin = false

  if (adminEmails.indexOf(event.request.userAttributes.email) !== -1) {
    isAdmin = true
  }

  if (isAdmin) {
    const groupParams = {
      GroupName: process.env.GROUP, UserPoolId: event.userPoolId,
    };

    const addUserParams = {
      ...groupParams, Username: event.userName,
    };

    try {
      await cognitoidentityserviceprovider.getGroup(groupParams).promise();
    } catch (e) {
      await cognitoidentityserviceprovider.createGroup(groupParams).promise();
    }

    try {
      await cognitoidentityserviceprovider.adminAddUserToGroup(addUserParams).promise();
      callback(null, event);
    } catch (e) {
      callback(e);
    }
  } else {
    callback(null, event);
  }
};
更新adminEmails数组以包含您想要允许管理员访问的电子邮件。
如果用户的电子邮件包含在数组中,则此功能将把用户添加到管理员组adminEmails。
贮存
接下来,让我们使用Amazon S3创建图像存储服务:
$ amplify add storage

? Please select from one of the below mentioned services: Content
? Please provide a friendly name for your resource...: <resource_name>
? Please provide bucket name: <some_unique_bucket_name>
? Who should have access: Auth and guest users
? What kind of access do you want for Authenticated users? create, update, read, delete
? What kind of access do you want for Guest users? read
? Do you want to add a Lambda Trigger for your S3 Bucket? N
API 和数据库
最后我们需要创建一个 API 和一个数据库来存储数据。该 API 需要允许经过身份验证和未经身份验证的访问。
经过身份验证的管理员用户应该能够在数据库中创建和更新项目,而未经身份验证的访问将允许我们在构建时查询 API 以获取应用程序所需的数据。
为此,我们将使用 CLI创建AWS AppSync GraphQL API 和Amazon DynamoDB NoSQL 数据库:
$ amplify add api

? Please select from one of the below mentioned services: GraphQL
? Provide API name: furnitureapi
? Choose the default authorization type for the API: Amazon Cognito User Pool
? Do you want to configure advanced settings for the GraphQL API: Yes
? Configure additional auth types? Y
? Choose the additional authorization types you want to configure for the API: API Key
? Enter a description for the API key: gatsby
? After how many days from now the API key should expire: 100
? Configure conflict detection? N
? Do you have an annotated GraphQL schema? N
? Do you want a guided schema creation? Y
? What best describes your project: Single object with fields
? Do you want to edit the schema now? Y
这应该会打开位于amplify/backend/api/postershop/schema.graphql 的GraphQL 架构。在这里,将架构更新为以下内容:
type Product @model
  @auth(rules: [
    { allow: public, operations: [read] },
    { allow: groups, groups: ["Admin"] }
  ]) {
  id: ID!
  categories: [String]!
  price: Float!
  name: String!
  image: String!
  description: String!
  currentInventory: Int!
  brand: String
}
此 GraphQL 模式具有一些在传统模式中可能看不到的附加指令:
@model - 该指令将搭建一个 DynamoDB 数据库,添加 CRUD(创建、读取、更新、删除)和列出 GraphQL 模式操作,以及操作和数据库之间的 GraphQL 解析器映射。
@auth - 此指令允许我们在 GraphQL 类型或字段上设置授权规则。
这些指令是 Amplify GraphQL Transform 库的一部分。要了解有关此库和这些指令的更多信息,请查看此处的文档。
在我们创建的模式中,我们希望有两种授权类型:
- 管理员用户可以执行所有操作
- 公众可阅读项目
现在应该配置好服务并可以部署到AWS了。为此,我们可以运行push命令:
$ amplify push --y
所有服务现已部署,我们可以开始将它们集成到客户端应用程序中!
要随时查看已创建的 AWS 服务,请使用以下命令打开 Amplify 控制台:
$ amplify console
客户端集成
现在后端服务已经部署完毕,接下来我们需要配置 Gatsby 项目以识别 Amplify 项目。为此,打开gatsby-browser.js并添加以下代码:
import Amplify from 'aws-amplify'
import config from './src/aws-exports'
Amplify.configure(config)
客户端身份验证
配置客户端应用后,请为管理面板实现身份验证。为此,请打开src/pages/admin.js并Auth从 Amplify 导入类:
// src/pages/admin.js
import { Auth } from 'aws-amplify'
接下来,将signUp、confirmSignUp、signIn和signOut方法修改为以下内容:
signUp = async (form) => {
  const { username, email, password } = form
  // step 1: Sign up a new user
  await Auth.signUp({
    username, password, attributes: { email }
  })
  this.setState({ formState: 'confirmSignUp' })
}
confirmSignUp = async (form) => {
  const { username, authcode } = form
  // step 2: Use MFA to confirm the new user
  await Auth.confirmSignUp(username, authcode)
  this.setState({ formState: 'signIn' })
}
signIn = async (form) => {
  const { username, password } = form
  // step 3: Sign in the new user
  await Auth.signIn(username, password)
  // step 4: Check to see if the user is an Admin, if so, show the inventory view.
  const user = await Auth.currentAuthenticatedUser()
  const { signInUserSession: { idToken: { payload }}} = user
  if (payload["cognito:groups"] && payload["cognito:groups"].includes("Admin")) {
    this.setState({ formState: 'signedIn', isAdmin: true })
  }
}
signOut = async() => {
  // allow users to sign out
  await Auth.signOut()
  this.setState({ formState: 'signUp' })
}
身份验证现已启用,用户可以开始注册和登录以查看库存。
在右下角的导航栏中,单击“管理员”查看管理面板,进行注册和登录
在此组件中,我们在 Auth 类中使用了一些不同的方法,例如signUp和。Auth 有超过 30 种不同的方法来处理用户身份验证。要了解更多信息,请查看此处的signIn文档或此处的API 。
接下来我们来测试一下:
$ gatsby develop
您会注意到,当您登录并刷新页面时,用户状态不会保留。我们可以通过在应用加载时检查用户是否已登录来解决这个问题。为此,请componentDidMount使用以下代码进行更新:
async componentDidMount() {
  const user = await Auth.currentAuthenticatedUser()
  const { signInUserSession: { idToken: { payload }}} = user
  if (payload["cognito:groups"] && payload["cognito:groups"].includes("Admin")) {
    this.setState({ formState: 'signedIn', isAdmin: true })
  }
}
客户端 API 集成
现在身份验证已经成功,接下来让我们使用 API 在应用中创建和更新数据。为此,我们首先要使用位于src/templates/ViewInventory.js 的库存提供程序。在这里,让我们更新它,以便从我们真正的 API 中获取数据。
首先,从 AWS Amplify 导入 GraphQL 查询和所需的 API:
// src/templates/ViewInventory.js
import { API, graphqlOperation } from 'aws-amplify'
import { listProducts } from '../graphql/queries'
接下来,更新fetchInventory从 API 获取数据的方法:
fetchInventory = async() => {
  const inventoryData = await API.graphql(graphqlOperation(listProducts))
  const { items } = inventoryData.data.listProducts
  console.log("inventory items: ", items)
  this.setState({ inventory: items })
}
你会注意到,当我们运行应用程序并通过console.log记录 API 返回的数据时,数组是空的。这是因为我们还没有在数据库中创建任何实际的数据。
为了添加创建项目的功能,我们需要对src/components/formComponents/AddInventory.js进行一些更新。
首先,更新导入以添加以下内容:
// src/components/formComponents/AddInventory.js
import { Storage, API, graphqlOperation } from 'aws-amplify'
import { createProduct } from '../../graphql/mutations'
import uuid from 'uuid/v4'
接下来,将onImageChange和addItem方法更新如下:
onImageChange = async (e) => {
  const file = e.target.files[0];
  const fileName = uuid() + file.name
  // save the image in S3 when it's uploaded
  await Storage.put(fileName, file)
  this.setState({ image: fileName  })
}
addItem = async () => {
  const { name, brand, price, categories, image, description, currentInventory } = this.state
  if (!name || !brand || !price || !categories.length || !description || !currentInventory || !image) return

  // create the item in the database
  const item = { ...this.state, categories: categories.replace(/\s/g, "").split(',') }
  await API.graphql(graphqlOperation(createProduct, { input: item }))
  this.clearForm()
}
现在,您会注意到您可以创建物品,并且当我们查看库存时,它们就会出现!
客户端存储集成
您可能会注意到一个奇怪的现象:图片没有显示在库存视图中。这是因为我们尝试渲染一个来自 S3 且尚未签名的图片密钥。我们可以通过在src/components/image.js中打开图片组件并添加来自 S3 的图片签名来解决这个问题。
我们将检查该图片是否是本地下载的图片(如果图片路径包含downloads)。如果不是,则我们就知道它是来自 S3 的远程图片,并获取该图片的签名 URL。
Storage首先,从 Amplify导入类:
// src/components/image.js
import { Storage } from 'aws-amplify'
接下来,将fetchImage函数更新如下:
async function fetchImage(src, updateSrc) {
  if (!src.includes('downloads')) {
    const image = await Storage.get(src)
    updateSrc(image)
  } else { updateSrc(src) }
}
现在,我们应该看到列表中呈现的图像。
接下来,我们需要启用项目的编辑和删除功能。您会注意到,如果您在管理视图中编辑某个项目并刷新,更改不会保留。要解决这个问题,请打开src/templates/ViewInventory.js并进行以下更改。
首先,导入updateProduct和deleteProduct突变:
// src/templates/ViewInventory.js
import { updateProduct, deleteProduct } from '../graphql/mutations'
接下来,将saveItem和deleteItem方法更新如下:
saveItem = async index => {
  const inventory = [...this.state.inventory]
  inventory[index] = this.state.currentItem
  await API.graphql(graphqlOperation(updateProduct, { input: this.state.currentItem }))
  this.setState({ editingIndex: null, inventory })
}

deleteItem = async index => {
  const id = this.state.inventory[index].id
  const inventory = [...this.state.inventory.slice(0, index), ...this.state.inventory.slice(index + 1)]
  this.setState({ inventory })
  await API.graphql(graphqlOperation(deleteProduct, { input: { id }}))
}
现在,当我们保存一个项目时,更新也会进入数据库!
构建时 API 集成
最后,我们需要修改构建步骤,使用我们创建的新 API,而不是之前硬编码的库存数据。运行gatsby develop或gatsby build时,我们将使用公共 API 访问权限,以便系统能够从 API 中查询数据并将其用于应用。
我们还希望在构建步骤中包含一种在项目本地下载图像的方法,这样我们就不会获取远程图像,而是渲染将要下载的图像的本地副本并将其存储在公共文件夹中的本地下载目录中。
为了使其工作,首先从管理面板在您的库存中创建至少 4 个项目。
接下来,在utils文件夹中创建downloadImage.js 文件。此函数允许我们使用文件系统 ( ) 模块将图像下载到本地:fs
// utils/downloadImage.js
import fs from 'fs'
import axios from 'axios'
import path from 'path'

function getImageKey(url) {
  const split = url.split('/')
  const key = split[split.length - 1]
  const keyItems = key.split('?')
  const imageKey = keyItems[0]
  return imageKey
}

function getPathName(url, pathName = 'downloads') {
  let reqPath = path.join(__dirname, '..')
  let key = getImageKey(url)
  key = key.replace(/%/g, "")
  const rawPath = `${reqPath}/public/${pathName}/${key}`
  return rawPath
}

async function downloadImage (url) {
  return new Promise(async (resolve, reject) => {
    const path = getPathName(url)
    const writer = fs.createWriteStream(path)
    const response = await axios({
      url,
      method: 'GET',
      responseType: 'stream'
    })
    response.data.pipe(writer)
    writer.on('finish', resolve)
    writer.on('error', reject)
  })
}

export default downloadImage
现在打开gatsby-node.esm.js。在文件顶部添加以下导入和语句:
// gatsby-node.esm.js
import config from './src/aws-exports'
import axios from 'axios'
import tag from 'graphql-tag'
import fs from 'fs'
import downloadImage from './utils/downloadImage'
import Amplify, { Storage } from 'aws-amplify'
Amplify.configure(config)

const graphql = require('graphql')
const { print } = graphql
接下来,创建一个名为“fetchInventory从我们的新 API 中获取库存”的新函数,并将该函数放置在gatsby-node.esm.js中的任何位置。
该函数还将映射所有库存项目,并在构建时使用downloadImage我们在上一步中创建的函数在本地下载图像:
async function fetchInventory() {
  /* new */
  const listProductsQuery = tag(`
    query listProducts {
      listProducts(limit: 500) {
        items {
          id
          categories
          price
          name
          image
          description
          currentInventory
          brand
        }
      }
    }
  `)
  const gqlData = await axios({
    url: config.aws_appsync_graphqlEndpoint,
    method: 'post',
    headers: {
      'x-api-key': config.aws_appsync_apiKey
    },
    data: {
      query: print(listProductsQuery)
    }
  })

  let inventory = gqlData.data.data.listProducts.items

  if (!fs.existsSync(`${__dirname}/public/downloads`)){
    fs.mkdirSync(`${__dirname}/public/downloads`);
  }

  await Promise.all(
    inventory.map(async (item, index) => {
      try {
        const relativeUrl = `../downloads/${item.image}`
        if (!fs.existsSync(`${__dirname}/public/downloads/${item.image}`)) {
          const image = await Storage.get(item.image)
          await downloadImage(image)
        }
        inventory[index].image = relativeUrl
      } catch (err) {
        console.log('error downloading image: ', err)
      }
    })
  )
  return inventory
}
最后,在exports.sourceNodes并使用新函数exports.createPages更新对的调用:getInventoryfetchInventory
/* replace const inventory = await getInventory() with this 👇 */
const inventory = await fetchInventory()
运行develop命令进行测试:
$ gatsby develop
运行新构建将从 GraphQL API 获取数据并根据更新的产品类别创建新的导航,同时构建网站的新静态版本。
结论
此时,您已启动并运行在 AWS 上运行的真实且可扩展的电子商务应用程序的 MVP!
从这里,您可能想要深入了解 Amplify 文档,以了解有关我们使用过的 API 和服务以及我们尚未使用的其他 API 的更多信息。
到目前为止,我们已经设置了以下功能:
您可能还有兴趣了解:
后续步骤Next steps
您可以采取以下措施来继续改进此应用程序。
托管 - 部署到 Amplify 控制台
如果您将应用程序托管在 GitHub、BitBucket、GitLab 或 AWS CodeCommit 中,则可以使用Amplify 控制台 ,在短短几分钟内轻松将整个网站部署到实时托管平台并添加自定义域。要观看如何在一分钟内使用 Gatsby 网站完成此操作的快速视频,请观看此视频。
配置服务器端逻辑,以便使用 Stripe 处理付款。您可以通过 Amplify 和 API 类别添加无服务器函数和 API,轻松完成此操作:
$ amplify add function

$ amplify add api

- Choose REST
如果您想查看与条纹交互所需的功能代码示例,请查看此代码片段。
此外,考虑通过将 ID 数组传递到函数中来验证总数,在服务器上计算总数,然后比较总数以检查并确保它们匹配。
购买后更新库存商品
为了保持库存最新,您可能希望在订单完成后减少库存。为此,您可以在订单确认前发送更新请求,减少数据库库存。
为了使其更加安全,您可以使用DynamoDB 事务仅在库存足够时处理订单,并在单次操作中减少库存中的商品数量。
要了解有关 Amplify 的更多信息,请查看以下资源:
文档
Awesome AWS Amplify
我的 YouTube
在 Twitter 上关注我:dabit3
文章来源:https://dev.to/aws/building-a-serverless-jamstack-ecommerce-store-with-gatsby-aws-303f 后端开发教程 - Java、Spring Boot 实战 - msg200.com
